An unusual way to diversify the variability of designs in manicure is use of transparent artificial materials... By combining the techniques of their application with various decorative elements, the master of the nail service is able to create a masterpiece.
Features of transparent manicure
Transparent manicure with or without design is performed using the following materials:
- acrylic Powder;
- base for alignment;
- gel;
- polygel.
Despite the fact that all of the listed materials have a transparent base, are intended for the correction and strengthening of nails, they have different characteristics, described in detail in the table below:
| Material | Characteristics | Appointment | Application features |
| Acrylic Powder | Fine powder. |
| It is used in combination with a special liquid (monomer). When it evaporates, the powder polymerizes in the open air. |
| Base | Coating with different viscosity grades. |
| The composition is ready to use after opening. Cures in a lamp. |
| Gel | Composition of a gel-like consistency. |
| It is odorless, needs UV or LED polymerization. |
| Polygel | A thick mixture of acrylic and gel. |
| It is used with both upper and lower forms. For work, a special fluid is required. Requires curing in a lamp. |
The choice of material depends not only on individual preferences, but also on the initial data:
- general condition of nails (color, strength, pigmentation);
- free edge length;
- direction of growth of the nail plate;
- the presence of defects and their nature.
Hard materials (acrylic, gel, polygel) are more versatile in work.
They make it possible not only to strengthen weakened nails, but also to radically change their architecture:
- raise biting nails;
- align the direction of growth relative to the central axis of the phalanx;
- add architecture to flat and springboard nails;
- increase the length of the free edge;
- simulate any shape you want.
The disadvantage of this method is the need to cut the natural nail from the inside. This is due to the flexibility of the nail and the hardness of the artificial material. When worn, the natural plate bends and twists, as a result of which detachments can occur at the ends. Moisture and microorganisms entering them can cause fungus and other nail diseases.
Sawing allows you to minimize the described negative consequences and increase the manicure wear period. A transparent manicure with a design can also be done with a base coat. After polymerization, the material is more flexible and plastic. This allows the mechanical bending of a natural nail to be repeated when worn.
With its help, they not only improve the adhesion of the natural plate and artificial material, but also correct its minor defects:
- tuberosity;
- flat shape;
- missing apex.
The first layer is applied with thin rubbing movements. After drying, leveling is carried out with a thicker layer. In this method, the natural nail acts as a substrate. This makes it possible to grow the length, but there are disadvantages.The material makes it impossible to correct serious defects (twisting, direction of growth). The length and shape of the final manicure depends on the condition of the natural nail.
In the absence of the angles, parallels, side walls necessary for the shape, the use of rigid compounds will be required. This type of manicure is especially relevant at home, as it makes it possible to choose an affordable technique. In the absence of a lamp for polymerization, you can use acrylic, drying in the open air. The use of a base for leveling minimizes the need for sawdust, therefore, you can do without buying an expensive router.
It is recommended to use a polygel at low speed.
Varieties of transparent nail designs
Sculpting materials give the free edge crystal transparency. The base is applied to the natural nail, so the result will differ depending on the pigmentation of the nail plate. Visually, this option looks more natural, but limits the variety of available designs.
List of the most popular transparent designs:
- drawings (geometry, floristry);
- decorative elements; (inlay, glitters, shimers, crystal chips);
- combination of techniques.
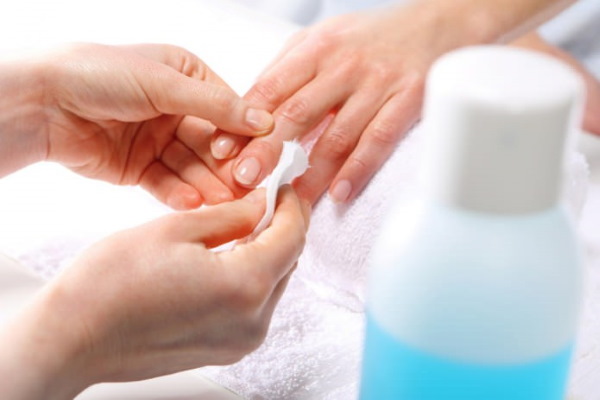
The wearability of any design depends on the quality of the manicure. Nail service masters recommend performing hardware or combined. Using a set of cutters and cutting tools allows you to qualitatively remove the pterygium, treat the sinuses, remove the regrown cuticle, and prepare the nail plate in a short period of time. A prerequisite is the removal of gloss from the natural nail and the lifting of the scales.
Step-by-step instructions for performing a transparent manicure with a base:
- A primer is applied to the prepared nail plate. The main task of this liquid is to degrease the surface and create a sticky layer after evaporation. The appearance of a whitish bloom indicates complete drying and the need to proceed to the next step. It should be borne in mind that a natural nail serves as the basis for future manicure, therefore, it is necessary to give the chosen shape in advance.
- A thin layer of the nail is covered with the first layer of base coat. At this stage, the surface has roughness and grooves. To fill them, the material is applied by rubbing with a brush. A full cycle of polymerization is carried out in the lamp.
- Without removing the sticky layer remaining after polymerization, the nail must again be smeared with a base. This step will moisturize the surface and facilitate the distribution of the leveling layer. A drop of material is collected on a brush from a bottle and placed in the center of the nail. Then they push it a little towards the cuticle, forming an apex. The remainder is distributed over the plane, canceling out in the area of the free edge. Actions are performed by a conveyor, one nail at a time, followed by polymerization.
- To fix the design, give gloss and protect the manicure from abrasion, a top is applied to the surface, followed by drying. If using a top with a sticky layer, it can be removed with a lint-free cloth dampened with a degreaser.
It should be borne in mind that this technology does not allow the use of volumetric decor. Otherwise, the surface will be bumpy or it will take a lot of material to level it. Visually thick nails will look rough and unkempt.
Step-by-step modeling technique with transparent gel:
- In addition to preparing the surface of the nail plate (removing gloss and raising the scales), it is necessary to remove the corners in the area of the growth points and the length of the free edge.
- After completing the preparatory stage, the natural nail is treated with a primer, and then the base is applied with rubbing movements. A thin layer of the base does not spread, which allows you to perform this action on ten nails at once, followed by drying in a lamp.

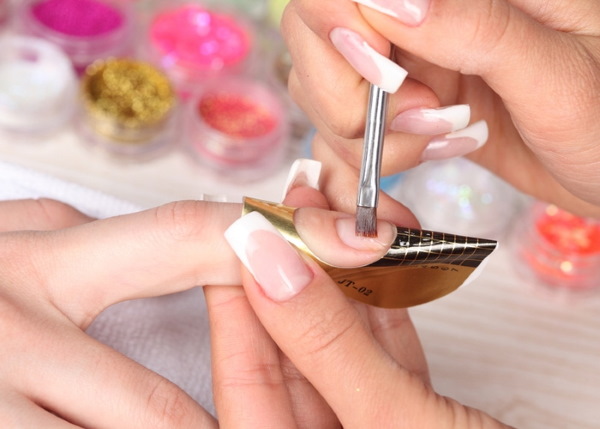
- A special paper form on a sticky basis is trimmed according to the anatomical shape of the finger in the smile zone, diagonal incisions are made for the side rollers. After removing the protective layer, its lower ears are glued together, the structure is installed under the nail, observing the axis and squeezed.
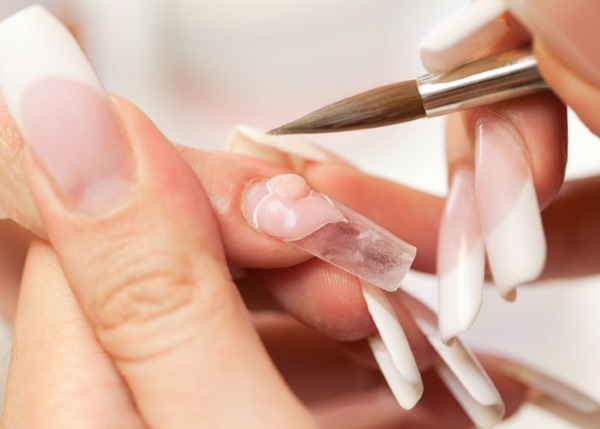
- A small amount of material is used to form a thin substrate with a brush. Particular attention is paid to growth zones. Special markings on the form serve as a hint for the correct distribution of the gel. With a high working speed and a thick material consistency, the substrate can be formed on several fingers at once. Otherwise, the procedure is recommended to be performed by a conveyor. The finished result is polymerized in a full cycle.
- The next step is to form the correct architecture of the nail. A large drop of gel is placed in the center of the nail and pushed towards the cuticle to form an apex. Without applying pressure, spread the rest of the material with a brush, reducing to nothing in the free edge area and polymerizing in the lamp.
- After removing the sticky layer with a special liquid, it is necessary to perform sawdust of the selected shape and smooth the surface with a file if necessary. After removing the remnants of dust after sawing, they carry out the design.
- To fix it, make it glossy or matte, the surface of the design is covered with a top and polymerized.

Transparent manicure with a design in this technique is often called aquarium. Modeling is a more time-consuming process that requires skills in laying out the material, knowledge of sawdust schemes and correct architecture.
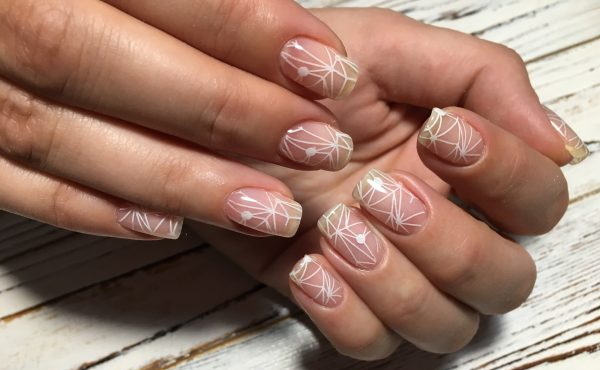
Drawings
A transparent manicure with a design involving a pattern on its surface can be done in several ways:
- using ready-made designs;
- in the stamping technique;
- hand painted.
The choice of method primarily depends on skills and budget.
Ready-made designs are suitable for beginners:
- stickers;
- sliders;
- foil.
A feature of the described decor is not only ease of use, but also a wide selection of image themes at a low price and availability. Stickers are small pieces of adhesive-backed paper or film with ready-made images. With the help of tweezers, it is separated from the base and transferred to the nail. Cover with top coat for fixation.
Sliders are a more delicate decor, as the pattern is applied to a thin film, which is fixed with a special compound. Before use, a fragment with the selected image must be cut and placed on a damp cloth. After 3-5 seconds, the fixing compound will be soaked and the slider will be ready for use. It is fixed on a sticky layer or a nail moistened with top. Excess air is removed with a silicone brush and sent to the lamp.
For reliable fixation on the nail, it is covered with a top coat. Special glue is used to apply foil images. It dries outdoors and forms a sticky layer necessary for transferring the pattern. The piece of foil is pressed against the surface and smoothed until the transparent film base begins to flake off. Before applying the top, nail service masters recommend processing the end of the free edge with a file.
A separate direction in manicure is stamping and reverse stamping. The chemistry of the materials used in it requires a high speed of work. Therefore, it will take some time to master the technique and develop the speed of movements.
Required tools and materials:
- engraved plate;
- scraper;
- liquid with acetone;
- stamp;
- lint-free napkins;
- stamping paint.
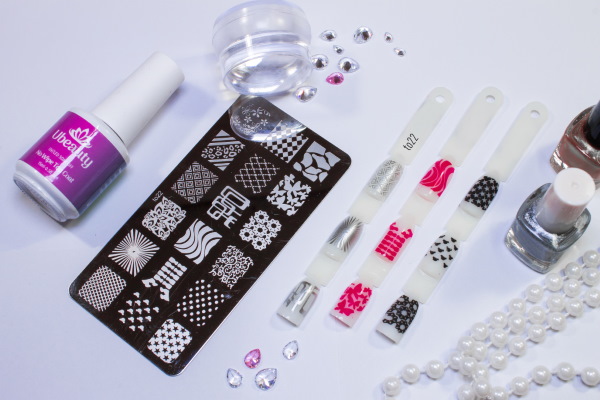
The paint is applied to the section of the plate with the selected engraving, the excess material is removed with a scraper. With a quick movement with a roll, the pattern is transferred to the stamp, and then to the nail. With reverse stamping, the contour is painted, dried and only then transferred. The purchase of materials will cost significantly more, but the plate will last a long time, and the consumption of paints is economical.
Hand painting is considered the most difficult option for making a drawing that requires artistic skills. An experienced master is able to create a work of art on the nail. Geometric patterns are created with a thin brush; for Chinese painting, a flat corner is required; in watercolor painting, thin brushes with natural bristles are used.
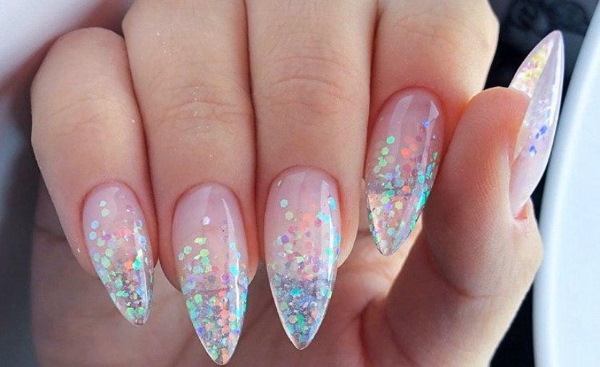
With sequins and rhinestones
Transparent manicure is wrongly considered boring. Designs made using rhinestones and sequins shimmer and shimmer incredibly effectively in the rays of the sun, attracting the attention of others. At the same time, such a design does not look gaudy and tasteless. A rhinestone composition looks more harmonious when larger elements are located in its center, and small ones closer to the edges.
Nail service experts recommend using rhinestones of various sizes, combining them with broths and crystal chips.
Most often, compositions are arranged as follows:
- along the perimeter of the cuticle;
- along the perimeter of the lunula;
- from the center of the cuticle to the lateral ridge;
- chaotic;
- geometrically (lines, shapes);
- in the center.
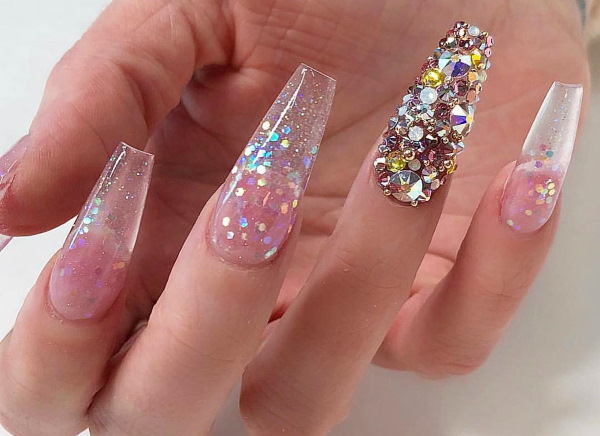
Sequins can cover the entire nail in a thin layer or they can be applied using a gradient technique. Another popular design is the glittering of a classic or moon jacket. Note that glitter designs need to be overlaid with a matte or glossy top, depending on the desired effect. Designs with rhinestones overlap with a top only in places where they are not. Getting on the surface of the rhinestones, the top rounds the edges of the stone, which makes it dull.
Other interesting techniques
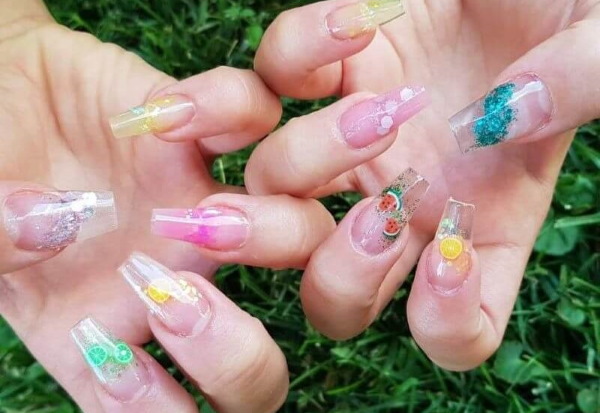
Designs with other decorative elements look incredibly beautiful on transparent nails:
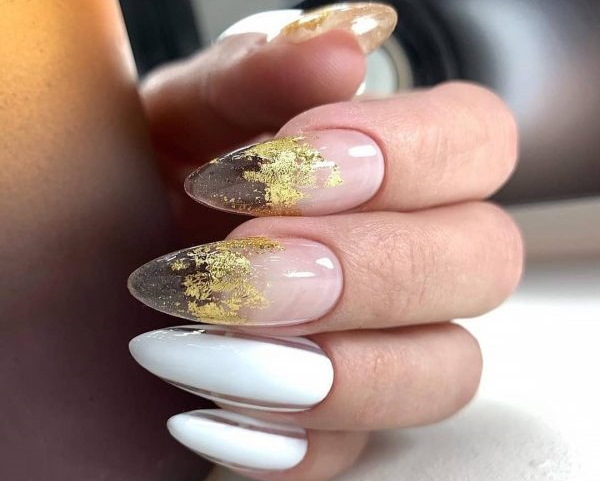
- foil (leaf, tear-off, cut);
- dried flowers;
- confetti;
- metal decor.
With the use of cut foil, you can achieve the effect of broken glass, while the leaf and tear-off visually age the surface. Confetti of various sizes will add a sparkle, especially for these designs and metal decorations during the New Years.
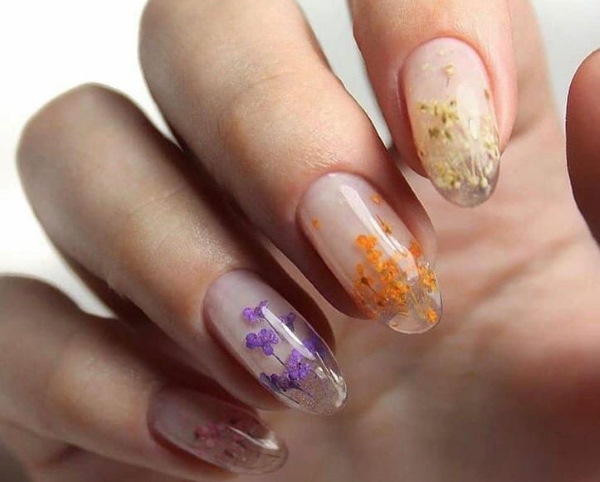
A separate type of art is designs using dried flowers:
- petals;
- flowers;
- inflorescences;
- twigs;
- leaflets.
Such designs resemble gems with insects and plants frozen in them. The peak of popularity of this decor begins in early spring and lasts until autumn. In addition to decor, there are express design techniques that are harmoniously combined with transparent manicure. One of the original techniques is a transparent jacket. When it is performed, the nail bed is drawn with color, and the free edge in the smile zone remains transparent.
The marble technique is considered easier to perform. For its implementation, a combination of colors is applied to the palette and mixed until a chaotic pattern is formed. The mixture is picked up with a flat gradient brush and spread over the nail. Visually, the pattern resembles a frozen paint in water or a cut of a mineral. Stained-glass design, popularly called "stocking", is considered quite complicated in execution, but very effective.
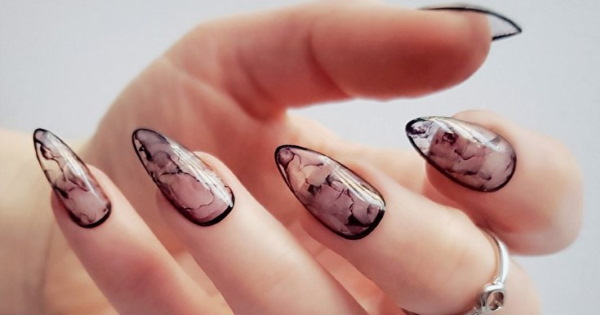
With a thin brush on a transparent nail, a drawing is made that visually resembles a stocking pattern (mesh, peas, lace). Then the pattern is covered with a translucent top with an admixture of black. It is very popular in this design to draw not only the pattern, but also the edging around the perimeter of the nail. The versatility of transparent manicure makes it consistently popular.
You can turn it from everyday to trendy thanks to the design with decor or pattern. Using advances in the nail industry, many of them are available for beginners.
Video about transparent manicure with designs
Transparent manicure ideas with designs: