Painting on nails is not as difficult as it seems at first glance. For beginners, there is a wide variety of designs that are simple to execute and effective in the end. All that aspiring nail artists need is some tools, attention, patience and strict adherence to instructions. And then everything will definitely work out!
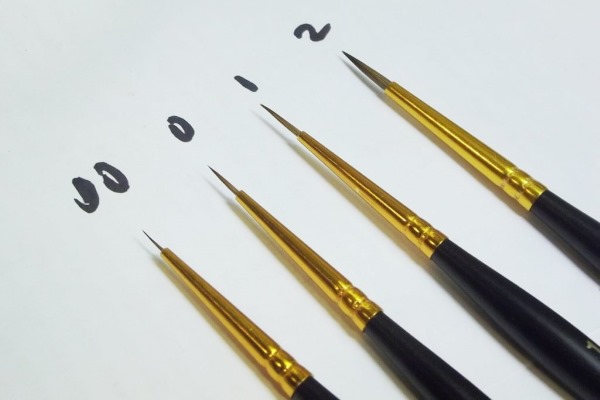
Tools for painting on nails and what you can replace them with at home
| Pattern type | Nail Art Tool | What to replace |
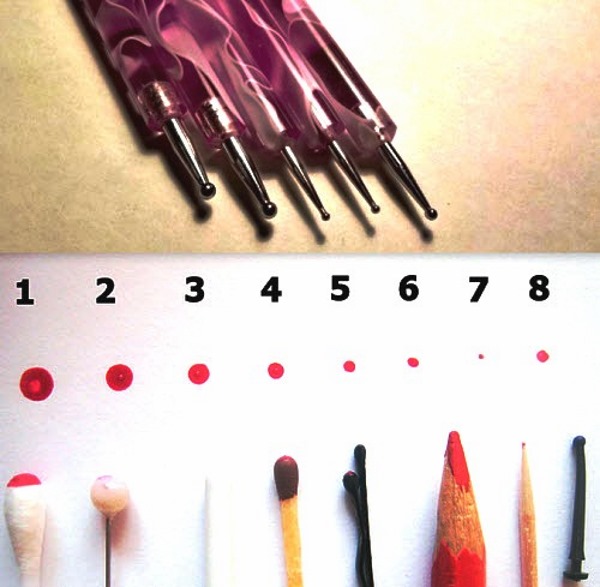
| Points, lines of different thickness, vignettes, lace, hearts, flower petals. | Dots - a special handle with balls of different diameters at the end. | Toothpick, wooden skewer, round head pin, pencil, cotton swab, hairpin-invisible, blank ballpoint pen. |
| Flower buds, lace, any small details. | Short-haired spot brush | Artistic brushes - nylon, column # 001, or trimmed to the desired look, larger brushes. |
| Fine brush with medium bristles | ||
| Stripes, monograms, stems, circles, curls, outline drawings, any subtle details. | Liner - thin brush with a long bristle | Helium pens, sewing needle. |
| Flower petals, background, rubbing, gradient, glitter distribution. | Flat brush, short bristle | Flat nylon brush # 2. |
| Small drawings, service jacket, flower petals, wide lines, glitter distribution. | Petal brush | # 3 flat nylon brush trimmed to the desired look. |
| Gradient, textured drawing | Sponge | Sponge for washing dishes |
| — | Mixing palette (metal, plastic, silicone) | A small piece of food foil, glass board, metal plate. |
An example of replacing dots with scrap materials
Before you start painting on your nails, try working with tools and materials on other surfaces. For this purpose, a notebook sheet (training card) inserted into a transparent file or plastic folder is suitable.
In addition, you need all of the above tools, nail polish remover, lint-free wipes and the type of varnish (paint) that you plan to do nail art.
Workout:
- Carefully study with what tool this or that element is drawn.
- Apply a small amount of varnish to the palette.
- Draw paint with the selected tool.
- Remove excess varnish from the brush, making gentle nap-curling strokes along the palette.
- Draw an element of the picture on the surface of the file, fitting it within the boundaries of 2 * 4 cells.
- Repeat several times in the following cells, achieving the desired shape and accuracy.
- During training, be sure to change hands.Manicure must be done equally carefully with both hands.
- Remove paint residues from the tool with a lint-free cloth.
- Repeat with other tools and pattern options.
Drawing on nails for beginners is like writing in grade 1 of school. There are even special training sheets for practicing elements and patterns. But it's better not to start with complex patterns.
To confidently master the nail art technique, you need to train on simple elements - straight lines of different thickness and slope, geometric shapes, labyrinths, waves, commas, dots, drops, leaves, petals. And only after mastering these skills, you can freely start designing your own manicure.
Drawing on nails with gel polish. Master Class
To complete the gel varnish proposed in the master class, you will need:
- LED lamp with UV spectrum, or UF lamp;

- dehydrator (degreaser);
- acid-free primer;
- basic coverage;
- gel varnishes of bright pink, pale lemon and black colors;
- finishing top;
- klinser (liquid designed to remove the sticky layer);
- linen or lint-free napkins;
- dots;
- flat brush or "petal";
- gel polish remover (for cleaning tools);
- palette.
The choice of means for applying a base for drawing with gel polish should be approached thoughtfully.
If you can save on the quality of the varnishes themselves by purchasing a large palette of colors of a smaller volume, then the base, finish top, degreaser and primer should be bought only of high quality. It is on them that the durability of the manicure, its appearance and the health of the nails depend.
Klinser at home can replace vodka. It has a beneficial effect on the quality of the coating, and the smell will quickly disappear. For the embodiment of artistic painting in the abstraction technique, high drawing skills and a "firm hand" are not required. This design option is available to a beginner even without using stencils.
Moreover, it should not be applied to all nails. You need to draw a drawing only on 1 - 2 fingers of one hand, for example, on the ring and index. The rest of the nails are covered with one tone.
Abstract design gel polish
- Prepare your nails for drawing with gel polish:
- give them shape;
- process the cuticle;
- remove gloss from the nail plate with a thin buff;
- apply dehydrator, primer and base;
- dry in a lamp. The processing time depends on the model and power of the device.
- Apply lemon or pink base polish to all nails except those chosen for the design. Apply in stages, not all nails at once. Thumbs dry separately, so don't apply varnish right away.
- Dry in a lamp.
- Apply a hot pink polish to the tip of the nail chosen for the design, forming a beveled drop from the upper left edge to the lower right part, gradually tapering to the bottom.
- With pale lemon varnish paint over the bottom of the nail to the line of the pink drop.
- Dry in a lamp.
- Draw a wide smooth line with black varnish on the border of two colors with the side part of a flat brush (or "petal").

- Dry in a lamp.
- Put some lemon polish on the palette.
- Using dots, paint lemon-colored dots of different sizes on the black line. First, place the widest circles, after the middle ones and, at the end, create a balance with very small points.
- Dry in a lamp.
- Cover the resulting design with a finishing top.
- Dry in a lamp.
- Remove the sticky layer from the nails with a clipper.

The advantages of painting with gel polish include the ease of applying paints, due to the density of the material, the brightness of the colors, the long service life of the coating and the ability to correct imperfections and irregularities before baking in a lamp. The undoubted disadvantage is the amount of time spent on the manicure.
A pioneer in this process will spend 3 to 4 hours mastering the method itself and gradually drying the layers. With the gain of experience, the process will become 2 times faster.The difficulty of removing the coating is an additional reason to think about its choice. Often it will not work to change the appearance of the pattern without harm to the nail plate.
Drawing on nails using wet gel polish. Master Class
The wet painting technique with gel polish is very similar to dry painting. The main difference is that the pattern is applied to the main color without drying in a lamp. This allows you to create unique patterns and color transitions, giving room for creativity.
To create this type of design you will need:
- LED lamp with UV spectrum, or UF lamp;
- burgundy and white gel varnishes;
- finishing top;
- cleanser;
- lint-free napkins;
- point brush or "liner";
- dots;
- gel polish remover (for cleaning tools);
- palette.
It is most reasonable to start drawing on nails for beginners with the technique of drawing on a wet surface. Its peculiarity is that it allows you not to draw a drawing, but to stretch it, make flows (smoke, marble, skin) and color transitions (sky, butterfly wings, flower petals).
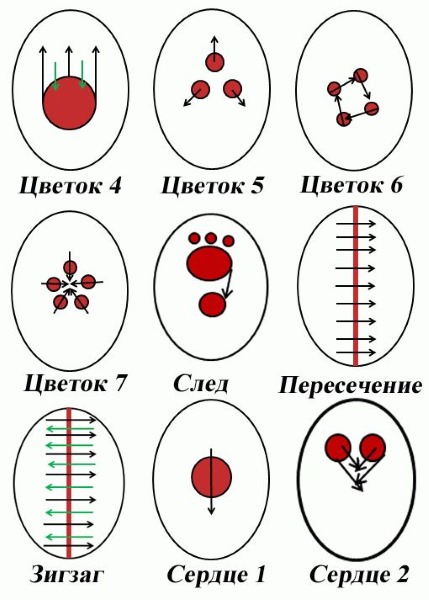
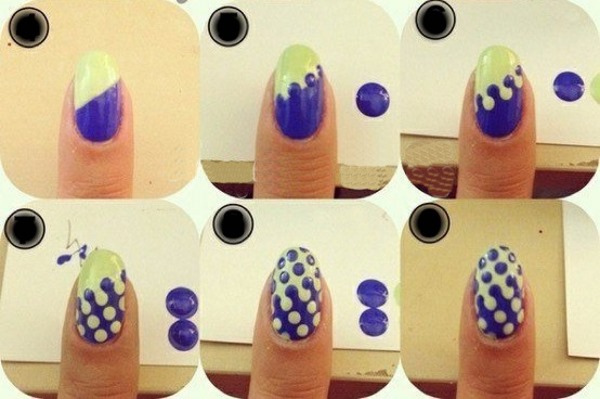
A wide variety of designs can be created using dots placed on a wet base and stretched in different directions: vignettes, waves, leaves, hearts, flowers, roses, footprints, buds.
The scheme of stretching gel polish from dots on a wet basis
It is better to choose varnishes for this technique glossy and always from the same manufacturer. The same consistency and chemical composition will not present any unpleasant surprises.
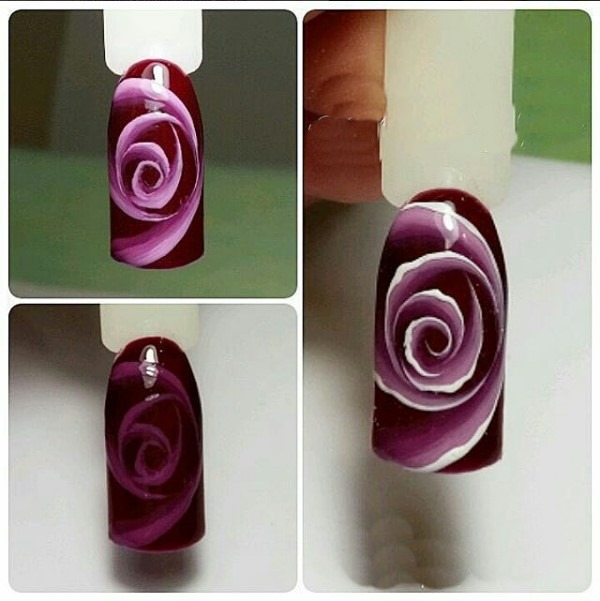
Design "Rose" is carried out with gel polish using the technique on a wet basis.
Master class "Rose" on wet gel polish.
- Prepare your nails for drawing with gel polish:
- Apply burgundy base polish to all nails. Do not dry!
- Apply some white gel polish to the palette.
- With white varnish and a point brush, paint the rose petals from the center to the edges around the entire perimeter of the nail. Broaden the petal brackets towards the center and cancel out towards the end. The unevenness of the petals will only enhance the effect of similarity.
- Use a dot or dot brush to blend the transitions from dark to light. Leave the inner part of the petal a darker color, the upper part lighter. The movement of the brush is not from the center to the edges, but from the center along the circumference of the arc, just below the light line.
- Dry in a lamp.
- Cover the resulting design with a finishing top.
- Dry in a lamp.
- Select the uppermost parts of the petals with a white varnish using a liner.
- Dry in a lamp.
- Remove the sticky layer from the nails with a cleanser.
This technique not only allows beginners to master many techniques for working with tools and mixing colors, but also significantly reduces the time spent on manicure.
It should be noted that the technique of working on a wet basis is used not only with gel polishes, but also with ordinary ones.
The only difficulty in using other materials is the quick drying of the paint. While gel polish will not dry without a lamp and allows you to make adjustments to the drawing until you achieve a perfect result.
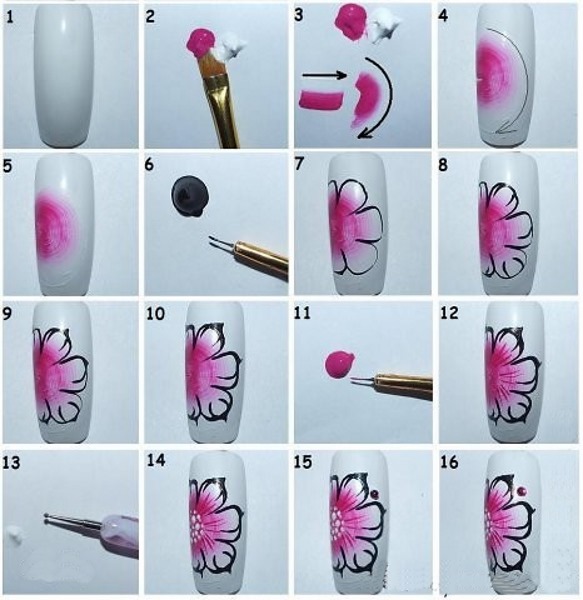
Drawing on nails with watercolor. Master Class
The technique of stretching and shading is also used in the watercolor technique. He received this name due to the external similarity with the painting style of the same name. All the techniques used in nail art are borrowed from the same place. Such a design is made on a white, or just a very light background.
To complete it, you need to prepare:
- LED lamp with UV spectrum, or UF lamp;
- buff;
- white gel polish base;
- artistic watercolors - pink, purple, pale yellow;
- finishing top;
- cleanser;
- linen or lint-free napkins;
- point brush;
- brush "petal";
- palette;
- small beads, or bouillonki, white and gold;
The watercolor technique is performed with special liquid, slightly pigmented gel varnishes, diluted with acrylic and watercolor art paint (not honey), watercolor pencils, or regular gel varnish diluted to the desired fluidity with a top or clinser."Transparent flowers" in watercolor technique.
Master class in the technique of watercolor using the "wash" method
- Prepare your nails for drawing.
- Apply white polish to all nails.
- Dry in a lamp.
- Repeat the application of the white base varnish.
- Dry in a lamp.
- Treat with a cleanser.
- Treat the base layer with a thin buff to remove the gloss.
- Apply pink, purple and yellow watercolors to the palette.
- With a brush, drip pink paint onto the center of the nail.
- Dry the brush with a napkin and, taking out excess moisture and paint from the nail, form a petal with rounded movements. The middle of it should become transparent, but the outline should remain.
- Repeat this step with all the other petals of the flower.
- Apply thin streaks from the edge of the petal towards the center. Without bringing the lines to the core of the flower.
- Draw the same method for smaller flowers at different points of the nail.
- Wait until the layer is dry.
- Repeat the drawing with small yellow flowers.
- Wait for the layer to dry.
- Draw purple petals using the same method.
- Dry.
- Cover the resulting design with a finishing top.
- In the center of a large pink flower, place 3 beads, or several bouillonki.
- Dry in a lamp.
- Remove the sticky layer from the nails with a clipper.
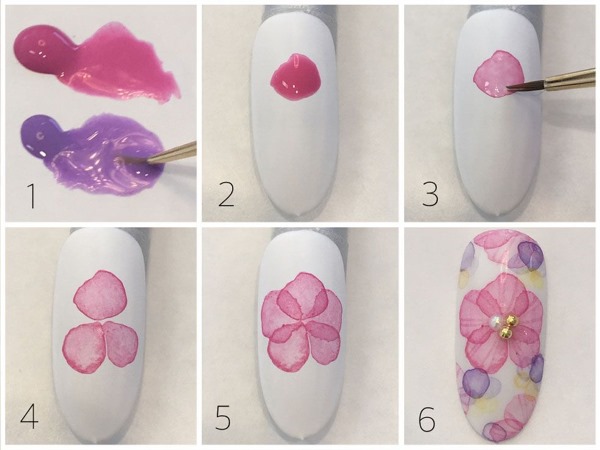
Light, delicate, transparent manicure using the watercolor technique has all the advantages and disadvantages of conventional nail art created by gel polish. Except for one thing - much less time is spent on its creation, and this is a definite plus.
Painting on nails with acrylic paints. Master Class
Drawing on nails for beginners will become a real holiday if you start mastering it with painting with acrylic paints. This material opens up wide prospects for creativity: thin lines, curls, geometric patterns, watercolor transitions and whole paintings.
To create such a masterpiece on your nails, you will need:
- LED lamp with UV spectrum, or UF lamp;
- buff;
- white gel polish;
- acrylic paints (light green, yellow, pink, purple, blue, black, white);
- finishing top;
- cleanser;
- linen napkins;
- point brush or "liner";
- petal brush or column brush # 001;
- dots;
- needle;
- palette;
- rhinestone;
- water for rinsing tools and diluting paint.
Materials for performing manicure do not have to buy specialized acrylic for nail art. Ordinary artistic universal acrylic paints will do. You can even get by with a set of 6 pieces, where there are basic tones from which it is easy to make any color.
Kits intended for children's creativity cannot be used.
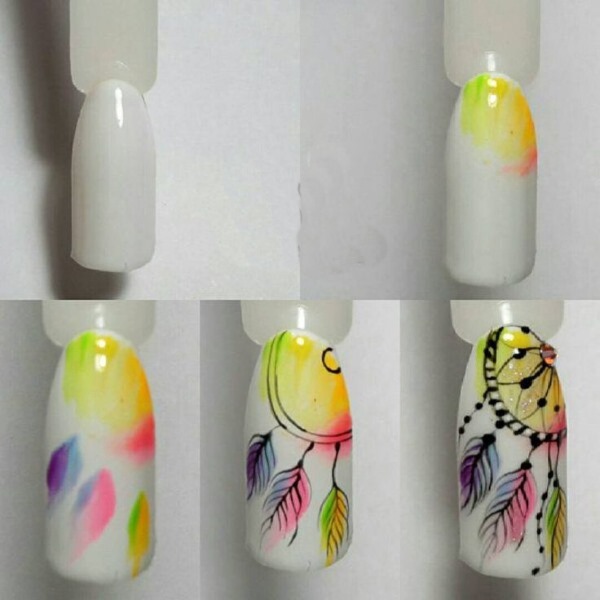
Their chemical composition is not suitable for use in nail art. In the master class of ethnic nail art "Dreamcatcher", made with acrylic pigments, the technique of watercolor, drip is used, and everything is decorated with artistic painting.
Master class of ethnic nail art "Dreamcatcher"
- Prepare your nails for drawing.
- Apply white gel polish to all nails.
- Dry in a lamp.
- Repeat the application of the white base varnish.
- Dry in a lamp.
- Treat with a cleanser.
- Treat the base layer with a thin buff.
- Apply light green, yellow, pink, purple, blue paint to the palette.
- Apply a couple of small green strokes on the top of the nail. Rinse the brush and slightly, with a damp "petal" brush, blur the color until transparent.
- Immediately add a few strokes of yellow paint side by side. Blend with a washed brush and lightly blur the color transition, achieving a watercolor effect.
- Finish this element in the same way with pink, creating a circle with smooth color transitions.
- In the same technique, perform feathers in the center of the nail plate in combination: purple and blue, blue and pink, green and yellow.
- Wait for the layer to dry.
- Apply some black paint to the palette.
- Using the side of the petal, draw a wide line in black for the dreamcatcher's rim.
- With a point brush or liner, draw feather hairs, threads for them and beads, a circle at the edge of the nail (the center of the "catcher" for the diameter of the rhinestone) and weave threads from the center to the outer circle.
- Dots with black paint to apply points of beads on the threads, at the bases of the feathers and at the joints of the weaves inside the "catcher".
- Rinse paint from dots.
- Wait for the layer to dry.
- Put a drop of white paint on the palette.
- Using dots with white paint, apply dots on a wide circle of the "catcher" at small even intervals.
- Use a needle to put white highlights on all the beads.
- Dry.
- Cover the resulting design with a thin layer of the finishing top.
- Fix the rhinestone in the center of the "dream catcher's eye".
- Dry in a lamp.
- With the finishing top, use a dotted brush to draw a circle around the rhinestone, further strengthening the grip.
- Dry in a lamp.
- Remove the sticky layer with a cleanser.

Acrylic paints have a thick, uniform texture that makes it very easy to paint on nails. Due to the fact that they are easily diluted with water, their consistency and transparency for use in different techniques can be easily adjusted from watercolor airiness, without losing color intensity, to the density of a volumetric texture.
And in case of an unsuccessful smear, it is easy to remove with a damp cotton swab. The fact that they dry out quickly and without baking in a lamp is both a plus and a minus. On the one hand, no extra time is wasted, and on the other hand, drawing is required quickly, and this is not possible for all beginners.
Drip painting technique. Master Class
The drip technique of drawing in nail art allows beginners to create a wide variety of designs: floral, abstract, geometric, subject, and even monograms and lace. Designs are created from droplets of paint applied by dots. And then they are stretched, mixed, drawn.
To work in this technique you need:
- LED lamp with UV spectrum, or UF lamp;
- lemon yellow and purple gel polish;
- finishing top;
- cleanser;
- gel polish remover;
- linen napkins;
- dots;
- palette.
You can work in this technique with any varnishes, paints and improvised tools, so it is good for beginners. But if you need a high-quality coating that will not collapse the next day, then it is important to choose high-quality materials for manicure - gel varnishes from one manufacturer, or artistic acrylic paints.
There are only two techniques used in the drip technique:
- on wet, when dots of paint are applied to an undried base and a pattern or pattern is formed from them;
- on dry, when drawn with dots on the dried base of the nail.
The proposed master class in drip technique introduces the technique of overlapping color on a dry basis.
Using this technique, laces are drawn, excluding detailed drawing of lines, eyes, multicolored spots for flowers and animal skins.
Drip technique master class
- Prepare your nails for drawing.
- Apply purple varnish all over the nail plate.
- Dry in a lamp.
- Draw a line with lemon yellow varnish from the middle of the nail plate on the left to the upper corner of the smile line on the right. Paint over the separated top of the nail.
- Dry in a lamp.
- Apply some purple varnish to the palette.
- Using dots along the color border on the yellow half of the nail, apply dots at small equal intervals.
- Apply a small amount of yellow varnish to the palette
- With dots, draw yellow circles in the intervals between the purple dots, but already on the side of the main color.
- Continue rows of yellow and purple dots in rows up and down. Yellow circles should be placed on a purple background, and purple on yellow. The tool must be cleaned from paint in a timely manner, avoiding contamination of flowers.
- Cover the resulting design with a thin layer of the finishing top.
- Dry in a lamp.
- Remove the sticky layer with a cleanser.
The main advantage of this drawing technique is its simplicity and the large number of designs that can be created with it.
Chinese technique of painting on nails. Master Class
The Chinese technique of "double brushstroke" is a set of drawing techniques, united by one feature. On 1 brush, 2 colors are typed at once and with the help of various continuous movements of the brush, a picture is created.
There are only 5 main types of strokes presented in this technique:
- smooth - straight line;
- openwork - dense vertical wave;
- half-shade - a wide wave from top to bottom, then sideways, up and down, without leaving the surface;
- feather - abrupt strokes with a thin brush in different directions;
- wave - continuous movement in different directions with a twisting of the hand.
To complete a drawing using this technique, you will need:
- LED lamp with UV spectrum, or UF lamp;
- white gel polish;
- acrylic paints in white, pink, black;
- finishing top;
- cleanser;
- linen napkins;
- flat brush
- point brush;
- dots;
- palette;
- small rhinestones;
- water.
It is preferable for a beginner to design in this technique with acrylic paints.
Their structure makes it easier to apply, distribute and mix paints at the time of the stroke. Master class "Flower" in Chinese technique with acrylic paints is very simple to perform and the most beginner can handle it.
Master class "Flower" in Chinese technique
- Prepare your nails for drawing.
- Apply white gel polish to all nails.
- Dry in a lamp.
- Repeat the application of the white base varnish.
- Dry in a lamp.
- Treat with a cleanser.
- Treat the base layer with a thin buff.
- Apply a small amount of pink and white paint close to each other on the palette.
- Dip a flat brush with opposite ends of the bristles in different colors. Draw test lines on a sheet of paper, checking the intensity and width of the paint grip, simultaneously mixing it and removing excess from the brush.
- In a circular motion, draw a circle in the middle left part of the nail plate with pink inside. Correct the result if necessary.
- Put some black on the palette.
- Draw the rounded outlines of the flower with a dotted brush, add leaf veins on top.
- With the same point brush, draw out the central part of each petal, sharpening and shaping.
- Outline the outline of the flower once again, achieving even lines.
- Using pink paint and a spot brush, paint the veins of the flower from the center to the middle of the petal.
- Dotsom draw many white small dots in the center of the flower.
- Dots with black paint mark the attachment points of the rhinestones on the free surface of the nail.
- Wait until dry
- Cover with a thin layer of finishing top.
- Fasten the rhinestones to the prepared places. You can add small transparent rhinestones to the center of the flower.
- Dry in a lamp.
- With the finishing top, use a dotted brush to draw a circle around the rhinestone, further strengthening the grip.
- Dry in a lamp.
- Remove the sticky layer with a cleanser.
It is wiser to start drawing on nails for beginners with simpler techniques and techniques. Chinese painting fully reveals its beauty in the hands of experienced craftsmen.
Features of drawing on nails with shellac
Shellac is not a separate type of nail art material. This is the name of the CND gel polish collection. Its wide distribution and small features of its use have made it a separate term. They paint it in the same way as with ordinary gel polish.
But you cannot mix shellac and other types of paints in the drawing.... You can use additional materials: sequins, rhinestones, stickers, shimmer. Also, stencils are not suitable for working with this material.
How beautiful to paint thin patterns on the nails
Thin patterns on the nails without long training will help to draw stamping - a technique for printing on nails using a silicone stamp and plates with an engraved pattern.
A helium pen can help you draw the outline of an object, a subtle detail or a vignette.
Drawing with a needle on a wet base can also be considered fine patterns. But to paint with a thin brush whatever the fantasy desires, it will take hard training.
How to quickly draw beautiful monograms on your nails
Monograms are all kinds of patterns of lines and curls that create a holistic, compositionally correct picture.

You can quickly and beautifully draw monograms on nails using a dots, liner or a dot brush, having previously created a drawing on paper. The simplest monogram is two opposite commas with a period in the center.
How to use markers and stencils
Markers and stencils are indispensable helpers for a beginner in nail art. Nail Art Markers are available in various shades and are filled with acrylic paint or varnish. When you press the marker pen, the paint is highlighted and you can start drawing.
It is much easier and more familiar for them to draw than to master the work with a brush, so such a device will be a good help in home manicure. The simplest and most affordable stencil is simple lace. A piece of lace is applied to the dried base and painted over with varnish in a contrasting color.
After drying, the stencil is removed, and the openwork pattern remains... But this method requires accuracy and good fixation of the material on the nail. At the slightest displacement of the material, the pattern will float.
Therefore, it is better to use factory stencils with an adhesive base, or, armed with nail scissors, create a similar device from masking tape or electrical tape. Drawing on nails for beginners is a fun and rewarding process.
In addition to its direct purpose in the form of a unique handmade manicure, this is an irreplaceable creative therapy that develops fine motor skills, attention and concentration.
Author: ZabavaLily
Article design: Anna Vinnitskaya
Video about drawing patterns on nails
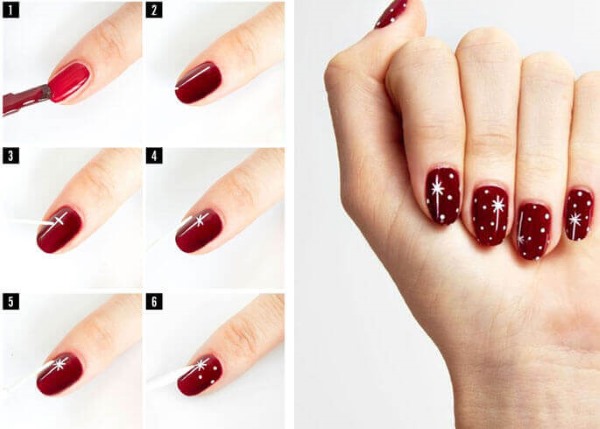
Manicure with monograms that even a beginner can handle: