The use of gel polish is a popular nail art trend, making it easy to create unique and long lasting designs. Self-creation of a manicure requires strict adherence to all stages of the procedure, accompanied by the phased application of shellac on the nail plate.
General recommendations for gel polish manicure
Gel polish (shellac) is a cosmetic substance (used for nail art design) that combines the qualities of a decorative coating and a polymer (gel). Manicure with gel polish is an alternative to nail extension, which allows you to create a beautiful, long-term look and give your hands a well-groomed look without injuring the nail plate.
Advantages of gel polish manicure:
- A huge palette of various shades, which makes it possible to choose any colors and decorations for independent nail art.
- Keeping the created design without correction for 2-3 weeks.
- The possibility of correcting the imperfect shape of the nail by using a strengthening base placed under the gel polish.
Disadvantages:
- The complexity of the procedure. A manicure with shellac is done for at least 40-50 minutes and a careful adherence to the sequence of actions is required.
- The possibility of chips, cracks in case of neglect of safety measures prohibiting the use of chemical, detergents for wet cleaning the house within 24 hours after applying gel polish.
- The inclusion of chemicals in shellac that injure the nail plate and lead to tissue delamination.

Nail art with gel polish looks great in any color scheme.
Trending shades of the 2019 season are:
- beige;
- powdery;
- champagne;
- pale pink;
- peach;
- blue.
At the peak of popularity, natural manicure created by transparent or pale pink shellac. For nail art with gel polish, you need oval, square, almond-shaped nails. The trend of the season is the nail plate, made in the form of a square with rounded ends and decorated with nude-colored shellac.
Business style requires minimalism and restraint, goes well with pastel-colored manicure, jacket, gradient.
Drawings, patterns applied to the ring fingers will help to diversify the office dress code. An evening dress allows for bold solutions, rich colors, and an abundance of jewelry. The little black dress is compatible with a dark, bright manicure, decorated with gold, silver foil, rhinestones, small pearls.
Techniques and methods of gel polish manicure
The step-by-step application of gel polish on the nails follows the mandatory plate processing procedure, which differs depending on the chosen manicure technique.
Applied nail art methods:
- Trimmed - classic (medical) manicure, which is the elimination of the cuticle, overgrown ptergia using a manicure set consisting of tweezers and scissors. A dangerous method that can injure thin skin and vessels close to the cuticle. Neglect of safety precautions during processing can lead to infection.

- Hot - a kind of medical manicure, characterized by additional processing of fingers with warm water (in the form of a hot bath) with the addition of salt and oils.After removing the cuticle, the nails are placed in a vessel with warm water, and then the softened sides are easily removed with a buff.
- Hardware the method is accompanied by the removal of keratinized skin using an apparatus. Less traumatic than classic nail art. Suitable for women with dry and thin skin.
- European - a popular technique, which is the elimination of the cuticle using dissolving drugs.
- Japanese - medical manicure, which consists in applying an agent to prevent fragility and delamination on the nail plate, followed by its polishing. This type of hand treatment does not involve the use of decorative coating.
- SPA manicure - a favorite method of modern women, which is a combination of European or hardware manicure with procedures aimed at strengthening nails and softening the skin of the hands (paraffin therapy, massage, peeling).
Manicure techniques:
| Monochromatic | Office design, during the execution of which a decorative coating of the selected color is applied to all fingers. |
| Striped | Created by stencil strips attached to the nail plate |
| French | The classic technique, which is the drawing of a contrasting smile at the end of the plate. Requires the use of stencils and brushes. |
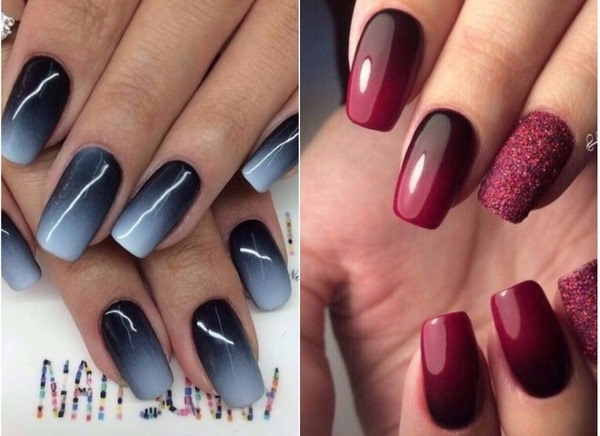
| Gradient
| Nail art created with a sponge. It is characterized by a smooth color (or tint) transition with clear (or blurred) boundaries reproduced within the same nail. Kinds: 1. Vertical - consists in applying a variety of colored stripes of different shades of the same color. 2. Horizontal - created with a sponge on which two matching colors (or shades of the same range) are applied. Multi-colored gel varnishes are mixed on the palette, the colored transitions are removed with a toothpick, then the created mass is transferred to the nail with a foam sponge. 3. Horizontal ombre, made within one hand - is the application of different shades of the same color scheme on different fingers of the hand. The ombre effect is visible only when all nails are connected. |
| Lunar | A reverse jacket, consisting in drawing a smile of a shade close or contrasting to the main color along the base of the nail plate. |
| Matt | Velvety (rough finish) created with a special top with a matte effect. |
| Stamping | Manicure, which consists in transferring the pattern from the aluminum stencil to the nail using a special stamp. |
| Water | It consists in creating a decorative coating or pattern on the surface of the water. Gel polishes of various shades are dripped into a glass of water, mixed with a toothpick, transferred to the nail when dipped in water |
| With micro beads and rhinestones | Festive nail design, consisting in decorating the plate with special glitters or decorative balls attached with glue. |
| Newspaper | A popular technique is to transfer phrases and letters from the pages of a printed publication onto a nail using an alcoholized piece of a newspaper sheet. |
| With foil | Shiny foil designs are cut out and then fixed with glue. |
| Art | Decoration of the nail plate with decorative painting, monograms, dots, watercolor drawings. |
| Photo design | Manicure using 3D stickers applied to the entire surface of the nail. |
Types of gel polish
Phased application of gel polish on nails is the main part of a manicure, the duration of which varies depending on the composition and consistency of the cosmetic.
The beauty market offers various variations of decorative coating, including:
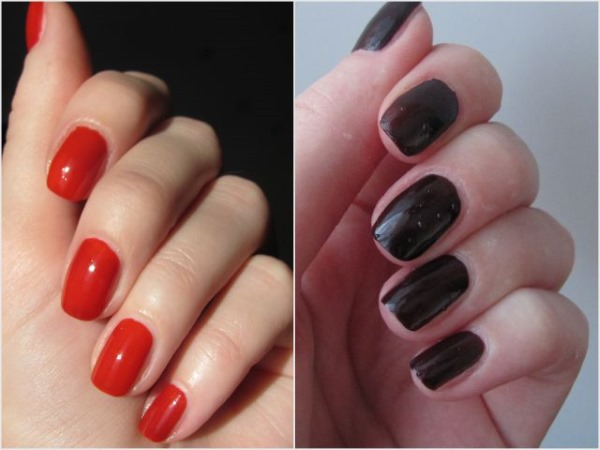
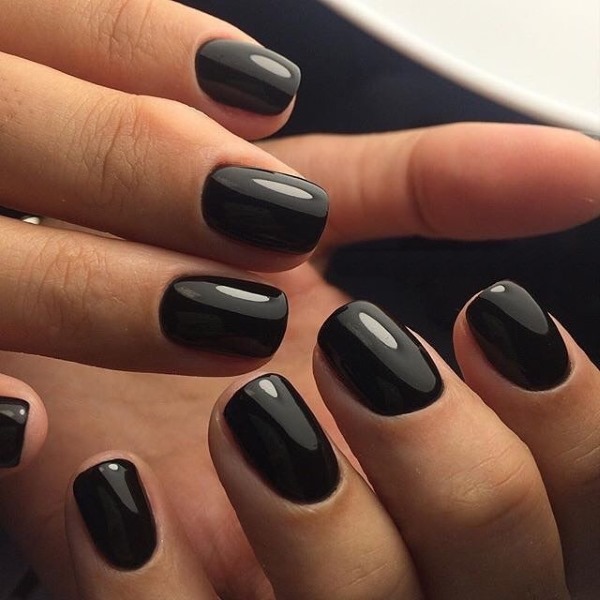
- Solid color gel polish - persistent shellac of a certain color, used in all nail art techniques. The number of layers applied to the nails varies depending on the brightness and saturation of the desired color. Suitable for daily and evening manicure.
- Thermovarnish... Shellac, which changes its shade with temperature changes. Ideal for the cold season.The tip of the nail has a richer color, as a result of which the varnish creates a visual ombre effect when used.

- Craquelure... Cracked effect gel polish.
- Magnetic... It consists of mirror particles that, when interacting with a magnet, create a shine comparable to that of a cefoman (a semi-precious stone). It is used for the "cat's eye" technique.
- Aromatic. Delivers a floral or fruity aroma after application.
- Mirrored... Has a metallic or mirror finish. It is necessary when creating a mirror manicure. Not recommended for frequent use due to the content of chemical compounds that destroy the nail plate.
Depending on the amount of cosmetic products required for the creation and additional durability of the manicure, shellac is divided into:
- 3-phase cover, requiring the use of gel polish, base and top.
- 2-phase - created by decorative shellac with a fixing structure;
- single-phase - lasting up to 7 days, which does not require drying and the use of additional funds (base and top).
How to use gel polish at home
Step-by-step application of gel polish on nails is the main process of a home manicure, which requires maximum patience and concentration.
For an independent manicure you will need:
- disinfectants;
- primer;
- base;
- decorative gel varnishes;
- fixing transparent top;
- manicure set;
- wooden (orange) stick;
- buff;
- nail files;
- UV or LED curing lamp;
- cotton pads and sticks;
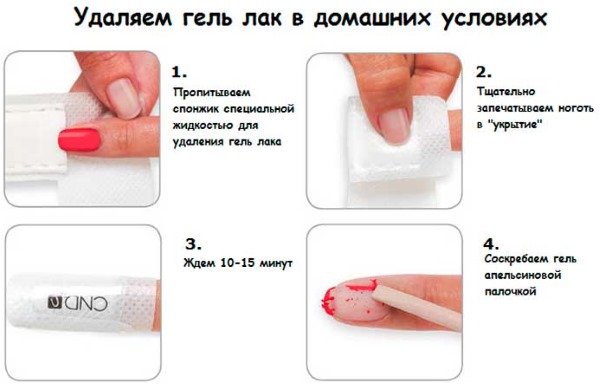
- gel polish remover;
- cuticle softener;
- nutritious cream.
To decorate nails you need:
- dots or a toothpick to create patterns;
- foam sponge;
- palette;
- art brush;
- various stickers;
- beads, rhinestones, stencils.
Stages of nail art:
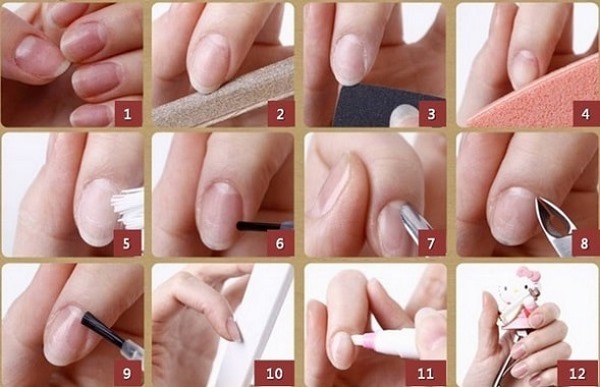
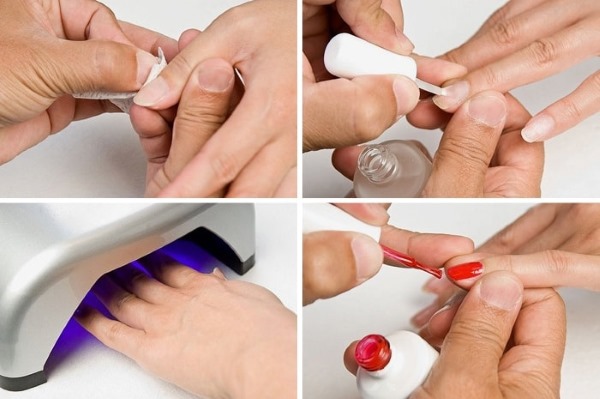
- Removing old coatings, cleansing nails and hands from contaminants with water and soap solution.

- Trim, hardware or European manicure, which consists in removing the cuticle with tweezers or a solvent. Giving the plate the chosen shape.
- Buff polishing. Before applying the gel polish, the nails should not be filed down too much to avoid injury to the plate.
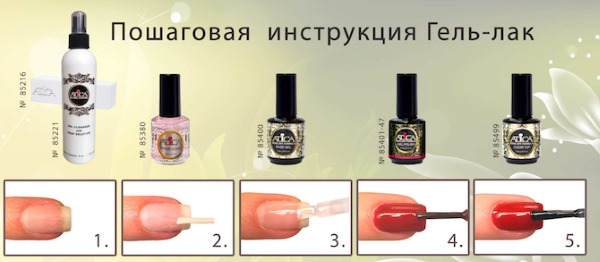
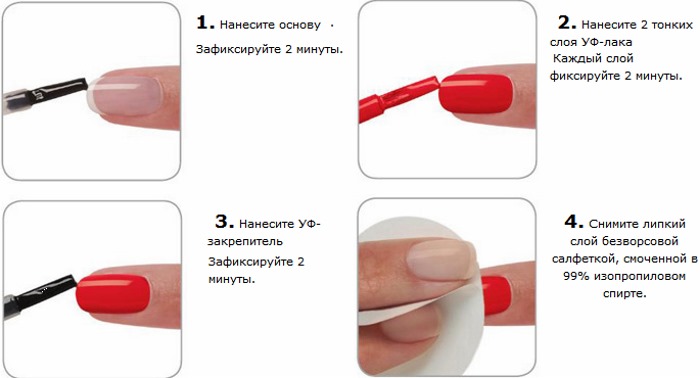
- Application of a base to strengthen the nail and fix the gel polish, followed by polymerization of the product in a UV or LED lamp (2 min.).
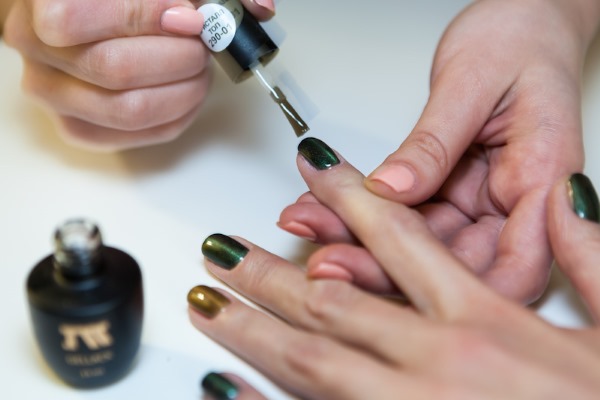
- Coating the plate with colored shellac. The gel is applied from the center of the nail with short strokes directed to the sides and end. The base of the plate is painted last. 2 nails are covered with a decorative coating with a step-by-step polymerization of each (2 min). The thumbs are painted over last (dried together separately from the rest).
- To fix the manicure, a top is applied, applied after the main color. Drying the top in a lamp takes from 30 seconds to 2 minutes (the time varies depending on the power of the device).
- At the end of the procedure, each brush is placed in a lamp for the final fixation of cosmetics (2 minutes per hand). Upon completion of drying, the sticky layer is removed from the nails.
- Decorative decorations (drawings, rhinestones, beads) are glued after the creation of a basic manicure.
- At the end of the procedure, the cuticle is lubricated with a caring agent, and the skin of the hands with a nourishing cream.
Master class of one-color manicure with gel polish
Gel polish on nails in a monochromatic manicure is applied in stages (2 layers). The final shade depends on the thickness and amount of coatings.
Benefits of monochrome nail art:
- relevance;
- appropriateness for any event;
- compatibility with the woman's chosen image and style.
Solid color - suitable for office and business dress code. Boring monochrome can be diluted with rhinestones, drawings applied on 1-2 fingers of both hands.
A decorative coating for a solid color nail art is selected depending on the season:
- winter offers cool shades, decorated with a snow theme;
- spring the period is associated with a nude scale and floral motifs;
- summer - the time of bright, saturated colors (raspberry, lilac, yellow, orange) and bold decisions in design and decoration.
- fall offers to do a manicure in warm shades with geometric patterns.
For home monochromatic manicure you need:
- tweezers (apparatus, cuticle remover);
- orange (wooden) stick, nail files;
- UV or LED lamp;
- buff;
- final top;
- base for manicure;
- monochromatic gel polish of any shade.
Technology:
- Carrying out a hygienic manicure with giving the nails the chosen shape.
- Degreasing the nail plate with a primer, followed by the application of a strengthening base. Fixation of the composition in the lamp (2 min.)
- Step-by-step coating of nails with a single-color varnish in two layers and drying them (2 minutes for each)

- Securing the manicure with a top, with fixation for 2 minutes.
- Removing the sticky layer from the nails.
- Depending on the woman's desire, the ring fingers of each hand can be decorated with drawings, rhinestones, dots.
Step-by-step application of manicure with cat-eye gel polish
Step-by-step application of gel polish on nails allows you to create a bright manicure using the "cat's eye" technique. This nail art is a technological process during which the nail plate is coated with a special varnish containing shiny particles. Under the influence of a magnet, the glitters line up, creating spectacular overflows, reminiscent of the glitter of a cyfoman stone.
To create a manicure with a "cat's eye" effect you need:
- Cat Eays gel polish;
- magnetic pen;
- transparent top and base.
The design looks good on short and long nails, but the most advantageous option requires the use of dark, saturated colors.
Creature:
- Preparatory manicure with degreasing the nail plate.
- Application of a transparent base to strengthen and align the nail.
- Applying shellac in 2 layers. After each layer of varnish, the product must be polarized in a UV lamp (2 minutes).

- Fixing the cover with a transparent top, followed by drying (2 min).
- After removing the sticky layer, a magnet is brought to the nails at a distance of 0.2-0.5 mm, aligning the particles in a row to create overflows.
The cat-eye manicure is suitable for evening and day looks.
In a business style, it is best to use warm, beige shades of varnish. The evening dress is advantageously combined with manicure made in dark colors with the addition of rhinestones and foil.
How to make a matte manicure with gel polish
Matte manicure is at the peak of popularity in the 2019 season. The velvety coating is given by a special matte top applied to the nails after the usual shellac.
Manicure tools:
- tweezers, nippers, nail files, buff;
- transparent base;
- denitration fluid;
- matte top;
- monochromatic gel polish.
Technological process:
- Preparation of fingers with edging, hardware, SPA manicure.
- Degreasing the plate and applying a transparent base to strengthen nails.
- Coating nails with 2 layers of plain shellac and drying them in a lamp.
- Applying a colorless matte top to a colored coating. Fixation of a cosmetic product in an LED or UV lamp (2 min.)
- Removing the dehydration (sticky) layer.
- Treating the cuticle with an emollient.
In addition to the matte top, the roughness of the manicure is given by:
- polishing the glossy coating with a nail file or buff;
- spraying acrylic powder over not completely dried shiny top.

We combine matte manicure with a classic jacket and moon technique. For the weekend design, it is allowed to decorate the velvet cover with rhinestones, pearls, foil. The most effective is dark matte nail art created on short oval or square nails.
Velvet long nails look vulgar, and pale (nude) colors are easily dirty and look sloppy.
Simple decorations and patterns
You can independently decorate a monochrome manicure with various patterns created by dotsem or a toothpick.The ornament is used to dilute the severity of a daily, office look (applied to the ring fingers) or is used to create an evening style.
Simple decorations, easily created by nail art beginners:
- The dot design is the decoration of a solid color coating with contrasting dots applied by dotsem (or a toothpick) and contrasting gel polish.
- A striped manicure created with stencils pasted onto a monochrome finish. The strips can be cut from paper yourself or purchased from retail or online stores.
- Monograms are drawn with dotsem or a toothpick. The color of the picture must match the basic tone of the coating.

The step-by-step application of gel polish on nails with monograms looks like a beautiful and neat design. - At the peak of popularity, abstract art, applied in the form of splashes of paints on a white background. With a brush, bright shades are sprayed onto the surface, creating a unique pattern.
- Geometric designs (lines, shapes) are drawn with toothpicks or require special stickers.
- A lace ornament is easy to create with tulle and white shellac. The fabric is applied to the nail, with a transparent base and covered with white gel polish. After drying, the tulle is removed, leaving an elegant lace on the plate.

Independent nail art is a laborious procedure that requires care and step-by-step application of gel polish on the nails. Strict adherence to the instructions will allow any beginner to create a unique manicure that retains its original appearance for 2-3 weeks.
Article design: Anna Vinnitskaya
Video on the correct application of gel polish
Step-by-step use of all the necessary materials for a manicure: