In the modern world, a lot depends on appearance, but not all girls are confident in their beauty. Many take drastic steps like plastic surgery or injections in certain parts of the face.
But now it is possible to do without surgical interventions and other procedures that can lead to irreversible processes.
There is a special technique that visually obscures all external imperfections - this is face contouring. With the help of cosmetics, you can remove the visible minuses of the shape of the nose, cheekbone lines or a blurred contour of the face.
Benefits of facial contouring and how it works
The main advantages of contouring are:
- Perfect face without expensive plastic surgeries;
- Using the technique at home (for more details see: face contouring, step-by-step instructions, photo);
- Perhaps self-study (video and photo lessons);
- Inexpensive cosmetics.
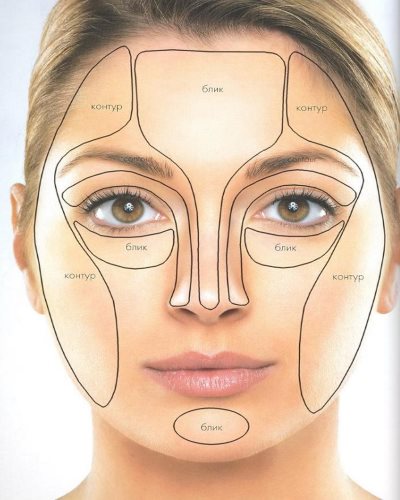
Face contouring very easy to use... With the help of special cosmetics, some areas on the face are darkened, while others are lightened.
There are two techniques for contouring the face:
- Dry - suitable for beginners.
- Wet technique for advanced users.
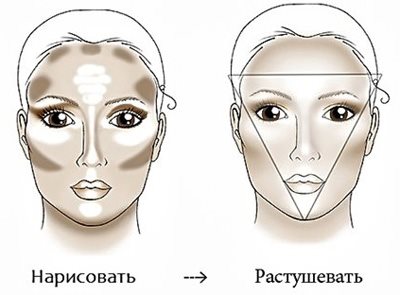
First, you need to draw the required oval, then shade the area that you want to reduce with dark tones, and highlight the area that you want to increase with light tones. Thus, you can get plump lips, a small nose, expressive cheekbones and visually reduce fine wrinkles.
There are two techniques for contouring the face. Dry - suitable for beginnersas it is easier to blend on the face. For dry equipment it is used:
compact or loose powder;
dense blush - very suitable for lightening / darkening, depending on the color palette, you need to match the color of your skin;
shimmer - a powdery powder with shimmery particles;
shimmer - a decorative agent for lightening certain areas;
brushes.
Wet technology for advanced users... Suitable for this technique:
liquid tonal foundations of natural tones;
concealer - a way to smooth out age spots, acne, mimic wrinkles, dark circles under the eyes, it can be dark / light tones, in the form of a pencil;
liquid base for masking some areas;
bronzer - a mineral cosmetic product for darkening the skin, it is matte and reflective;
highlighter - a creamy cosmetic product for lightening the necessary areas of the face, correcting fine wrinkles.
In everyday life, contouring the oval of the face can only be done with bronzer and highlighter, you still need to purchase special brushes, sponges.
Contouring tools
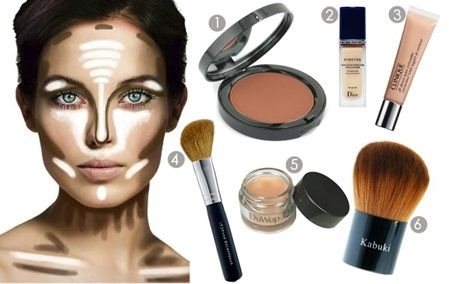
To perform a structured make-up, you need to purchase brushes, sponges and other tools:
Beauty Blender - on the one hand, a pointed device for applying cosmetics in hard-to-reach places, on the other hand, the end is ideal for shading;
Kabuki - This tool is suitable for smoothing out various tones. It is a wide brush with a flat cut;
Rounded Brush - Suitable for applying makeup;
Angled Brush - Easily apply tones to the wings of the nose and cheekbones;
Large brush (dome) - for blending powder.
The main assistant in face contouring - bronzer
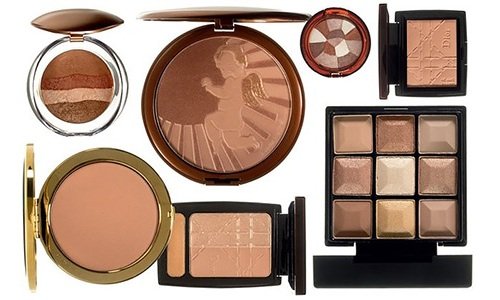
Bronzer can be powder and also cream-based... With its help, it is easy to give the skin a fresh appearance, create a natural make-up. But do not overdo it too much, as it may turn out that the face is tanned, but the neck, neckline, and other parts of the body remain white.
To give the skin a natural light tan, it is desirable apply bronzer on the nose, top of the cheekbones, chin, lower jaw, top of the forehead of the root zone.
Choosing a bronzer for contouring:
In order to obtain an unobtrusive make-up, bronzer is used two shades darker than the skin;
For swarthy skin, bronzer of honey, red-yellow or terracotta color is suitable;
A skin medium needs a golden color or pinkish gold;
For light skin, honey, peach, beige or pink are recommended;
Owners of snow-white skin should abandon the bronzer; for contouring, only blush and highlighter of cold shades are suitable for them;
Be sure to test the product on the skin before buying;
If the skin is considered oily, it is necessary to carefully approach the choice of a bronzer or, in general, refuse. As its shimmery particles will add more oily sheen.
Bronzer can be powder as well as cream based. With its help, it is easy to give the skin a fresh appearance, create a natural make-up.
Choosing a palette for skin contouring
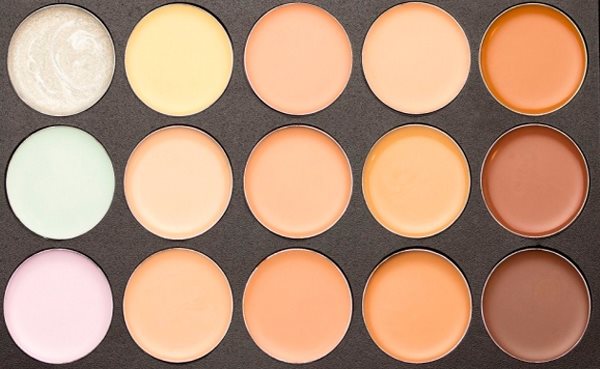
Today, there is a large assortment of palettes on the shelves of shopping centers, you need to approach the choice responsibly so as not to be mistaken in your preferences for the color scheme. The palette consists of: blush, dark / light bronzers, highlighters.
- To make the makeup look natural, you cannot use reddish or orange shades;
- The dimmer (bronzer) is the main component of the palette, it should be two shades darker than the skin without mother-of-pearl. A completely matte tone will look perfect on the skin;
- A highlighter should be chosen with fine shine and a tone lighter than your skin. So, it will give the appearance a natural look.
Face contouring: step-by-step instructions with a photo at home
Stages of structuring:
- At the beginning of the contouring, it is necessary to wipe the face with cosmetics;
- It is advisable for owners of dry skin to apply a moisturizer, and for girls with oily skin, to cleanse the appearance with a liquid from an oily sheen;
- The next stage, masking freckles, pimples, dark circles under the eyes - concealer;
- Apply a tonal foundation;
- Apply powder;
- The next step is to do the contouring based on the type of face.
Contouring rules depending on the shape of the face
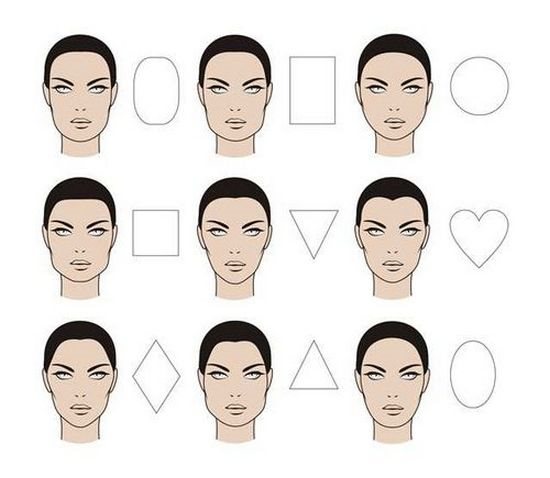
Before starting the procedure, you need to determine what type of person is. This will help step by step instructions for contouring a face for a specific shape (with photos).
Heart-shaped type. In this type, the top of the oval looks more than a chin, so it is necessary to darken the temples with a bronzer.
Thus, it will turn out to equalize the shape. Contouring with dark tones in the lower area is not allowed, since the balance of the oval can be shifted.
In order to lengthen the nose, you need to apply bronzer on its sides. Then it will turn out to soften the angularity, and to make the nose slightly raised, you need to apply a bronzer under its tip.
After working with the bronzer, take a highlighter and apply it along the line of the nose, under the eyes and chin. It is better to leave the forehead unchanged, as the highlighter can whiten the upper part of the face too much, as if making it heavier. Shade everything well so that there are no rough transitions.
Contouring ends with blush... On top of the bronzer, apply blush with a slight slope to the chin, which preserves the natural lines of the oval.

Square shape. In working with such a face, it is necessary soften the chin... A dark color should be applied to the temples, on the forehead at the root zone of the hair. Then, starting from the middle of the ear, go along the cheekbones, but do not touch the chin. The nose needs to be enlarged.
The next stage of contouring, highlighter. Highlight the middle of the forehead, chin, and under the eyes. But so that the face remains natural, do not apply a lot of highlighter.
Blush should be applied from the edge of the cheekbone down to the nose until it crosses with the starting point of the eye. This method of applying blush will add a rounded line to a square face.
Oval type. Owners of this type need to focus on reducing or increasing the desired area of the oval. They usually have a predominant nose, so bronzer is applied on half of the bridge of the nose and on the sides.
You need to darken the cheekbones above the corners of the mouth, creating a triangle. Thus, the "horse effect" can be excluded. For a visual expansion of the face, the highlighter is applied over the lip (minimal application) and on the chin.
The forehead also needs to be minimally bleached. Blush is applied clear movements from the wings of the nose to the upper point of the ear.
Triangular shape. Since the chin is the narrowest area, it must be darkened to balance the entire oval. It is also worth applying bronzer on the forehead according to hair growth.
That will reduce its width, but the eyes, on the contrary, do not need to be darkened, because with such an oval they are already so noticeable. Required whiten the wings of the nose with a highlighter, the area under the eyes with the continuation of the line under the nose.
Lighten the brows and chin a little. Apply a light blush to the cheekbones.
Important to remember! Before starting the procedure, you need to determine what type of person is.
Elongated type. Correction occurs by darkening the lower part of the chin, the area from temple to temple along the hairline. Such a dark edging will slightly expand, and also proportionate the face. It is also necessary apply bronzer to eye areasto look away from the chin and forehead.
Slightly darken the cheekbones and nose so as not to prolong it. Minimally apply highlighter only in the area under the eyes, between the eyebrows, as well as on the bridge of the nose. To shorten the chin a little, draw a lightening line under the lip along the entire width.
You cannot overdo it with a highlighter, as you can lengthen the oval even more. The goal is to balance the look. Blush should be applied with a wide line towards the nose.
Round shape... When contouring of this type, it is necessary to darken large areas with bronzer. In this case, it is important to highlight the cheeks with a dark tone, without touching the forehead and chin, this will visually narrow the appearance.
Then, with a highlighter, draw a line along the entire bridge of the nose from the middle of the forehead, lighten the top of the cheeks, make a triangle on the chin. This contouring will give a slightly elongated appearance. Minimally apply blush just above the cheekbones, in some cases, you can refuse to apply blush.
Depending on the specific type and form of appearance, professional cosmetologists perform individual face contouring in each case.
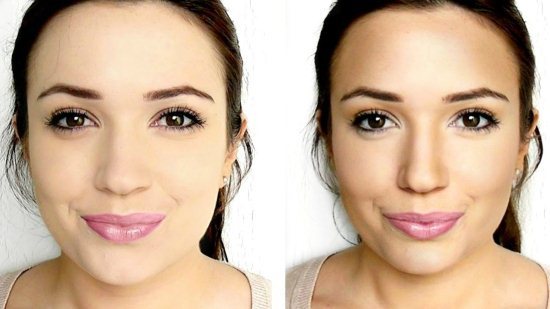
Step-by-step instructions with photos for a home make-up will help you make an error-free makeup and decide on the choice of shades.
Useful tips for contouring
- Categorically it is forbidden to use liquid bases and loose powders at the same time... Since the result will be clear lines of shades that cannot be shaded;
- After removing the excess corrector, you must apply a transparent powder;
- You can only contour the face with foundation and bronzer;
- Dry skin should be moisturized, special cosmetics should be applied as a base layer;
- If you have to take a photo, you need to remember that the highlighter has a reflective effect... Therefore, you should not lighten the convex parts of the face too much in order to avoid overexposed skin areas in photographs;
- In case of perspiration under the nose, apply a matte highlighter to the nasolabial triangle.
Today, every girl, thanks to step-by-step instructions and photos on face contouring, can look irresistible.
Dear women, always be beautiful!
I don't see the point in full daily contouring. This is most likely for people who are often in front of camera lenses, cameras. Representatives of some professions need to look charming, and since not everyone will lie on the operating table, face contouring is a way out. I will say for myself, the only thing I do every day is to apply blush and slightly correct the cheekbones. I think that this is enough in everyday life.
Thanks for the detailed explanation on contouring, I really liked the article and the step-by-step instructions are accessible and clearly written. And about such a specific make-up, I will say that for a festive event, for a photo shoot or another significant day, you can try to do it, but it is advisable to first practice, purchase everything you need.
I think every modern girl should look beautiful and individual before going out. I do light dry contouring every day. I put makeup on cheekbones, forehead and nose.Fat correction only for more demanding events.
I did the contouring myself, although at first it was not easy. It turned out well, I'm happy.