Create beautiful nail designs you can do it yourself. To do this, you need to choose a photo of a simple decor and understand its implementation. Each design is broken down into stages that create the perfect finish layer by layer.
General recommendations
The key to a perfect manicure is the smooth surface of the nail plate. Craftsmen check its alignment visually under the glare of a round lamp. It should be located in the center of the nail in an even oval without refractions. To achieve this effect, you should strictly adhere to the technology for preparing the nail for design.
The main stages of preparing a nail for creating a design:
- perform a manicure: qualitatively clean the lateral zones from pterygium (thin skin growth on the horny surface of the nail) and cuticle (roller at the base of the nail);
- treating the nail with a buff is a prerequisite for working with natural nails, and with artificial nails, it will help to level the surface after removing the previous design;
- treat the entire finger (especially the nail on the outside and inside) with an alcohol-containing solution applied to a lint-free napkin;
- after 1 min. (alcohol must dry on the surface of the finger) treat the nail with a primer, which is applied in a thin layer;
- the primer dries in the air for about 3 minutes;
- a primer layer of the base material is created: a base is applied with a semi-dry brush, rubbing in a circular motion, dried for 30 seconds in an ICE lamp;
- a drop of the base is exposed in the apex zone (between the center of the nail and the cuticle) and with the help of a thin brush is stretched over the surface of the nail (the brush pulls only the material, while trying not to slide along the nail plate so that grooves do not form after polymerization);
- nails, processed and dried, for 30 seconds in a lamp in a conveyor way (each finger separately, in turn);
- a design is created: colored layers of gel polish are applied, decorated with decor or rhinestones;
- overlaid with a top layer with a glossy or matting effect: the application technique is the same as with a base drop. This layer is leveling;
- if necessary (when creating a complex design with uneven decor), a second layer of top material may be required.
- each layer of the topcoat is dried for at least 30 seconds.
Masters do not always strive for perfect alignment. For example, texture designs are covered with a thin layer of top so as not to "fill" the volume (design with foam, modeling, acrylic powder, "knitted" design, drawing with art pastes).
Techniques and methods
Nail design is simple and beautiful (photos of popular options can be found in the blogs of beauty experts) you can successfully create it yourself. Depending on the chosen technique and work skills, you can get by with the minimum amount of materials and tools.
With the expansion of skills and desires, the working base of materials increases over time, acquiring new decor and lines of colored gel varnishes.
The main techniques that beginners use:
| Name | Description | Tools and materials |
| Stamping | The drawing (of any complexity) is transferred from the engraved plate using a silicone (rubber) stamp. The grooves of the plate are filled with a special paint with dense pigmentation. | Plate, stamping paint, stamp, scraper, liquid with acetone to clean the plate. |
| Sliders | A thin transparent film with a colorful drawing is glued on a thick white cardboard.It is cut with scissors close to the contour. The workpiece must be wetted - the film will peel off from the base. It is transferred with tweezers to the nail. | Sets of cardboard sheets with pictures, a container with water, tweezers. |
| Foam design | Foam any liquid and transfer the head of foam to a wet topcoat. Dry in a lamp. Remove material residues with an alcohol-based liquid. | Top gel (with or without sticky layer), foam, fan brush, cleanser. |
| "Knitted" design | With the help of acrylic powder (white or colored), convex, voluminous patterns are created. Geometric patterns imitate a knitted fragment. | Multi-colored acrylic powder, color gel polish, top. |
| Spider gel geometry | From a jar of gel with the help of a dots or an orange stick, thin threads are drawn, which fit onto the plane of the nail in the desired pattern. They can overlap with a top, but you can leave it without a finishing layer. Dry after application for 60 sec. | Different colors of gel, dots, a napkin with a cleanser for cleaning the material in case of contact with the skin around the nail. |
Beginners are advised to create a process map when planning complex (multi-layer) designs, in which all actions and drying time are described in layers. Several techniques can be used in such designs at the same time.
Master class for one-color manicure
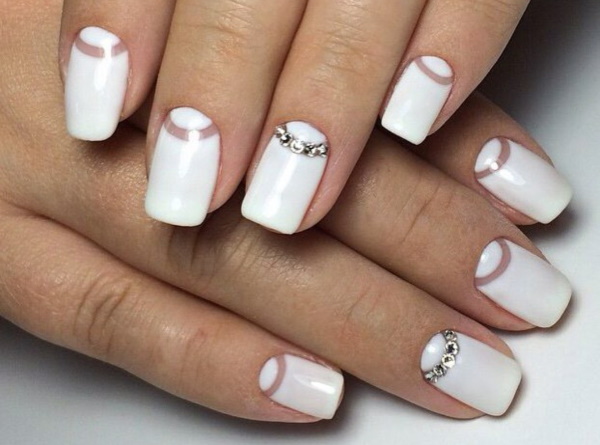
The nail design is simple and beautiful (photos are given in the article below), created by combining a monochromatic coating on different fingers. For example, two colors are chosen - light gray and dusty pink, which are applied to different fingers.
On the pinky and ring fingers - gray, and on all other fingers - pink. These designs look elegant when coated with a matte top coat. Often this color application serves as a background for inlay with rhinestones and broths.
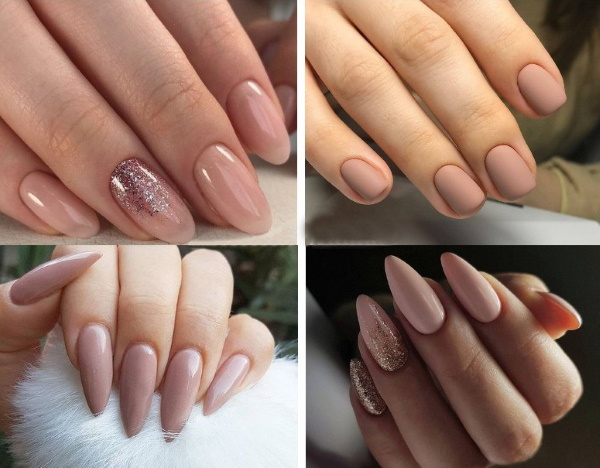
Today manufacturers strive to create dense pigmented gel polishes. The difficulty lies in the fact that they dry out poorly in low-power lamps (less than 48 W). To ensure an even layer of color gel coating, it is better to apply the varnish in 2-3 layers. Dry each layer for 30 seconds in an ICE lamp.
The technique of layer-by-layer application of color gel polish:
- Prepare the nail for applying the base coat (the method is described above).
- Apply a base coat with a smoothing layer (using a drop spread). Dry for 30 sec.
- Apply the first layer of colored gel polish using a brush from a bottle. Dry in a lamp for 30 sec.
- Apply a second coat to seal the end of the nail. Paint over the cuticle and lateral ridges with a thin brush. Dry for 30 sec.
- If there are bald spots in the layer, apply a third thin layer, avoiding streaks along the edge of the nail. Dry for 30 sec.
When coating with gel polishes in several layers, the accumulation of polymer material on the end of the nail should be avoided, which will lead to its thickening and loss of its attractive appearance. Therefore, the end is sealed with one layer of colored varnish and a layer of top. According to the rules of manicure, the thickness of the free edge should not exceed the thickness of a plastic bank card (1-1.5 mm).
Manicure master class in different shades
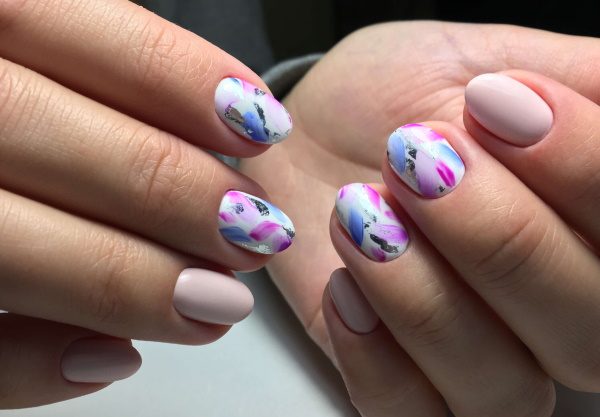
Multi-colored nail designs (photo examples can be found in the portfolio of the nail master) allow you to create a simple and beautiful manicure that is suitable for everyday life.
The most common color design options are:
- gradient;
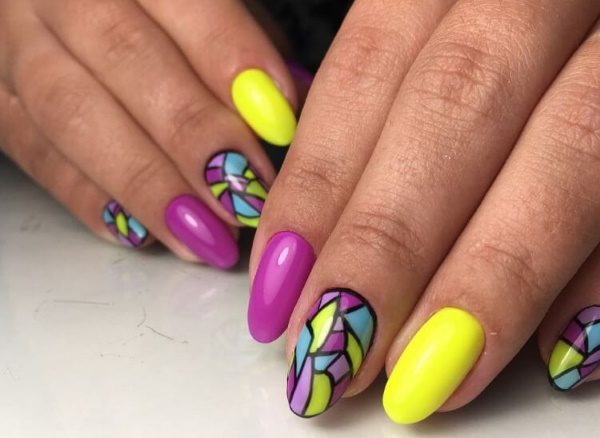
- colored geometry ("stained glass");
- abstraction;
- art painting.
Popular techniques for creating abstract patterns include:
- stamping from the palette;
- using a base for spreading;
- transfer from the palette using the comb brush.

On the palette (glass or plastic surface), colored stripes are laid out with a brush from a bottle of varnish, which are mixed with a dots or a toothpick into an abstract colored pattern. It can be transferred to the nail using a brush or silicone stamp.
Description of the stamped method:
- clean the stamp with a sticky surface (stationery tape can be used at home);
- press the stamp to the varnish on the palette, not pressing hard on the pillow, so as not to smear the varnishes into a colored spot;
- transfer the abstract pattern to the nail with a camouflage base and print in a rolling motion;
- to polymerize the material in an LED lamp - 30 sec;
- cover with a finishing layer according to the surface leveling technique. Dry in a lamp for 30 sec.
Description of the method with the comb brush:
- lay out multi-colored lines or large drops of gel polish on the palette;
- with a clean gradient brush ("comb") pick up the layers from below, slightly mixing them;
- on nails with a dried camouflage base, transfer the colors of the varnish without pressing the bristles of the brush to the nail. Lightly touching the surface, draw zigzags or circles that will blend into an abstract design (you can watch the video of the process on the Internet);
- dry for 30 seconds in an ICE lamp;
- apply a layer of topcoat with drying in a lamp for 60 seconds (so that the leveling layer of the top is completely dry).
The nail design is simple and beautiful (photo below) is obtained using the technique of gradient application of colors.
How to make a gradient yourself:
- using a comb brush;
- aeroofing brush;
- airbrush;
- fan brush.
Today, airbrush gradients can be made at home if you have an instrument. There are budget diffuser options available that can be purchased for smooth, elegant color transitions.
In the absence of a device, use special brushes.
A comb brush is a tool with a long, thin bristle that is clipped along its entire length. Aeroofing brush is a soft, foam-rubber ball on the handle (it can be successfully replaced with a small square that is cut off from a soft kitchen sponge for washing dishes).
Simple patterns and designs
Nail design is simple and beautiful (photo with a picture for creating a design is chosen ready-made) using various original patterns can be created even by masters who cannot draw.
They can use:
- sliders - to create colorful drawings with floristry or in watercolor technique;
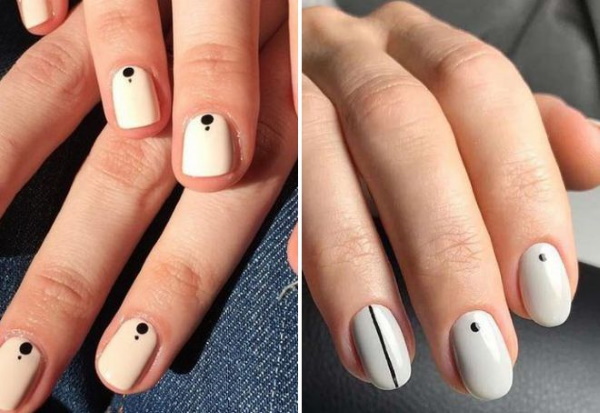
- dots - to create small monograms or compositions of small flowers, which are created from points of different diameters;
- spider gel - for drawing thin straight lines and geometric patterns.
At home, color geometric design is created in several ways:
- The nail is painted with colored spots, and geometry is applied on top using stamping or drawing with a thin brush.
- Sketch straight lines, the intersection of which forms a geometric pattern. The cells between the lines are painted in different colors (stained glass effect).
- Marking a geometric pattern with a marker and painting the elements with color. Then, along the top coating, drawing the borders of the pattern with volumetric lines using art pastes.
How to create a geometric pattern with spider gel:
- A colored gel polish is applied to the prepared nail. For an even layer, 2-3 coats may be required. Each layer needs to be dried for 30 seconds.
- Using a dots or the sharp edge of an orange stick, pick up the material from the can and pull it into a ton of thread. Throw it on the nail and break it with a sharp movement of the hand.
- Repeat the manipulation the required number of times. Dry for 30 seconds in an ICE lamp.
- If desired, decorate with decor and cover with a finishing layer with drying up to 60 sec.
Decor ideas for beginners
Many decor options are adapted for home use. It is necessary to observe the technology of fastening the elements, then the colorful decor will be provided with durability. For example, rhinestones (not overlapped on top with a finishing layer of gel) must be processed along the contour with a thin brush with a construction material.
https://www.youtube.com/watch?v=Spm_rnxweUQ
It is recommended to cover sequins and kamifubuki with 2 thin layers of top, drying each layer for at least 30 seconds.
Two ways to apply glitter:
- On the palette, mix the selected sequins with a few drops of top. Spread the glitter polymer over the nail with a flat or thin paintbrush. In this way, it is convenient to make the gradient with sparkles (stretch in density).
- Using a thin brush, spread the glitter on the sticky layer of the colored coating (in the right places of the design) Fix in the lamp for 30 sec. Cover with a finishing coat.
Technology for attaching rhinestones in the form of a crescent moon at the nail hole:
- The nail, prepared by the manipulation of the manicure for the coating, is covered with a colored layer of gel polish. Dried in an ICE lamp, 30 sec.
- If there are drawings or sliders in the design idea, they are applied to the surface of the nail at this stage of the work.
- The finished design is covered with a layer of topcoat (often an overlap with a matting top is used under the rhinestones). Dry your finger in a lamp for 30 seconds.
- A composition of rhinestones is built on the palette. This is necessary in order to select stones in color and size, to determine the appearance of the inlay.
- With a thin brush, a strip of transparent construction gel or dense base is applied in the area near the cuticle. The strip is drawn convex or concave in relation to the nail hole.
- Rhinestones from the palette are transferred to the undried material. When installing them, it is necessary to strictly center the calculation along the central axis of the nail. For beginners, it is recommended to mark it by attaching a file to all phalanges of the finger.
- In such a design, the creation of inlay begins with the installation of a central stone (it is the largest). Further to the left and to the right, smaller stones are set symmetrically. Only after the completion of laying out all the stones, the nail is sent to the lamp for 30 seconds.
- The initial installation is completed, the stage of strengthening the stones begins: processing them in a circle with a thin brush with gel. At this stage, drying can be done in several stages.
- After the stones are completely fixed, they are decorated with broths. To do this, decor balls are sunk in the drop of the top or base on the palette. With the help of a thin brush, they are transferred to the nail and set in the places between the rhinestones. They move easily over the surface thanks to the gel that envelops them from all sides.
- After placing the broths, the incrustation must be dried for at least 60 seconds. From above, the design is not overlapped with a finishing layer.
Bright decor in the form of rhinestones, Pixie crystals, kamifubiks is used today not only for solemn occasions, but also for everyday manicure. Polymer materials allow the decor to be firmly attached to the nail. Such a manicure will cope not only with office work, but will be able to survive household chores.
Fashion trends in 2019-2020
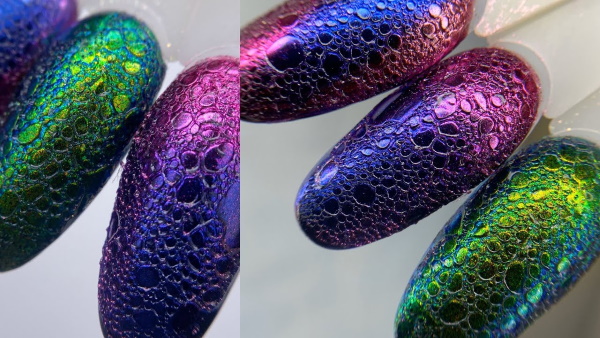
At the end of 2019, "foam design" burst into the world of nail art. It is at the peak of its popularity and is moving into trends for the next season. Practicing masters make their own adjustments to its performance, so there are variations of the "foam design" with sparkles or rubbing.
How to make such a decor yourself:
- Prepare the nail for applying a colored coating using a manicure (as described above in the article).
- Cover with a base coat. Dry in a lamp for 30 sec.
- Apply color gel polish. It should be remembered that on very light and darkest shades, the "foam design" blends into the background and only gives texture to the coating. This can already serve as an independent design, especially when covered with a matte top. However, in order for the appearance of the "foam bubbles" to be clearly visible, it is recommended to use pastel colors with warm and cold undertone. For example, blue, coffee, olive, lemon shades. Dry the color layer in the lamp for 30 sec.
- Apply a layer of top (it doesn't matter if the material is sticky or not). Do not dry.
- First, beat the foam in a wide container and transfer part of it with a fan brush to the undried layer of the top. Immediately send to the lamp for 30 sec.
- While the nail has not cooled down after polymerization, wipe it with a lint-free cloth moistened with a cleanser (any alcohol-containing liquid).
- If the pattern of bubbles turned out to be too embossed, with sharp edges - process on top with a soft buff to smooth out the roughness, but not destroy the texture of the picture.
- When covering with a top, they choose between two options: to level the surface with a thick top (hide the pattern "under glass") or to cover with a thin layer of the finish, while maintaining the relief. Dry the design in a lamp for 60 sec.
For the preparation of foam, any foaming products are suitable - washing gel, shampoo, dishwashing detergent. The more intensively the product is shaken (diluted with water 1: 1), the smaller the diameter of the bubbles will be on the surface of the nail.
For whipping, you can use a shallow, wide container (it is convenient to get the foam out of it) or a small soft plastic bottle (squeeze the foam directly onto the nail).
To add variety and shine to the design, you can first put glitter on the place where the foam is applied and dry it. Then the bubbles on top of it will shine in different colors, and the picture will become clearer and brighter.
"Foam design" will be performed over the entire surface of the nail or only on a part of it (it is convenient to combine with geometric patterns and designs in the "stained glass" style). Such a manicure attracts attention with restrained elegance and originality. It is done both on all fingers of the hand, and selectively.
Simple and beautiful nail designs are done independently using modern polymer materials (photos of possible options are given above in the article). They are practical in everyday life. Allows you to create a feminine look for any style of clothing and intensity of life.
Simple Nail Design Videos
Simple fall manicure: