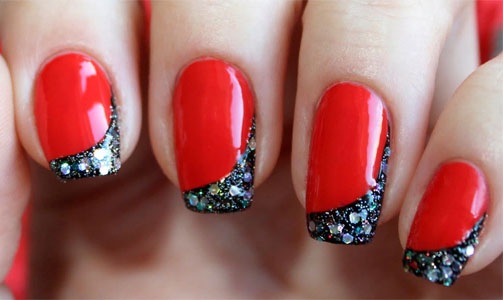
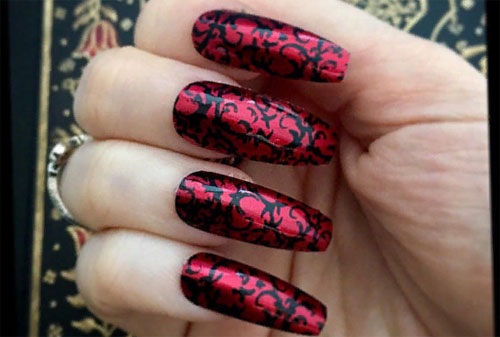
On nails, a manicure in black and red shades looks bold and attracts attention. This design is best suited for a photo shoot or professional filming. But in life it will be appropriate.
Features of black and red manicure
The combination of black and red looks impressive and harmonious. On the color palette, these shades are contrasting, which means that their combination in one design is permissible.
However, there are some peculiarities in applying these shades:
- Black gel varnishes are not sufficiently pigmented or too liquid. This causes uneven color intensity or bumps. To solve this problem, it is necessary to apply the varnish in 2 - 3 layers.
- Red gel polishes are the most difficult to distribute over the entire surface of the nail plate, including the area under the cuticle and the area of the lateral ridges. This is due to the saturation of the shade, which is why the blemishes in the application of varnish become noticeable. To avoid this, you will need to use a thin brush, which is usually used for drawing designs.
- You should not oversaturate the manicure in these colors, which are already bright enough. Design elements are recommended to be used as an addition, not as main accents.
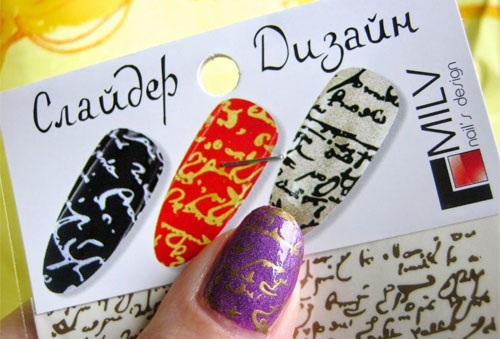
Design with lettering
A popular trend in the nail industry - sliders with inscriptions - fit perfectly into the concept of black and red design. This manicure will suit women who prefer grunge or sport chic style. Provocative or funny inscriptions on a black and red background will complement the whole image.
To create such a manicure you need:
- Distribute basecoat.
- Apply to all nails, except for the large and unnamed, colored coat in black.
- The remaining nails will need to be covered with red varnish.
- Apply a slider with the inscription on each black nail.
- Cover the finished manicure with a top finish.
Sliders with inscriptions in a large assortment are presented in English.
The most popular are the following inscriptions:
- LOVE.
- New York.
- Sweet.
- State.
- Government.
- Global.
- Eclipse.
- Wow.
- Purfff!
- Zlonk.
- Shhhhh!
In one design, you can combine several inscriptions in different fonts. However, there is a limitation in the choice of color. The color of the letters must be completely white or black with a white border. This is necessary so that the design looks harmonious and not overloaded with different shades.
Moon rhinestones
Black and red manicure, the photo of which is complemented by moon rhinestones, has become the most fashionable design in the new season.
Such rhinestones differ from the classic ones:
- Their surface is absolutely smooth and has no edges.
- The shine of such rhinestones is delicate and delicate, so they cannot be covered with a finish on top. Even covering the thinnest layer will destroy the glow of the moon rhinestones.
- All rhinestones in the set are presented in different diameters, which makes the design more interesting.
- The bottom of the rhinestones is flat, which makes them convenient to attach to the surface of the nail plate.
For contrasting black and red manicure, these rhinestones are better suited than the classic version. They do not look defiant due to the delicacy of the overflow and the rounded surface.Such rhinestones serve as an additional decoration, but do not conflict with the brightness of the main shades.

The design with moon rhinestones will be appropriate for cocktail and evening events, as well as for a date or a friendly party.
To create it, you will need to follow the recommendations:
- It is necessary to apply black varnish to the nails of the middle and ring fingers of both hands.
- The remaining nails should be covered with red.
- Using tweezers, you need to select red rhinestones of various sizes. There should be no more than 2 large crystals on the nail. The number of small stones should be determined based on the length of the nail.
- Red rhinestones will need to be installed in a chaotic manner on nails painted black.
Delicate play of rhinestones, reminiscent of the glow of a moonstone, will add solemnity to the manicure. At the same time, the basic idea of a daring color combination will not be violated.
Insects in nail design
The trend towards using images of various beetles is not fading away. Designs acquire a new design - volumetric. Bulky beetles accurately convey the silhouette of a real insect. In a black and red design, manicurists recommend performing ladybirds.

It is necessary to perform a voluminous manicure step by step:
- Cover nails with manicure base.
- Apply a colored coating. Red varnish is required to be spread over the surface of the nameless nails, and black varnish is applied to all other nails.
- Top is required on prepared nails.
- On the ring fingers, it is necessary to mark the future ladybug. Marking in the form of an insect silhouette is performed with a thin brush and black gel-paste.
- The volume is created using a transparent base. It is necessary to raise the volume so that the ladybug matches the size of a real insect. For this, the base can be applied in several layers. It is important that the base drop is uniform, but at the same time embossed. An insect should have a head, wings, body.
- The head must be painted with black gel paste, and the wings with red. On the prepared wings, you need to place black dots, like a real ladybug.
Creating a volumetric design is possible only when working with gel polishes. Therefore, after each step, it is necessary to dry the coating in a UV lamp and then remove the sticky layer. To give the beetle a realistic overflow, you can fill it with rubbing at the end. Then the insect will be indistinguishable from the real one.
Candy ball design
Black and red manicure, the photo of which is striking in its contrast, can be supplemented with the fashionable Candy ball technique. It is based on the independent production of decorative balls from gel polish. The trend to create decorative elements on their own was set by craftsmen in South Korea showcasing the wonders of nail art.
The video shows the technology of self-production of volumetric flowers for manicure:
The technique for creating balls is extremely simple:
- It is necessary to apply cuticle oil to the stack needle. Balls are created with this tool and the oil will make them easier to remove from the needle.
- The balls are created with gel. It is important that it is transparent and not too viscous.
- The needle must be immersed in the gel for 2 mm, and then abruptly withdraw it. A miniature ball will remain at the end of the needle.
- On the ball, you need to draw 3 petals on all sides with red gel paste, and then dry it in a UV lamp.
- The ball should be immersed in the lamp 4 to 6 more times, painting and drying after each immersion. The frequency of diving depends on the size of the ball you want to achieve. Its size increases with each dive.
- Similarly, you need to create 2 balls with black petals.
- The nails need to be painted black, but a red coat will need to be applied to the nail plate of the middle and ring fingers.
- The balls should be coated with a finish without a sticky layer, dried, and then removed from the needle.
- Finished balls must be fixed on red nails using a transparent base.

This technique belongs to volumetric designs. When performing it, it is important to dry each new layer of preparations in a UV lamp.
Poppies on nails
Black and red manicure, the photo of which looks gentle and romantic, reflects the floral theme. Feminine colors make designs in vibrant colors softer and more casual.
To create a design with poppies you need:
- Apply a camouflage base to your nails.
- Cover the nails around the circumference with black gel polish and dry the coating in the lamp.
- Poppies should be painted with red gel polish, creating a vague circle by drawing large petals. The petals should rest against the black edging.
- The middle of the flower should be filled with black gel polish.
- For a realistic design, poppies can be finished with stems and leaves with a green shade of gel polish.
The femininity of the floral design makes it versatile. It suits any style, place and event. Thanks to the base of the design, made with camouflage of a neutral shade, the manicure does not look bright and defiant. The edging, reminiscent of the picture frame, will give an interesting twist to this design.
Scottish cell
The fashion trend for plaid clothing is complemented by a matching manicure. Black and red plaid is a bright print that becomes the main accent in the design. It is performed only on nameless nails. Do not overload your manicure. It is recommended to arrange the rest of the nails in a minimalist style.
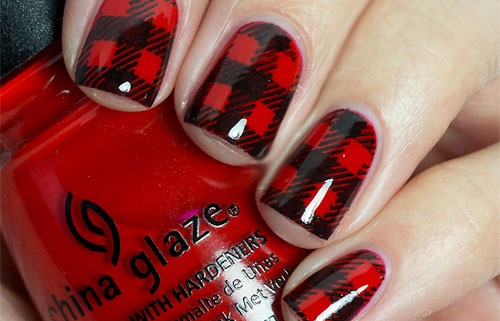
The design is carried out in several stages:
- All nails, except for the nameless ones, should be covered with black gel polish.
- A bright scarlet varnish is required on the nails of the ring fingers.
- With a black gel polish of medium saturation, it is necessary to draw a translucent vertical stripe. Then horizontal stripes should be drawn up. At the intersection of the stripes, the shade will be more saturated. For a more interesting design, you can choose a black color with small sparkles.
- The design should be complemented with thin stripes of rich black color to create a beautiful textured check.
- After drying your nails in a lamp, cover them with a glossy top.
Plaid design is most appropriate in the autumn-winter period. It will complement bright scarves and coats, as well as add contrast to everyday sweaters and turtlenecks.
Gothic design
Photos with manicure in the Gothic style fascinate with their audacity and courage. For this design, black and red colors are best suited.
Masters recommend creating this design in several stages:
- All nails, with the exception of the middle and nameless, must be coated with a bright red varnish.
- The remaining nails are required to apply a translucent black base.
- Light gray varnish is required to mark the future skull on the middle finger nail.
- Black varnish should draw the outlines of the skull on the base, darkening the areas in the eyes, cheekbones and nose.
- Use a wide flat brush to apply black strokes around the circumference of the nail to make the design look finished.
- A plurality of miniature metal beads must be attached to the ring finger using the base. This will serve as an imitation of thorns.
A top is required on the finished design.
The best gel polishes for black and red designs
| Name | Advantage | Price |
| Blise | A pliable polish texture that adheres evenly to the nail. | RUB 200 |
| Puf | A handy brush that allows you to paint or paint your designs. | RUB 350 |
| Uno | Bright, rich and well-pigmented colors. | RUB 600 |
A design in black and red can look different both in the photo and in real life. Depending on the decor and pattern, such a manicure can be daring or classic feminine.
Article design:E. Chaikina
Useful video clip about black and red miniature
Video on how to do black and red manicure with water:
Ladybugs in 3D look awesome! I have already learned to draw them myself - it turns out very similar to real ones. Another would be to find somewhere a lesson about 3D butterflies, are they interesting or not ...?