The laces on the sneakers help both to adjust their position on the foot, and to create comfort when walking, to ensure safety in sports training. Not everyone knows how to tie shoes beautifully, but knowing several methods of lacing will help you look original in sneakers, sneakers and boots every day.
Lacing sneakers, sneakers, boots: features of laces filling by type of shoe for 4, 5, 6 holes
Lacing sneakers, boots and sneakers has many options: from the classic way to complex weaves. Interesting options for tying the laces on sneakers can be used as a way to secure the shoes more tightly and protect against possible injuries while playing sports.
Beautiful lacing on sneakers, sneakers and boots has become a way to stand out from the crowd and make shoes personal. At the same time, beautiful types of lacing are not at all difficult to make yourself.
The universal (classic) option for lacing a wide variety of shoes is simple:
- First, both halves of the lace are alternately threaded, directing from the inside to the outside, in a row of holes that are located at the very bottom.
- The ends of the lace, pulling both of them towards the top, need to be aligned in length.
- Then they are intertwined and passed into a row of holes (eyelets) above from bottom to top.
- You need to do the same, constantly tightening the lace, until the very last hole, after which the lace is tied tightly.
This option is not only simple, but also allows you to quickly pull the lace on sneakers to make it easier and more comfortable to move in them. A child can also cope with this type of weaving.
Professional athletes use a tighter and safer lacing method that will prevent the shoes from flying off their feet during training. And the knot itself is necessarily tightly fixed inside so that the laces do not come loose during active movements. How to tie beautifully laces on sneakers using various weaving options, and highlight your shoes quite simply in other ways.
To do this, when lacing:
- use round or latex laces;
- the color of the laces is changed to bright or contrasting;
- use 2 lace colors for each sneaker;
- jewelry is strung on laces;
- shorten or use long laces.
The type of lacing largely depends on the total number of holes (eyelets) in the shoe.
There may be 4,5,6. For shoes with an even number of holes (4.6), parallel lacing, double turn, lacing with a ladder, twisting and the classic lacing method are suitable. On shoes with an odd number of holes, all other types of lacing can be tried. There are many of them, but all can be divided into lacing options without a bow and with it.
| Lacing name | The required number of holes in the shoe, pcs. |
| Ladder (ladder) | 4,5,6 |
| Zipper (zipper) | 5,6 |
| Double back (double turn) | 5,6 |
| Loop back | 4,5,6 |
| Bush walk | 6 |
| Saw tooth | 6 |
| Foot bag (suitcase for legs) | 6 |
| Hash (hash) | 6 |
| Twistie (twisting) | 4,5,6 |
| Riding bow | 6 |
| Lattice (grid) | 5 |
| Bi-color (two-color) | 4,5,6 |
| Checkboard | 4,5,6 |
| Display | 4,5,6 |
| Hidden Knot | 6 |
Bow lacing methods
Bow weaving methods allow you to leave enough lace at the end of the weave to tie a simple bow. This is done for the reliability of fixation and beauty. A neat bow at the end of the knit completes the composition, and the shoes always look neat.
Ladder (ladder)
The simplest yet most creative method of tying shoelaces is called "Ladder". Such weaving looks strict and interesting.
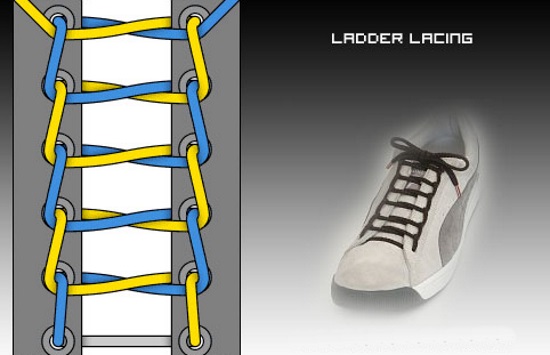
- To do this, insert the 2 ends of the cord from bottom to top into the first row of eyelets from the bottom.
- The height of the laces is leveled and threaded into the holes next to each other above both halves of the lace.
- The right half of the lace must be threaded from the front side into the loop on the left, and the left half must be threaded under the right loop in the same way.
- The ends of the lace in 3 from below are threaded a row of holes, but now the right end is pulled in on the left, and the left end is stuck on the right.
- Weaving until the very last row is repeated and knotted.
Zipper (zipper)
Zipper braiding gives a very tight knit to the laces that are not easy to untie. It is better to perform it immediately on the foot in order to adjust the density of the shoe.
- It is necessary to stretch 2 halves of the lace in 1 row of holes from the bottom up and equalize their length.
- Then the laces are passed under the resulting loop and crossed.
- The ends of the lace are again passed from the bottom up into the holes of the 2nd row and tightened tightly.
- Each of the ends of the lace under the previous loop must be skipped and woven with each other. Weaving is also done to the top.
- After that, the laces are pulled and a bow is made.
Double back (double turn)
How to tie beautifully laces on sneakers in the classic way, and to do it using weaving called "double turn" (Double back), is not at all difficult. The resulting lacing makes it possible to pull the laces right on the leg and looks attractive.
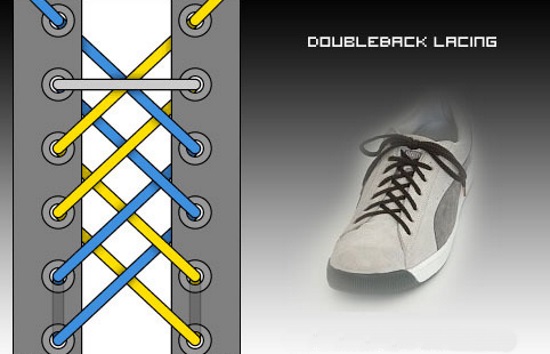
- To perform it, you need to pull in the ends of the lace from the outside to the inside, 2 from the top from the top, and intertwine them.
- Then the ends of the lace are inserted into the holes located through the row below, from the outside to the inside, intertwined and brought out through the bottom row of eyelets to the outside.
- The ends of the lace are inserted into holes 2 counting from the bottom of the row of shoes, then pulling them up.
- The laces are crossed and, stretching under the hinges, are inserted from bottom to top into 4 rows of holes from below.
- Having crossed the laces for the last time, they are inserted from the inside into the holes on the top of the sneakers, tightened and tied tightly on a knot and a bow.
Loop back
The weaving, which is called "Loop back" (reverse loop), will look bright if you use multi-colored laces when lacing.
- From the beginning, in 1 from the bottom, a row of holes, the laces need to be inserted from the bottom up and aligned in length.
- Both halves of the lace must be crossed 2 times so that in the end the left end of the lace remains on the left, and the right end on the right.
- The ends of the lace are inserted from bottom to top into the 2nd row of holes and the crossing is repeated.
- Weaving is done to the top of the sneaker, and then everything is fixed with a tight bow.
Bush walk
The method of weaving shoelaces, which is called "Bush walk" or forest walk, is rather complicated, but weirdly look on shoes with a large number of holes (6 holes or more) in a contrasting color. With this weaving, the bow always remains on the side of the middle, which is relevant.
- The ends of the cord are threaded from below into the bottom row of holes and pulled until the length of both halves of the cord is the same.
- The left half of the lace is inserted from the outside inside 2 from the bottom of the row of eyelets on the left and pulled out from the inside through the right hole in the same row. The lace is tightened.
- The right lace on the right at 3, counting from the bottom, a row of holes is inserted from top to bottom, pulled and pulled out of the left hole of the same row completely.
- The left lace is inserted from the outside to the inside into the right hole 4 from the bottom of the row of holes from the outside to the inside, pulled in and 4 rows of holes out of the right hole.
- Then the right lace is inserted from the left into the 5th row of holes from the outside and pulled from the inside through the right hole of this row. The lace is tightened.
- The left half is inserted on the left into row 6 from the bottom, pulled out from the back and pulled out through the right hole of the same row.
- The ends of the lace are pulled and tied into a bow on the side.
Saw tooth
Saw tooth braiding gives a clear division into a lower diagonal braid and an upper horizontal braid. The laces do not stick together and are easier to pull.
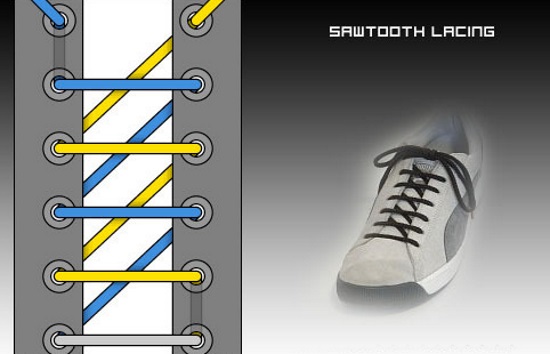
- From top to bottom, half of the lace is inserted into 1 row of holes and aligned in height.
- The left half of the lace is pulled from bottom to top into the left hole 2 from the bottom of the row, and then into the hole of the same row from top to bottom on the right and pulled.
- From the bottom up, stick the right half of the lace from the left into hole 3 from the bottom of the row, and then insert it in next to the right hole, tighten it.
- The left half of the lace is fully pulled outward through the left hole 4 in a row from the bottom of the row and to the right is inserted into the hole of the same row, directing it from top to bottom.
- The right half of the lace on the left is inserted inside, and then on the right is taken out from the inside 5 from the bottom of the row of holes and pulled out.
- The left half of the lace is inserted from the left into the hole in the last row, and the right half into the hole of the same row next to it.
- The laces should be pulled tight and tied.
Foot bag (suitcase for legs)
The foot bag allows you to keep your toes looser but tighter on the top of the foot. Such a comfortable weaving is convenient to use for long walks, and it is beautiful to wear.
- From the inside, 2 halves of the lace are inserted into a row of holes 3 from the bottom and pulled out to equal length.
- Then the right half of the lace is pulled into the eyelet on the right, and the left half of the lace is pulled into the eyelet on the left into hole 2 in the count from the bottom of the row of eyelets. The lace is tightened from the inside.
- The right half of the lace is taken out from the inside on the right, and the left half on the left through the hole of the lower one of the rows and pulled to the end.
- After that, weaving begins at the top. To do this, thread the right half of the lace on the right, and the left half on the left into the holes 4 from the bottom of the row of holes from top to bottom, pull and cross.
- Then the laces are inserted into the 5th row of holes from the bottom to the outside and interlaced again.
- From the inside, completely pull the ends of the lace through the remaining row of holes, tighten them tighter and tie a knot in the form of a bow.
Hash (hash)
Hash lacing on the sneaker gives a beautiful diamond pattern. It is quite simple to perform, but it looks fashionable.
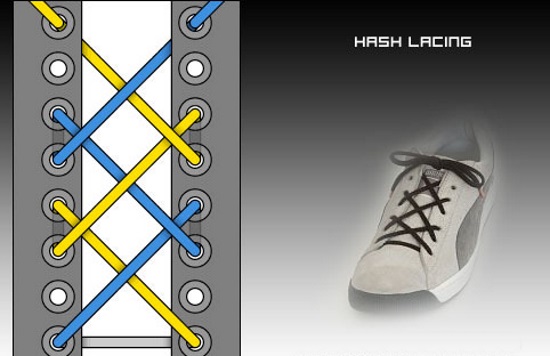
- First, in the bottom row of holes, the 2 ends of the lace from the inside to the front side need to be inserted and equalized in length.
- Then the ends of the lace are crossed, and from the inside, the left half is threaded outward into hole 4 at the bottom of the row on the right.
- The right half of the lace is directed inward into the left hole of 4 rows of holes, if you count from the bottom. The lace is tightened.
- The right half of the lace is pushed from bottom to top into hole 3 at the bottom of the row on the right, and the left half of the lace is passed through the left hole of the same row.
- They are intertwined and pulled inward into the holes through 1 row (6 row from the bottom). The laces are pulled.
- Then the ends of the lace are inserted from bottom to top into holes 5, counting from the bottom, rows, without crossing them.
- Having tightened the laces, the ends must be crossed and inserted into the holes through the row.
- The lace is pulled tight and tied.
Twistie (twisting)
Twist lacing called "Twistie" allows you to securely fasten the shoe to your foot. It runs tightly, does not come loose and does not allow you to tighten the shoe without decoupling, so it is often used to fix shoes before cycling, skateboarding or parkour.
It is not at all difficult to perform such weaving.
- The ends of the lace are inserted into 1 row of holes, guiding them from the inside out, and tightened to the same size.
- The ends of the lace must be crossed 3 times, tightened and inserted into the 2 row of holes from the bottom, also from the inside to the outside.
- All repeat several times and, reaching the top, tie the lace in a knot.
Riding bow
How to tie beautifully laces on sneakers, and you can place the bow in the middle of the shoe using the "Riding bow" weaving (horseback riding). Only with this type of weaving, by tightening 1 of the ends of the lace, you can separately pull the lower or upper part of the shoe.
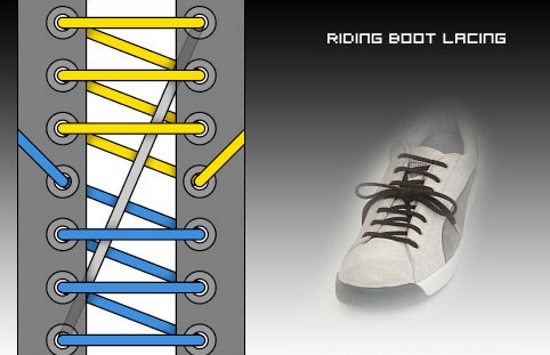
- To complete it, 1 end must be inserted from the right into the lower of the rows, and the other end from the left into the upper one so that the lace inside is located diagonally.
- You need to pull up the halves of the lace so that they become the same in size.
- The right end of the lace is inserted from above into the hole of the lower row on the right and pulled through the left second hole, counting from the bottom of the row of holes, tighten.
- Then the same end of the lace is inserted from the outside inward on the right into the 2nd row of holes from the bottom and pulled out on the left on the 3rd row.
- The same operation is done again with the row above.
- The left half of the lace from the top right is inserted into the upper row and passed through the left hole of the previous row.
- Then the same end of the lace on the right is threaded from above into 6 from below a row of holes and pulled out through the left hole 5 from the bottom of the row.
- The left half of the lace is pierced from top to bottom into the right hole 5 in a row from the bottom of the row, and then from below is inserted into the hole 4 left from the center at the bottom of the row of holes.
- Both ends of the laces are tightened and tied with a strong knot and bow.
Lattice (grid)
One of the most difficult is Lattice lacing. It takes practice to do it correctly.
- To begin with, half of the lace needs to be inserted into the very first holes of the sneakers from the bottom up and even their length by pulling the short end towards you.
- The ends of the lace are intertwined and inserted from top to bottom at 4, counting from the top, a row of holes with the right end from the lace into the left hole, and with the left end into the right.
- Then the laces are pierced from bottom to top through the next highest row of holes so that the left lace comes out of the right hole, and the right half of the lace comes out of the left.
- The ends of the lace are tightened, intertwined and inserted from top to bottom into 2 from the bottom row of holes so that the right half of the lace is on the previous loops, and the left one goes under the last loop.
- The ends of the lace are tightened, threaded from bottom to top into holes 3 from the bottom of the row of holes, tightened and crossed.
- Then threading the left end of the lace under the middle loop, and above it - the right one, you need to insert the ends of the lace into the remaining row of holes.
- The lace is pulled up and tied.
Bi-color (two-color)
Bi-color is often used to decorate sneakers. For him you need to prepare laces in 2 different colors or contrasting colors. For example, black and gray.

- The black and gray laces are tightly tied together, positioning so that the gray part is 1/3 longer than the black one.
- The ends of the lace must be cut off, and the edge must be singed so that it does not come off into threads.
- The black lace in the lowest row is passed into the left hole, and the gray lace into the left hole 2 from the bottom of the row of holes from bottom to top so that the knot on the lace is inside the shoe in the middle between the holes.
- The laces need to be pulled.
- The black lace is inserted into the hole in the bottom row on the right, pulling it out from the outside to the inside, and then pulled out from the right hole 3 at the bottom of the row of eyelets.
- The gray lace is inserted from the top right into hole 2 at the bottom of the row of holes and pulled through the right hole 4 from the bottom of the row.
- The black lace is inserted into the left hole 3 while counting from the bottom of the row of eyelets from top to bottom and pulled from the left hole 5 from the bottom of the row of holes.
- Then it is pulled out from the upper right hole.
- The gray lace is inserted from above into the left hole of the 4th row and removed from the left hole of the topmost row.
- The laces are pulled and tied in a knot.
Lacing patterns without bow
Some people prefer to tie their sneakers so that they do not have a bow.Weaving without a bow allows the knot to be hidden or leaves short ends. The remaining ends can be easily hidden behind the tongue of the sneakers and securely fasten the weaving, because the lace in this case will definitely not come loose.
There are several types of lacing without a bow and all of them are performed on the shod foot to ensure a comfortable position of the shoe on the foot.
Checkboard
Weaving "Checkboard" (checkerboard) is done with 2 laces on each sneaker. It is better to take long laces in contrasting shades for this. For example, brown and yellow.
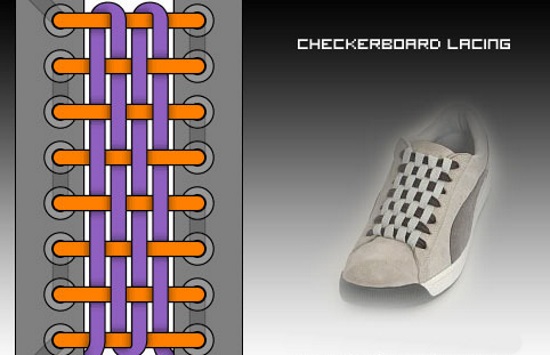
- The brown lace is inserted from bottom to top into the lower left hole of the shoe, and then from the top into the opposite right hole.
- So they lace it along all the rows of holes located above to the very end so that at the end the lace goes into the hole of the upper row on the right.
- The yellow lace is pulled out from under the lower right corner of the tongue of the sneaker and woven through the brown lace to the top, winding it alternately above and below the existing loop.
- Then the lace is folded to the bottom and weaving continues in reverse order down and up again.
- The end of the yellow lace is wound behind the tongue of the shoe.
- The ends of the laces inside the shoe are tied together so that the knot remains hidden.
Display
When performing a "Display" weave, the laces cross down and remain inside the weave. It not only looks unusual, but also provides increased comfort for the foot when walking.
- First, in the bottom 1, a row of holes in the sneaker is threaded from the outside to the inside and equal in length.
- Then they need to be crossed over the tongue and pulled out through 2 rows of holes inward.
- Repeat also to the very top, then the lace is tightened and tied in a knot under the tongue of the sneaker.
Hidden Knot
The weaving of "Hidden Knot" (hidden knot), in which the knot on the laces is completely hidden, is becoming more and more popular. Weaving must be done loosely, because the edge of the laces is simply cut off after tying to a knot.
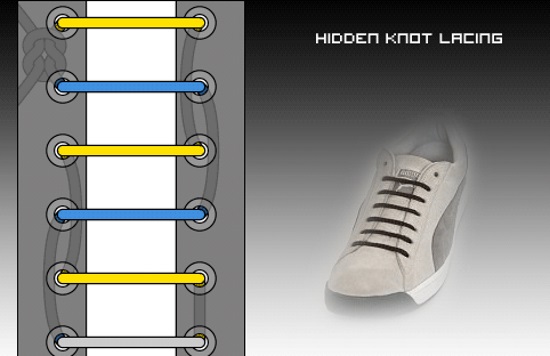
- The ends of the lace should be pulled into the bottom row of holes on the sneaker from top to bottom and trimmed to length.
- The right half of the lace is inserted on the right in the 3 bottom row of holes, and then on the left in the same row from top to bottom.
- The left half of the lace is threaded into the left hole 2 from the bottom of the row, pointing up, and inserted on the right in the same row from top to bottom.
- The right end is pulled out of the left eyelet 5 from the bottom of the row and inserted into the right hole next to it.
- The left end of the lace is threaded from the inside into the left hole 6 from the bottom of the row and inserted on the right into the hole in the same row.
- Inside, the laces must be tightly tied in a knot so that the shoes can be easily put on the foot.
- The ends of the laces are cut off.
Crochet lacing
There is a lacing that resembles crochet. You can do it using this tool for convenience.
- The ends of the lace should be pulled into 1 row of holes on the sneakers from the bottom up so that the right half of the lace is slightly longer than the left.
- The right half of the lace should be inserted into the right hole 2 from the bottom of the row from the inside and pulled slightly until a small loop is formed.
- Then the right half of the lace is inserted into the right hole of 3 rows from bottom to top and a loop is made again. Repeat to the very top right hole.
- The left half of the lace is threaded into the lower loop and inserted into the left hole 2 from the bottom of the row from bottom to top.
- Then this lace is also intertwined with loops using a crochet hook to the top.
- The laces are pulled through the topmost opening, pulled tight and tied in a knot.
How to tie your laces so they don't come loose: step by step instructions
Nicely tied laces on sneakers often untie even after tight lacing. This happens at the most inappropriate moment, when there is no time to tie them, and it is not noticeable, therefore, the ends of the laces, as a rule, get dirty. This may be due not only to the fact that the laces could not be tied correctly, but also to heavy traffic or the specific material of the laces.
So that the laces are not untied, there is a special knot that will securely fasten the entire knitting and will not be noticeable. There are several ways to tie the "eternal" knot. The most common and simple is the "hare ears" knot.
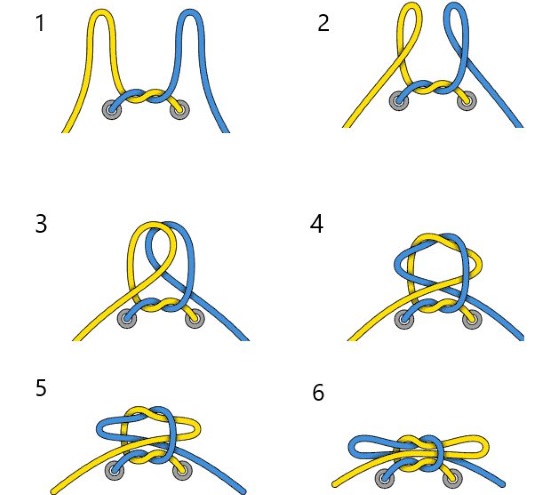
- First, the remaining ends of the lace are tied in a regular knot. To do this, you need to cross them and stretch 1 end into the resulting loop.
- The knot is pulled tight and large loops are formed from each end of the lace.
- The right loop is carefully threaded into the left one, and the left loop at the same time into the right.
- The ends of the loops are tightened tightly to create a simple but secure knot.
Another lightweight and durable knot is called the "double sliding knot". It is not difficult to tie it, but it also holds the lacing securely.
- The ends of the lace are tied in a simple knot and pulled down.
- On both sides of the laces you need to make 2 large loops.
- The loops cross each other.
- Both ends of the loops must be simultaneously passed in the middle into the hole under the place of their weaving so that one loop passes on one side and the other on the other side of the knot.
- Then the ends of the hinges must be pulled strongly to tighten the knot.
Both of these knots allow you to tie your laces tightly. You can only untie them with your hands with a little effort, which will allow you to move freely in your sneakers.
How comfortable to lace up sneakers for a child?
How beautiful it is to tie the laces on an adult's sneakers, and neatly lace them up for a child is quite simple. However, such weaving should also be reliable and comfortable. Most often, for lacing sneakers, a child is recommended the classic and simplest lacing that anyone can handle.
The classic lacing is done quickly and allows you to tightly tighten the laces and firmly fix the sneaker on the child's foot.

- The laces for its implementation are threaded in 1 row of holes from the bottom to the outside.
- Their length is leveled on both sides.
- Then the ends of the lace are intertwined and passed from bottom to top into the next row of holes.
- Manipulations are repeated up to the top edge and a knot and bow are tied.
On the child's sneakers, laces need to be tied most often both beautifully and very quickly. After all, a child needs to put on shoes in a matter of minutes, he will not sit quietly for a long time. Classic lacing allows you to cope with this task.
Gradually, you can teach your child to tie their sneakers using this technique on their own. The classic lacing allows you to pull up the laces along the entire length if the sneakers are loose and loosen them if they are pressed. The laces do not chafe the foot, and the lacing itself always looks neat and beautiful on any shoe.
Useful videos on different types of shoe lacing
5 ways to tie your shoelaces beautifully:
Lacing boots "Star":
Thanks for so many awesome ideas !!!