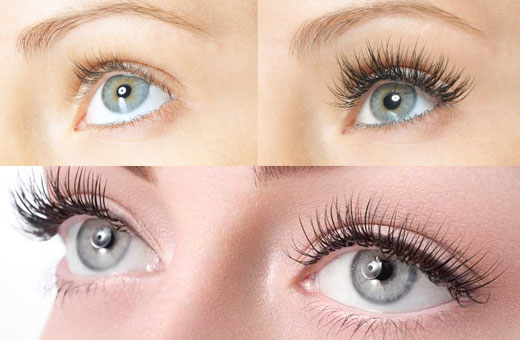
Any eyelash extension is mistakenly considered a dangerous procedure that spoils the original composition of your own hairs. Modern technologies for increasing the volume of eyelashes, subject to the use of quality materials by the master, as well as the absence of contraindications from the client, will temporarily transform the girl without negatively affecting the "natural structure".
Lessons for beginner masters are conducted by professionals who are able not only to give theoretical knowledge, but also to share practical experience, important nuances of work.
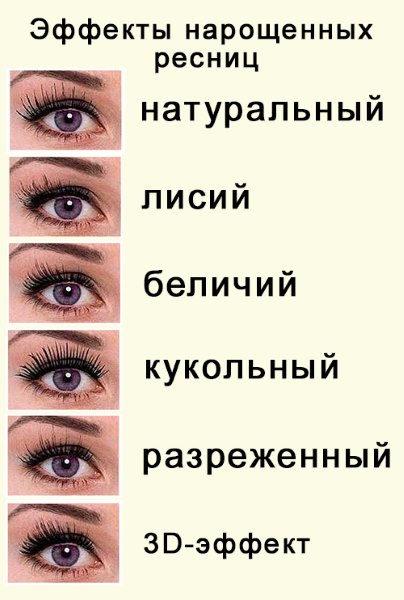
Types of eyelashes and extensions
Eyelash extension lessons for beginners involve learning about the types of techniques available, as well as the types of artificial hairs themselves.
Experienced lashmakers distinguish only 3 main areas:
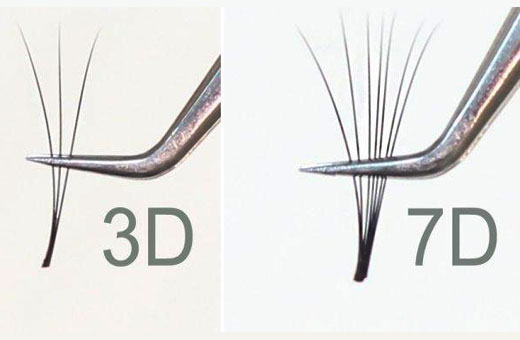
- Bulk build-up. Includes the most popular types: 2D, 3D, 5D and so on. With this type of extension, the master sticks several artificial ones on 1 real eyelash, due to which the expressiveness of the look and the volume of existing hairs increases several times.
- Eyelash build-up. Requires more painstaking work: 1 artificial eyelash is attached to each real eyelash, as closely as possible to the original structure of the hairs.
- Beam extension. Differs in the minimum amount of time spent on the procedure, as well as short-term preservation of the "expressive look effect". With this type of extension, masters use bundles consisting of eyelashes glued together in advance, placing them at a short distance from each other along the entire length of the eyelid.
 To attract a larger flow of customers, as well as to create the appearance of a large number of extension techniques, several "marketing types" were invented.
Such, for example, as:
- Japanese build-up;
- American build-up;
- Indonesian build-up;
- building up corners;
- incomplete extension.
They all differ in the materials used by lashmakars within a specific technique, as well as in the number of artificial hairs attached to real eyelashes.
Depending on the desired result, the masters offer their clients types of artificial eyelashes that differ in:
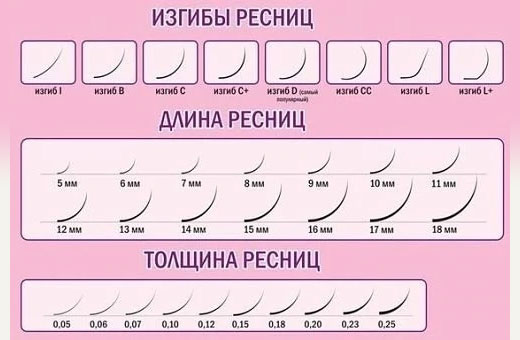
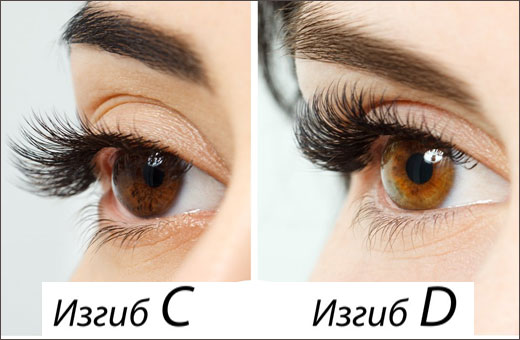
- Shape (bend): B (natural), C (creates the effect of slightly curled eyelashes), CC (more curved, used to "open the gaze"), D (maximum curvature, which must be selected strictly according to the shape of the eyes), L (curvature is most noticeable on the eyelash closer to edge).
- Length. The length of the eyelashes varies from 6 mm to 14 mm and is individually selected by the lashmaker. It is important to keep in mind that within the framework of one work, the master uses at least 3 lengths to give a natural expressiveness to the look (in the inner corners of the eyes, the eyelashes are shorter than on the outer ones).
- Thickness eyelash extensions. They are classified as: thick (0.18; 0.20; 0.25 mm in diameter), thin (0.10; 0.12; 0.15 mm in diameter), ultrathin (0.5; 0.7 mm in diameter).
- Manufacturer. The highest quality eyelashes are considered to be produced under the brands: Barbara, Vivienne, 3D Beauty International, Irisk Professional, Dolce Vita.
To create maximum safety for the eyelash extension procedure, the master needs not only to understand what are the features of the materials he uses, but also to choose exclusively products from trusted brands for work.
Contraindications
Novice eyelash extension masters should pay special attention to the existing contraindications to the procedure during the lessons. Among them are clearly pronounced diseases and dysfunctions of the client's body, which must be identified not only so that the result of the build-up satisfies the person, but also does not harm his physical condition.
It is not recommended to extend eyelashes when:
- existing allergic reactions;
- current eye diseases;
- increased tearing;
- psoriasis;
- HIV;
- the presence of inflammatory or colds in the body;
- hormonal disruptions (including during pregnancy and lactation);
- high blood sugar;
- asthma or acute respiratory diseases;
- existing deviations in the mental state of a person.
If you ignore the above contraindications, the client runs the risk of wearing eyelashes as soon as possible (up to 1 week).
You can find out about contraindications for eyelash extension here:
In order to avoid unforeseen reactions of the body, if there is suspicion of 1 or more diseases listed in the list of unfavorable conditions for eyelash extension, you should consult with a specialist before the first procedure.
Choice of materials
Experienced lashmakers get by with a minimal set of tools, but they come to this exclusively by experience.
Among the materials that masters, regardless of their work experience, cannot do without in eyelash extension:
| Work material name | Description and purpose of use for eyelash extension |
| Degreaser (or primer) |
|
| Glue for eyelashes |
|
| Eyelash remover |
|
The use of quality materials in work is not just a guarantee of long-term wearing of eyelashes by the client, but also minimization of the risk of an acute allergic reaction and other side effects due to the application of an untested composition to the eyes.
Tools for work
Eyelash extension lessons for beginners also imply the study by the future master of the list of necessary tools for the upcoming work.
Among the main devices:
| Working tool name | Description and purpose of use for eyelash extension |
| Duct tape |
|
| Extension tweezers |
|
| Jade stone |
|
| Artificial hair tray | Used as a surface on which the master pours eyelashes for further extension |

Using the tools listed above helps the lashmaker to correctly organize his work and significantly reduce the overall time for eyelash extension.
Training
Compliance with the preparatory steps before eyelash extension is important not only for the master, but also for the client himself.
Before the upcoming look change, it is recommended:
- do not dye or curl natural eyelashes;
- remove contact lenses;
- 2 days before the expected day of extension, dye natural eyelashes in a dark color (if the client has light natural eyelashes).
For a lashmaker, preparation for the main part of the work involves the following stages:
- disinfection of tools used in work;
- preparation of the necessary materials for the upcoming build-up;
- the implementation of makeup remover for eyelashes and eyelids;
- protecting the lower row of the client's natural eyelashes with adhesive tape, disposable pads or patches;
- degreasing natural hairs;
- applying a primer to natural eyelashes (if the composition of the degreaser does not imply the substances that make up the primer);
- choice of eyelashes (type, bend, length) for a specific client and the location of the working material on a special tray, which should be at hand;
- preparation of glue for the upcoming work (it is necessary to squeeze a small amount of glue onto a jade stone or other surface used for this purpose).
Having completed all the preparatory measures, the lashmaker can proceed to the main part of the extension, the stages of which will differ depending on the type of eyelashes used, as well as the type of extension chosen.
Safety and Precautions
Eyelash extension lessons for novice masters necessarily include the study of safety measures and safety precautions at work. Compliance with them is important to minimize the risk of side effects after the procedure (for example, infections on the mucous membranes of the eyes; the occurrence of allergic reactions).
The main of these mandatory rules include:
- The presence of absolute confidence in the absence of contraindications to eyelash extension for a particular client.
- Competent selection of used artificial eyelashes. By choosing the wrong composition of artificial hair, its length or bend, the master can harm the client's natural eyelashes.
- Purchase of quality materials and tools for building.For example, cheap eyelash glue can not only spoil the natural structure of natural hairs, but also cause irritation of the eye mucosa or allergic reactions.
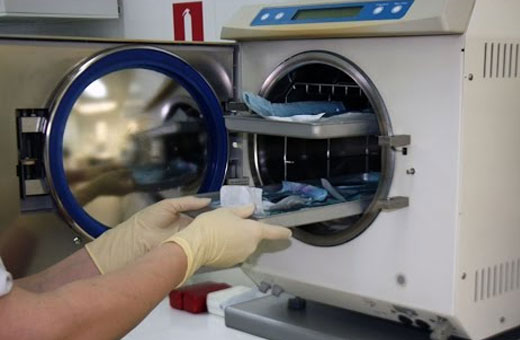
- Thorough disinfection of the room after each eyelash extension procedure.
- Mandatory sterilization of the instruments used in the work of a lashmaker after each client. For this purpose, it is recommended to use high-temperature equipment capable of destroying not only bacteria and microbes, but also fungi.
- Storage of clean tools used in work in special UV cabinets, and not in plastic boxes or on an open shelf.
- Before the extension procedure itself, it is necessary to check the client's tendency to allergy to glue. To do this, it is recommended to build 1-2 eyelashes in the corner of the eye and observe for a few minutes. If clients notice the occurrence of dryness, burning or redness of the eyes, eyelash extensions using a specific composition are contraindicated for her.
- Compliance with the "autonomy" of each eyelash. Lashmaker should make sure that only 1 artificial or 1 bunch (with volumetric extension) is glued to 1 natural eyelash. Ignoring this rule can lead to sticking of natural eyelashes and a violation of the integrity of their structure.
- Control the correct setting of artificial hair to natural. According to the rules of extension, the eyelash should be attached with a minimum indent from the eyelid skin. Otherwise, the client will experience discomfort, and the natural eyelash may not withstand the incorrectly distributed load and break.
It is important for novice craftsmen to pay special attention to safety during their work, since the client, who cares not only about the result of eyelash extension, but also about his own health, pays attention to every little detail in the work of a lashmaker.
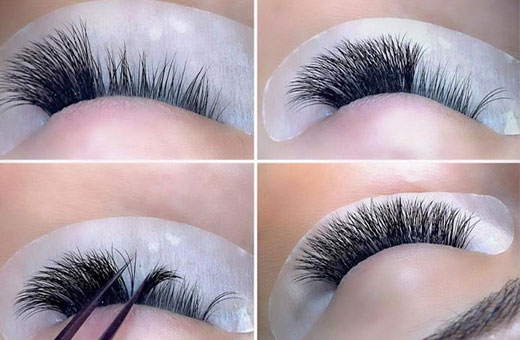
Extension of individual cilia step by step
The classical extension of individual cilia is the basis for other types of gaze transformation. Having thoroughly studied the sequence of actions in this technique, the master will quickly master the "complicated" types of building.
The basic algorithm includes the following steps:
- Prepare the glue and eyelashes to work with. In this case, a drop of glue and about 100 to 130 artificial hairs of the appropriate length, bend and thickness will be needed.
- Isolate the lower lash line, degrease the upper one and treat with primer (optional).
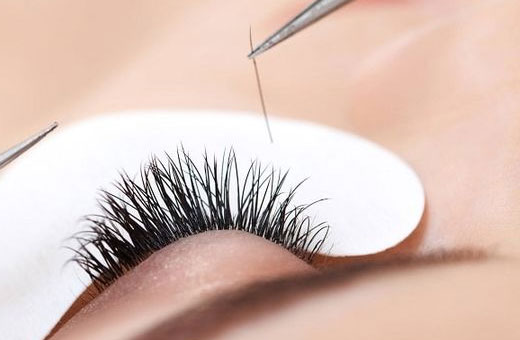
- Grab one artificial hair with tweezers (you need to start with the shortest eyelashes, gluing them to the inner corner of the eye) and lower it into the glue with a blunt end, as if drawing a horizontal strip.
- Place the false eyelash on the natural eyelash, about 0.5 mm away from the eyelid.
- Having built up 30 cilia, it is necessary to proceed to the second eye, allowing the material used in the first eye to "grab". We glue 25-30 eyelashes on the second eye, we should return to work with the first.
- Apply eyelashes alternately until the visual effect of the same amount of artificial hairs is achieved on both eyes.
- Comb the extended eyelashes, check them for gluing, remove the protective material that isolates the lower eyelid.
Upon completion of the procedure, the client should be left with her eyes closed for 3 - 5 minutes.letting the glue dry completely. If the eye is not opened in time, the glue can get on the mucous membrane and cause discomfort or acute pain in the client.
Bundling step by step
For beam extensions, no more than 20 groups of glued artificial hairs are usually used. Such a transformation of the look will not last longer than 2 weeks, but it will look more "solemn" and catchy in comparison with eyelash extensions.
The bundle build-up algorithm implies:
- Prepare glue and eyelash tufts to work with. In this case, a drop of glue and about 30 groups of artificial hairs of the appropriate length, bend and thickness will be needed (quantity with a margin).
- Isolate the lower lash line at will, degrease the upper one and treat with a primer (optional).
- Using long curved tweezers, grab the tuft and lubricate the “knot” (the junction of the eyelashes in the bundle) in the glue.
- Using straight tweezers, spread the natural eyelashes and place a bunch of artificial hairs between them or on one of the natural hairs, stepping back 0.5 mm from the eyelid.
- Extend until desired volume is obtained, then comb through lashes and remove lower eyelid isolating material.

When using the beam extension technique, it is necessary to move from the outer corner of the eye to the inner, using bundles consisting of cilia of various lengths (from long to shorter).
Eyelash extensions using Japanese technology
Japanese eyelash extension technology is very similar to the classic version of the eyelash transformation of the look. The difference lies only in the quality of the materials used (in this case, the eyelashes are thicker and practically do not differ in their length throughout the entire century).
- Prepare eyelashes and extension tools.
- Isolate the lower row of cilia, comb the upper one and separate with tweezers.
- Using tweezers with a bend, take one artificial hair, place it on a natural eyelash and press it strongly against it (the direction of movement is from the outer corner of the eye to the inner one).
- After finishing with eyelash extensions on one eye, move on to the second.
- After allowing the glue to dry as much as possible, remove the material used to isolate the lower ciliary row.
- Comb your eyelashes.
It is widely believed that eyelash extensions using Japanese technology can be done to oneself even at home. It's a delusion. Extending eyelashes on your own, you can not only fail to achieve the desired result, but also harm the mucous membrane of the eye and the structure of natural eyelashes.
Eyelash Extension Care
Eyelash extension lessons for beginners also involve learning information about the care of artificial hairs, which the lashmaker should give to his client upon completion of the procedure.
The basic rules for long-term wearing of cilia are:
- For the first 24 hours after the procedure, it is recommended to avoid any eye contact with water.
- For the first 48 hours, it is not recommended to steam the skin (visit a solarium, sauna, open sun).
- Do not use any formulation of mascara on extended eyelashes.
- Avoid mechanical impact on artificial hairs (for example, do not sleep with your face in a pillow, do not rub your eyes).
- Do not use fatty creams, oils, tonics. This can reduce the "adhesion" of artificial eyelashes to natural ones, significantly weakening the properties of the applied glue.
- Use exclusively water-based products for facial hygiene, without essential oils and fats in the composition.
- Do not use eyelash tongs.
- Brush the lashes regularly with a special dividing brush.
If the basic recommendations for the care of extended eyelashes are followed, the client will be able to maintain an expressive look for 3 - 4 weeks, on average. In case of appearance of "bald spots" in the ciliary rows, you need to contact your master for the correction procedure.
Removing eyelash extensions
It is necessary to remove extended eyelashes using a special composition - a debonder (or remover). They are of 3 types, depending on the consistency: liquid, gel, cream. The most gentle of them is cream.
Such a remover will not only not harm the mucous membrane, but will thoroughly corrode the glue in 10 - 15 minutes.
Removing eyelashes at home is not recommended. If you do not work properly with glue solvents, you can get a burn of the mucous membrane and harm the original structure of natural hairs. Effective eyelash extension implies that the masters know a large number of nuances of this procedure.
Lessons for beginner lashmakers include not only practical knowledge of the stages of the extension itself, but also the methods of sterilizing working instruments, as well as the choice of materials used. Understanding the importance of all the details of the process of transforming the look of a client will help a beginner to become a professional in his field and get a large number of regular customers.
Article design:E. Chaikina
Useful video clip on eyelash extension
A detailed video about the stages of eyelash extension:
Thank you very much. Very clear and understandable. I like it!
Thank you very much, everything is detailed and shown. In the summer, I also extended my eyelashes, but did a doll image, did not know that there were others. In addition, this experience was not entirely successful, the master scratched my cornea of the eye. Then I went to the ophthalmologist, fortunately, everything worked out. Only Korneregel dripped for a week so that the cornea healed faster. Probably, I will no longer go to this master, I will look for another.