For attractiveness, a woman needs to have not only a well-groomed face, a good figure, but also perfect manicure... For example, nails decorated with an original ornament will attract attention. Stamping requires diligence and basic knowledge of how to do the technique correctly.
What is stamping manicure
Translated, the word Stamping means "stamping", which fully expresses the essence of the technique. Applying an image with a stamp on the nail, when used correctly, makes it easier to create a unique design and allows you to change it every time, adding originality.
Stamping on nails should be done correctly: even professionals find it difficult to create patterns from thin, intertwining lines in a short period of time. Sometimes it is mistaken for hand-painted.
List of required tools and tools
To prepare nails for work, you need to purchase standard manicure tools:
- scissors;
- nippers;
- files for shape correction (preferably glass);
- buff for polishing;
- a device for pushing back the cuticle;
- nail polish remover;
- composition for degreasing nails;
- basic coverage.
Stamping on nails (it can be done correctly only with knowledge of the execution technique) is performed only with the purchase of special devices.
Stamping plates
They can be square or round and are usually made of metal. The base is engraved from several patterns: there can be from 4 to 42 pieces. These devices are intended for reusable use. It is better if there are several of them.
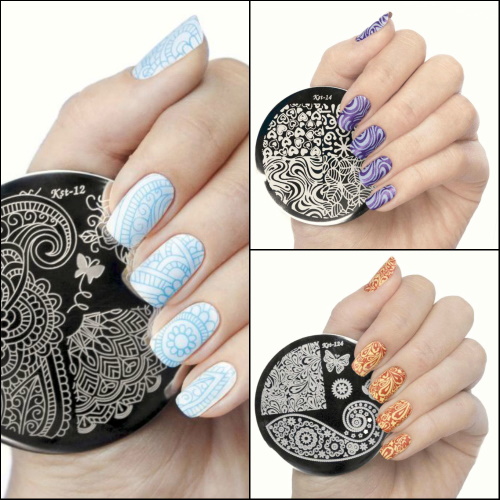
To prevent damage, the new plates are covered with a protective film on top, which is removed before use. A quality product has a sufficient engraving depth and a clear pattern.
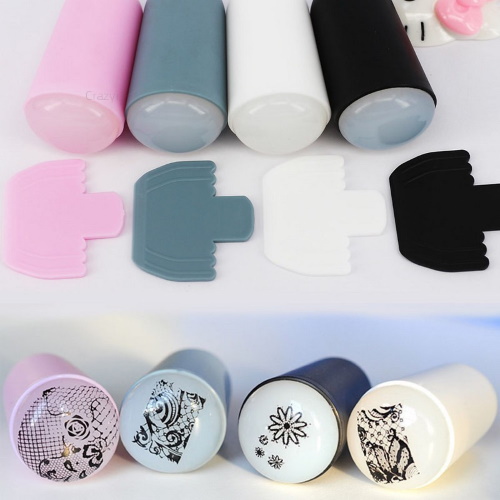
Types of stamps
They are made of silicone or plastic rubber. For ease of holding, the stamps have a special handle. The sizes can be any.
The choice of product depends on the shape of the nails:
- if you need a small pattern for short nails, it is better to choose a small stamp;
- for a larger design on long nails, round stamps with a large ornament are suitable.
The choice of a product made of silicone or rubber depends on the convenience of the master. Better to try both first and pick the perfect one.
For instance:
| Stamp material | Description |
| Rubber | They are more rigid than silicone. They are more difficult to fix on the corner of the nail. To get a clear pattern, you have to roll the stamp from one edge of the base of the nail to the other, without completely tearing it off the surface. |
| Silicone | It's easy to work with this material. It is enough to apply it to the surface, and it will be gently distributed over it. However, this pattern often lacks clear lines. |
Popular varnishes for stamping
The choice of paint for this coating is important.
Good varnish:
- saturated color;
- thick consistency of the composition;
- hiding power, allowing you to create a uniform surface. Thanks to her, it will be possible to get a clear pattern that will not blur after application.
Acrylic and gel paints are usually used for this design, but high-quality ordinary varnishes can also be taken. They should retain a clear ornament.The disadvantage of using acrylic paint is that it dries very quickly, so if you have no experience with such a coating, it is better to practice first.
An ordinary varnish is chosen without glitter and mother-of-pearl: large particles will not allow a clear drawing. A thick and matt varnish is recommended. The design looks great if the varnish has a holographic or metal effect.
Gel polish or shellac is not suitable for such a manicure. To get a bright base, thick coatings should be selected, because a double layer cannot be used with this technique. It is recommended to dry the flowable gel varnish in a special lamp without removing the stamp before application. This destroys the whole concept of stamping.
However, you can cover the sticky layer with glitter or decorative elements, which will make the design unique. Considering that the material consumption is small, it is better to purchase small bottles for home use.
Other tools
For work, you will need a scraper - a scraper for even distribution of paint over the nail plate. It is flexible, made of plastic. Sometimes he has a pen. If a gel base is used, then a special UV lamp is needed to dry it.
These tools can be purchased as a set or you can choose each separately. If there is no experience of such design, it is better for beginners to use stamping paints.
Rules and methods of application
Stamping on nails (you can do it right, knowing the subtleties and nuances of the technology) allows you to get a beautiful pattern if:
- perform work strictly according to the instructions;
- do not use metal files and make a motion to polish the edge in one direction, which will prevent delamination;
- apply a special oil for the elasticity of the cuticle;
- carry out degreasing before applying color pigment to increase the adhesion of materials;
- apply a denser coating to the surface with defects to hide them;
- apply a fixer at the end that fixes the design.
Before work, you should prepare:
- tools;
- compositions;
- cotton pads;
- acetone composition for nail polish remover;
- paint;
- basis;
- base;
- fixer.
The steps are as follows:
- The old coating is removed from the nails and the cuticle is pushed back.
- The nail plate is degreased and a transparent base is applied to it.
- The nail is covered with color and is expected to dry completely. The gel polish must be dried in a special lamp until it hardens completely.
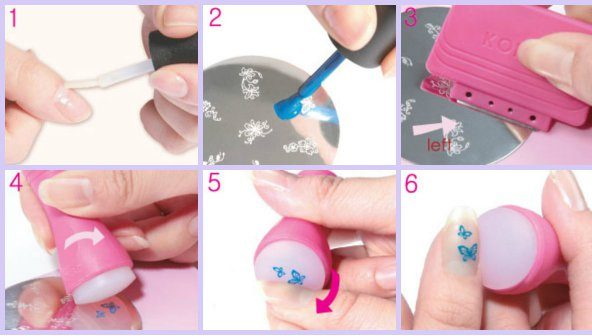
Execution technology
The main process consists of the following steps:
- A stencil plate is taken, from which the protective film is removed.
- The surface of the drawing is degreased.
- Manicure paint is applied to the edge of the selected stencil.
- The entire surface of the image is processed with a scraper. The paint is spread evenly in a thin layer. The tool is held at a 45 ° angle during operation. To obtain a clear pattern, excess pigment is removed.
- The surface of the stamp is wiped with a nail polish remover. For the acquisition of roughness, silicone products are treated with a buff. Sticky silicone does not require such preparation.
- By applying a stamp to the prepared stencil, with the help of rolling movements, the pattern you like is imprinted on it and the resulting pattern is quickly transferred to the nail, performing exactly the same movements. The hand should remain firm when moving along the nail, this is the only way to get a good drawing without details of the 3D effect. After receiving the print, the tool is removed. It must be remembered: the rubber pad rolls over the nail, and the silicone pad simply squeezes.
Make sure the coating is completely cured before applying the fixer.
Trim manicure
To make the manicure look neat, nails are trimmed to the same length. This is done with nail scissors or tweezers.After that, the edges are processed with a nail file, and they are given the desired shape. To avoid delamination and damage to the plate, this should be done when the nails are dry.
The cuticle is removed first. It is preliminarily softened by making a bath with salt or using a special tool. After 5 minutes, remove the remnants of the product and use an orange stick to push the skin back. After that, oil is applied to slow down cuticle growth.
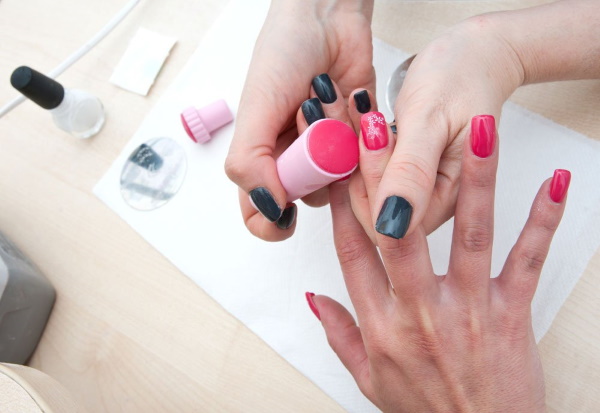
Transferring print to nails
If there is no experience in creating stamping, it is better to train on an old manicure, which can be removed in case of unsuccessful work. The rubber stamp is wiped with cotton wool dipped in nail polish remover, the silicone stamp is cleaned of adhesive tape.
To obtain a clear pattern, the rubber stamp is varnished using rolling movements. Movements when using a silicone stamp should be soft so that the ornament does not smudge. If you just press the nail against the pad, the pattern will be printed well even on the sides.
Application of stencils
These devices are only reusable. They are sold in sets containing an embossed blank, scraper and stamp. Their application allows each time to create a new design on the nails. The drawing is transferred quickly, but the work itself requires a certain skill and experience.
Getting a good nail art result using a stencil depends on the quality of the work and is therefore thought out in advance. This can be done only after preparing the nails for work.
For this:
- Apply a transparent base to the nail and let it dry.
- If necessary, cover the surface with the base compound and wait at least half an hour for the nail to dry.
- Stick the stencil on the nail or apply the selected pattern with a stamp.
- Cover the free part of the nail with a contrasting varnish.
- After setting, but not completely dry, remove the stencil.
- Fix the finished nail art with a top coat.
The use of stencils allows several times to reduce the time for creating a nail design, and the use of modern stamping technologies makes it available for girls who have no experience in creating it.
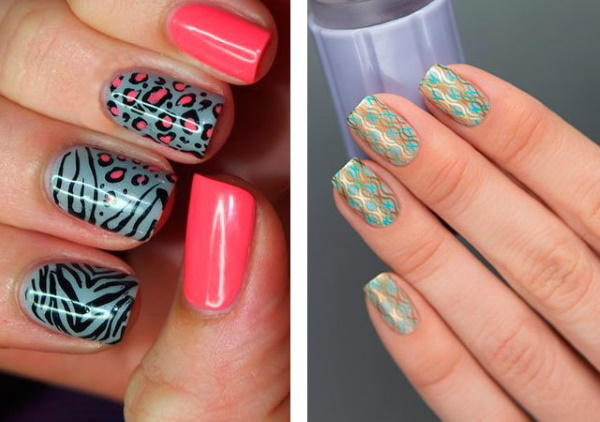
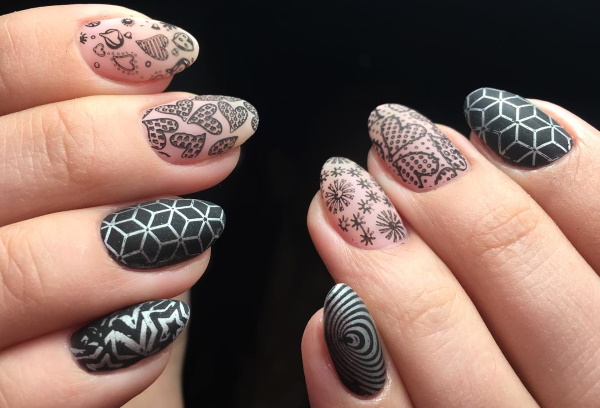
Design ideas
Fashionable manicure of the season 2019-2020 gave women interesting ideas for creating beautiful designs. One of the available ones is nail stamping. This manicure is in trend and wins over with its simplicity of execution and originality of the result.
Stamping on nails (you can do any option correctly, using various devices and knowing the basics of technology) allows you to make patterns of any complexity from stripes, nets, ornaments. The length of the nails does not matter. The technique emphasizes the beauty and tenderness of a woman's hands with original and well-executed patterns.
Manicure can adapt to seasonal motives of nail art. The number of technique options is so great that you can change the pattern depending on the weather and mood.
For instance:
| Season | Description |
| Spring | Stamping is based on a delicate color palette of discreet but beautiful ornaments. Pastel colors are supported by glossy and matte finishes. |
| Summer | Bright drawings with rich backgrounds are welcome. It can be floral arrangements, abstract and geometric patterns, which allows you to refresh and highlight any created image. |
| Fall | The technique is complemented by the colors of the ripe harvest, multi-colored leaves and saturated flowers. Many people like to make their hands in pints in the form of sheets, twigs and curls. |
| Winter | A fabulous time when you can create frosty patterns, use ethnic, holiday motifs or patterns in the form of Christmas trees, animal figures, snowflakes. |
To create stamping on the nails, it is better to choose a gel polish that allows the manicure to last longer.
After training, it is easy to work with the technique, which allows you to clearly identify the smallest details. The technique is based on a combination of different methods of creating a manicure.It allows you to apply various patterns on plain surfaces. High-class specialists are able to combine patterns and several colors on one surface.
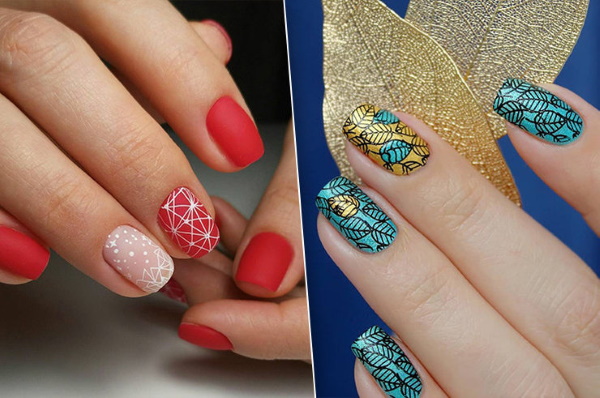
Stamping:
- combined with classic French manicure;
- transforms vertical and horizontal ombre;
- makes any manicure sophisticated and sophisticated by decorating a few or 1 finger with a pattern, leaving the rest solid.
The main trend of the season is color stamping. It combines bright and rich colors with delicate pastel tones. Against the background of a red and ultramarine base, soft coral and a shade of Marsala, a combination of black and white, stand out. Bright, dense colors are diluted with transparent and shimmering shades.
An innovation was the so-called reverse stamping for nails, based on the reverse image of the picture. This technique allows you to make a manicure textured and voluminous.
For festive, evening or wedding nail art, stamping goes well with rhinestones, medium-sized sparkles, delicate modeling elements. Such a nail design easily fits into the bride's looks, creating a harmonious picture.
Effective stamping on the nails opens up unlimited possibilities for improving the image by combining patterns and ornaments, which is easy to accomplish with the help of stamps and stencils.
This nail design is versatile and easy to execute. To do this, it is not necessary to have the talent of an artist, it is enough to do a manicure, follow the instructions and choose the right materials.
Video about stamping
How to properly stamp: