Gel polish is a versatile durable manicure coating that has not lost its popularity for many years. Nail masters offer many design options for nails, including with sliders - stickers on the nails. You can use this method in any manicure design: from classic, strictly, to bright, stylish and youthful.
Features and Benefits of Slider Design
Slider design for nails (how to use with gel polish will be discussed later) is a manicure technique with a special sticker that is attached to the nail plate. In appearance, the technique is in no way inferior to hand painting, but at the same time it saves time. The procedure takes a little time, and the customer receives a beautiful manicure, even if the master does not have the skills of decoration.
The advantages of slider design are as follows:
- such drawings do not need to be redone and corrected, unlike hand-painted, the main thing is to correctly and accurately apply the sticker;
- no need to think over the design, it is enough to choose a ready-made ornament from a huge variety of options;
- the fastest and most simple application process that even a beginner can handle;
- the cost of the design is much lower, because the master spends more time and effort on art painting;
- slider design significantly allows you to complete the procedure much faster;
- a properly applied coating with stickers lasts for a long time, such a manicure will please with durability.
There are 2 main types of slider designs: water-based stickers and self-adhesive. For their application, completely different technologies are used.
| Water Stickers | Photo design |
| This material is easier to work with. Firstly, it does not need to be trimmed to the shape of the nail, it fits easily, it does not have a rigid base. Secondly, sliders are suitable for any technology, whether it be working with regular varnish, gel or extended nails. That is, you can use water-based stickers both in the salon and at home. Thirdly, the variety of patterns and ornaments is much wider than that of self-adhesive images. | Self-adhesive stickers are very wear resistant, they will last for a long time, on average 2-3 weeks. And, despite the fact that you will have to spend a little more time to create a manicure with a photo design, it has one more undoubted advantage: when ordering stickers with your own design, you can create an absolutely unique manicure. |
The most popular among women choosing a slider design are stickers with abstract, geometric, plant and animal patterns, as well as portraits of famous people, heroes of popular cartoons, hearts and flowers.
Tools and materials for work
Using the slider design in conjunction with gel nail polish is as easy as applying a regular coat.
The first thing that is required is to prepare the necessary materials and tools:
- A special pusher paddle that allows you to move the wader away.
- Nail scissors.

- Nippers.
- File
- Manicure machine (if available).
- Acid-free primer.
- All types of coating: base, varnish, finish.
- Slider.
- Small tweezers.
- Warm water in a small container
- Lint-free wipes.
- Auxiliary materials: cotton sponge, cotton swab.
- UV lamp.

All this is required to apply a water-based slider. When working with photo design, water is not needed.
Features of working with water stickers
The correct application technology must be selected depending on the substrate on which the sticker is placed.
- If the water slider is located on a self-adhesive base, they must be separated from the base, placed on the nail plate, and a cotton sponge, previously moistened with water, should be placed on top. It only takes two minutes for the sticker to come off. After that, the disc needs to be removed, and the nail must be covered with a finishing layer. The slider is perfect for both regular and gel polish.

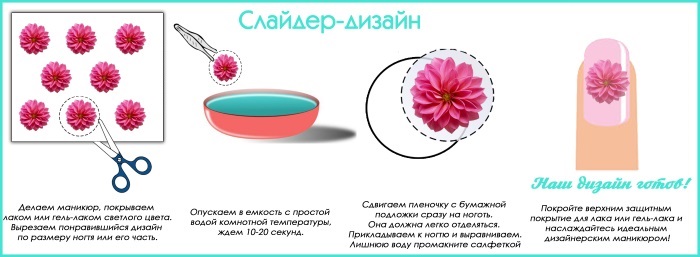
- You will need a container of water to apply regular water-based stickers. At the first stage, such sliders are not separated from the base. You need to cut out the design you like from the general sheet and soak it in warm water for 20-30 seconds. For convenience, tweezers are used. Then the drawing is dried with a napkin, the base is removed, the image is applied to the nail. After the finish is applied.
How to glue self-adhesive stickers - features
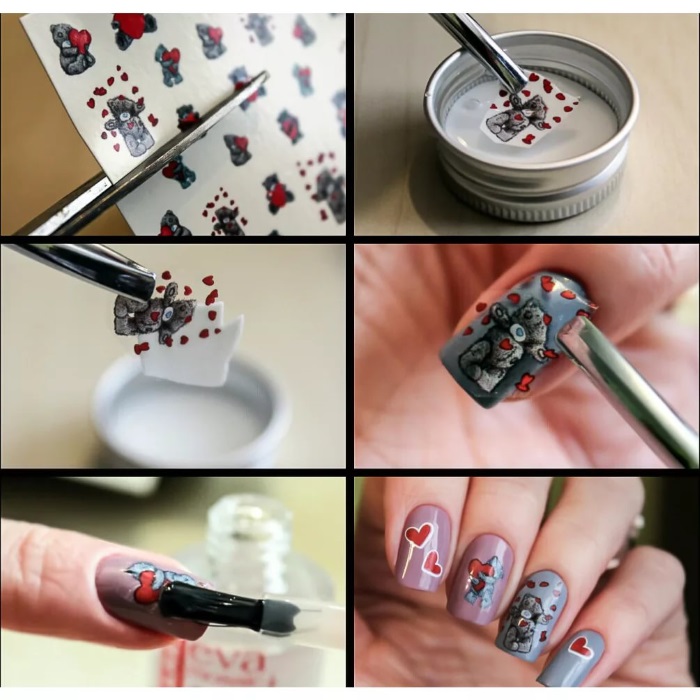
To apply a photo design on a gel polish, you should adhere to a different technology. Unlike working with water sliders, no water is needed to transfer the self-adhesive onto the nail, which is very convenient and time-saving.
Most often, photo design is a solid image that either already repeats the shape of the nail, or is located on a solid sheet. In the second case, the master first cuts the image and only then proceeds to apply it.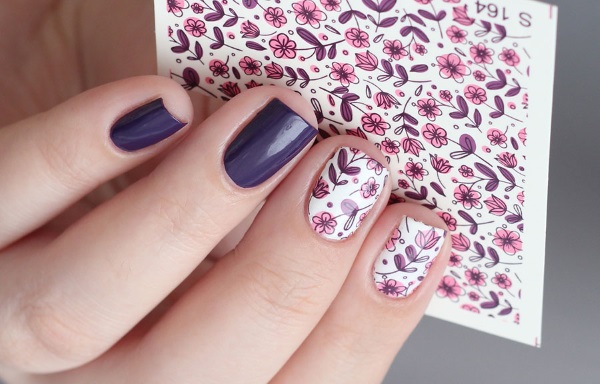
After preparatory work and applying two layers of gel polish, you can start transferring the slider. You need to carefully, using tweezers, separate the picture from the base, attach it to the nail, starting from the cuticle and moving to the edge of the nail. It is important to avoid the appearance of an air bubble under the sticker.
It is necessary to step back a little from the cuticle and on the sides, and tuck the edge of the film under the nail. Next, the plate is slightly filed, a topcoat is applied, the edge is carefully sealed.
3D slider design
Slider design is not always the simplest sticker; 3D sliders are gaining popularity in the nail industry. They differ from ordinary ones in their structure - the sliders are voluminous and convex, due to which an interesting effect is created.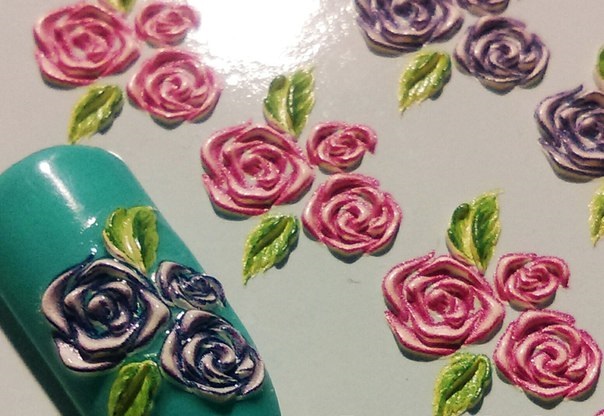
3D stickers are glued to a transparent base so they can be easily tried on before gluing to represent the final result.
Otherwise, their application is exactly the same as working with a slider that has an adhesive base. It is necessary to cut out the drawing of interest, remove it from the base, carefully using tweezers, attach it to the manicure and smooth it out. It is impossible to complete the entire process with a topcoat, because then the desired volumetric effect will be lost.
To remove the 3D slider yourself, you need to know certain nuances. When applied to regular varnish, a nail polish remover is used to remove it, but it will only remove the pattern.
To get rid of the glue base, you need to use an orange stick: it does not scratch the plate, but at the same time it effectively removes glue residues.
How to glue the entire nail
A sticker on the entire nail is either a picture with the finished shape of the nail, or an image that must be cut out beforehand to fit the shape and size of the plate.
Sliders for the whole nail are very practical, they often do not require a preliminary application of a colored coating. In order to cut the slider and not make a mistake with the size, you must first prepare a stencil from foil or thin paper.
For the more experienced, there is another option: by eye, given the semicircular shape of the plate, trim the sticker with a small margin. The length of the slider is adjusted after it is glued to the aligned nail.
How to glue sliders on gel polish - step by step instructions
The slider design for nails (how to use with gel polish will be described later) is applied using a special technology. This will avoid annoying mistakes that can lead to detachment and chips.
The very application of gel polish and preparation for coating is standard, the procedure is known to everyone who has done a manicure at least once. The difference will be visible only at the stage of working directly with the sticker.
First, you need to give the nail plate the desired shape, push back and remove the cuticle using a hardware, combined or classical method. Next, you should walk with a brush to remove the sawdust, at the end you need to degrease the surface.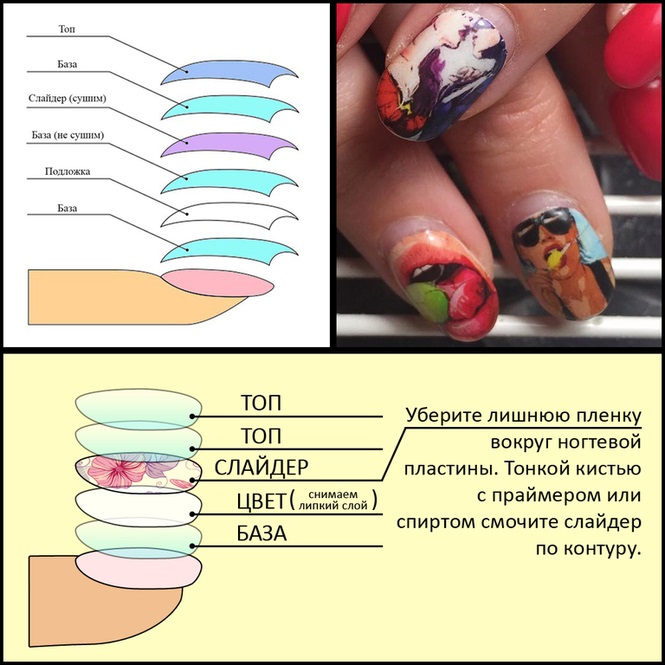
The next step is to apply the primer and base. The edge of the plate is carefully sealed to prevent chipping. After the base is dry, the selected color is applied in two layers. Each layer is dried separately under a lamp. At each stage, the time spent on the nail under the influence of ultraviolet radiation is approximately 2 minutes.
Now the stage of working with sliders has come. For water stickers, the selected image, the master must cut out the image of interest, lower it into pre-prepared warm water, use a napkin to remove excess moisture, and then apply it to the nail. Using items at hand, such as a cotton swab or orange swab, can easily slide the sticker back into place.
If stickers with adhesive are used, the process is different. To begin with, the master tries on the drawing to the nail, if necessary, cutting off the excess from the sticker with manicure scissors. After that, the image is carefully separated from the base and the adhesive side is applied to the nail. It is important to remove all air bubbles, otherwise you can forget about a neat and beautiful manicure. The sticker is pressed from the cuticle to the edge.
When working with a transfer slider, the first step is to remove it from the base, then attach it to the nail and press it well. As soon as the picture sticks, you need to remove the top layer.
The final stage is classic: applying the finish, drying under a lamp and the obligatory removal of the sticky layer.
It should be noted that stickers look better on light, pastel varnishes or bright colored finishes. But white lace is suitable for a black coating.
Features of gluing sliders on extended nails
The sticker lays on the extended nails in the same way as on natural ones, and the procedure is standard in most stages, but there are still some peculiarities and nuances.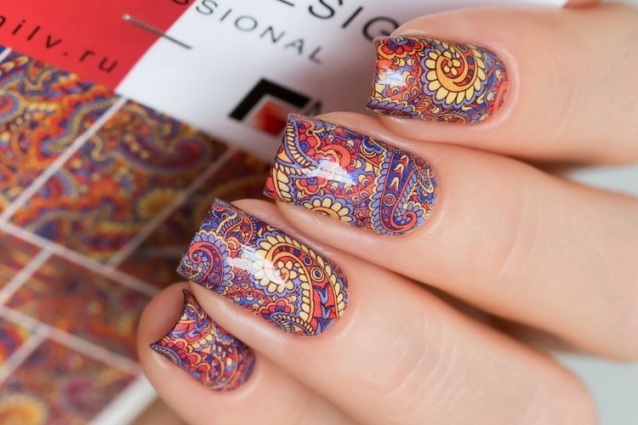
You can use the sticker already when the nail is fully modeled. The master must carefully dust off the surface and apply the drawing. It is important to do everything right the first time, because you cannot displace and move the slider on acrylic. If a gel is used for extension, before gluing the slider, the nail must be dried under a lamp.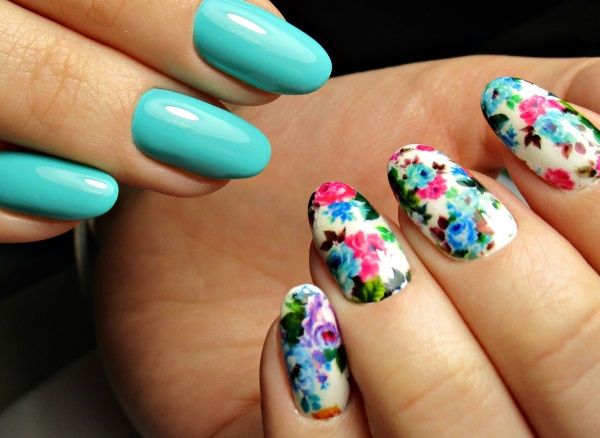
At the end, the topcoat is applied and the manicure is ready.
How long should you hold on
Slider design for nails: how to use with gel polish and how much should it hold on such a coating - there is an unequivocal answer to this question. The sticker will easily last 2-3 weeks, and this is enough for most women. Usually, it is after 3 weeks that the manicure has to be updated, since the nail plate grows strongly, and the cuticle needs care.
On ordinary varnish, the slider will last up to 5 days. If you want to extend the wear period, you can additionally apply a fixer every other day.
What to do if it doesn't hold on
If after visiting a salon or home manicure the slider does not stick to the nails, at some stage the technology for applying the sticker was violated.
To prevent detachment, it is important to follow a few rules:
- accurate application of the pattern prevents the appearance of air bubbles, which can provoke damage to the sticker, gentle smoothing from the center to the edges will solve the problem;

- do not forget about the high-quality drying of the varnish under the slider, otherwise the risk of damaging the drawing increases several times;
- top or finish coating is mandatory, it prevents mechanical damage, the sticker cannot be accidentally torn, peeled off, it will not get wet and peel off;
- you need to forget about steaming palms, washing dishes or floors without gloves.
Potential problems and how to solve them
When working with a slider design, 3 main problems can arise, having dealt with which you can get a neat manicure:
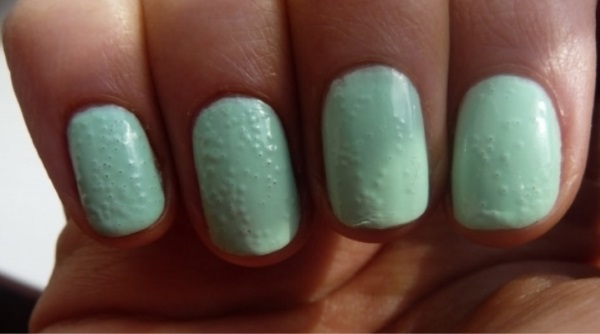
- If the sticker comes off along with the base, the reason lies in poor drying of the top or the layer of colored varnish itself.
- If wrinkles are clearly visible on the slider, then the sticker has not been sufficiently dried before application, or it is too dense. Also among the possible variants of this problem is low-quality material or a slider.
- If the finish peels off, the coating was applied to the decal while still wet. Craftsmen advise leaving an uncoated surface with a slider at the base and on the sides of the plate to ensure better grip of the finish. To avoid this problem, it is important to always seal the edges well and use only high quality materials.
Using a design slider like on gel polish and other coatings is fast, convenient and beautiful. With stickers, every woman has the opportunity to get a high-quality and neat manicure on her nails. And it doesn't matter if the design is done in a salon or at home, if the technology is properly followed, it will look as stylish and original as possible.
Author: Koroleva Alina
Article design: Vladimir the Great
Video about nail sliders
Technique for applying a slider design to nails: