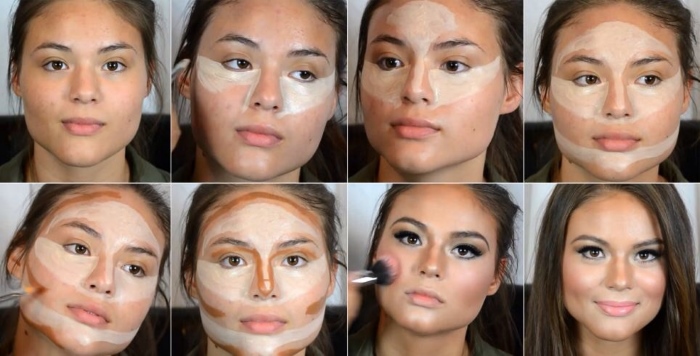
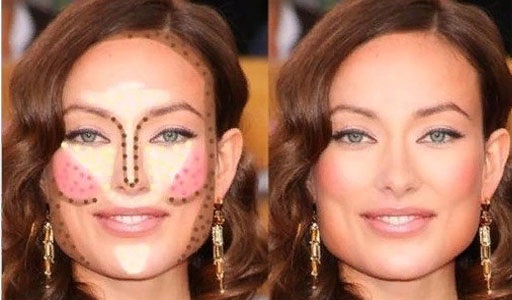
Sculpting skills allow you to visually change the proportions of the face and correct imperfections. This helps to bring it closer to the ideal shape - the correct oval. Step by step photos make the process simple and straightforward.
Features of sculpting. A photo
Sculpting or contouring is not new to Hollywood makeup artists who used it in the golden age of cinema. However, this makeup technique has become a fashionable trend only in recent years. Now it is as much an essential part of everyday makeup as mascara or lipstick.
Contouring is aimed at modeling the relief and facial features. This is achieved by darkening and lightening certain areas.
The technique allows:
- Reduce facial volume.
- Get rid of a double chin.
- Accentuate cheekbones.
- Make the nose thinner and reshape it.
- Correct the chin and forehead.
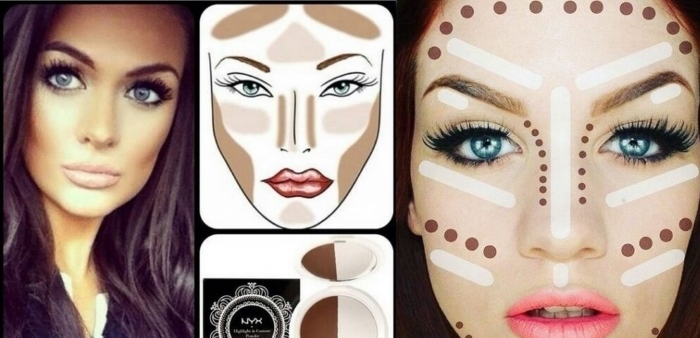
Thanks to the contrast of light and shadow, it is possible to add volume or remove it in the right places. At the same time, the contouring technique is simple enough to be repeated at home.
Pros and cons of contouring
This makeup technique has several advantages:
- Possibility of significant transformation of facial features.
- The need for a minimum set of cosmetics and brushes.
- Simplicity in execution.
- Fast application.
- Natural result.
However, you can get a positive effect from sculpting only if you master the shading technique.
If it is violated, you will have to face the disadvantages of contouring:
- Noticeable transition lines.
- Red spots on the face.
- An unnatural result.
- Puff-cake feeling on the face.
What is needed for contouring?
Sculpting the face (the photo reflects step by step the full range of cosmetics for this makeup) is carried out using:
- Makeup bases.
- A sculptor for shading or a palette for contouring.
- Highlighter for creating highlights.
- Transparent powder.
- Blending brushes.
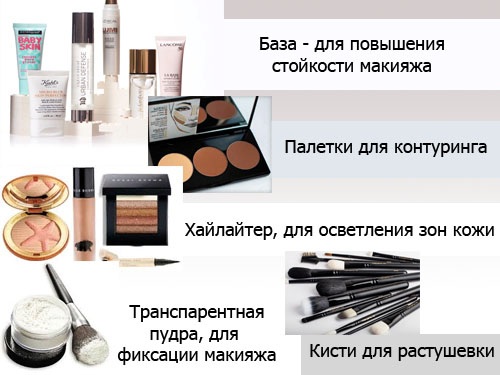
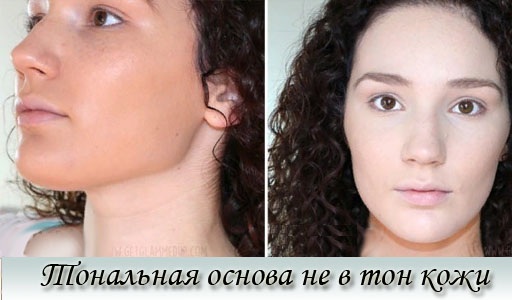
Before you start modeling your face, you need to purchase a base and a final product. The make-up base provides an even texture for natural blending, and also enhances sculpting products. It should be chosen according to the type of skin: matting, moisturizing or concealing imperfections in tone.
To fix the result and make-up durability, a finishing transparent powder is required.
Choosing a sculpting agent
Sculpting tools are available in various textures:
- Dry sculpting blush and powder best suited for everyday contouring. The light, dry texture forms a thin veil on the skin, creating a natural shadow.
- Cream products are used to take pictures in front of the camera.Rich texture and vibrant hues ensure that color is not lost through the lens. Such a texture will not work for everyday makeup. In real life, she clearly stands out and looks unnatural.
It is difficult to apply and blend cream contouring products, so it is not recommended to do this without the skills of a makeup artist.
- Sculpting products in sticks have a delicate and light creamy texture. Thanks to this, they create a natural shadow that is easy to blend. The sticks have a moisturizing effect and are therefore suitable for dry skin. Unlike powder, they do not accentuate flaking.
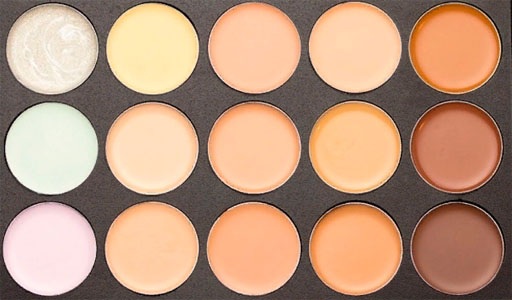
Only matte products are suitable for face modeling. The tone can be either warm or cold. Makeup artists recommend combining both tones to create a natural shade without reddishness or grayness. For this, there are sculpturing palettes that combine several shades.
When choosing a color, consider the natural skin tone. The contouring agent should be 1 to 2 shades darker.
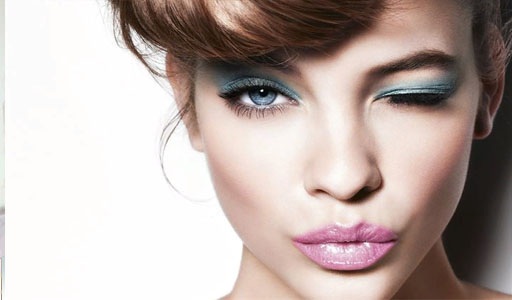
Highlighter selection
Sculpting the face (photos step by step convey not only the effect of shadow, but also light) is impossible without a highlighter. Thanks to it, it is possible to lighten certain areas to give them volume and a delicate shine.
Highlighters differ in texture:
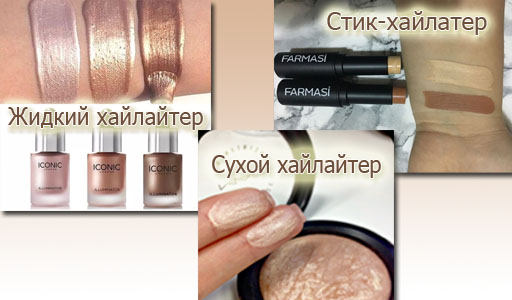
- The liquid highlighter has a texture similar to water. It is recommended to use it for beginners who are just mastering the contouring technique. Thanks to its light texture, it is impossible to overdo it with this product, and it is also easy to layer. The liquid product creates the most natural and delicate effect.
- The creamy texture is the most versatile. It is suitable for all skin types. Such a highlighter is not difficult to shade. To achieve the desired effect, a pea-sized amount is enough.
Application of the product does not take long, as the creamy texture is well pigmented.
- The sticks have a viscous and rich creamy texture. They are most conveniently applied due to their packaging format. In addition, sticks are most often used when you need to frequently transport a highlighter. However, they are contraindicated for oily skin due to the risk of pore clogging.
- Dry and friable highlighters have a powder-like texture. They are useful on oily skin that tends to absorb other textures quickly. This product can only be applied with a brush.
When choosing a highlighter, you need to decide on the color and size of the shining particles. The shade of the product can be silver, gold or pinkish. Shining particles are small and invisible, which is necessary to create the effect of a natural glow of the skin from the inside. There are also highlighters with large sparkles, each of which is noticeable individually.
These products are appropriate for evening makeup or on set. Some companies produce highlighter palettes that combine different shades.
Choosing contouring brushes
Brushes are required for even application and natural blending of sculpting products.
They differ in form:
- Beveled.
- Universal oval.
- Flat with short pile.
- With a tapered tip.
The shape of the brush can be any. It is important that it is comfortable. The most versatile is the flat brush. It allows you to work out both large areas of the face and small ones, for example, the corners of the eyes or the wings of the nose. The brush should be tightly padded and the bristles elastic.
Avoid buying cut-bristle brushes as they leave uneven spots. Better to choose hand-stuffed tools.
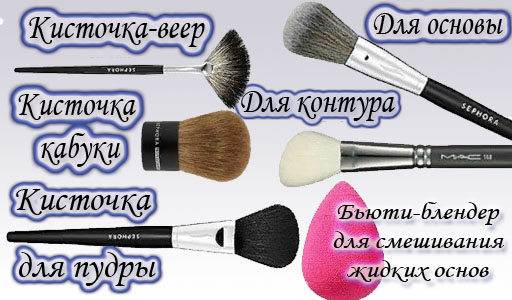
Brushes are made of natural and synthetic fibers, as well as mixed - duofiber. For dry textures, natural pile is suitable, and for cream textures, synthetic or duofiber is suitable. When blending creamy textures, you can also use a sponge or use your fingers.
Contouring: step by step instructions for a round face
To model a round type of face, you must follow the recommendations:
- Applying a make-up base to the entire surface of the face, as well as a foundation if necessary.
- Darkening the cheekbones and cheeks with a sculpting agent.
- Darkening of the temporal zone.
- Darkening of the wings of the nose.
- Highlighting the central forehead and chin.
- Highlighting the back of the nose. If there is a hump, it is necessary to darken it.
- Lightening the area under the eyes.
- Applying a fixing finishing powder.
The plot is about how to determine your face type in order to correctly smooth out its imperfections with the help of a highlighter:
Thanks to this make-up technique, you can visually narrow the face, creating a shadow in the area of its periphery. In this case, the main darkening emphasis falls on the cheek area. Highlighting the central part of the face gives it a look close to the ideal oval.
Modeling a heart-shaped face
Facial sculpting (photos help you create the perfect makeup step by step) should be performed in stages:
- It is necessary to even out the tone of the face. To do this, apply a make-up base, as well as a foundation and concealer if there are visible imperfections on the skin. Wait 1 - 3 minutes before proceeding to the next step, so that the base is absorbed into the skin.
- To visually smooth the shape of the face, it is required to darken the area above the cheekbones, as well as the temporal zone. It is important that the darkening falls on the area up to the middle of the face.
- The powder for contouring a dark shade needs to be shaded from the temples to the hairline. In this case, the central part of the forehead should remain intact.
- The area above the bridge of the nose needs to be lightened with a highlighter. The product must be shaded in the form of a small triangle.
- In the chin area, you need to lighten the central part, and darken the area under the chin.
- The highlighter should be applied to the central part of the nose, as well as to the area under the eyes.
- The final touch is to spread the transparent powder in a thin layer.
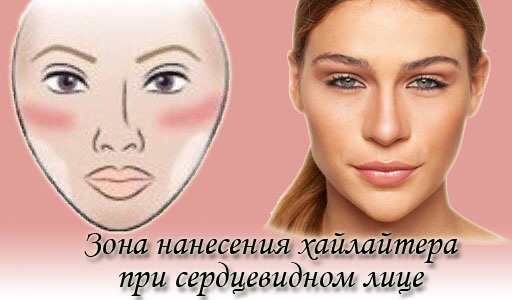
Due to the visual smoothing of the sharp corners of the heart-shaped face, its shape will be close to oval.
Triangular face contouring
Correction of a triangular face shape is carried out in the following stages:
- Creation of a foundation by applying a make-up base, concealer or foundation.
- Darkening the area above the cheekbones, as well as the lower part of the face under the cheekbones.
- Applying dark contouring powder to the center under the chin.
- Darkening the forehead along the entire hairline.
- Application of highlighter to the entire chin area, excluding the darkened area below.
- Blending the highlighter from the central forehead to the bridge of the nose and then to the bridge of the nose.
- Lightening the inner corners of the eyes.
- Securing the result with transparent powder.
Correction of this face shape is aimed at visually smoothing the angularity, which is characteristic of the triangular shape.
Sculpting a square face
Modeling a square type face must be performed step by step:
- It is required to create an even tone using a make-up base.
- The darkening agent is required to be applied to the cheekbones, blending into the area under the cheekbones.
- In the forehead area, darken the areas where there are noticeable protrusions. Darkening is done along the hairline. At the same time, the central zone, as well as the area above the temples, remain intact.
- Darkening of the wings of the nose is carried out from the inner corner of the eyebrows. In this case, the line is shaded towards the area of the tip of the nose, which means that its intensity decreases.
- The highlighter should be spread over the center of the forehead, chin and around the eyes.
- To fix the makeup, apply a thin layer of transparent powder.
The contouring of a square face is aimed at giving visual smoothness to lines.
Is oval face contouring necessary?
Oval face type is the canon of beauty. However, it can also be sculpted.In this case, the main goal will be to emphasize and highlight the natural features of the face to enhance their beauty.
Simulation is carried out in several stages:
- Applying makeup base.
- Darkening the area under the cheekbones.
- Applying a highlighter to the chin, center of the forehead and the bridge of the nose.
- Application of a sculpting agent on the wings of the nose with shading along the upper eyelid along the line of growth of the eyebrow, which is carried out before its bend.
- Lightening of the area under the eyes, as well as the inner corners of the eyes, the breakpoint of the eyebrow.
- Securing the contour with finishing powder.
The oval face requires minimal correction. Unlike other face types, it is aimed at emphasizing the natural smoothness of facial features, and not at their visual smoothing.
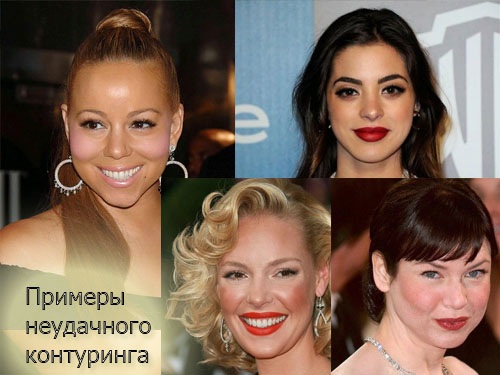
Common mistakes
Sculpting the face (photos step by step cannot reflect all the details and subtleties of the technique) can occur with errors.
The most common ones are:
- Inability to model a face in accordance with individual characteristics. Contouring is not meant to draw a new face. This technique only allows you to correct facial features so as to emphasize the advantages, and darken the disadvantages. Don't lose your individuality.
- Incorrect placement of light reflections, which violates the harmony of the makeup. Do not apply the highlighter all over your face or large areas, as it is only intended for highlighting accents.rather than serving as a substitute for powder.
- The lack of blush on the face makes it not alive. Do not limit yourself only to contouring powder and highlighter. It is necessary to complement the makeup with bronzing blush, matched to skin color.
- Improperly preparing the skin for contouring can ruin the entire makeup. It is imperative to use the base. If this is not enough to smooth the skin's surface, you can apply a tone or BB cream.
- Using the wrong colors creates messy spots on the face. Do not choose a contouring product that is too warm red or dark gray. It is better to mix warm and cold tones, and choose the color based on the skin tone. It is also worth abandoning funds with yellowness.
- Insufficient feathering of the lines leads to a violation of the proportions, which makes the facial features look unnaturally narrow or wide.
If you have problems with feathering, a good quality brush should be used. It is not necessary to collect a lot of funds for it, and it is also important to shake off its excess.
Makeup artist tips
Professional tips to help you make your makeup perfect:
- Before applying contouring agents, you must carefully look at the reflection of the face in the mirror. You will need to imagine an oval in place of your own face. What has gone beyond its features must be darkened.
- If you have difficulties with the visual presentation, a face chart will help. It can be purchased at any makeup shop. The face chart depicts different face types so that the makeup artist can apply makeup and see how he would look on one type or another.
- It is important to lighten a small area under the cheekbones - a hollow that is noticeable when you turn your head. This will prevent the cheekbones from becoming too sunken and prevent a sore face.
- The precision of the highlighter is easier to adjust with a thin, flat brush. After that, the area of application must be shaded with a contouring brush. So it will be possible to correctly place the light reflections, avoiding busting with a highlighter.
- For evening make-up or shooting in front of the camera, you must use the dry texture of the contouring agent over the cream.
This will achieve the most expressive effect, and the makeup will become more resistant.
The best contouring products
Facial sculpting is impossible without quality cosmetic products. The procedure and technique for applying them will be prompted by step-by-step contouring photos.
| Name | Texture | Pros and cons | Price |
| Palette sculptor Travel Contour Kit Smashbox | Powdery | The product has the advantage of mixing 3 different tones: neutral, warm and cold. The palette comes with detailed instructions for applying products from the brand's makeup artists. The miniature palette is convenient for travel. The lack of a brush is a drawback. | 1650 RUB |
| Highlighter & Contour Palette NYX Cream Pro | Cream | The advantage of the palette is the combination of 3 shades of highlighter and 3 shades of contouring agent. The product features matte and sparkling textures, as well as neutral and rich colors. The disadvantage is the lack of a mirror and sponge included. | 1590 RUB |
| Sculptor Lumene Instant Glow Bronzer | Liquid | The advantage of the product is a light liquid texture that is absorbed evenly, creating a natural darkening effect. The disadvantages include poor color saturation. | RUB 1000 |
| Highlighter Soda Stik | Cream stick | The advantage of the product is a bright shine, which is achieved through a combination of large and tiny sparkling particles. The disadvantage is the viscous texture, which is difficult to spread and can clog pores. | RUB 550 |
By sculpting the face, you can transform its features. This technique is simple enough with step by step photos. The main thing is not to forget about the individual characteristics so that the make-up result is harmonious.
Author: Alena lash
Article design:E. Chaikina
Useful video on face sculpting
Video on how to correct the face correctly and what preliminary procedures need to be done before applying a dry highlighter:
https://www.youtube.com/watch?v=HoR0iRpi5T8
How complicated everything is ... I always make it easier - I take brown shadows and shade where in my opinion it is necessary - it always turns out perfectly.