Weaving from beads is the process of transforming a handful of colored balls into a handicraft creation. For novice craftswomen, detailed photos and schemes for describing the process of work are suitable - master classes.
Beading Tools
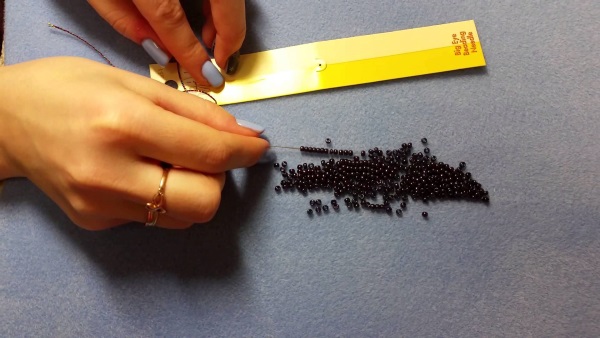
To create a bead product of any plan, auxiliary tools are needed. The range of materials used is large, it depends not only on the goals of the work, but on what should be the result, also on the personal preferences of the master.
In the process of work and gaining experience, it is necessary to determine and select the most convenient and preferred tools for yourself.
A thread
Depending on the tasks and personal preferences, it is recommended to use several thread options in the work:
- Reinforced thread with lavsan. This thread can be of various colors. It is strong and durable, made of synthetic elastic fibers, pleasant to the touch, reminiscent of natural material.
- Monofilament. In another way, monofilament is a thin line. It is used if there is no thread of the required color or it is necessary to secure the beads with an invisible fastener, it will also be ideally combined with beads of light shades and transparent.
- Wire for beading. The wire is not only of different colors, but also of different thicknesses. The thickness is selected depending on the purpose of the work. Wire is suitable for bulk compositions.


For more experienced needlewomen, rubber threads will be needed, and for specific tasks, silk and cotton threads are needed.
Needle
Beading needles are thinner than regular sewing needles. These needles come with different ears, it is recommended to use a needle with a wide eyeso that in the process of work there are no difficulties with threading the needle. However, if you are using small beads, such as # 15, then a needle with a small eye is needed.
A long needle is used for weaving, since the short one is necessary for embroidery with beads. But there are times when it is extremely inconvenient to work with a long needle: the long end interferes with the maneuver, bites into the fingers or the needle bends - then it is recommended to have a short needle in stock to complete the intended action.
For more experienced needlewomen, rubber threads will be needed, and for specific tasks, silk and cotton threads are needed.
The needles used for beads are produced by numbers: the thickest needle is # 1. The most commonly used are no. 12 needles.: short for beads, 35-45 mm long and long for 50-55 mm beads. Experienced craftsmen recommend needles made in England and Japan.
Other tools
In addition to the most important tools, such as a needle and thread, a number of auxiliary devices will be required in the work. Some are essential items, some are used less often in the process of work.
List of required tools:
- Pliers. Used for attaching items such as a tripod, ring or chain. Pliers are required to hold the beads together using auxiliary elements.
- Round nose pliers. With this tool, you can create your own metal rings, bend any parts, round chains.
- Scissors. It is important to choose a sharp instrument. The use of nail scissors is recommended. They will be required for use in hard-to-reach places.
- Spinner for beading. A device for a quick set of beads on a wire. You can buy it in the store, or make it yourself.
- Tweezers for needlework. These tweezers are useful for working with small parts. With tweezers, you can not only pick up the thread, but also straighten the bead in the finished product, take a small element.
- Tool for creating knots... Used when the parts are very small.
Which beads to choose
Weaving from beads for beginners is not an easy hobby, step-by-step photos of master classes and weaving patterns will help in the work. But for the finished product to work, you need to choose the right beads.
Round and faceted beads are made of the following materials:
- bone;
- plastic;
- glass.
Beads should be of the same shape and size, without chips. After the beads are selected, it is recommended to rub the material between the fingers. If it is of poor quality, then the paint will peel off and marks will remain on the skin. If a large volume of beads is required, it is recommended to test a small amount.
To do this, put several beads in a light-colored fabric, roll it up and put it in boiling water for one minute. After checking the result, high-quality beads should not leave any marks on the fabric... The size of the beads is indicated by numbers: the larger the number, the smaller the beads.
Experienced craftsmen recommend needles made in England and Japan.
The holes must be hollow and the same size. Initially, it is important to determine what size needle the craftswoman will use, so that the selected beads will ideally pass through the holes. It is strictly forbidden to leave bead products under direct exposure to the sun, otherwise even the highest quality beads will lose their original color.
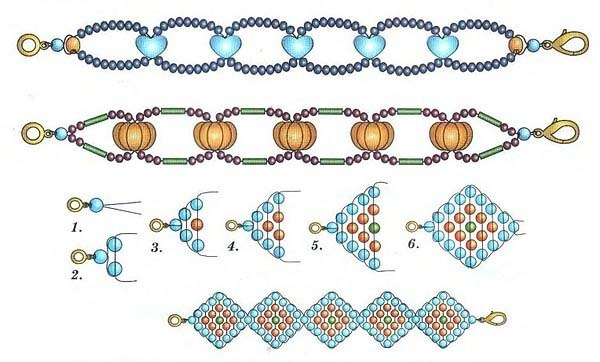
Mosaic technique
Mosaic weaving from beads for beginners (photo, schemes of which are necessary to create bracelets, paintings, as well as for weaving individual elements) is performed using certain accessories.
Required:
- beads;
- beading needle;
- thread (nylon recommended).
The first 3 rows will look smoother when secured with wire.
Step by step creation of initial rows:
- To fix the work, you need to take a bead of a different color. At a distance from the end of the thread, the bead is fixed by passing a nylon thread through it several times.
- Elements for the 1st row of the composition are typed on a thread, for example, 24 pieces.
- A piece of wire is passed through the bead. From this number of beads, 2 rows should be obtained.
- In the second row, pass the line through one bead, braiding the third row.
Mosaic weaving is divided into types:
- even;
- odd.
Even weaving is the simplest, it is used more often. Odd weaving is more difficult to perform, with its help symmetrical products are created.
Even mosaic weaving
This technique is simple, but the edges of the finished product may appear uneven. To avoid severe unevenness, it is recommended to use small beads.
Step-by-step master class:
- First, you need to fasten the starting bead in a neutral color, as indicated in the general instructions in point 1.
- Then, beads should be collected on the thread in the amount necessary for two rows. The number of beads taken should be a multiple of 4.
- Then you need to drag the thread in the other direction through one bead, dividing it in half, into rows. Between the elements in the first row, the elements of the second row should fit.
- In the opposite direction, weave the third row. After threading each bead, the needle is passed through the second row of beads. Actions are repeated to the end of the row.
- The remaining rows are similar.
Odd Mosaic Weaving
This type of weaving is more time consuming.With the help of odd mosaic weaving, shapes are created with the most even edges.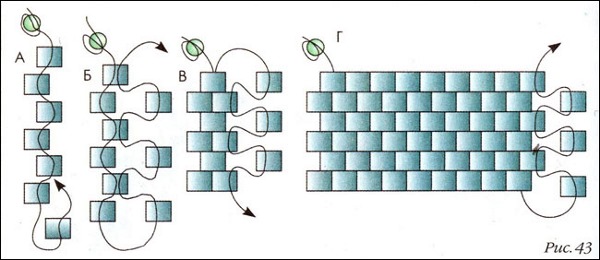
The holes in the beads must be hollow and the same size.
Step-by-step master class:
- As with even weaving, the first 2 rows are recruited, the number of beads should be divided by 2.
- Divide the beads into 2 rows.
- They dial the third row, one bead should not be enough to fix it, so a fishing line is passed through the first bead, then the second bead of the third row is threaded through the second row, and the actions are repeated until the end of the row.
- As soon as the row is dialed, the needle is turned around and in the other direction, it is threaded through the first row.
- Passing the needle through the extreme elements of the first two rows, they return to the beginning of the third row. Thread a line through this bead and from that moment they begin to weave the fourth row.
- The next two rows are woven as in even weaving.
- As soon as the turn of the odd row comes, the thread is fixed in the same way.
Helpful hints
To make the finished product perfect, you need to know some subtleties about how to read the diagrams correctly, how to choose the necessary thread and beads.
Recommendations:
- The bottom corner on the left is considered the beginning of any weaving.
- Weaving is carried out upward.
- Rows are counted diagonally.
- To make the canvas dense, you need a thread no longer than 2 meters and beads with smooth edges.
- If the thread is longer, then it is recommended to tie it up and fasten the knot with glue.
- At the beginning of any row, it is recommended to dial 2 beads, so the row will turn out to be complete, without cut edges.
Brick technique
Weaving from beads with a brick technique for beginners will allow you to get unusual elements of irregular shape as in the photo, weaving patterns resemble mosaic weaving, but these are completely different techniques. The product is neat and dense enough, therefore, when the thread breaks, the figure will not fall apart completely.
Step-by-step instruction:
- 2 beads are put on the selected thread, it is necessary to pass the thread through the center of the beads so that a loop is obtained, after which it is tightened.
- The next element is passed through. The free edge of the thread should be at the top, going through the previous bead, and the opposite edge should go down through the hole of the new bead.
- All other beads are woven in the same way to the end. A straight line of beads should come out, tightly fastened to each other.
- Collect 2 beads, pass the needle under the resulting loop between the two beads of the first row.
- The line is passed through the first bead of the second row, tightened.
- The following elements are strung through the loops obtained from the bottom, returning the thread each time through the center of each bead.
- The third row is created in the same way as the second, only in the opposite direction.
If the finished rows in the product look like a brick wall, the technique is correct. In order to shorten the width of the row during weaving, it is necessary to cast on a thread instead of 2 beads, 1 bead. If you add 2 beads to one loop, then the width of the product will increase.
To increase the length of the row along the edges, you need to dial 2 beads, and at the end, weave 1 bead, catching on the edge of the thread. If there is a free edge of the thread and to prevent unraveling, it must be passed through the beads in any order, and the free edge must be cut off. This will avoid tying knots on the product.
Circular technique
Weaving from beads with a circular technique is also called French, this technique suitable for beginners, as you can see in the photo, the figures are voluminous, and the weaving patterns are quite simple to perform. Beads are woven with a fishing line, they are arranged in a circle tightly to each other.
When working in French technology, any element is based on a main wire rod, which will differ in its thickness. Several beads are put on the thread, and a thread with beads of smaller thickness is added from below.Two wires must be placed opposite each other, fastened together by twisting.
It is recommended for beginners to perform a flower using the parallel weaving technique.
On the opposite side of the trunk, another working thread with beads is attached from below. If you weave several arcs in this way, alternately fixing the wire from below and from above, you will get a finished product element - a leaf. The thread of the extreme row must be fastened with two curls, cut off the rest.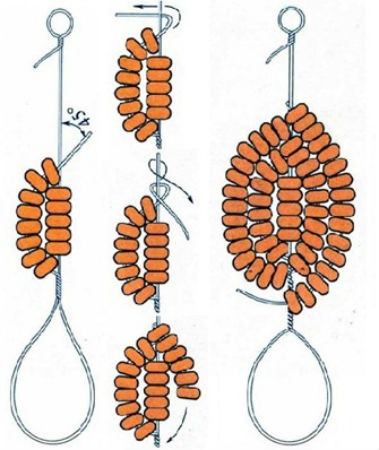
It is important to cut the wire on one part of the main rod so that a free edge remains slightly less than a centimeter, which must subsequently be bent inside the product.
Parallel weaving
Parallel weaving is most often used to create flowers, leaves, animals, both volumetric and flat. This weaving is carried out with two ends of one thread. At one end of the thread, beads are put on for the next row.
The other end of the thread is threaded through them towards the first. In this way, you can make elements of any size and shape, which will depend on the number of rows and their length. In the finished product, as a rule, it is imperceptible how the beads were fixed, by the edge or for every 2 beads, but the relief of the beads itself and parallel rows are clearly visible.
It is recommended for beginners to perform a flower in this technique. Flowers with thin colored leaves do not require a lot of material, but they teach the master to apply imagination in practice.
Bracelet
To create a bracelet, you need materials:
- beads with a diameter of 8 mm;
- beads with a diameter of 4 mm;
- beads # 10;
- 2 needles;
- nylon thread;
- clasp.
 Step-by-step master class for weaving the base:
- Cut the thread 140 cm long.
- Each end of the thread is threaded through the needle.
- Collect 4 beads (4 mm) and 1 bead (8 mm).
- Place the beads in the center so that there is a large one on the right and all small elements on the left.
- The needle on the right is passed through the last element on the left, in the opposite direction, tightened, spreading the thread up and down on the sides.
- 3 beads (4 mm) are put on the lower line, 1 bead (8 mm) on the lower line.
- The needle from above is passed in the opposite direction through the extreme 4 mm bead located on the lower thread.
- Tighten to make the canvas dense.
- 1 bead (8 mm) is strung on the lower line, 3 beads (4 mm) are put on the upper line.
- Perform actions similar to paragraphs 7 and 8.
Then the steps are repeated as many times as necessary, while the account should be kept by the number of beads 8 mm. It is important that the thread is not too tight and not too loose, the product should be tight. The end of the line that goes into a 4mm bead will be used to add a different color of bead to the weave.
Brick technique is used to create a heart.
Supplementing the base with elements:
- On a needle with a thread, you need to put on 5 beads, then insert the needle into 3 and 4 beads from the edge of the bracelet.
- To make the product symmetrical, you need to pass the needle through the nearest bead.
- 5 beads are skipped again as in point 1.
- Repeat the steps to the end of the base until the last 4 mm bead remains.
- 5 beads are put on the edge of the thread and a needle is threaded into the extreme bead of 4 mm, the needle is brought out through the last three beads.
- To secure the fastener, pull the needle through the extreme bead, tighten.
- The end of the line is taken out randomly to the center of the bracelet, a knot is made and fixed with glue.
- The second fastener is secured in a similar manner.
Earrings
Earrings are made in parallel technique, so a beginner can do them.
Step-by-step master class:
- Cut a fishing line 1 meter long and pick 1 bead on it.
- Next, 2 beads are put on one of the ends.
- Cross-section of the thread is made through the holes of the outer beads. With each subsequent row, the number of beads should increase evenly by 1 piece.
- When the number of collected beads becomes 11, continue to weave, adding in each new row the same number of beads equal to 11, thus getting parallel lines of the product.
How many such rows there will be depends on the length of the earring. To secure the fasteners, you must use the free ends of the line. The second earring is made in the same way.
Trees
Step-by-step weaving of birch branches:
- Mix two colors of tree leaf beads.
- They take a piece of wire 50 cm, on which 9 beads are recruited, it is necessary to retreat 7 cm from the edge, then make a loop, scrolling 6 turns.
- 9 beads are put on the long end of the wire and a similar loop is formed. There should be 9 loops in total, centimeters apart.
- The finished element is folded in half so that there is 1 loop in the top center, and 4 loops on the sides.
- Starting from the top, twist the wire to each other until the end. There should be 72 branches in total.
- To form branches, two branches must be twisted together, then another one is screwed to them.
- The rest of the branches are formed in a similar way. There should be 24 branches.

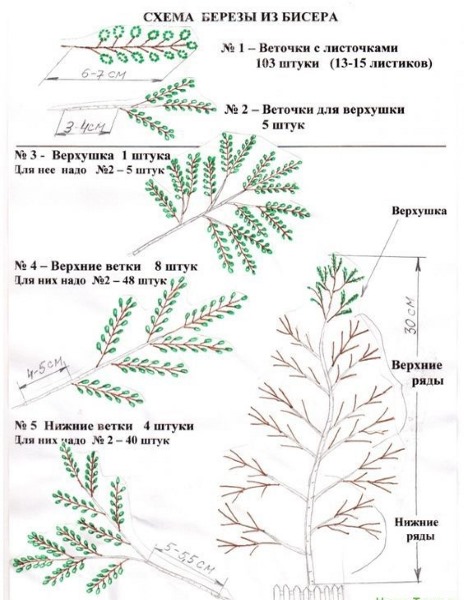
Step-by-step tree assembly:
- 3 twigs are twisted together to form a single trunk.
- A thick wire is applied to the branches, then I wrap a single trunk with threads, attaching the branches in the process.
- For the trunk, take branches in the following quantity: for the top, 3 pieces and 13 pieces to fix around.
- A second smaller trunk is collected, as well as the first, but 2 branches are used for the top, and around 6 branches.
- The two resulting trunks are fastened together with thread and wire.
The wood is fixed on any base with plaster or glue.
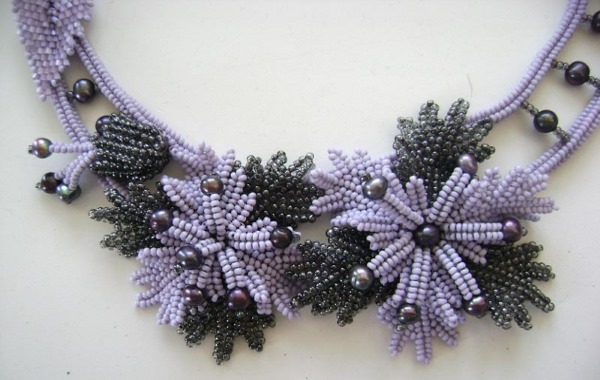
Flowers
Weaving chamomile beads for beginners will be presented in a detailed master class with a photo, according to the diagrams, the process of creating a flower consists of several stages.
For work you will need:
- beads number 10.
- wire with a diameter of 0.3 mm in the color of the beads.
- threads.
- scissors.
Step-by-step master class for weaving petals:
- Cut a wire 40 cm long.
- 25 elements are strung on it.
- Twist the wire in a loop.
- In a similar way, 2 more petals are woven.
- Take a bead for the core, which must be fixed at one end of the wire and held towards the other.
- Then 4 more petals are formed.
- Twist the wire.
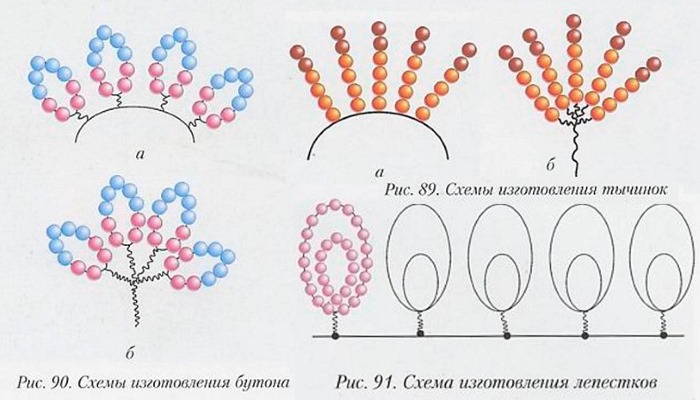 Step-by-step master class of the second stage (formation of sepals and leaves):
- 9 beads of the same color are put on a green wire.
- The end of the wire is returned to the first bead and a loop is formed.
- Weave the next 5 loops as well and twist the wire.
- Twist the wire of the flower and sepal together.
- They take a wire of 30 cm and put 3 beads on it, placing them in the middle.
- The end of the wire is drawn into two beads towards each other, the thread is tightened.
- Then the beads are recruited according to the scheme: 3-3-4-4-5-5-4-4-3-3-2-1, the teeth are formed as follows: beads are drawn on the thread, the end of the wire is threaded into the first bead and pulled out.
- Finished leaves are screwed to the stem.
- The finished product is wrapped with green thread or tape.
The wire must be wrapped with green thread.
Heart
Brick technique will be used to create the heart.
Step-by-step master class for creating a blank:
- Cut off 60 cm of fishing line.
- 3 beads are put on the thread.
- They come back and thread the thread through two beads at the beginning again, tighten the thread.
- Next, string 2 elements and pass the needle under the fishing line through the two upper triangle elements and thread the fishing line through the last stringed bead. Tighten without effort.
- Take a bead, pass the line under the loop, and then pass the thread through it. 3 rows of beads should form, namely a triangle.
- In the first loop of the previous row, a "brick" of 2 beads is formed, in the second loop - two "bricks" one by one.
- For the next row, you need to make a "brick" of 2 beads, weave 2 "bricks" one bead in the outer loop.
- The next row is woven in the same way.
It is important to remember that in the first loop you need to attach two beads, and in the last - 2 times by 1. In total, 6 beads should be fixed in a row.
Step-by-step weaving of a heart from a blank:
- For the upper part, string 5 beads on the needle, skip one loop of the row, insert the needle into the third bead from the row from the edge, tighten the thread.
- Then you should bring the thread through the next bead in the row upwards.
- 5 beads are put on the thread, fixed at the end of the row.
- Tighten the thread.
Animals
A step-by-step master class on making a volumetric tiger cub using the mosaic weaving technique:
- To weave the tiger's cheeks, put on a bead on the thread, threading the needle through this bead again, and fix it. Next, string beads of white color. For one side, you need white and black beads, in the amount of 2 pieces.
- The cheeks are stitched with a mosaic stitch.
- The nose is woven in a mosaic, using 14 brown elements. Next, the nose and cheeks are combined.
- Orange beads are threaded from the nose on both sides. There should be 4 rows in total, after which eyes are woven from black beads.
- They continue to weave the head of the animal in a circle, stringing black and orange beads in turn.
- The ears are woven in a square weave of white and orange material. One ear consists of two parts of different colors, the finished ears are connected to the head.
- The lower jaw is woven from white beads, the tongue is woven into the same place from 6 red beads. The finished jaw connects to the head.
- The body is woven with beads of three colors, alternately.
- From the 18th row, you need to start reducing the number of beads on the sides, then in front.
- The details of the lower and upper legs should be 16 rows, with a mosaic seam the sole is connected to the paw.
- The tail is braided with a square plait and combined with the product.
Insects
To weave a flat shape of a butterfly, you need large and small beads, fishing line, wire and scissors.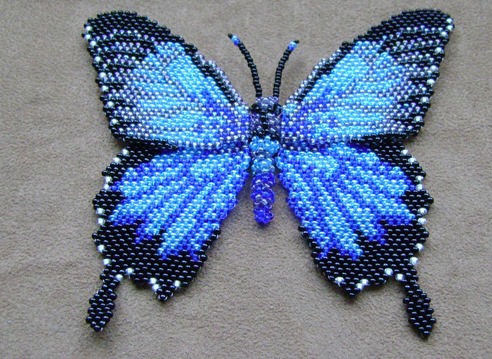
To weave a flat shape of a butterfly, you need large and small beads, fishing line, wire and scissors.
Butterfly weaving pattern:
- A 40 cm wire is cut off, a bead is strung on it, the opposite end of the thread is threaded into the same bead and tightened.
- Repeat the action.
- 2 beads are put on the wire and the end is pulled through them. Tighten up.
- Repeat the action.
- The next row is woven in the same way, using beads of a different color.
- A bead is put on the wire, the free end is pulled through it, tightened. The mustache is twisted from the remaining wire using the smallest beads.
- A wire 30 cm long is pulled into the second row, 12 beads are strung on the free end, the remaining end is pulled into the third row.
- At the other end, the actions are repeated, but in the opposite direction.
- At the ends of the thread, 15 beads are strung on each side, then these ends are threaded in the 4th row.
- The free ends of the threads tighten the wings on the butterfly's body.
- The ends are twisted and hidden from the inside of the butterfly's body.
Weaving in the shape of a flat butterfly from beads is ready, this is a simple master class for beginners, photos and detailed diagrams will help to make products as accurately as possible. Beads of any color and size are used for weaving the wings.
Patterns and photos of weaving from beads
A beginner master should choose the most simple and understandable weaving pattern for himself, use high-quality large-sized beads, even wire in his work. To begin with, it is recommended to make the simplest products, not bulky, which do not require a lot of experience and a lot of time. Then the finished product will be perfect.
Video about weaving from beads
Master class for beginners on weaving bead bracelets:
How to weave a beaded butterfly:
Love this stuff. Honestly, I thought it was all complicated. However, the diagrams in the article seem simple.