There are many types of pedicure: from classic edging to hardware and acidic. And some of them can be applied at home. For beginners, a non-educational or European pedicure technique is suitable. This procedure is less traumatic and does not require any specific experience.
General recommendations
Home pedicure for beginners can be done using regular nail polish or gel polish. The first option is inexpensive and easy to apply, but such a coating is very short-lived, and will last no longer than 3-5 days. Gel polish is more durable and will remain unchanged for 2-4 weeks, but it costs much more.
And to dry such a coating, you need a special lamp, as well as a top and base. A beautiful pedicure can be either monochromatic or multi-colored. It can be supplemented with decorative elements or drawings. But in any case, pedicure is not just painting with varnish. This procedure involves caring for the skin of the feet, because even the most beautiful design will look unattractive with coarse heels.
Techniques and methods
There are several types of pedicure that can be applied at home:
View | Features: | Benefits | disadvantages |
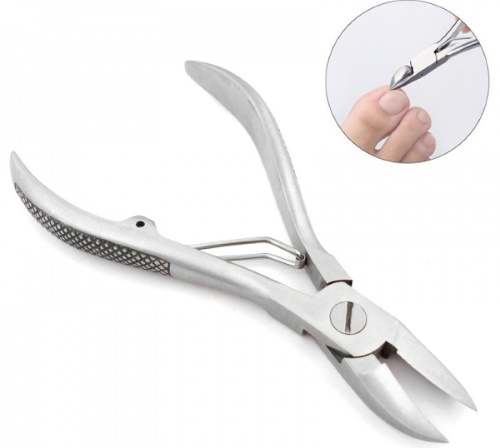
| Classical | Steamed feet are processed with a pumice stone, razor or grater. The cuticle is trimmed with scissors and the nails are filed with a file. | The technique of execution is simple, and a beginner can master it. To perform a pedicure, you need simple and affordable tools. | There is a high risk of injury to the skin. If you use non-disinfected instruments, you can get an infection. Often the procedure accelerates the growth of hardened skin. |
| European or unedged | The cuticle is not cut out, but softened with a special compound, and then pushed back. Rough skin is removed with special graters. | The technique is safe, and practically eliminates the risk of injury or infection. | The procedure is extremely delicate, so it will take 5-6 sessions to put in order the neglected feet. |
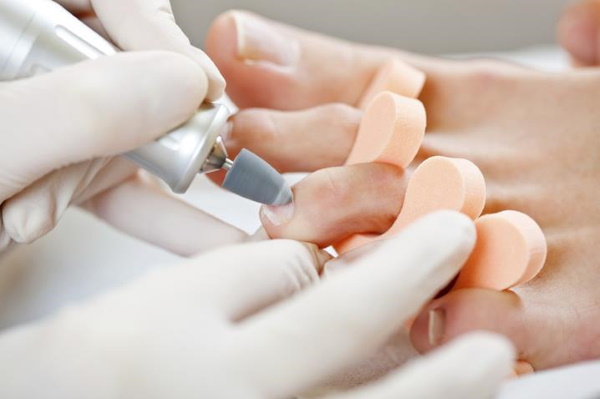
| Hardware | It is carried out using a special device and milling attachments. The legs are not steamed before the procedure. | This type of pedicure is safe and effective. The feet stay soft for longer. | The device for the procedure is very expensive. In addition, some experience is required to apply it. |
| Acid | The feet are treated with a special compound containing fruit acid. After that, the dead skin is removed with a file. | The method is safe and allows you to get rid of any corns and calluses. An acidic product is inexpensive and can be easily applied at home. | Cannot be used with fungus or wounds. After the procedure, the skin often peels off for 5 days, which looks unattractive. |
For beginners, it is advisable to dwell on the unedged method.
It consists of the following stages:
- Training.
- Removal of dead skin.
- Filing nails.
- Moisturizing the skin.
- Coating.
Required materials and tools
To get a pedicure at home, you need the following:
- Scissors, tweezers, wire cutters... It is important to choose sharpened tools from quality steel.

- Nail file... It is advisable to choose a glass nail file for filing nails. But it is better to grind the surface with a buff.
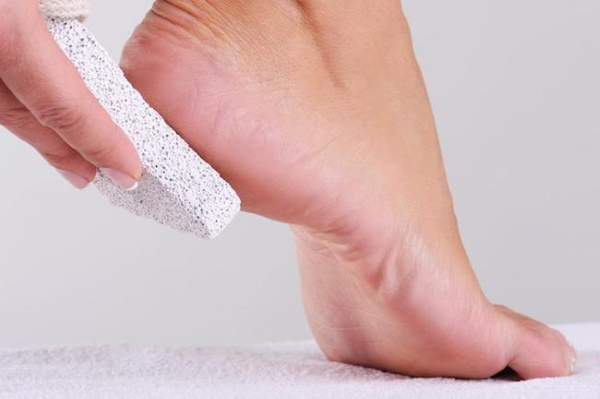
- Pumice... Alternatively, you can use a special pedicure machine or a fine-grained grater to remove rough skin.
- Ceramic or plastic container for steaming legs.
- Towel, cotton swabs and discs.
- Means for nail polish remover.
- Emollient cream or oil, scrub.
- Finger spacers and a wooden stick.
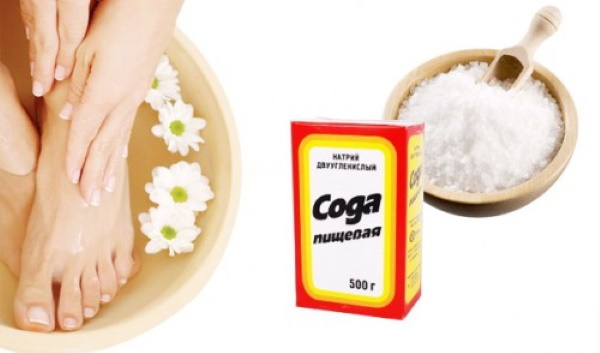
- Sea salt, herbal teas, or a special heel emollient.
You will also need varnish or gel varnish, as well as decorative elements, if they will be used to create a pedicure.
Training
At the initial stage, it is necessary to remove the remnants of the old varnish. After that, you need to steam your feet in a warm bath. This will soften the hardened skin and can be easily removed afterwards.
Various ingredients can be added to the water to enhance the effect:
- Sea salt... Strengthens nails and promotes rapid skin softening. It goes well with essential oils.
- Baking soda... It kills germs and is used to treat and prevent foot fungus. Perfectly removes unpleasant odors. For 3 liters of water, 4 tbsp is enough. l. soda.

- Decoction of chamomile or calendula... The addition of these products not only disinfects and softens the skin, but also relieves stress. For cooking, you need to pour a glass of boiling water 2 tbsp. l. vegetable raw materials, leave to infuse for 30 minutes.
If the skin on the feet is very coarse, then you can make an express bath. To do this, add a few tablespoons of table salt to the water. Next, you need to soak your feet in this solution for 5-10 minutes, and then pour 2 tbsp there. l. hydrogen peroxide.
The resulting reaction will help to quickly remove even strong calluses and corns. After 10 minutes of such a bath, you can proceed to the pedicure itself.
How to carry out the procedure
A pedicure at home for beginners is carried out according to the following algorithm:
- The steamed legs must be wiped off with a towel. After that, rough skin should be removed using a pumice stone, a machine or a nail file. Movements should be smooth and accurate. Particular attention should be paid to corns and keratinized areas. To remove dead cells from your fingers, you need to scrub them.

- After peeling, you need to wash your feet and apply a nourishing cream or oil to them. For better absorption of the funds, it is advisable to massage the skin for 5-10 minutes.
- Using a wooden stick, you need to move the cuticle, and then remove the dirt from under the nails. This procedure must be carried out very carefully so as not to injure the skin.
- Use a pair of tweezers or scissors to trim your nails. But do not be too zealous from the edge, otherwise they will then grow into the skin. It is best to generally trim your nails in a straight line without touching the tips. After that, you should file the edges, giving them a slightly rounded shape. The upper surface of the nail needs to be polished with a buff.
All that remains is to apply a coating, which can be matte, glossy, with a design or monochromatic - it all depends on the imagination and the desired result.
Master class of one-color pedicure
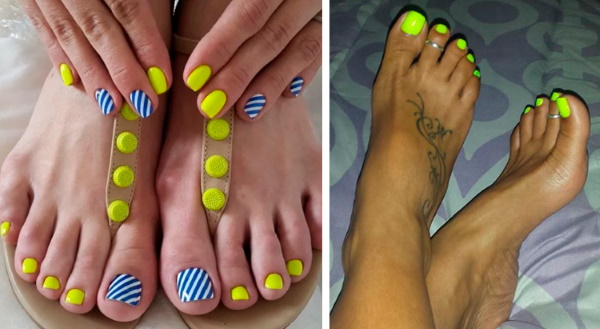
The monochromatic finish looks attractive and is suitable for everyday pedicure. Those who want to stay in trend should choose coral color. He will be at the peak of popularity in the fall-winter season. Shades of blue, beige, red, gray, as well as classic black and white do not go out of fashion.
Those who love unusual tones should choose purple, fuchsia, burgundy, gold, orange, mint. Neon varnishes are popular in the last season. They look catchy and defiant, and are perfect for a club or beach look.
A monochromatic pedicure with rubbing, shimmer or glitter looks no less impressive. Such a coating looks festive even without additional decor, and is suitable for an evening look.If you wish, you can cover only one nail with sparkles, and paint the rest with glossy varnish of the same shade.
The matte monochromatic coating looks stylish and elegant. For the upcoming autumn season, burgundy shades will be especially relevant.
How to do a solid color pedicure:
- After preparing the feet, it is necessary to treat the plates with a degreasing agent to remove the remains of cream or oils from them.
- Then you need to apply the base to the nails, and after waiting for it to dry, cover it with 2-3 layers of varnish. Each of them is applied only when the previous one is dry.
- The coating needs to be fixed with a finish, then the result will last longer.
Options in different shades
Home pedicure for beginners can be made bright and memorable by using a technique such as a gradient or ombre. It is based on the play of color, and can be created from several shades that smoothly flow into each other.
To create such a design, you need the following:
- 2-3 shades of varnish of the same or different colors, but matching each other;
- sponge;
- base, fixer.
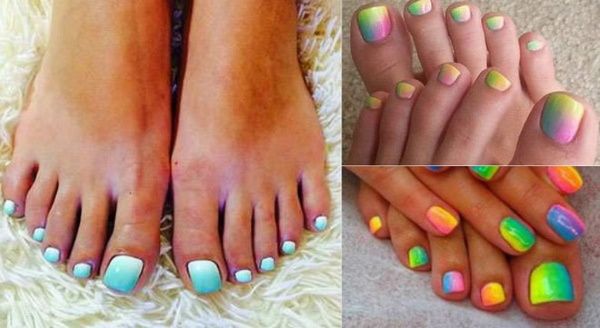
To make a pedicure gradient at home, you need to treat your nails with a base. Then you need to apply varnishes of different colors to the sponge. The strokes should be placed as close to each other as possible. Until the varnish has dried, you need to quickly transfer it from the sponge to your nails with patting movements. Beginners should remember that the result obtained must be secured with a topcoat.
The gradient on all nails looks no less impressive. In this case, a different varnish of the same color is applied to each plate, starting from the lighter one on the thumb and ending with the dark one on the little finger.
Pedicure master class with simple patterns and drawings
Even without artistic skills, you can make a beautiful pedicure with a variety of patterns. Moreover, there are several different painting techniques that even beginners can handle.
With scotch tape
Thanks to this material, you can create geometric shapes, diagonal or vertical lines, thin or wide stripes. To do this, you need to cover your nails with a base color varnish.
After waiting until the layer is completely dry, you need to stick the strips of adhesive tape to the plate so that you get the desired design.
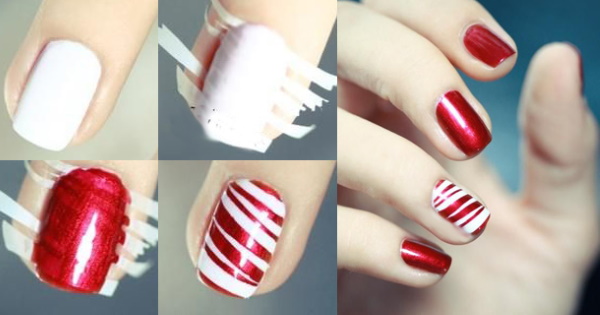
After that, you need to cover the nails with varnish, the color of which contrasts with the base. After waiting for the layer to dry, you should carefully tear off the tape and fix the result with a topcoat.
Drawing with a needle
The simplest drawing can be done using 2 varnishes of a contrasting color and a regular needle. And also a fixer is required for work.
Algorithm of actions:
- On prepared nails, apply the base varnish. Wait until the layer is completely dry before moving on to the next step.
- On the nail, you need to put several points of varnish contrasting from the base. Then you need to stretch the needle through these points, drawing monograms and curls.
- When the pattern is dry, cover the nail with a finish.
And also with a needle, you can draw thin lines or make outlines of a pattern.
Dotsom drawings
It is easier to draw patterns with dots than with a needle. Indeed, with the help of the tool, you can control the volume of the drop, due to which the lines are smooth. To create a design, you need to apply base varnish to the nail. And after waiting for it to dry, you should dip the "ball" of dots in a contrasting color, and then apply the desired pattern to them.
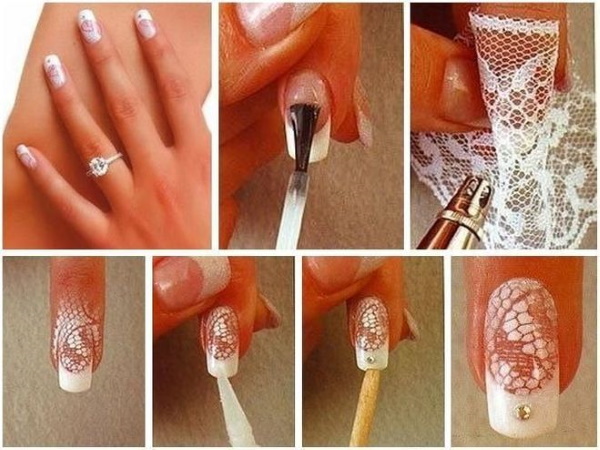
Tulle lace
With a piece of old tulle, you can make a lace pattern on your nails. This pattern looks gentle and elegant, and is suitable for both festive and regular pedicure.
Execution algorithm:
- On prepared nails, you must apply a base, and then cover it with a layer of varnish.It should be borne in mind that it will be the main color in the design.
- After waiting for the varnish to dry, you need to attach a piece of tulle to the nail. Then you need to paint the material with varnish in a contrasting color.
- Wait until the layer is completely dry and carefully pull the tulle away from the nail.
- The result must be secured with a finish.
If desired, this design can be decorated with rhinestones, sparkles or crystals. Then the pedicure will be more festive.
Pedicure master class with decor
A pedicure at home for beginners can be done with the following decor elements:
- rhinestones;
- kamifubuki;
- foil;
- stickers;
- metallized stripes;
- stamping.
It should be borne in mind that you cannot overload your nails with decor. Otherwise, the design will look vulgar.
Rhinestones and crystals
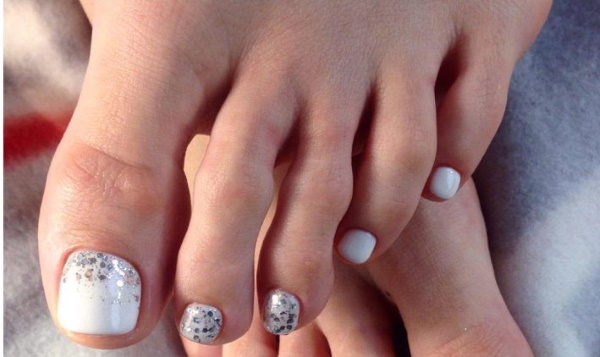
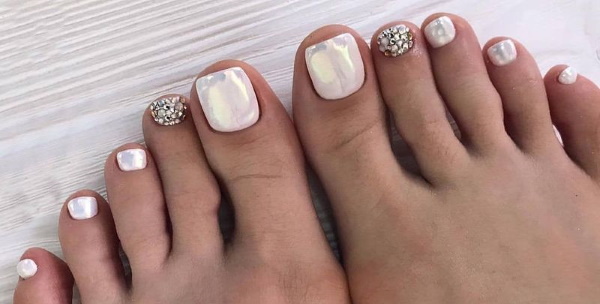
These decorative elements come in different colors and sizes. They look solemn and festive, and you can lay out whole pictures from them. But rhinestones and crystals peel off quickly, so they are not recommended for everyday pedicure. But for an evening look, they are not interchangeable.
To make a pedicure with rhinestones and crystals, you need to attach these decorative elements to the not yet dried topcoat. If necessary, they can be covered with another layer of sheer top.
Kamifubuki
These are the names of colored confetti or sequins. Such decorative elements are both round and of unusual shape (triangles, stars, hearts).
And they can be used both as single decorations and to create compositions. Kamifubuki, like rhinestones, are attached to the finish coat. They are suitable for summer designs and look spectacular against bright and dark backgrounds.
Foil
With foil, you can make an original and unusual pedicure that will look appropriate both in an everyday and a festive look. And with this decor you can decorate one or several fingers, or in general, highlight some part of the plate.
To make a pedicure with foil, you need to prepare your nails, and then attach the decor sheet to the varnish that has not yet dried. If you wish, you can make various patterns by painting them with a colorless base. You need to wait 1-2 minutes, and then tear off the foil with a sharp movement.
Stickers
Stickers and sliders help you create an unusual design in a matter of minutes, and even a child can use them. The main thing is to remember that it is advisable to apply white or flesh varnish under such decor. And on top of the sticker, it is advisable to process it with a transparent fixer.
If this decor is used for a pedicure with gel polish, then you need to attach it to a dry finish top. And only then should you dry your nails under a lamp. After completion of work, avoid contact with water for 30 minutes. Then the stickers or sliders will look perfect for 15-20 days.
Metallic stripes
This decor is ideal for creating geometric motifs that have not gone out of fashion for several seasons.

The stripes also help to hide the joints between two contrasting colors of varnish, for example, in a jacket, and they can be used for both everyday and festive looks.
Stamping
Stamping is the application of patterns using stamps. A similar technique helps to make an unusual and original pedicure in a matter of minutes. It is necessary to apply a base on prepared nails, preferably matte. Then the drawing will be clear and bright.
It is necessary to apply bright varnish to the plate with an ornament or pattern, and then transfer it to the nails using a stamp. The first time you get uniform drawings will not work, so you have to practice. At the end, be sure to fix the result with a colorless finish.
Fashion trends in 2019
Monochrome pedicure remains trendy. Moreover, it is not necessary that it repeats the color of the nails on the hands. On the contrary, such a combination is considered provincial.For those who do not particularly like a monochromatic pedicure, you can diversify the design with a pattern on one or more fingers.
As for the shades, bright colors are in fashion: coral, green, gold, transparent blue. Lovers of a discreet style should choose burgundy or wine red. These colors look especially impressive in a matte pedicure.
In 2019, complex and intricate patterns are no longer in vogue. They were replaced by unobtrusive, simple drawings, but thought out to the smallest detail. Geometry, abstraction and funny prints, polka dots, flowers and ornament are in trend. Those who prefer laconicism should choose the ultra-fashionable marble pedicure.
The classic jacket never goes out of fashion, and remains relevant this year. But instead of the traditional white color, it is recommended to use red, blue, golden shades for the stripe. Moon nail art is popular.
This year, the hole can be made both traditionally oval and triangular, double or unfolded. Moreover, beginners can easily cope with this technique at home. If desired, a similar design can be decorated with rhinestones or a metallic strip. But here it is important not to overdo it with the decor, otherwise the pedicure will look vulgar.
Article design:Lozinsky Oleg
Video on how to do a pedicure at home
Life hacks how to do a pedicure at home:
neatly varnished nails indicate that a woman takes care of herself and monitors not only her face and hair, but also the condition of her legs.
There are cases when, in addition to hygienic cleaning, therapeutic / prophylactic treatment of the feet is also required (hyperkeratosis, corns, cracked heels, dry feet), visiting the pedicure master in time can cope with these problems. A knowledgeable master will always be able to select / advise the therapy (creams, ointments, scrubs) for home care.
By doing a pedicure once a month, your legs will get rid of the feeling of heaviness, gain lightness and a well-groomed appearance.