Trim manicure involves the use of cutting tools: scissors, nippers, trimmers. For this reason, it can be difficult for beginners to play. During the procedure, the cuticle is removed by cutting. The correct technique can be learned by watching the video tutorials.
Advantages and disadvantages of a trim manicure
The types of manicure listed above are equally good - each of them is designed to solve problems that are different in nature.
The advantages of an edged manicure include the following facts:
- Trimming is universal and is used in all salons.
- Edged manicure helps to radically solve the problem of untidy, neglected cuticles, while hardware and unedged manicure is more often used to maintain a neat looking skin.
- A classic manicure is a quick procedure.
- This type of manicure is the cheapest.
However, a trim manicure has many disadvantages:
- A trim manicure is a traumatic procedure that must be performed by a qualified and experienced master.
- There is the greatest risk of infection. With a trim manicure, it is easier to damage the vessels, and skin injuries provoke bleeding. Also, tools for edged manicure require more attention - they need high-quality disinfection using special equipment.
- When trimming, the cuticle grows back faster.
- With a regular cut manicure, the cuticle coarsens.
- If the manicure is done poorly, or a blunt instrument was used, the cuticle will be “torn”.
A trim manicure is suitable for those whose cuticles are thick and dry - the tools will remove the skin from the nail bed as much as possible.
This type of treatment is suitable for those who have not done a manicure for a long time, or for those who naturally have a rough cuticle. The most effective is a combination of edged and unedged manicure - after the procedure, the skin is treated with cosmetics to soften and remove the cuticle, which does not allow it to grow.
General recommendations
Trim manicure (video tutorials for beginners will explain the technique step by step) must be carried out in accordance with these rules:
- If the procedure is performed in a salon, you must carefully choose a master. The best result will be achieved if the master has extensive experience, uses a non-traumatic technique of work, and also monitors the cleanliness and condition of the instrument: disinfects, sharpens the instrument in time or replaces an already out of order.
- It is necessary to trim only dry keratinized areas. Cutting off live skin can injure blood vessels.
- The cuticle is cut in one smooth motion. By "biting" the cuticle with sharp movements of the instrument, you can get burrs and protruding pieces of skin.
Materials and tools
Trim manicure (video tutorials for beginners will help you get used to the toolkit) can be done at home. This requires tools, several cosmetics, and supplies.
Tools
For a trim manicure, you need several tools: files, pusher, nippers or scissors.

- Files are used to correct the length and shape of the nail plate. There are metal, glass, ceramic and paper files. Also files differ in shape, purpose and abrasiveness. The files are square, oval, "boomerangs" in shape. By appointment - for filing, polishing, grinding or removing gel. The abrasiveness (surface hardness) of files is measured in special units - grit. The larger the number indicating their number, the harder the surface of the tool. For natural nails, the optimal abrasiveness is 220-320 grit. For artificial - 90-120. Files of 320-400 grit are also used to treat lateral ridges (skin areas on the sides of the nail bed).
- Pusher is a scapula-shaped tool for pushing the skin off the nail plate. Pushers are made of metal, silicone, wood. A silicone or wooden (orange stick) tool can be used daily. The metal pusher is designed for professional use. For a trim manicure, a metal pusher is preferable. As a rule, this tool is two-sided: a spatula at one end and a scraper (blade) at the other. Pusher can be more rounded, or more sharp - the first option is less traumatic and suitable for a thin, damaged nail plate.
- Nippers - forceps with handles and spring, designed for cutting cuticles and burrs. Nippers differ in purpose, material, blade shape. Pedicure clippers are not suitable for manicure. A medical alloy tool is preferred. This material is durable, does not rust and does not cause allergic reactions, unlike some types of metal.
- Scissors serve the same function as wire cutters. Choose scissors with a medium blade. It is also worth opting for one-piece scissors - the handles should not be plastic or wooden. The scissors blade, as well as the cutting pliers, should not have cracks or notches.
When choosing a tool, you should pay attention to the fact that it fits comfortably in your hand. Nippers and scissors need to be sharpened regularly - you can do this at a professional tool store or in a special service.
Cosmetics
The very first step of the procedure is treating the skin of the hands with an antiseptic. You can use a regular, alcohol-based pocket-sized antiseptic. An option from a pharmacy is also suitable - chlorhexidine solution. The most effective are medical antiseptics - they are used in many beauty salons.
Skin antiseptics are alcohol and water based.
Alcohol products have the most pronounced antibacterial effect. Aqueous solutions are less traumatic for sensitive skin of the hands and do not cause dryness. Also, an antiseptic solution is used to treat a cut or other injury to the skin. At home, it can also be processed with a metal tool - provided that only one person uses it.
Before using nippers or scissors, you can use cuticle softeners - removers. Typically, these are gels with a high acid content that remove dead skin and soften living skin. The remover must be held for 15-60 seconds - the exact time is indicated by the manufacturer.
If the product is too aggressive or the natural nails are thinned, the remover should be applied to the varnished nails. Otherwise, the product will damage the nail plate.
Consumables include wet, lint-free wipes, cotton pads, extension molds, and so on. - the list depends on the goals of the manicure. Lint-free wipes are needed to remove dust from nail filings.Such napkins, unlike ordinary ones, do not leave particles of fiber on the nails, which can get under the layer of varnish.
How to do a trim manicure at home:
A trim manicure (video tutorials for beginners can be viewed on many resources) can be done at home. The whole procedure is carried out in several stages: preparation of the nail plate, preparation of the skin, treatment of the skin with a tool.
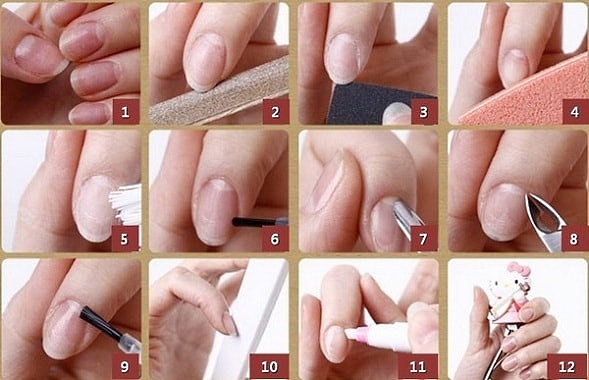
Below is a step by step guide:
- It is necessary to prepare the workplace. It should be well lit by daylight or a lamp, and kept clean. It is best to use a clean towel or disposable tablecloth to cover the surface.
- At the beginning, you should decompose tools, consumables, antiseptics.
- It is necessary to treat your hands with an antiseptic (chlorhexidine or alcohol antiseptic), paying attention to the cuticle area. The skin antiseptic should be rubbed into the fingers, the spaces between the fingers, palms and nail plates.
- If necessary, you can remove old coatings from nails with nail polish remover.
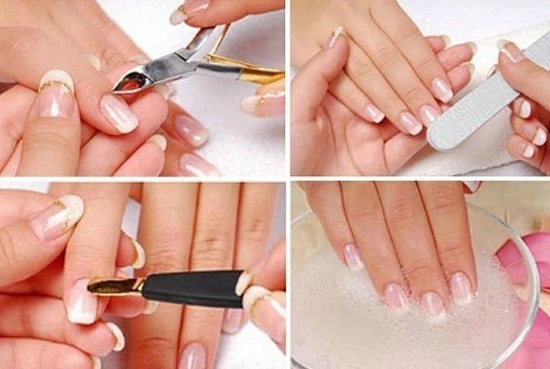
- Using nippers and a file, you should give the nails the desired shape. In order for the length to be the same, you can use nail extension forms. Each form is marked with length and width. After the sawdust, remove dust with a nail brush or a damp, lint-free cloth.

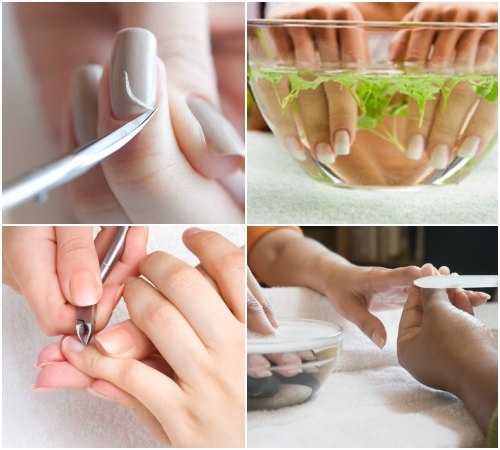
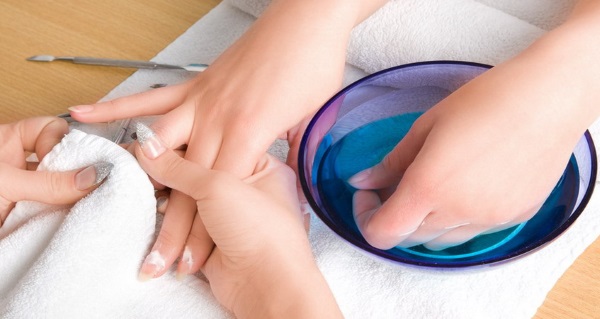
- There are two ways to soften the cuticle: by soaking the skin in a bath (classic method), or using cuticle softeners (combined manicure method). In the first case, you need to dip your fingers in warm water for 5 minutes. As a container, you can use a regular bowl or a special manicure bath. Oils or sea salt can be added to the water. In the second case, apply the product to the cuticle area for 30-60 seconds.
- The softened skin is pushed with a pusher or orange stick with gentle movements towards the nail hole. If you press too hard on the nail plate, furrows or white spots may form on it.
- Then pat the skin dry with a dry towel to absorb excess moisture.
- Using nippers or scissors at a 45 degree angle, make the first cut at the side roller. When using scissors, hold them with the blades upward. Further, winding the lower blade of the tool under the cuticle line, continue to cut along the perimeter of the cuticle, without making any sudden movements. In the middle of the cuticle line, the instrument lies parallel to the skin. Closer to the edges of the side rollers, the angle of inclination of the instrument to the skin increases.
- After removing the cuticle, apply oil to the nails and massage each finger lightly.
- The last stage is cleaning the workplace and treating the instrument with an antiseptic solution.
Why is it dangerous to use non-disinfected instruments?
An instrument that has not been disinfected can lead to infection. The risk is especially great if the instrument is used by several people. There are several stages of instrument processing: cleaning, disinfection and sterilization.
- Cleaning is a simple rinsing of the instrument with water and cleaning agents.
- Disinfection produced by placing the instrument in a special solution for a short time - such processing is sufficient at home for an instrument used by one person. As a result, microorganisms on the surface die.
- Sterilization instruments are carried out using autoclaves, dry heat, sterilizers. Such treatment negates the occurrence of bacterial and fungal diseases on the hands, hepatitis B and HIV when using the instrument on several people.
How to choose a manicure set?
A trim manicure can be performed with both separately purchased tools and tools from the set.
Basic recommendations for choosing a manicure set:
- You should purchase sets of proven brands - a poor-quality tool has a short service life and can provoke injury.
- Sets of 4-7 items are preferable. They must include the following tools: file, pusher, nippers, nail scissors, scraper. With experience, an understanding will come about which tools need to be purchased individually.
- Preferred sets, the components of which are made of medical steel.
How to take care of your nails after a trim manicure.
A trim manicure (video tutorials for beginners will help you master the correct technique) is a procedure, the result of which must be maintained with daily care. Its main task is to prevent subsequent coarsening and growth of the skin.
To do this, you must regularly carry out the following actions:
- After showering, gently push back the cuticle with a pusher or fingernail. Thanks to this, the skin will not grow on the nail plate.
- Use a cuticle remover once every 7-10 days to help cuticle growth slower.
- Repeat the manicure procedure every two weeks. If the condition of the skin around the nails is normal, then an edged manicure can be carried out every 2-3 months or as needed.
- Lubricate the cuticles with oil or nourishing cream at least twice a day - this will help to avoid dryness and the appearance of burrs and cracks. The moist cuticle does not build up on the nail bed.
- Carefully cut off the appeared burrs with scissors or nippers, preventing their growth.
To nourish the cuticle, use regular butter or butter (hard butter).
Most nutritious oils:
- shi;
- avocado;
- olive;
- coconut;
- cocoa.
Lungs include grape seed oil, apricot seed oil. You can use ready-made oil mixtures sold in stores and pharmacies, or you can make them yourself.
For maximum nutrition, a vitamin E capsule can be added to the oil. The oil is applied to the cuticle, after which it is distributed and left for 5 minutes to be absorbed. After the specified time has elapsed, the oil is rubbed into the cuticle and nail plate with massage movements.
Which manicure is better: hardware or edged?
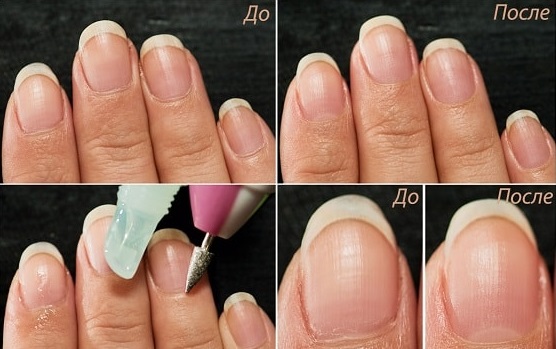
Edged and hardware manicure have a number of differences. You can learn about them in video tutorials for beginners. The first technique involves the use of a special apparatus with a rotating element.
Dozens of cutter attachments can be used on the device:
- for removing and polishing the cuticle;
- for cutting off the gel coating;
- polishing nails;
- removal of calluses and calluses on the feet.
Unlike unedged manicure, both hardware and trimming techniques use a mechanical method to remove the cuticle. In the process of the hardware manicure procedure, the master chooses the necessary cutter, the speed of rotation of the nozzle and cuts off the dry cuticle. Hardware processing is performed exclusively on dry skin. Damp skin can tear from the rotation of the cutter, so the skin is not steamed before the procedure.
The advantages and disadvantages of hardware manicure relative to edging are presented below:
| Benefits: | Disadvantages: |
|
|
A trim manicure has many benefits and is easy to do at home. You can learn it from video lessons, understandable even for beginners. All that is needed for the best result is a quality tool and compliance with safety regulations.
Video about edged manicure, the features of its implementation and the necessary tools
Classic trim manicure:
Necessary tools for classic manicure:
I'm a fan of edged manicure! I'm afraid of the apparatus like fire. And here everything is simple, even on your own you can do it without problems if there is no time for a salon.