One of the modern ways to get a reliable manicure is to extend nails with gel on forms. Following the instructions step by step, you can carry out nail extension at home. The gel allows you to model the shape and length of the nails, while maintaining the aesthetics of the manicure for two to three weeks.
What do beginners need for nail extension on forms
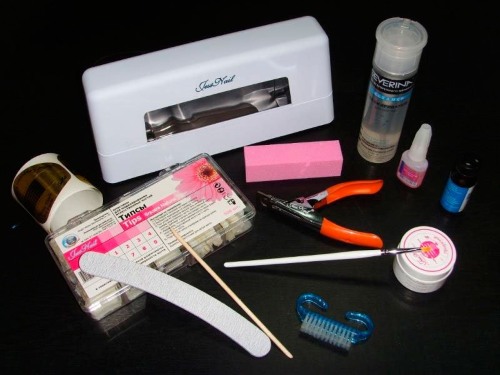
Mandatory toolbox:
- Pusher. Lovers of natural materials replace it with an orange stick. The pusher is more convenient in that it connects two instruments at once - a sharp tip-hatchet and a flat blade. They are used to move the cuticle and skin off the nail, correct minor gel defects, place rhinestones, etc.
- A set of files for processing nails of various shapes and degrees of abrasiveness. Be sure to have a soft type of file-buff for polishing the surface of the nail plate.
- Manicure scissors, nippers, tweezers - for processing barbs, cuticles, etc.
- Soft brush for removing sawn particles.
- A set of paint brushes.
- Tweezers for working with small parts.
- Lint-free cloths.
- UV lamp for curing the gel coat.
- Forms for modeling nails.

Mandatory set of materials:
- Antiseptic for pretreatment of the nail and adjacent skin.
- Cuticle softener.
- Composition for disinfection, degreasing, dehydration. You can use separate formulations, but it is better to purchase a specialized spray or 3-in-1 liquid preparation that performs all three functions.
- Primer (or other adhesive) - to ensure adhesion of the nail plate to the gel.
- Degreaser that removes the sticky layer.
- Base gel coat. The gel can be one-, two- or three-phase.
- Colored gel coatings.
- A high-gloss gel finish.
Types of gel for nail extension
For successful nail extension, it is necessary to ensure strong adhesion of the polymer to the nail plate, correct the shape of the nail and give it shine and smoothness. According to the process technology, gels are divided into one-, two- and three-phase - depending on the number of technological stages and compositions required for work.
There are a large number of gels on the market from different manufacturers.
Experienced craftsmen advise choosing products from the following brands:
- FormulaProfi, Russia. Good value for money. Produces several varieties of three-phase gel. It is in demand among professionals as a quality product.
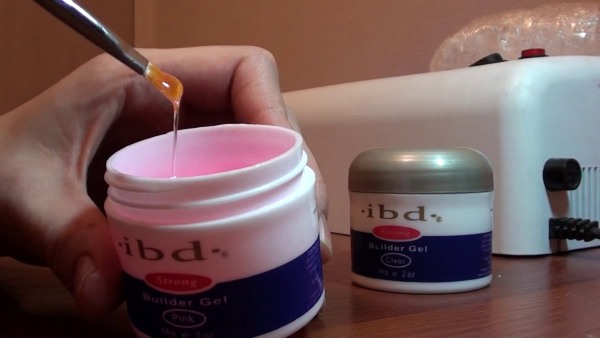
- IBD, USA. Offers a range of products: primer gel, construction gel, etc. Differs in a composition that is gentle on nails and of high quality. Used mainly by professionals.

- Global, USA. Offers single and three phase gels. Differs in high quality. Recommended for beginners and home treatments.
- CNI, Russia. Premium design for 3-phase simulation.
There are other brands on the market.
What is the difference between single-phase and three-phase gel
The sequence of step-by-step actions for building nails with gel on forms differs depending on which technology is used: single-phase, two-phase or three-phase.
Differences:
- Gel composition used for single-phase extension, performs all the necessary functions: guarantees adhesion to the nail base, allows you to simulate the required shape of the nail, ensures smoothness and shine of the coating. This technology is very convenient for beginners, because the easiest to use: only one type of gel is required, which is applied in one step and fixed in one session of irradiation with an ultraviolet lamp.
- Two-phase technology requires the use of two types of gel. One of them provides connection and modeling, and the other is protective, ensuring the smoothness and strength of the nail. Accordingly, two coats and two curing sessions are required under the UV lamp.
- Work on three-phase technology the most time consuming. Three compounds are used: for adhesion, for modeling, for protection. Each layer is applied and illuminated with a lamp separately. This method requires the master to have work experience and qualifications. Professionals prefer this particular technology because of the high quality of the modeling.
Preparing nails
Before building, the nail needs high-quality preliminary preparation:
- Disinfectant treatment... To avoid possible infection, you must carefully treat the nail and adjacent skin with an antiseptic. In this case, you should choose a material that does not leave lint.
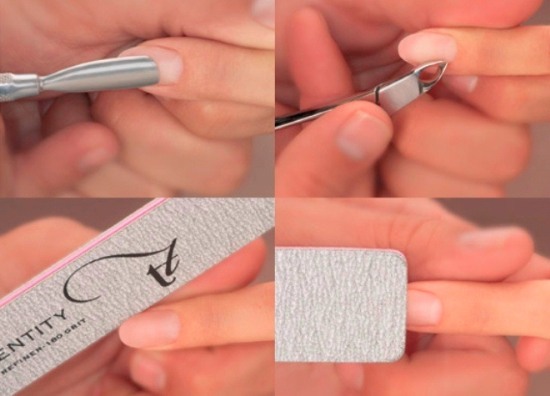
- Cuticle treatment... It is not cut to avoid possible injury. A special softener is applied to the base of the nail plate, after which the cuticle is gently pushed back. The same remedy softens the skin that has grown on the nail - pterygium. The pterygium should be moved away especially carefully, because its particles will break the adhesion of the gel to the nail plate.
- Filing the nail... The edges of the nail plate are processed with a file to give the desired shape. The length of the edge of the nail is about 3 mm.

- Surface treatment of the nail plate... To ensure adhesion, the top layer of the plate is removed. It is important not to remove too thick a layer, which will lead to thinning of the nail, so you should not use files with a high degree of abrasiveness. Experienced craftsmen advise using a 180 grit buff. The direction of processing is from the cuticle along the nail to the edge. Transverse processing is not permitted, because leads to nail damage.
- Removal of cut particles... Avoiding touching the sawn-off plate with your fingers, carefully brush off the formed dust with a brush.
- Disinfection, degreasing, dehydration. For this, the nail is treated with a special composition - liquid or spray.
- Application of adhesives... A layer of adhesive (primer, gel adhesive, etc.) is applied to the treated surface. When using forms, the primer is applied after overlapping the templates. There are two types of primers - air-drying and UV-drying.
The nail plate is ready for extension.
How to fit the shape to the nail
A mold is a marked template made of metal, Teflon, and other materials. Durable reusable forms require thorough disinfection after use, so disposable forms made of paper, thin plastic, and foil are often used. The shape can be fixed at the top or bottom of the nail.
Installation and fitting of the shape is a very important stage, on which the quality of the extended nail depends.
When using solid forms, it is necessary to select the size of the nail so that it fits perfectly to the nail plate. The form is bent with light pressure and put on the nail through the provided hole. After matching the shape with the "smile line", it is securely attached to the finger.
Disposable soft forms require additional adjustment.They make it possible to fit the stencil to the outline of a specific nail plate. This is especially useful when processing nails with irregular shapes. If the forms are too soft, then experienced craftsmen advise to glue two pieces together.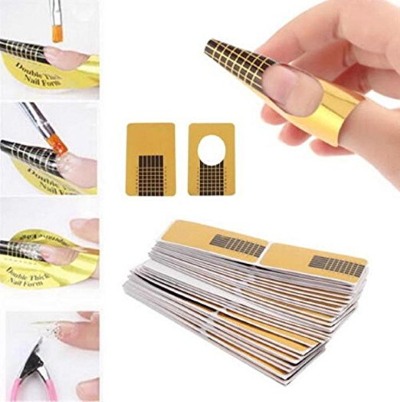
The disposable template is removed from the backing, the perforated oval is extruded and glued to the back of the mold, providing additional rigidity. The bottom edges are torn along the perforated line, the shape folds slightly and slides over the finger. There is a center line for orientation on the form.
Before the final fixation on the finger, the shape is given the desired slope - it should continue the line of the nail without deviating up or down. If gaps are formed between the surface of the nail and the mold, the cutout of the mold is adjusted with nail scissors. The coincidence of the shape with the root arch must be perfect, otherwise the gel will flow into the formed gaps.
After fitting, the “ears” are carefully glued to fix the shape on the nail. The bottom edges of the mold are glued to the finger. The shape is adjusted individually for each nail.
Stages of nail extension with single-phase gel on forms
The single-phase gel, due to its ease of use, is optimal for those who are just learning the art of nail extension. Novice masters should build each finger separately.
After gaining practical skills, it is important to follow the order of building up: first 4 nails (except for the thumb) of one hand, then 4 nails of the other, the nails on the thumbs are processed last - otherwise the gel will drain from them due to the angle.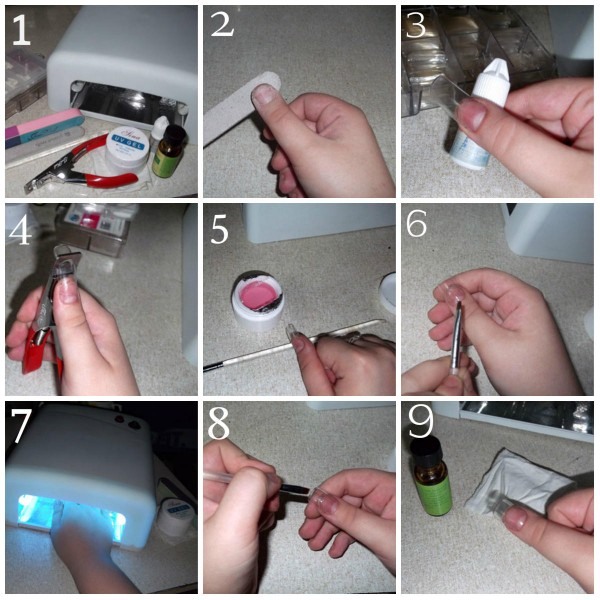
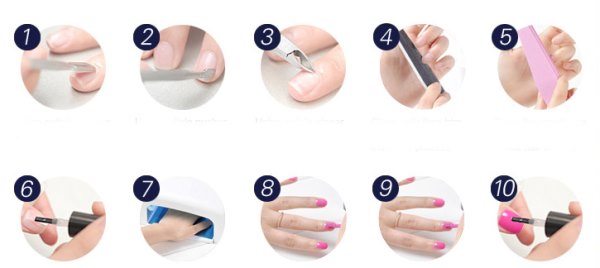
Build-up step by step with gel on forms:
- Preliminary preparation of nails:
- antiseptic treatment;
- hygienic manicure;
- filing the edge of the nail and nail surface;
- cleaning from nail dust;
- application of dehydrator and primer.
- Installation and adjustment of the form.
- Applying the first gel layer. The layer is made thin by spreading the gel with a brush over the entire area of the nail. On the first third of the nail at the base - the cuticle area - the gel is applied in a thin layer. In the stress zone (the rest of the nail area, the line of the nail and the mold junction, one third of the mold), the layer thickens slightly, because this is where the bulk of the load falls. Towards the edge of the simulated nail, the layer becomes thinner again. The layer is polymerized - under a UV lamp for 2 min, under an LED - 1 min.
- Application of the second gel layer. A drop of gel is applied with a brush in the middle and gently spread over the surface. Then you need to hold your fingers horizontally for half a minute so that the gel is equally distributed over the surface of the first layer. The polymerization conditions are the same as for the first layer.
- Removing the sticky layer - produced with a lint-free napkin.
- Removing the stencil.
- Surface grinding and adjusting the edge of the created nail.
- If necessary - applying a decorative coating.
How to work with three-phase gel - step by step instructions
Building up step by step with a three-phase gel on forms requires the master to have certain experience and qualifications.
Sequencing:
- Preliminary preparation of nails:
- antiseptic treatment;
- hygienic manicure;
- filing the edge of the nail and nail surface;
- cleaning from nail dust.

- Installation and adjustment of the form.
- Application of dehydrator and primer.
- Application of the first composition - basic, transparent, which provides adhesion of the artificial nail to the nail plate. It has a liquid consistency, is applied and evenly distributed with a flat brush. The layer is polymerized - under a UV lamp - 2 minutes, under an LED - 1 minute.
- Application of the second composition - a gel modeling structure. It is a thick, viscous formulation suitable for giving the nail the desired shape. The layer is polymerized - under a UV lamp - 3 minutes, under an LED - 2 minutes.
- Removing the sticky layer with a lint-free cloth.
- Correction of the resulting nail.
- Application of the third layer - top coat.It is a protective layer that secures the previous two layers and gives the extended nail shine and strength.
Building lesson: a jacket on forms - in stages with a photo
Classic French manicure (French) is a plain, discreet background (flesh or pinkish tint) and a clearly drawn white "smile line" along the edge of the nail. The appearance of extended nails led to a new round of popularity of the jacket, which looks especially impressive on nails of the correct geometric shape.
When creating a jacket using forms, it is laid out with a gel of the selected color.
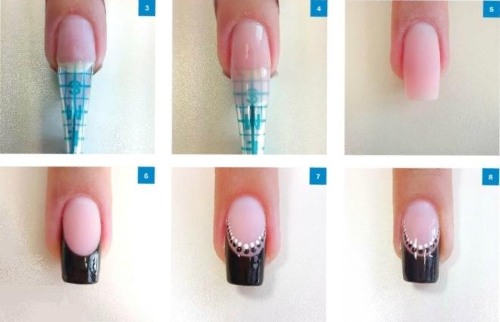
Stages of performing a service jacket on forms:
- Preliminary preparation of nails.
- Installation and adjustment of the form. The edge of the mold is placed under the nail, the other edge is fixed on the finger.
- Application of a layer of base gel. To make it matte, you can blot it with a napkin.
- The gel of the chosen shade (pinkish, flesh) forms the nail - up to the border of the future "smile". The "smile line" is laid out very carefully. The surface must be perfectly flat.
- With a white gel using a brush, a smile contour is formed, the gel is applied close to the main color. The layer is polymerized - under a UV lamp - 2 minutes, under an LED - 1 minute.
- Removing the form.
- Grinding the surface and adjusting the edge of the created nail, removing the sawn-off particles.
- Application of a transparent layer for protection and shine.
You can create a French manicure without using white gel. Then the “smile” is painted on the formed nail with white acrylic paint, and the nail is covered with a protective layer of transparent gel, which is polymerized according to the technology.
Extension with gel-jelly
Gel jelly is one of the latest developments in the field of nail design. The dense jelly-like consistency makes it a very convenient material to work with. Working with gel-jelly takes noticeably less time than with conventional gels. It is easy to form, it is convenient for them to correct mistakes made when building up, it is convenient when repairing nails.
The setting time is only 5 seconds, the polymerization takes 2 minutes. Manufacturers offer natural shades of gel-jelly: nude, beige, pink.
How to work with top forms
When using the upper forms, the template with the already formed nail is applied to the nail plate.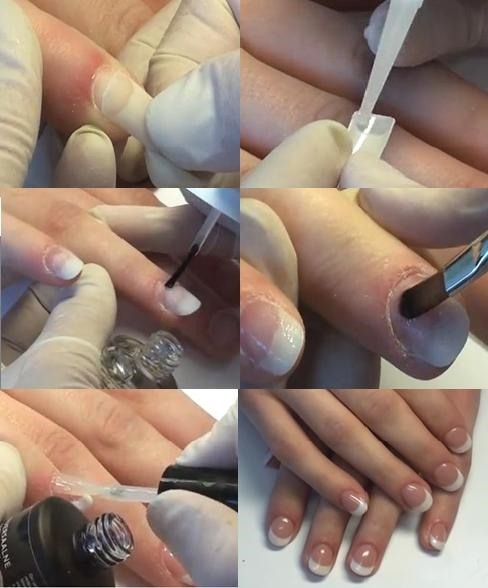
Step-by-step sequence of building with gel on the upper forms:
- Preliminary preparation of nails is carried out.
- On the inner side of the sculpting gel stencil, a nail is modeled and the layer is partially polymerized in a UV lamp (20 sec) or LED (10 sec).
- A layer of base gel is applied to the nail plate, which provides adhesion to the artificial nail.
- The stencil form is tightly pressed in the desired position (without distortions) to the nail plate, fixed for 15-20 seconds.
- With the help of a pusher, excess gel mass is removed.
- The nail is placed under the final cure lamp.
- The shape is carefully removed, the edge is adjusted with a nail file. The surface of the nail does not need correction, because with this method, it is perfectly smooth.
- A protective layer is applied.
This method is quite laborious, but it is indispensable for repairing broken nails and correcting cracks and other serious defects.
Modern techniques and materials allow you to create a durable and beautiful manicure. One of these technologies is gel nail extension on forms. If you follow the step-by-step instructions, you can achieve an aesthetic and wearable manicure.
Video: building step by step gel on forms
How gel extension is performed on forms, see the video clip:
How to build up nails with gel, find out in the video clip: