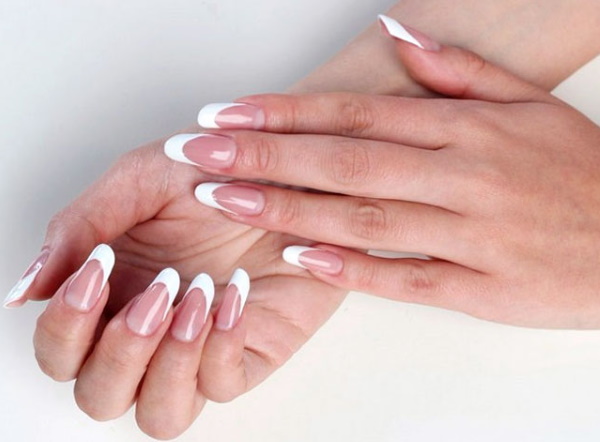
Extension of nails popular among girls whose nails are naturally brittle and fragile. The creation of an artificial nail on tips in their case is an opportunity not only to make their hands more well-groomed, but also to protect the plates from external negative influences.
Despite the fact that even a non-professional can build up nails, it is recommended to do it at home only after studying the theory, where not only the workflow is described step-by-step, but the techniques and key points of building are explained.
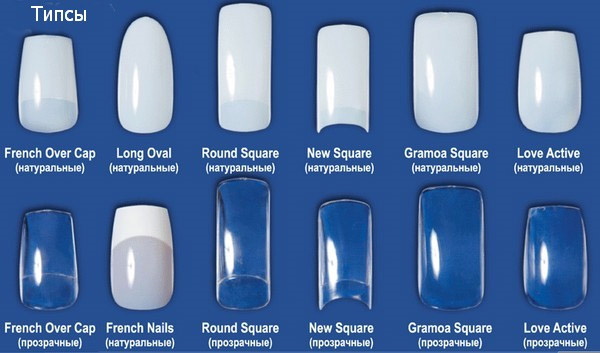
Types of tips for nail extension
Building up on tips (it is recommended to consider the workflow step by step only after getting acquainted with the theoretical part) cannot be done correctly without knowing what kind of main consumable material is.
Manicurists classify tips:
| Type of tips | Short description |
| Classic type | This type of tips is made of ABS plastic. These artificial nails are slightly curved and rounded. Such tips are thinner than their counterparts, but much more elastic and, as a result, stronger and more reliable. Classic tips are extremely easy to use, and the materials required for their attachment are as cheap as possible. The only drawback of this type of tips is the inability to make a long manicure. |
| American type | This type of tips can be made not only from ABS plastic, but also from nylon. Such artificial nails have a greater bend (in comparison with the classics). The main advantage of using them is the ability to make long manicure and more complex designs, and the disadvantage is the need to carefully select expensive materials for attaching tips (especially important for nylon tips). |
| Liquid tips | This type of tips does not imply attachment to the nail plate. Its purpose is to level the nail in order to protect and further apply gel polish, as well as to correct the natural shape of the plate. |
What to look for when choosing tips
The key points in choosing tips should be:
- the shape of the artificial nail;
- the material from which they are made;
- color spectrum;
- features of the contact area.
Forms tips
If a girl builds her nails at home, then the tips should be chosen in such a shape that they are as similar as possible to the appearance of a natural nail plate.
This will avoid the need to adjust the contact area, and will also significantly reduce the risk that the extended nails will look rough or unnatural in combination with the length or thickness of a particular person's fingers.
If tips are selected for use by a girl in her professional activities (regardless of where she indicates services - at home or in a beauty salon), it is necessary to buy artificial plates of various shapes.
The greater the choice of forms the master has, the higher the quality of his work will be (only thanks to correctly selected tips, you can make a neat manicure that looks natural).If it is not possible to acquire tips of various shapes, it is recommended to manually adjust the artificial plates, cutting off excess plastic or nylon using special templates.
Material
Despite the fact that the most popular are tips made of ABS plastic, in the vast majority of cases, nylon plates are more suitable for manicure.
They can not only be used when working with nails of any length (plastic tips can be attached only when creating a manicure of minimum or medium length), but also sit more firmly on the nail plate, and are also of higher quality.
During the initial visual assessment of the consumable, it is recommended to pay attention to the color of the plate, as well as its elasticity.
To check the quality of the tips, just bend them in half. High quality materials will not allow the plate to break, and when unbending, there will be no traces of mechanical stress on its surface. Samples of poor quality will break or crack when bent, and after returning to the original shape, creases or local color changes will remain at the fold.
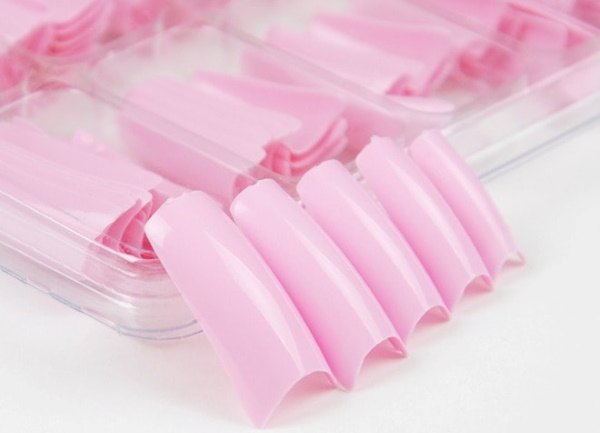
Color spectrum
Tips in their appearance should be as close as possible to the natural shade of the human nail plate. It is recommended to choose plates that are milky or light beige. In some cases professional craftsmen also use transparent tips.
Despite the fact that this type of consumable will look exactly like natural nails, it is not in great demand among professional nail service specialists. This is due, first of all, to the high cost, as well as the non-proliferation of such goods in stores and from suppliers.
Features of the contact area
The contact area of the tips is the area of the artificial plate that is attached in close proximity to the cuticle. This part of the tips can be round, square, oval, and so on.
Despite the fact that it, like the free edge (part of the tips extending beyond the finger and the natural nail plate), can be manually adjusted, only experienced manicure masters can do this with high quality.
If the contact zone is not properly cut, the tips will not fit snugly to the nail, which will make the extension process impossible. Correction of the contact area should be carried out using a rigid file or a special attachment on a machine for hardware manicure.
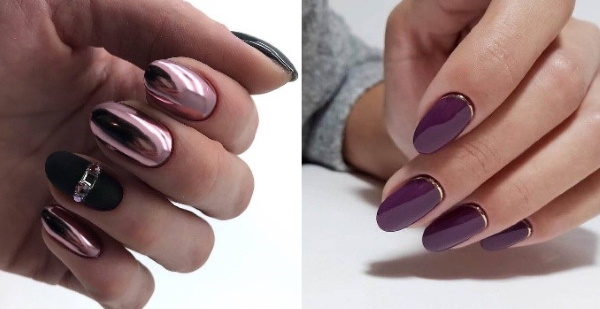
Fashion ideas for nail extension on tips
Build-up on tips (the step-by-step process of the procedure will help to accurately carry it out at home) must be performed in accordance with fashion trends.
Liquid tips
The most attractive and neat look are the following manicure options involving the use of liquid tips:
| Extension example | Description |
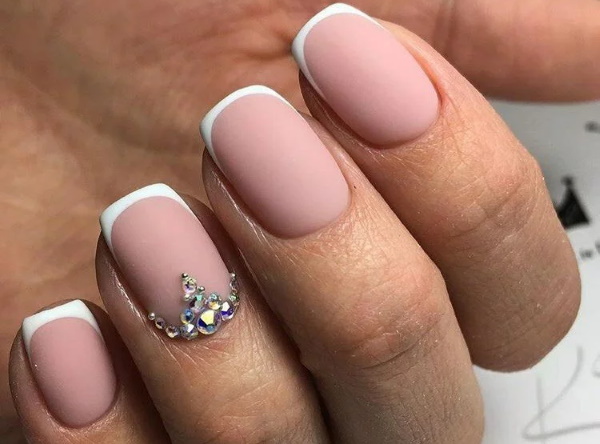
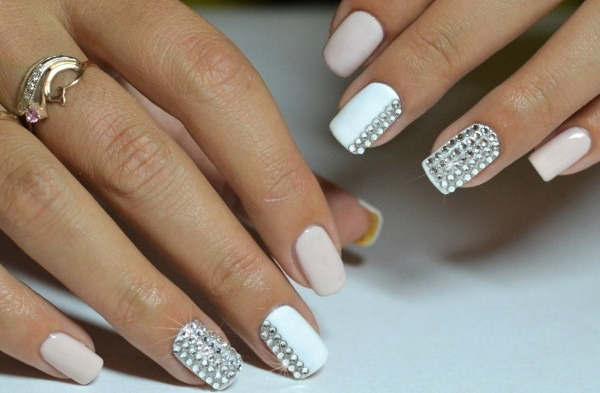 | This extension is most often done for a festive event, such as a wedding. Liquid tips here help the master to apply the layers of a monochromatic gel polish as evenly as possible, and also to fix the rhinestones as firmly as possible. With insufficient evenness of the surface of the nail plate, the rhinestones will disappear already after 1-2 hours after their attachment, and the areas of the nail, where there should have been an even matte finish, will have roughness that negatively affects the appearance of the manicure. |
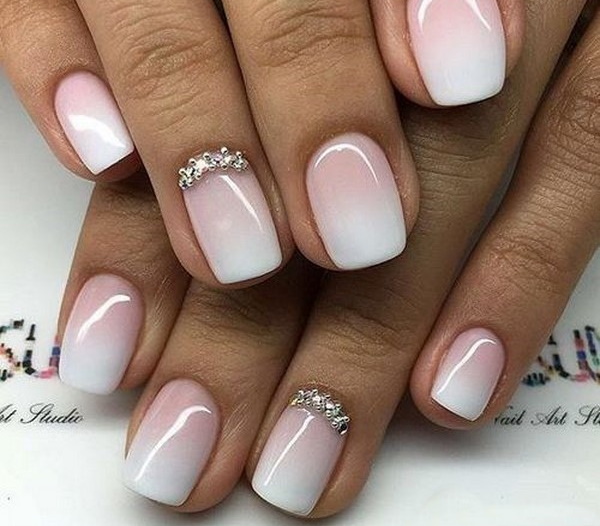
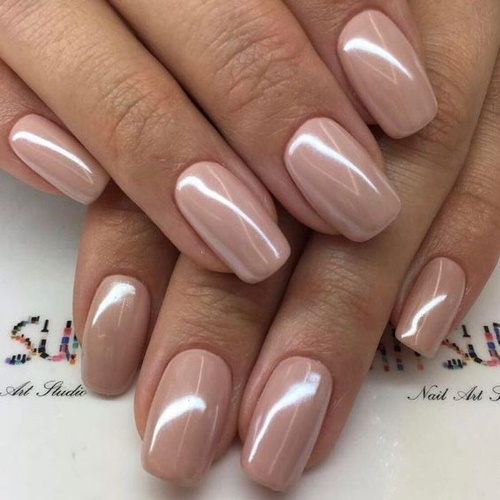 | The classic discreet version of the manicure, which is suitable for both a festive event and for everyday wear. Liquid tips in this case are used in order to maximize the alignment of the plate, as well as to give it an ideal round shape (at the request of the girl, the shape of the nail can be pointed). |
Sharp tips
Sharp tips can be bought ready-made or shaped into the desired shape using a file or a machine for hardware manicure:
| Extension example | Description |
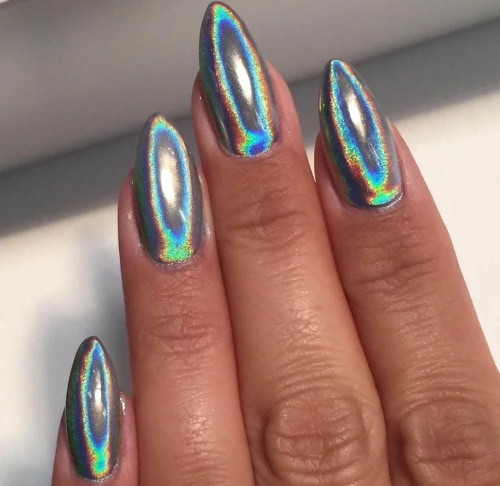 | An unusual manicure with a mirror rainbow effect is suitable for both a festive event and for daily wear. Girls who choose this design are usually eccentric and always strive to attract the attention of others. Sharp tips help fix the desired length of the nail plate. |
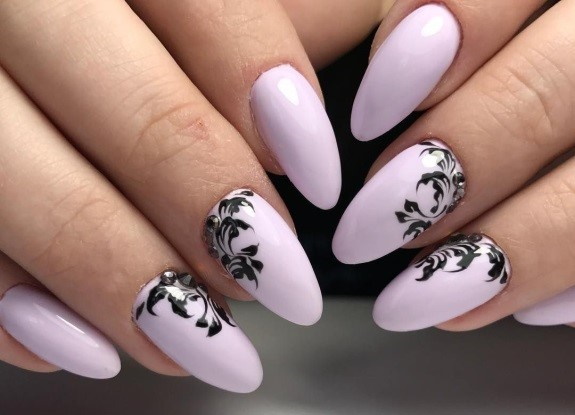
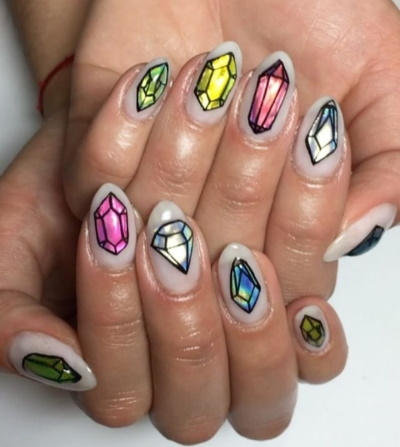 | This type of manicure with pointed tips is more versatile. Despite the presence of bright accents (a colored element is depicted in the center of the nail plate), the manicure itself will be quite restrained and neat. As colored elements, you can use special stickers for nails or figures made of rhinestones. Sharp tips visually lengthen the nails and also make them less brittle. |
Square nail tips
Square tips are suitable for girls with long and thin fingers.
Extension of nails with such plates will visually make the brush more graceful and miniature:
| Extension example | Description |
 | Square nail tips are most often used in French manicure. This is due to the fact that it is easier to draw an angular shape with a contrasting varnish than to follow the perfect evenness of the line when creating a jacket on rounded plates. Tips help in this case to align the nail plate, allowing the master to use a matte top coat. |
 | Square tips are also used when creating a gradient. In this design, it is recommended to use 2 contrasting shades of gel polish, the transition between which should be as blurred as possible. To make the design unique, it is permissible to decorate the nail plate with rhinestones or stickers, placing them on 1 or 2 nails (on both hands). |
Oval tips
Oval tips look most harmonious on thin, graceful fingers that do not require visual adjustment:
| Extension example | Description |
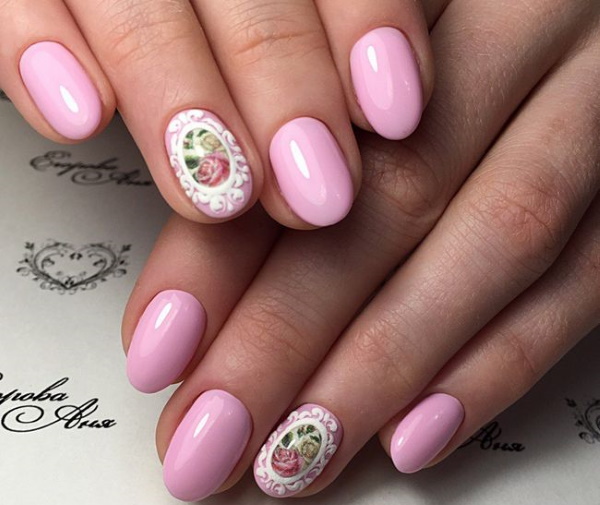
 | This manicure design is more suitable for everyday wear. The base is a plain matte finish, and for decoration, you can draw small patterns in the contact area. It is optimal to draw patterns on 1 or 2 fingers. More of these design elements can lead to the overall look of the manicure being overwhelmed and unnatural. |
 | Oval tips can be attached to nails if there is a need to slightly lengthen the original size of the nail plate, without visually correcting its shape. This design option is usually chosen by discreet girls who want to emphasize their grace and femininity. As a unique element, you can use the painting of the nail on the ring finger (on both hands). You can paint the nail plates either manually or using stencils for this. |
Almond shaped tips
Almond-shaped nail extensions are the most common way to transform nail plates.
The design in this case can be either bright and eccentric, or classic, restrained.
Preparing nails for extension
Building on tips (the step-by-step process described will be understandable to both beginners and people who already have experience in creating a manicure) requires careful preparation of the nail plate before the main part of the working process.
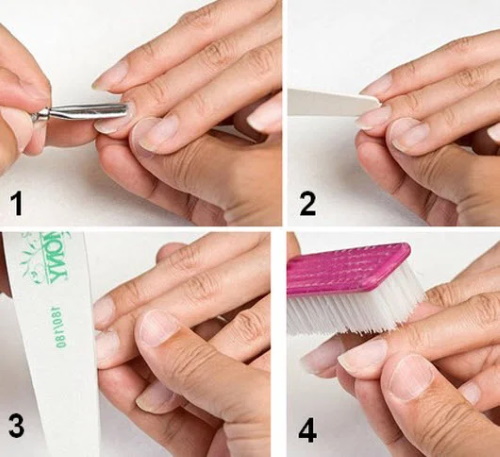
It is done in several stages:
- First, you need to treat the brushes with an alcohol solution or an antiseptic, for example, Chlorhexidine or Miramistin.
- The cuticle must be softened with a special oil, and then with an orange stick, move it to the base of the finger.
- If necessary, in the next step, it is recommended to shape the nail by adjusting its original length with a file.
- Then you need to grind the nails with an abrasive file, moving it from the base of the nail to its free edge. For the convenience of removing the sawn layer, you need to use a small brush.
- At the final stage, it is necessary to apply the primer in 1 layer.It is important to take into account that the effect of this tool, aimed at improving the adhesion of the tips with the surface of the nail, disappears almost completely after 30 minutes. after application.
Extension of nails on tips with acrylic
The step-by-step process of a correctly organized process of nail extension with acrylic tips should look like this:
- Before carrying out the preparatory activities preceding the main part of the nail extension process, it is necessary to select tips. In this case, you should pay attention not only to the width and shape of the nails, but also to their bulge.
- Next, you need to prepare the nail plate for further extension.
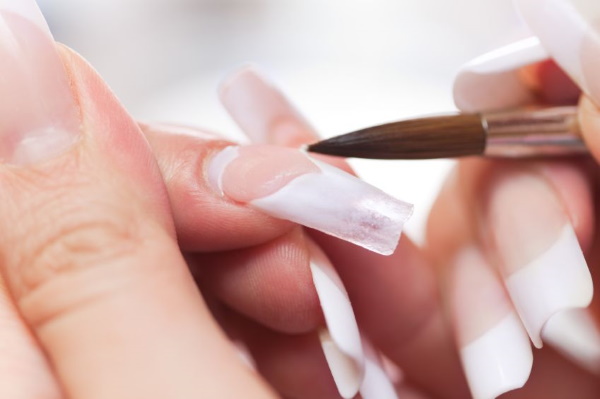
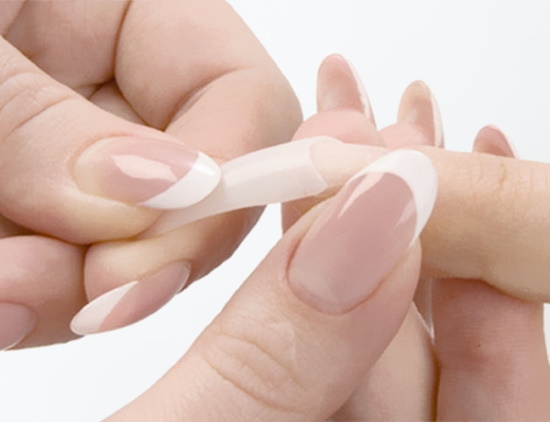
- On the inner surface of the selected tips, it is necessary to distribute glue with a thin layer, and then press the artificial plate to the nail.
- After making sure that the tips fit snugly against the nail, you should adjust the free edge.
- For the best adhesion of the nail polish to the tips, the surface of the artificial nail must be sanded to a translucent white color. Small particles of the cut layer must be removed with a brush or a brush.

- The working brush, with which the build-up will take place, must be moistened in liquid, and then dipped in acrylic powder.
- Having laid out acrylic powder in the center of the nail plate, it is necessary to distribute it over the entire surface of the nail in accordance with the shape the future nail should have.
- Having adjusted the resulting shape, it must be sanded and lubricated with oil on the cuticle.
- Checkout the design.
Gel nail extension on tips
Extension of nails on tips with gel should be as follows:
- Before carrying out the preparatory measures preceding the main part of the nail extension process, it is necessary to select tips. In this case, you should pay attention not only to the width and shape of the nails, but also to their bulge.
- Next, you need to prepare the nail plate for further extension.
- On the inner surface of the selected tips, it is necessary to distribute glue with a thin layer, and then press the artificial plate to the nail.
- After making sure that the tips fit snugly against the nail, you should adjust the free edge.

- For the best adhesion of the nail polish to the tips, the surface of the artificial nail must be sanded to a translucent white color. Small particles of the cut layer must be removed with a brush or a brush.
- Apply the gel of the chosen color to the nail with a brush, while placing the finger at an angle of 45 degrees, so that it can spread over the surface of the nail.
- Having adjusted the resulting shape, it must be sanded and lubricated with oil on the cuticle.
- Checkout the design.

Extension to liquid tips
When building nails on liquid tips, it is recommended to use a standard algorithm:
- Before carrying out the preparatory measures preceding the main part of the nail extension process, it is necessary to select tips. In this case, you should pay attention not only to the width and shape of the nails, but also to their bulge.
- Next, you need to prepare the nail plate for further extension.
- On the inner surface of the selected tips, it is necessary to distribute glue with a thin layer, and then press the artificial plate to the nail.
- After making sure that the tips fit snugly against the nail, you should adjust the free edge.
- For the best adhesion of the nail polish to the tips, the surface of the artificial nail must be sanded to a translucent white color. Small particles of the cut layer must be removed with a brush or a brush.
- Apply a base coat and then let it dry on its own or using a UV lamp.
- Remove liquid tips and then apply a second coat of base forming agent (acrylic or gel).
- Allow the coating to dry.
- Having adjusted the resulting shape, it must be sanded and lubricated with oil on the cuticle.
- Checkout the design.
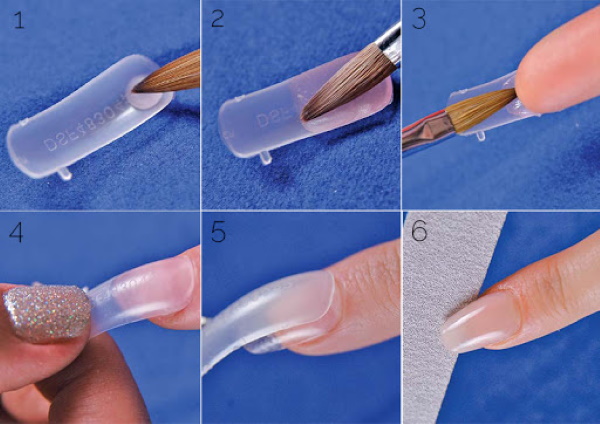
Build-up on top forms
Building on tips (the step-by-step described workflow can be used as a reminder, regularly re-reading the recommendations when performing the first work) on the upper forms it is necessary to do this:
- Before carrying out the preparatory measures preceding the main part of the nail extension process, it is necessary to select tips. In this case, you should pay attention not only to the width and shape of the nails, but also to their bulge.
- Next, you need to prepare the nail plate for further extension.
- On the inner surface of the selected tips, it is necessary to distribute glue with a thin layer, and then press the artificial plate to the nail.
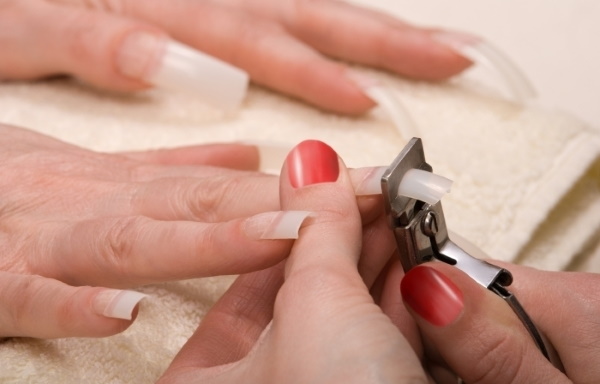
- After making sure that the tips fit snugly against the nail, you should adjust the free edge.

The photo shows step by step nail extension on tips. - For the best adhesion of the nail polish to the tips, the surface of the artificial nail must be sanded to a translucent white color. Small particles of the cut layer must be removed with a brush or a brush.
- Apply a base coat and then dry it if necessary.
- Saw off excess gel or acrylic, and then remove the top mold (tips) and file the resulting shape along the free edge.
- Apply top as a top coat.
How much do tips from different manufacturers cost?
Nail extension on tips is considered a rather expensive procedure. Only a professional nail service specialist or a person who works at home, but who has extensive experience, will be able to perform it step by step with high quality.
In addition to time costs, the master also has to buy expensive consumables. The cost for tips, depending on the manufacturer, ranges from 300 to 600 rubles. for 1 set (10 tips).
Nail extension on tips, despite the use of artificial materials, can look natural. This can be done subject to a detailed study of the theory, which is presented step by step in special manuals, and a regular increase in experience.
Video about nail extension on tips
Step-by-step execution of building on tips: