In the art of manicure, the red tone is considered traditional. The debut of this nail art took place in Italy. Designers used red polishes so that bright nails would be favorably combined in a composition with all the details of the outfit, creating a new image of an active woman. This can be seen in the photos below.
Advantages and disadvantages of red manicure
Red varnish is very demanding. Carelessness in performing such a manicure is completely excluded.
Pros:
- the season doesn't matter;
- no emphasis on a specific age;
- the length of the nail plate can be any.
Minuses:
- the drying time is longer in comparison with other colors;
- drawing skills are of great importance.
Any error will be visible to the naked eye.
When is red on nails appropriate?
The classic red color of varnish is relevant for celebrations and festive occasions. Darker shades work well for everyday use. Red nails look great with clothes of any style. And thanks to the fact that it is combined with a large number of shades, the design flight of imagination is not limited to certain frames.
Shades of red for every day manicure
Monotony is the main feature of classic trends in manicure. A decorative "twist" on one of the fingers adds charm and sophistication to a woman's everyday look. Owners of fair skin need to be especially careful about the selection of red shades.
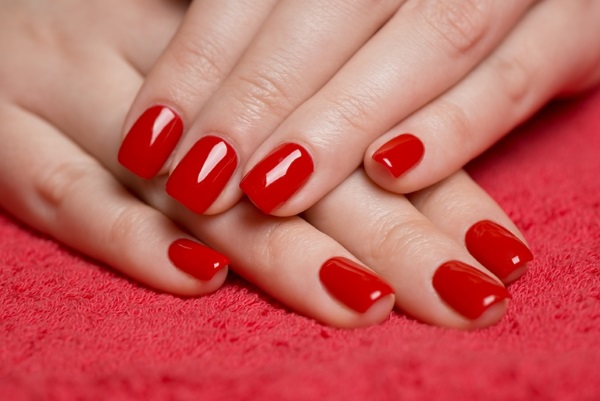
This color looks best in its pure form, because it makes an advantageous accent on the whiteness of the hands and the length of the nail plate. If it seems very bright, then you can pay attention to its variations in cold colors, for example, burgundy or cherry.
If the skin is dark, denser bright shades will be relevant.
These include varieties:
- scarlet;
- coral;
- wine.
A manicure in red tones, the photo of which is presented below, depends directly on the tone of the skin: the darker its color, the brighter the nail art should be. Red-haired girls who have freckles on their skin should look at the orange shades of red.
Combination of other colors with red
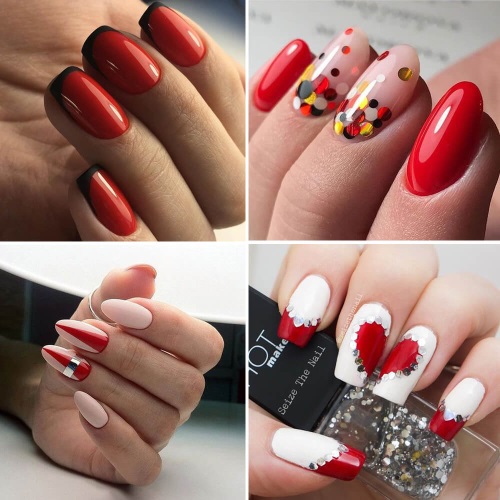
The red tone always dominates the image, regardless of what other colors are present in the manicure. The only exception will be the star trio (as shown in the photo) - a white-red-black combination and paired versions of red with one of these colors. In the case of all others, it is important to maintain a balance: one color dominates, the rest complement.

The cherry shade is harmonious with the sky blue and cool shades of yellow (from sandy to pale orange). Red looks good with blue, green and yellow.Red-orange variations require emphasizing framing, and light shades of blues, greens and yellows are perfect for this. Gold, beige and blue colors will be an excellent complement to the burgundy shade of red.
Features of red nail polish on short nails
A manicure in red tones, the photo of which is shown below, or its dark shades on short nails, accompany a business style - an excellent design move that emphasizes individuality. It doesn't matter whether matte or glossy varnish is used in the manicure. In any of these cases, the hands will become more expressive, and the fingers will look visually longer.
Manicure in red on long nails
The rich red color of the manicure testifies to the confidence and firmness of the character of its owner. Red nail polish and long nails are the dream of any nail designer. After all, this is a great opportunity to bring many artistic fantasies to life.
In designs for long nails, it is recommended to use matte and pearlescent textures. If we talk about drawings, then in the 2018-2019 season, preference is given to minimalist art and geometry. It is also possible to combine them with hand-painted painting.
Which coverage should you choose?
To decide which coating is better to use, you need to figure out how they differ from each other, find out their positive and negative sides.
Shellac advantages and disadvantages
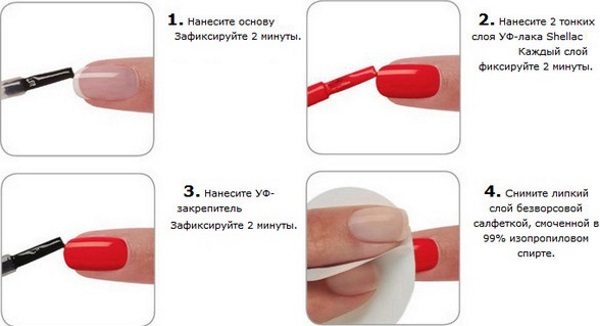
Shellak is a brand name for a product from the American company CND, an improved formula for conventional gel polish. The application of this nail polish requires a special technique.
If the manicure is done as this technology requires, shellac guarantees a number of advantages:
- a smooth nail plate without flaws;
- gloss of the coating;
- duration of wearing and durability of application;
- sealing the nail plate, which allows the fragile nail to grow back to the desired length.
Shellac, in addition to its advantages, also has disadvantages:
- it is not universal and therefore not suitable for every woman. This type of coating is contraindicated for weakened nails with problems such as delamination and brittleness - it does not allow air to enter the nail, which will aggravate the situation;
- the cost of the procedure;
- although manufacturers and craftsmen talk about strength, there is still a factor that has a negative effect on this type of coating - temperature jumps.
Pros and cons of gel polish
Gel - varnish coating combines the properties of these two substances - gel, which gives depth to the composition, and varnish, which provides color and shine to the nail coating. Therefore, in combination, these two funds give an amazing effect. Gel polish is a coating that combines the properties of the constituent parts: from the gel, the depth and density of color, from the varnish - shine and intensity.
Pros of gel polish:
- Duration of wear coverage.
- It does not take a long time to dry completely.
- Good product quality.
Cons of gel polish:
- Cannot be removed with ordinary acetone.
- Cannot be worn all the time (it is recommended to take a break).
Advantages and disadvantages of simple varnish
Nail polish in its original form is actively losing ground due to the emergence of a competitor - gel polish, with which it is almost impossible to compete. However, regular varnish has its advantages, which should not be forgotten.
And the disadvantages completely negate the competitiveness of the varnish:
| Advantages | disadvantages |
| It doesn't take long to apply the coating. | The coating has a short service life. |
| Large selection of palettes and textures. | Bad smell. |
| Minimal negative impact on the nail. |
The choice of nail coating is individual.
Types of manicure techniques. Step by step guide
There are a large number of techniques for applying and creating coatings for different types of red manicure, there are individual techniques and methods.The use of special tools is provided, as well as the use of applied decorative additions.
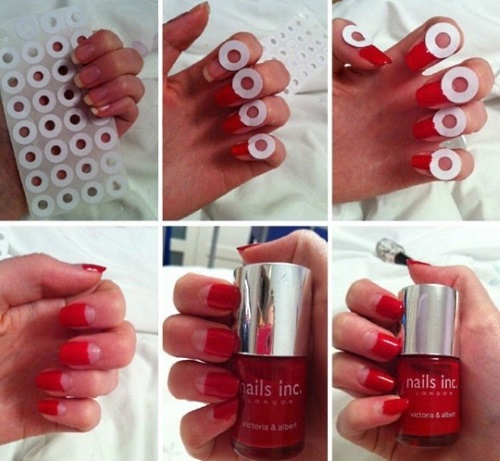
Lunar manicure in red colors
To get a high-quality moon manicure in a red tone, you must adhere to the following steps:
- Tidy up the cuticle and the nail plate itself.
- Apply a base coat underneath, which will extend the wear period of the manicure and protect the nail from negative influences.
- Using a stencil method, fix the place for the future hole, varnish the colored area of the nail, and then the hole itself. Apply a top protective layer.
- Decorate the nail with a pattern or use additional decorative techniques.
Manicure design with the moon at the nail can be different. It all depends on imagination: transparent or shiny hole, geometric patterns, frame creation.
Manicure with rhinestones and sparkles
Manicure in red tones, the photo of which is presented below, in combination with glitter and rhinestones, is a favorite festive decor of the fair sex's manicure.
Fantasy will tell you how to place shiny elements:
- diagonal lines;
- wavy line pattern;
- stripes vertically or horizontally.
In the performance of lunar manicure, a strass framing of the hole is often used. Something similar is used in decorating a jacket, when the contour line of the painted part of the nail is filled with stones.
Ombre on red nails
This technique of nail decoration allows you to quickly and easily create a special design:
- The main color is applied - red, it dries well.
- Foil is used for the mix. The required shades of varnish are applied and mixed on it, after which they are imprinted on the sponge.
- The sponge is applied to the nail plate and smoothly moves up and down.
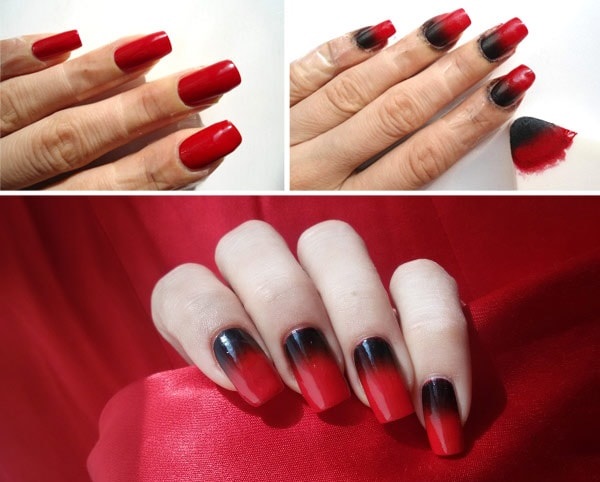
Multiple coats can be applied to achieve the desired gradient effect and dry well.
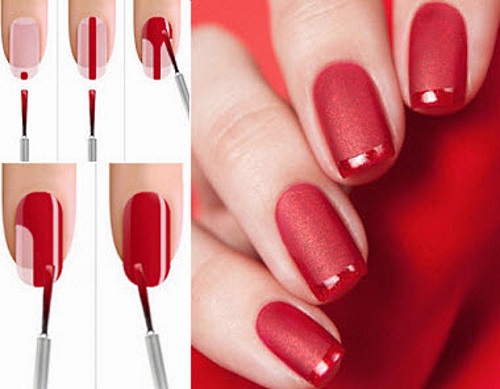
Red French
For a French manicure in the red version, you will need a base coat, varnish, a top and a comfortable thin brush. To simplify the task, you can resort to using a stencil for a jacket.
Step-by-step execution of a jacket:
- Nail treatment: length, shape, cuticle removal, plate polishing.
- Coating is the basis for design.
- Nail edge decoration. Using a fine brush, the perfect red border of the jacket is created on each nail.
- After thorough drying under the lamp, the top coat should be fixed.
Simple actions give an amazing result - a manicure, which will be an excellent complement to the image not only on holidays, but also brighten up your everyday routine.
Stripes on nails
The simplicity of the drawing is due to the use of tape-stickers, thanks to which the "striped" manicure acquires perfect evenness of lines. This method is used when creating a jacket or lunar nail art, as well as actual geometric patterns.
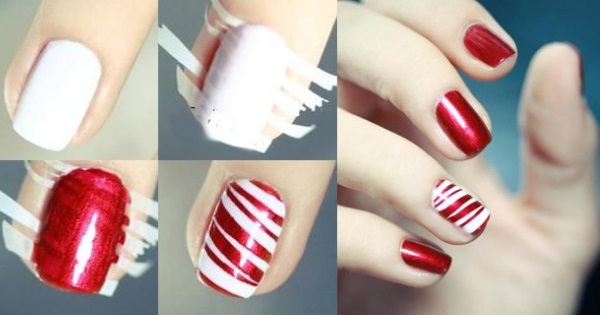
Stages of work:
- The main color is applied to the plate, after it dries, strips are glued, pre-cut in the desired shape.
- The next step is to apply a different color. If necessary, the manipulations are repeated until the complete drawing of the lines.
The finished drawing is fixed with a colorless top coat.
Transparency
Transparent elements in the drawings on the nails make the manicure unusual, and create an additional charm for its owner.
Sequencing:
- Preparatory edged manicure.
- Degreasing nails.
- One-color varnish is applied to all plates except those on which the decor will be made.
- The nails are opened with a base colorless coating and dried using a UV lamp.
- At this stage, a picture or pattern is created (for example, using stamping).
- Tinting nails with a translucent dark shade, which can be obtained by mixing a top coat and black varnish.
In the process of learning, it is better to start doing such a manicure with simple point-and-line elements of the pattern, complicate it over time, improving your skills.
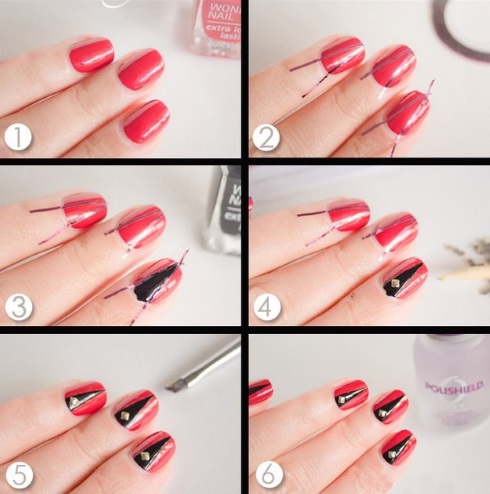
Geometry
Before creating the decor directly, you need to take care of the condition of the nails: do an edged manicure, bring the plate to a perfectly even state and cover it with a base.
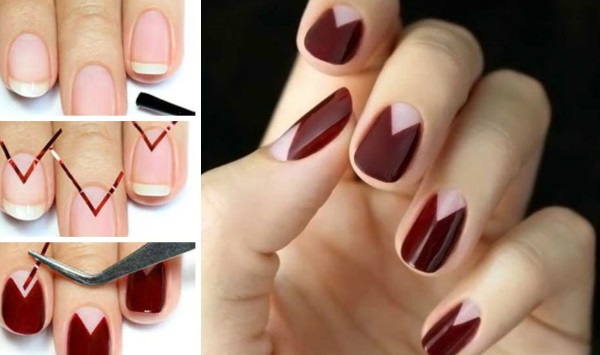
Geometric decor requires clear lines, so it will be appropriate the use of special tape and a certain sequence in the actions:
- Covering with the main color, drying nails.
- On the nail plate with tape, create a conceived contour drawing.
- Apply a contrasting color.
- Remove adhesive tapes carefully.
- Dry the manicure in a UV lamp.
- Fix the result with top coat.
Geometric ornaments give the manicure laconic and completeness.
Safari
The application of a pattern inherent in the skin of a tropical animal (for example, giraffe or leopard spots, zebra stripes) is perfect for a modern fashionista.
Step-by-step instructions:
- Make a trim manicure with cuticle removal.
- Apply base coat to nails, dry.
- Apply the main color, which will be the drawing, in two layers. Each of them requires careful drying.
- Apply the drawing with a brush or toothpick.
- Fix the result with a double top coat and dry well under a lamp.
There are many safari-style drawings, but in the red color scheme they are more expressive, which makes the manicure unusual.
Stamping
To create a decor for this type of nail art, a stamp is used, which transfers the finished drawing from the stencil to the nail plate.
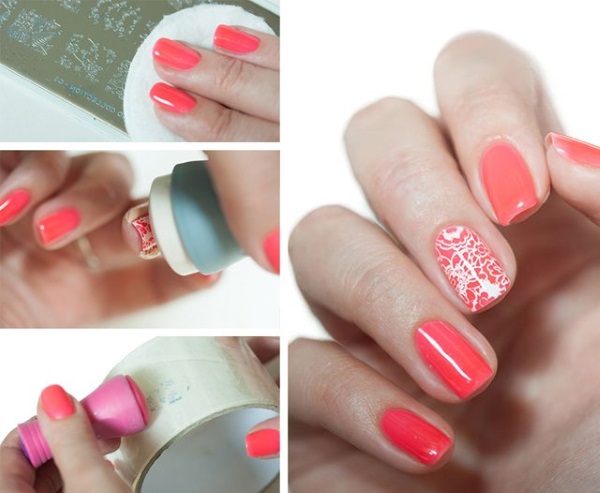
Step-by-step execution instructions:
- Degrease the nail plates and apply a base coat to them.
- Open with the main color, dry.
- Apply a contrasting varnish color to the stamping stencil.
- Remove excess with a special scraper.
- Print the picture onto the stamp.
- Press the rubber part of the stamping tool firmly to the intended place of the drawing.
- After the transferred pattern has dried, fix the result with a topcoat.
Stamping is a great alternative to hand-drawn drawings.
Cell
Checked nails are also a classic that attracts attention with its brightness and originality. To create such a manicure, you need gel varnishes and gel paints.
Instructions for implementation:
- After the base has dried, cover the nails with two coats of red nail polish.
- At the same distance, draw wide lines of a dark color diagonally.
- Make thin lines of white in the center of each strip.
- Draw the outline of the wide stripes with thin lines of the same color.
- Secure with topcoat.
Checkered manicure is a limitless flight of fantasy and creativity of nail art masters.
Drawings
For artistic painting of nails, varnish or acrylic is used, which are applied with brushes or dots.
Brush drawings:
- After tidying up the nails, apply the base and let it dry.
- Apply background color, dry.
- You need a very fine brush to paint. It should be remembered that after each dipping the device in the paint, remove the excess.
- Fix the created masterpiece with the top.
Dots technique
The essence of this technique is to apply a different shade to the color of the main background.
Execution steps:
- Preparing nails for painting.
- Base coat application.
- Opening with varnish in the main color. When starting to work with dots, you need to ensure that the paint is evenly distributed over the ball of the tool.
- More complex designs require preliminary spot application, which will subsequently facilitate the creation of the overall picture.
- When the main drawing is complete, you can start working with elements of a different color.
Fix the finished painting with a fixing agent.
Spray
This nail design is not only simple to perform, but also always looks different.
- Open the nail plate with the base.
- Close the periungual area with tape.
- Lay any protective covering on the desktop.
- You need a thin tube to create the splatter. Dip it in color and blow it sharply on the prepared nail. Repeat the same for each color.
- Remove the protective tape and wipe off excess paint from the cuticle.
- Secure the drawing with a top coat.
The choice of color palette and their combination is unlimited; you can also resort to decorating your manicure with additional decorative means.
Flowers
A large floral pattern on a contrasting background can fill the entire length of the nail in an original way.
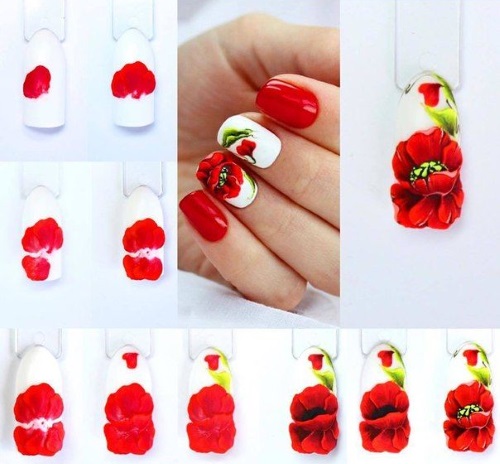
Step-by-step application:
- For better shading when applying the main pattern, it is better to use gel polish with the addition of a small amount of top or base. If watercolors are used, shading and mixing of colors should be done constantly.
- By using a darker shade of the base color, the depth of the picture and its shadow are created.
- In conclusion, with any other varnish that matches the color, the outline of the flower and its veins are made.
Floral manicure will be a great highlight of the look for any special occasion.
Matte red manicure
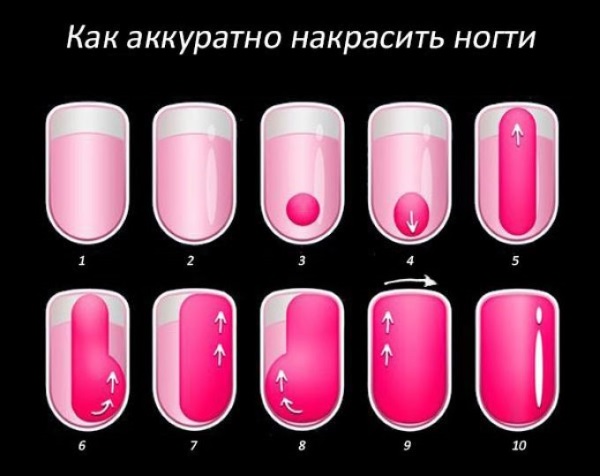
Step-by-step execution instructions:
- Prepare your nails, adjusting the shape and length, and pay attention to the condition of the cuticle.
- Degrease the work area.
- Cover nails with eco-primer and cure in a UV lamp for 2 minutes.
- Open with a layer of varnish, dry again for 2 minutes.
- Apply a second coat, dry as much.
- To create a matte effect, a special matte topcoat is used, with which colored layers of gel polish are fixed (dry for 2 minutes).
- Remove stickiness from the nail plate and treat the cuticle area with oil.
Matte red manicure can be either classic red or in combination with tint options.
Gradient manicure
Use a sponge or sponge to create a gradient effect. The transition tone palette corresponds to the combination of the main color with its shade.
Stages of work:
- The color for creating a gradient manicure is applied not to the nail, but to the surface of a special sponge.
- In order to transfer the color effect to the surface of the nail, you need to carefully press the sponge firmly against the nail plate.
- Fix the finished manicure with a top layer.
The result will be a smooth transition of the base color to its shade or vice versa.
Monochrome coating
Monochrome manicure has always been considered simple and rigorous, but this has remained in the distant past. Now such a manicure can be of different textures or decorated with auxiliary means.
- Matte sand in a monochromatic manicure. Using sand in a monochromatic version of the manicure, you can draw patterns on the shiny glossy surface of the nail plate or decorate several nails on the hand.
- Stones, glitters and kamifubuki in a monochromatic manicure design. With all the simplicity of implementation, there is a complete transformation of the overall monotony of the manicure. Blotches create the effect of elegance and fervor.
- Application of rubbing. The assortment of all kinds of rubbing allows you to choose the effect of metallic, pearls, chameleon.
Shiny and iridescent elements perfectly decorate the classic monochromatic manicure.
How to keep a manicure longer?
There are different ways to preserve your manicure:
- Avoid edged nail art.
- It is worth switching to the European version of nail care, which does not take much time and helps to reduce the growth of the cuticle zone. Accordingly, it does not need to be done as often as usual.
- Cuticle care should be permanent.
- Every use of chemical cleansers should be followed by moisturizing the cuticle with any express product.
- Seal the nail edge every month. This procedure strengthens the plate and protects it from delamination.
- Each filing of the nail edge should be completed by sealing it.
- It is necessary to handle the file correctly during work: in no case should you saw from side to side, you can only move the tool in one direction. This will protect the nail from delamination and make it stronger. Edge sanding is completed with a finer file and a buff for polishing.
- For additional hydration of the skin of the hands and cuticles, you can use baths with oil solutions, which should be an important step in the care.
The presented photos illustrate the most fashionable and daring solutions for decorating manicure in red tones using lace, gradient effect, metal inserts and artistic painting. All this can be done on your own, adding your fantasies and creative skills to the design.
Video tutorials on creating a manicure in red tones
Red manicure with foil:
Black to red gradient:
Classic red is probably my most frequent choice in the salon. I like to do a monochromatic manicure on short nails, and dilute a little design on long ones.