A detailed description of each step by a professional will help you complete the original drawing and put your nails in order.
Choosing a nail shape
When doing a manicure, special attention should be paid to the shape of the nails.
When choosing the shape of the future manicure, you should pay attention to:
- cuticle shape;
- shape of nails, length of fingers;
- the shape of the nail bed.
The most common is the oval shape of the nails, it is suitable for any type of hand and finger shape. Oval nails visually lengthen the fingers, especially if the hands are full and the fingers are short.
For owners of graceful hands with thin fingers that have nails with a convex nail plate and a rectangular cuticle hole, a rectangular shape of the nail is suitable. In this case, the length does not really matter, rectangular shape looks good on both short and long nails.
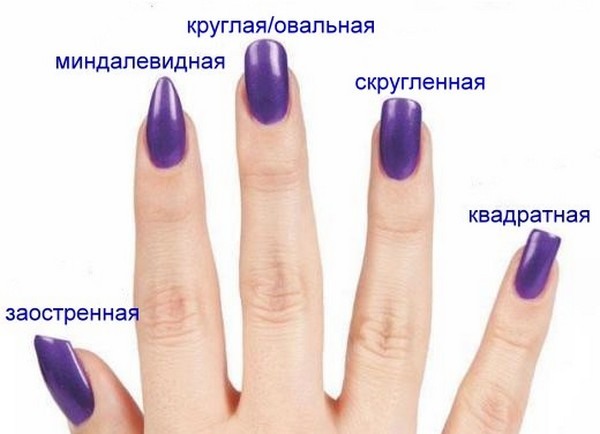
For those women who have wide hands and large fingers, rounded nails are ideal. In this case, the length of the nail, receding from the edge, should be at least 3 mm. So a manicure will lengthen your fingers and give your hands grace.
A pointed form of manicure, it is also called almond-shaped for those who have been endowed by nature with a thin shape of hands and long fingers. On full hands, such a manicure will look awkward, violating the proportions.
Manicurists believe that the shape of the nails should follow the shape of the cuticle. But everything is purely individual.
There is one more important rule of manicure. All nails should be the same length. If one nail breaks, then all the others will have to be shortened to the same length.
Choosing a nail file. What and for what purpose
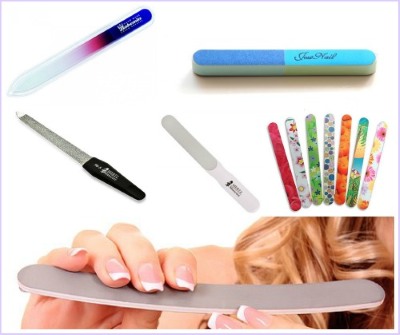
For a manicure step by step at home, you will need nail files. When choosing a nail file, you should pay attention to the materialfrom which it is made and for its hardness - abrasiveness.
Abrasiveness is the hardness of the file.
It depends on how coarse or fine the file has a dusting and how many units of abrasive are per unit area. This value is measured in grit. The higher the number of grits, the softer the file., a file with a lower number of grits will be stiffer.
For filing natural nails, it is recommended to use files 180-240 grit. At the last stage, a file from 240 to 400 grit is used to polish both natural and artificial nails.
For polishing natural and artificial nails, buffs with an abrasiveness index from 400 to 1000 grit are used.
Materials from which files are made, advantages and disadvantages:
- Metal... They are durable and durable, these are all their advantages.The main disadvantages include the fact that such a nail file, by its spraying, severely damages the nail plate, which further leads to delamination and fragility. Metal nail files can be used for artificial nails.
- Glass... A file that spares the nail plate. With proper handling, such a nail file will last a long time. Its only drawback is fragility.
- Plastic... The perfect choice of material. These nail files are easy to use, easy to clean and disinfect. A large assortment from different manufacturers will allow you to choose a nail file of suitable quality and reasonable prices.
- Paper... A budget version of a nail file based on dense cardboard with a spray. This file is not very durable, it is suitable for one-time use.
- Ceramic... A glass nail file is used to gently process the tips of the nails, and a ceramic file will allow you to seal the edge of the nail so that it does not delaminate. Just like a glass file, this nail file is quite fragile and requires careful handling.
Steaming the nail plate
There are 2 types of manicure:
- classic, edged manicure;
- European, not edged manicure.
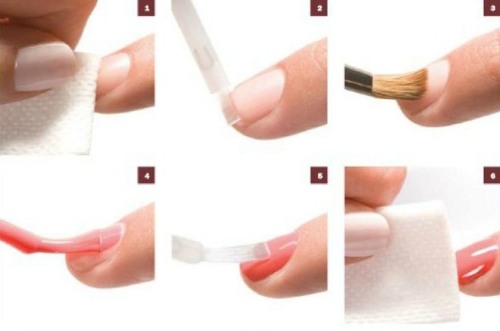
For a manicure step by step at home, it is better to choose a safe way to handle the cuticle. This is considered a European manicure. With this method, the cuticle is not cut, but steamed and shifted to the edge of the nail. Oils and special gels are used to slow down the growth of the cuticle.
Classic manicure - steaming and removing cuticles. Suitable for those who have some skill in nail polishing.
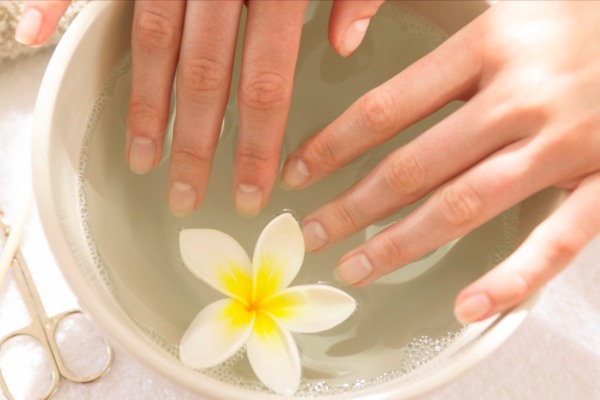
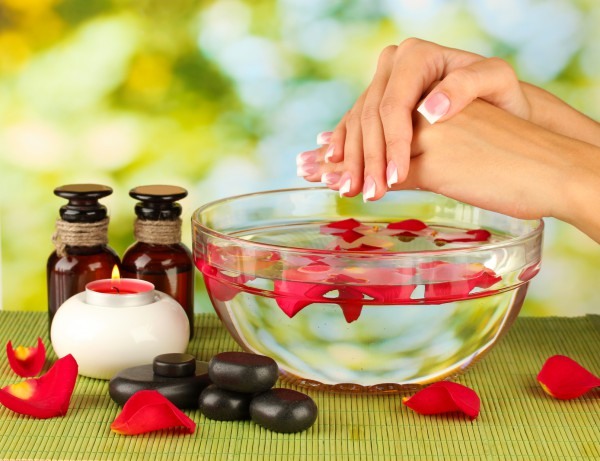
In both cases, you will need to steam your hands in a hot bath for 5-7 minutes.
First, before steaming, give the desired shape to the nails with a file. Steaming can replace the treatment of the cuticle with a special gel, which will soften it and make it easier to remove.
Additives to the steaming bath for herbal decoctions, essential oils, sea salt, table salt will strengthen the nails, make the skin of the hands softer and more silky.
Polishing
Polishing gives a cleaner look to your nails. When no coating is applied, polishing will give the nails a shine. When applying the coating, the coating adheres better to the polished surface of the nail.

Some rules should be followed when applying polishing:
- Doing a manicure at home, do not get too carried away with polishing the nail plates... Once a month is enough. The step-by-step use of nail files with different hardness spraying will allow you to achieve excellent results.
- It is not recommended to polish weakened nails, this may worsen their condition.
- Before polishing, nails need to be sanded... This procedure will improve the condition of the nail plate, eliminate irregularities and minor flaws. After sanding, the nails are polished with a soft coated file. If you plan to cover your nails with gel polish or shellac, you should only lightly sand the nails. Excessive sanding will thin the nail plate.
Coating
Any varnish, gel or shellac when applied to a base coat has a brighter color and lasts longer. When using a coating of dull, pale colors, white matte varnish can be used as a base. Using a base will avoid layering.
In order for the coating to adhere well, the nails must be well degreased immediately before coating.
This advice is especially relevant if fat-containing cuticle removers have been used for preparation.
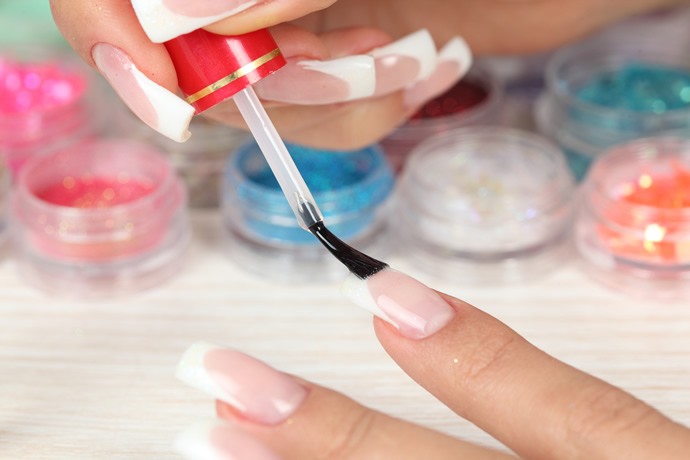
Coating starts at the base of the nail and continues to the edge of the nail... The movement of the brush should be with light pressure in order to paint the maximum surface of the nail in one movement. Next, you need 2 more light brush strokes to paint the remaining edges of the nail.
Coating with gel or shellac requires additional funds - base and top coat. On degreased nails, the base is first applied, after the gel.After the coating has dried, a top is applied to strengthen it. In the case of using ordinary varnish, the base is not needed, but the use of a top coat will extend the life of the manicure.
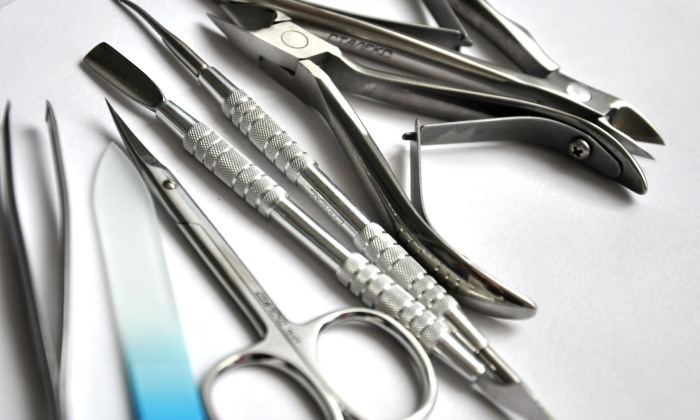
Materials and tools
The step-by-step execution of a manicure at home implies the availability of tools for such work.
You will need:
- nippers or tweezers for removing cuticles, manicurists call them nippers;
- manicure scissors with rounded ends for those who are not used to using nippers;
- several files, with different hardness. For grinding and buffing buff;
- sticks with a special end for cuticles / pusher (metal tool for working with cuticles).
Additionally:
- nail polish remover / acrylic stripper;
- cotton pads;
- foil is needed to remove the acrylic coating;
- cuticle remover (for dry manicure);
- capacity;
- additives such as essential oils, sea / table salt, soap / gel;
- paper napkins;
- oil to moisturize the cuticle, hand cream - all this is used at the end of the manicure.
Sterilization of instruments at home
The health of the nails depends on how clean the instrument used for the manicure will be. A minor wound can cause big trouble. At home, manicure tools should also be disinfected.
The number of users of the instrument at home is limited, but this does not negate disinfection.
To sterilize manicure tools at home, you do not need to buy a special apparatus that is used in salons.
Home remedies for sterilization:
- hydrogen peroxide;
- pure alcohol;
- vinegar.
Depending on which product is used, the sterilization time also differs. Pure alcohol means instant sterilization, and using hydrogen peroxide will take several hours. You can sterilize the instrument with vinegar as long as the liquid does not damage the coating of the instrument.
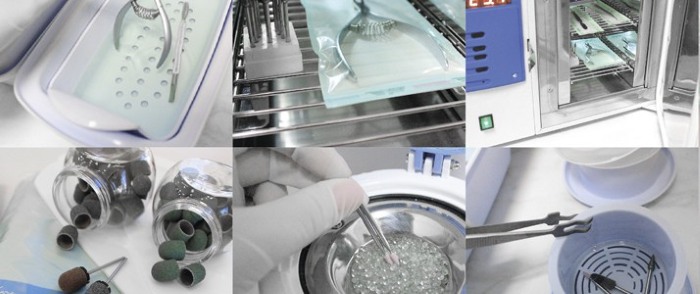
Methods for sterilizing metal instruments:
- boiling;
- warming up in an open flame;
- warming up in the oven.
Previously, metal instruments are washed under running water, then sterilized. Sterilization on an open flame is carried out within 5 minutes, boiling or sterilization in the oven - within 15-20 minutes.
To sterilize files, use a spray filled with disinfection solution.
If someone at home has a fungal infection of the skin and uses the same tools, disinfection should be carried out especially carefully.
Ready-made disinfectants that can be purchased online, at a pharmacy or specialized stores:
- sterillium;
- cutasept f;
- octenisept;
- estylodesis antiseptic;
- bansolar;
- alaminol.
The manufacturer offers such funds in the form of sprays, concentrates, napkins.
What pharmacy products can be useful
For sterilizing home manicure tools, products can be purchased at pharmacies.
These include:
- hydrogen peroxide;
- alcohol;
- octenisept;
- sterillium.
Cuticle removers
For quick and effective cuticle removal, salons use special tools - removers. They allow you to soften the cuticle in a short time and contribute to its high-quality removal. Some removers contain substances that subsequently slow down the growth of the cuticle.
These products contain acids or alkali, therefore, removers are not recommended for use in case of fungal diseases and people prone to allergic reactions.
There are several types of removers:
- acidic;
- alkaline;
- oil;
- mineral.
The safest are oil and mineral-based removers. They are recommended for home use.
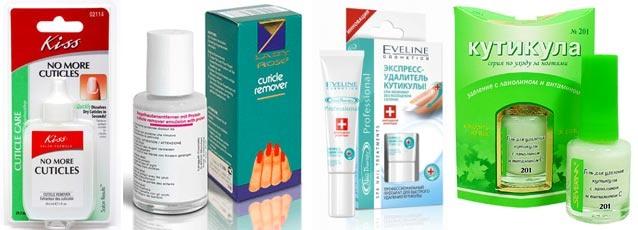
The remover is applied to dry cuticles with a brush or directly from a tube with a special spout.After 3-5 minutes, the product is wiped off with a napkin, the cuticle is pushed back with a stick or pusher. The product is not washed off with water. When using an acid remover, it is recommended to cover the skin around the nail with oil.
When doing a manicure at home, you can use olive oil and lemon juice step by step. This combination will allow you to quickly and efficiently process the periungual space.
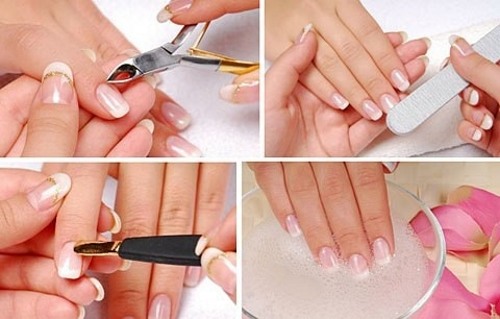
Step-by-step instructions for the execution of a classic trim manicure
Performing a trim manicure step by step has the following steps:
- removal of the old coating, if any;
- shaping the nails, this should be done before steaming;
- steam hands, remove cuticles / in case of dry manicure, use a remover to remove cuticles;
- using a stick to clean the space under the nails;
- grinding, polishing;
- applying nail hardening agents;
- the end - apply cuticle oil on nails and around the nail, then apply hand cream.
Unedged manicure at home
European manicure is done in 3 ways:
- Dry method with the use of a remover, hands are not steamed. Remember that some types of removers can cause allergic reactions.
- Wet way using a warm bath for steaming hands.
- Hot method designed for steaming heavily hardened cuticles and hand skin.
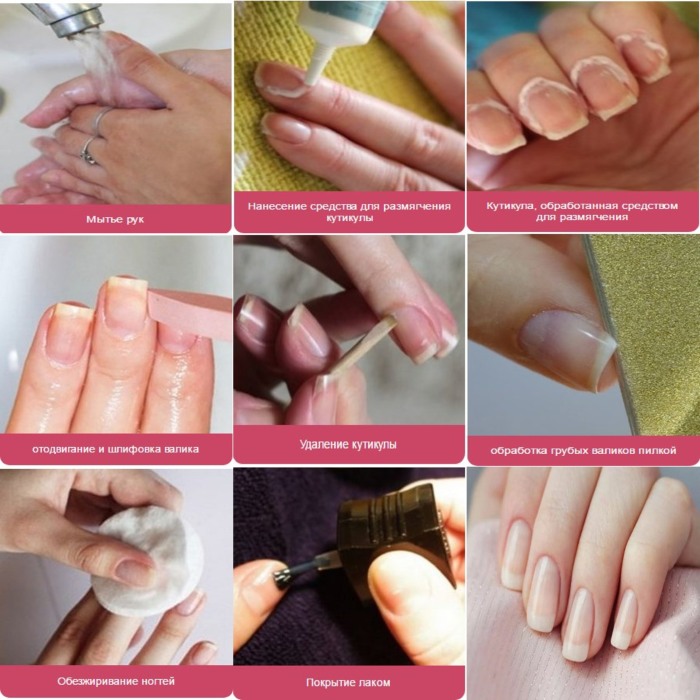
Manicure should be performed in the following sequence:
- First you need to shape your nails.
- Steam your hands. With the dry method, treat the cuticle with a remover. After 5-7 minutes, you can work with the cuticles.
- Wipe hands dry / Remove remover with a cloth or cotton swab.
- Move the softened cuticle to the root of the nail with a wooden stick or a pusher.
- Apply oil that slows down the growth of the cuticle, rub it well into the nail plate at the base of the nail. The use of such oil will allow you to do manicure less often in the future.
- Degrease the nails thoroughly before coating.
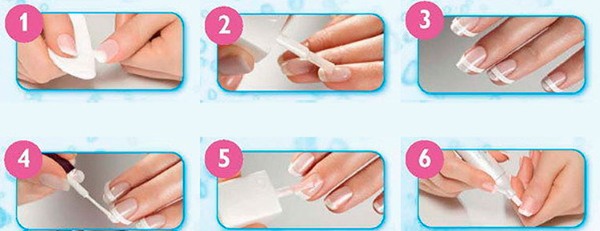
How to make a French (French manicure) step by step
The most popular manicure is a French manicure. The jacket is suitable for all occasions: an evening dress and an office suit.
The classic version of a French manicure is a flesh base and a white smile at the tip of the nail.
Modern nail design offers different variations of this manicure.
To make a French manicure at home, you need a little skill:
- Give the desired shape to the nails... Better if it is rectangular or oval.
- Steam your hands.
- Treat the cuticle... For a jacket, a classic cut manicure is suitable.
- Further sand and polish your nails... These simple procedures will prolong your coverage.
- Apply base coat, flesh or beige varnish.
- After drying paint a smile with a thin brush or stencil. The smile width should be the same on all nails. A wide smile will visually shorten the nails, so it is not recommended to get carried away too much. The width of the contrasting strip should be no more than 2 - 3 mm, depending on the length of the free tip of the nail.
- After cover your nails with clear varnishsecuring a smile. You should also cover the end of the nail, this will seal all layers and strengthen the coating.
- The procedure ends applying oil to the cuticle... Apply a little cream to the skin of your hands, rub with massage movements.
Gradient on nails
The technique of applying in the style of a gradient or ombre has been very popular for more than one year. This is the use of several colors, the transition from one color to another. This coating looks original and impressive.
Required:
- varnish 2-4 colors;
- sponge;
- nail polish remover;
- cotton swabs;
- toothpick;
- foil.
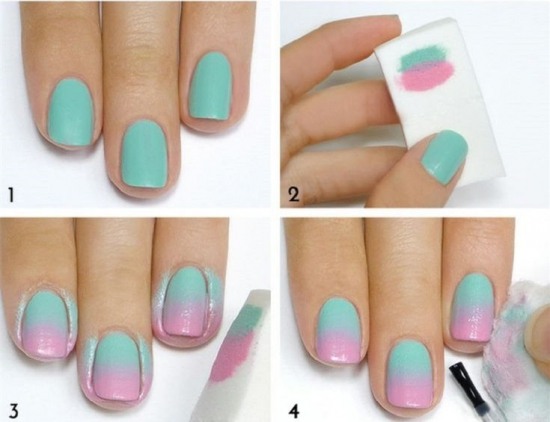
Gradient coverage, staged:
- Prepare your nails.
- Before applying the coating, generously lubricate the skin around the nail with cuticle oil. The oil will make it easier to remove varnish on your skin.
- Further actions will require some speed in work.Draw strips of varnish on the foil close to each other and blend their borders together. Blot the sponge into the created palette and transfer it to the nails.
- Cover the nails with a top, without waiting for the layer to dry.
- Clean excess varnish with a cotton swab and nail polish remover.
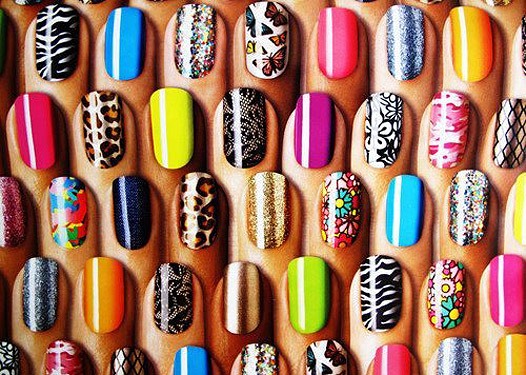
Multi-colored nails
A popular technique is varnishing in different colors. You can choose a palette of colors close or opposite to each other on the color wheel. You will need varnishes of 2-5 colors, manicure tools.
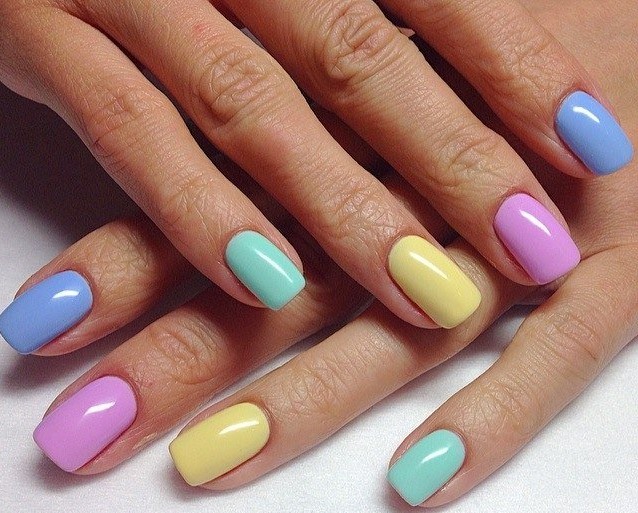
Step by step execution:
- Preparation of nails.
- Before you start covering your nails, the bottles of varnish should be opened and prepared in the sequence in which they will be used. If 2 colors are applied, determine which nails will be covered with which color.
- Cover nails alternately, dry, secure with top.
Lunar manicure gel polish or shellac
Moon manicure is the opposite of a French manicure. The hole is covered with white varnish, the main coating is made in a different, contrasting color. You can use brighter foundation and smile combinations.
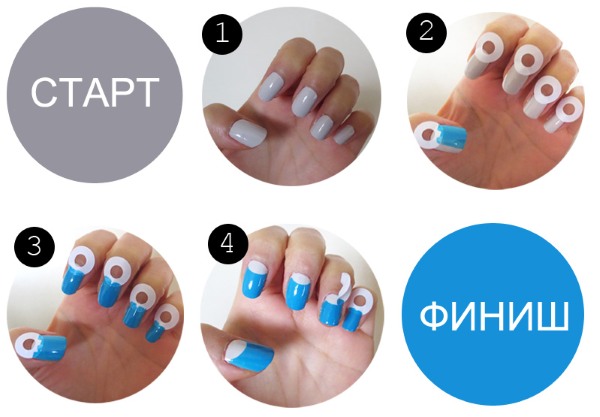
Step-by-step instructions for performing a moon manicure with gel varnish or shellac:
- Preparing nails for coating
- Coating the nails with the main color, drying the coating in the lamp. Depending on the wattage of the lamp, this will take 1 to 2 minutes.
- Drawing a moon smile using a thin brush. Drying.
- Top coat and dry again.
The border line between the base layer and the base can be decorated with rhinestones... Rhinestones are applied to the smile before drying. The surface is reinforced with a top.
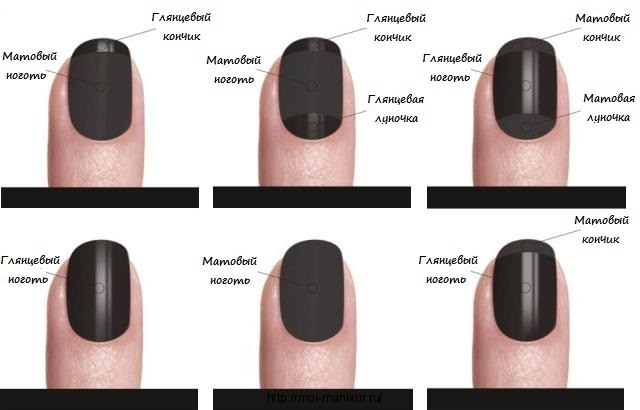
Matte and mirror manicure for short nails
The fashionable trend is a combination of matte and mirror manicure in the same color. A matte surface is obtained by applying a special coating on a regular gel polish.
This coat is great for short nails.
Instructions for the step-by-step execution of a matte-glossy manicure:
- Preparing nails for coating.
- Base application, then base. Drying in a lamp.
- Applying a matte top to selected nails. For a combination of matte finish and gloss on one nail, use a stencil. This technique will create an interesting design.
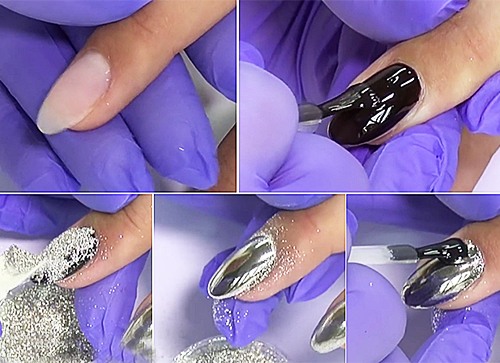
For a glossy manicure at home, foil or rubbing, polyester powder is used. You can buy all this in specialized stores.
Step-by-step instructions for creating a mirror manicure using powder:
- Prepare nails for cover.
- Apply the main layer of gel, dry.
- Powder the base layer immediately after drying. The powder is applied with a spatula. Rub the powder with the applicator. Remove excess powder with a brush.
- Apply top, cure in a lamp.
The secret of overflowing mirror nails
A special powder is used for mirror manicure. It is made of polyester, a material that consists of small particles. It is these particles, reflecting the light, that give the manicure a mirror shine.
The use of powder with different colors and particle sizes makes it possible to create an original manicure.
Newspaper manicure
Easy-to-perform newspaper manicure.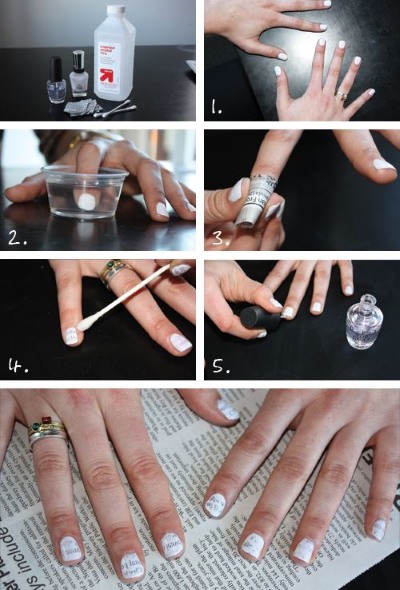
Required:
- base color;
- newspaper, 10 pieces of newspaper with a fine dough for each nail;
- acetone;
- transparent top.
Sequence of execution:
- Prepare nails for cover.
- Apply base color.
- Immediately after applying the base color with a drop of acetone, attach a newspaper fragment to the nail.
- Wait until the newspaper is completely dry. Do not move the newspaper until it is completely dry so that there are no streaks.
- Remove newspaper, cover nails with a transparent top.
Applying this manicure will take time, but the results will be worth it.
Hollywood mirror minx with foil
Mirror manicure with foil. The choice of the color of the foil depends on the color of the varnish to be used.
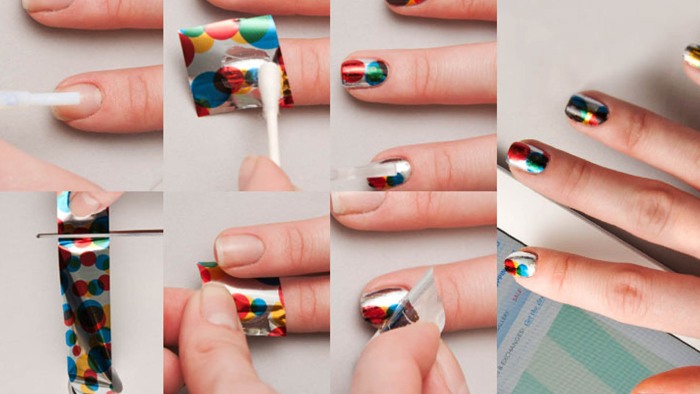
Step by step execution:
- Gel polish is applied to prepared nails and dried.
- After that, a colorless foil glue is applied to the gel. You must wait until the glue dries.
- The foil is applied to the glue with the matte side and carefully smoothed with a wooden stick.
- After that, the foil is removed and the mirror layer remains on the nail.
- Completion - covering with a pinning top.
Design - cat's eye
Spectacular cat eye manicure. A special magnetic gel - a varnish containing particles that, under the influence of a magnet, create an iridescent pattern on the nail.
To work, you will need a gel polish with magnetic particles and a magnet.
Step by step execution:
- Gel polish is applied to the prepared nails.
- A magnet is brought to the surface of the nail, which orientates the particles in a certain direction, creating a reflective effect. Depending on how you act with the magnet, the particles will be located. Exactly, diagonally or in wavy stripes.
- Then dry the layer.
- Apply top, dry.
Beautiful manicure with a stencil
Manicure using a stencil is very popular. The stencil makes it possible to make an original and neat manicure at home without much difficulty. In a specialty store, you can buy stencils for French and moon manicure.
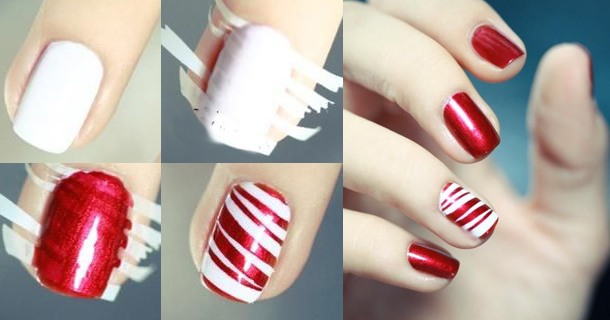
Special adhesive tape for geometric patterns and a variety of glue plates with delicate patterns are also sold. For such a manicure, you will need 2 colors of varnish, a stencil.
A manicure with a stencil is performed like this:
- first prepare the nails for coating;
- the base is applied, then the base, the layer must be dried;
- a stencil or adhesive tape is glued and the nails are covered with varnish of a different color;
- the stencil is removed from the nails at the moment when the layer is dry, but not completely dry;
- a protective coating is applied and dried.
Stamping - stamp design
Another quick method to make an original manicure, now with the help of stamps. This method differs from the previous method in that the stencil is a one-time sticker, and the stamp can be reused.
To perform a manicure using stamping, you will need plates with drawings and a stamp - a device with a silicone base for transferring the pattern to the nail plate.
First, the nails should be prepared and covered with a base, then a base on which the pattern will be applied.
Dry the main layer thoroughly so that there are no blots when applying the stamp. Apply a protective coating to the skin around the nail, which will be removed after applying the stamp and the skin will remain clean.
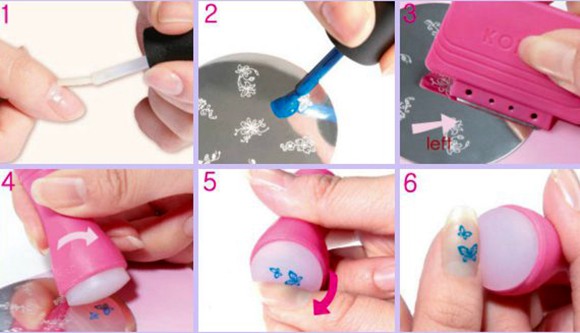
Varnish is applied to the stencil with a pattern, the excess is carefully removed with a scraper. After that, the drawing from the plate is transferred to the stamp, then to the nail, and so on. Then the finished manicure must be covered with a top.
A stencil drawing is rather fragile and requires protection. The top should be applied without strong pressure so as not to smudge the stamp. Top coat will prolong the durability of the manicure.
Water manicure: how to make your own manicure
A simple technology of water manicure, it will require:
- a container for water, not very wide, but sufficient to place a finger in it;
- varnishes 2 - 3 colors;
- a toothpick for drawing patterns;
- scotch tape / cuticle oil / greasy cream to protect near the nail space from excess varnish;
- cotton swabs and discs;
- remover for varnish;
- base, top.
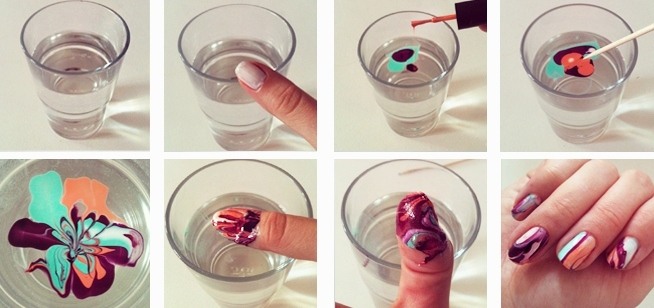
Execution step by step:
- Cover nails with a base, then dry with varnish, which will be the main one.
- Fill the container with water at room temperature.
- Drop a few drops of varnish on the surface of the water. Place the next drop in the center of the previous one. Wait for them to spread.
- Create a pattern on the water. Make 2-3 movements with a toothpick on the varnish film.
- Grease the periungual roller with cream / cuticle oil / tape around the nail. Keep your nails dry.
- Dip your finger in water, the film is transferred to the nail. Remove your finger.
- Next, you should remove the tape, if you used a cream, wipe off the excess varnish. What could not be removed immediately, clean with cotton swabs and a wash.
- This procedure can be done with each nail.The combination of a monochromatic and aqueous coating of nails on the fingers of one hand looks original.
- Secure the resulting pattern with a top.
Simple varnishes with special effects
Special effects varnishes are a quick way to make original manicure effortlessly.
Manufacturers offer:
- Glitter varnishes... These can be rare small patches of glitter in a colored base or distinguishable medium to large sparkles of geometric shapes in a transparent and colored base.
- Glitter varnishes made entirely of glitter glitters.
- Glitters with splashesresembling sugar crystals. The coating has a dense texture, when dry, they have a rough surface.
- Metallic varnishes, silver and gold.
- Craquelure effect varnishes, cracking effect. The varnish is applied on a contrasting base with a shimmer (reflective particles). Then a special colored coating is applied to the base and air-dried. In this case, cracks appear on the top layer of varnish.
- Matte coatings with splashes of sparkles and without.
Brands of varnishes and acrylic coatings for nails and approximate price:
- Laque RuNail - 270-300 rubles;
- Essie - 300-350 rubles;
- Vinylux CND - 550 rubles;
- P.I. - 550 rubles;
- Kodi Professional - 500 rubles;
- Shellac CND - 1000 rubles;
- Gelish Harmony - 1000 RUB.
The most common brands preferred in nail salons are Kodi, Shellac CND and Vinylux CND.
Baths and oils to strengthen nails after manicure
For nails that exfoliate, baths with sea or table salt will be useful.
To enhance the effect of such a bath, a drop of iodine should be added.
For weakened nails - warm oil baths with the addition of vitamins A and E, herbal decoctions of chamomile, calendula and mint.
Using natural oils for nails will strengthen the nail plate, prevent splitting and brittle nails, improve the general condition of nails and the skin around them. Oils can be used both as part of the baths, and independently.
Baths with the addition of essential oils:
- lemon;
- grapefruit;
- rosemary;
- jojoba;
- avocado.
To strengthen nails, rub in ylang-ylang oils, lavender, tea tree oil. Also used are nail masks made from a mixture of natural oils. As a basis for such a mask, olive, castor, and linseed oil is used. For effective action, the oil mixture must be heated before use.
When performing a manicure yourself at home, you need to follow the advice from professionals.
Then step-by-step execution will become not just work, but a fascinating creative activity, to which you will want to return more and more often.
Well-groomed hands and beautiful manicure are the calling card of every woman.
Useful videos on how to do a manicure at home
How to make a Gradient manicure yourself at home? Watch in the video clip:
How to perform a trim manicure yourself, find out in the video: