A short manicure is beautiful and practical, besides, it has a number of advantages that provide it with a leading position in the nail service.
The main advantages of short length manicure are as follows:
- The nails look neat and stylish. This length of nails with the right design will suit any occasion.
- Less risk of accidentally breaking your nail.
- In any color design, the manicure will not look aggressive and defiant.
- Deficiencies are less noticeable on short nails than on long ones, such as chips.
- A short manicure is more practical for everyday wear.
- Feeling of inner comfort: there is no need to be afraid to perform various actions.
- Well, the most important argument. For a man's eyes, well-groomed short marigolds look more attractive.
Correct nail shape for short manicure
The shape of the nails is an important detail in a manicure, which largely determines the future design and slightly hints at the character of its owner. To make the right choice, the nail should be shaped like a cuticle, then the nail bed will look very organic. Or trust your taste.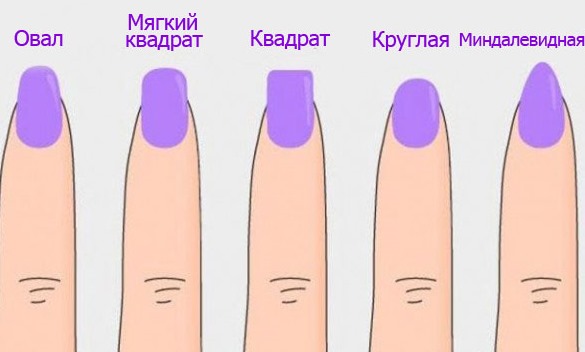
The most relevant forms for short nails are:
- almond-shaped;
- oval;
- round;
- square with clear corners;
- soft square.
Rules for a perfect manicure for short nails
There are rules in creating a short manicure, following which the achievement of an ideal result is guaranteed.
Basic Rules:
- Thorough preparatory work. Removal of cuticles and excess skin around the nail, polishing, degreasing of the nail surface, base coat.
- Correctly chosen shape.
- Suitable color of gel polish. Dark shades (for example, red or black) are considered the most advantageous for short nails, and lighter shades can visually reduce their length.
- Correctly selected design. In a short manicure, you should avoid volumetric patterns, large sculpting, the use of large rhinestones and horizontal stripes.
Design options for short nails with gel polish
French manicure
Technique "French manicure" is a classic of nail art. Versatility combined with neatness and femininity of design will suit any look. French in the traditional version is created using shades of pink, peach color as the base for the nail plate and white for the upper edge of the nail.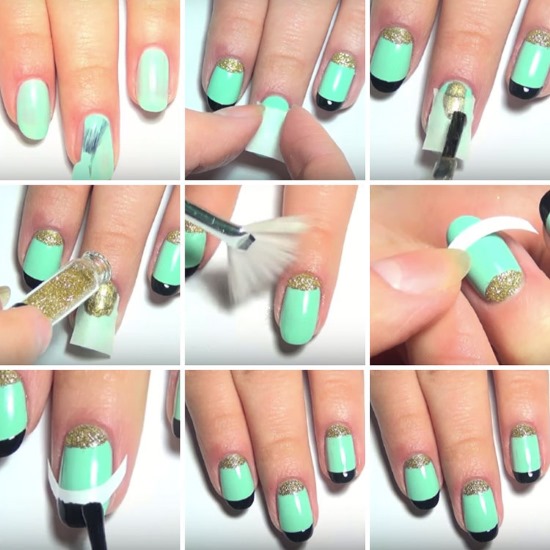
Main steps:
- Base coat layer. It evens and protects the nail. It is dried in a UV lamp - 2 minutes, in an LED lamp - 10 seconds.
- Main color. Depending on the desired saturation, it is applied in several layers, each of which is dried in a UV lamp - 2 minutes, in an LED lamp - 30 seconds.
- "Smile". To draw a white strip, nail masters use different methods: stickers, special thin brushes or brushes from the varnish itself. "Smile" is a distinctive feature of a French manicure, so it must be perfect. All irregularities should be corrected with an ordinary cotton swab or a special corrector. When using gel polish, this can be done without damaging the base color. Dry
- Top. Finish gel is applied to fix the manicure and give it shine and volume. Dried
- Removing the sticky layer... In this final stage, special tools (clinser) or lint-free wipes are used.
Over time, French manicure was enriched with new spectacular options, but retained its peculiarity - "smile".
The most popular are:
- Bright "Floral jacket". It is distinguished by a variety of color options and combines both absolutely contrasting and similar tones. The edge of the nail can be decorated with floral patterns, rhinestones, geometric patterns, kamifubuki, decorative elements "broken glass", etc.
- Sparkling Millennium. To create a sparkling effect on the tips of the nails, use sparkles, rhinestones, glitter, gold or silver varnishes.
- Fan french - bright and catchy. Its main feature is its bold decoration: beads, beads, rhinestones, pieces of lace, foil, feathers. In general, everything that will help to give exclusivity to the design of manicure.
- Ombre. French with a color transition effect is a great option for short nails. With a creative approach, it can combine from 2 to 5 shades.
- The “smile” line can change its shape in the “Non-standard” jacket. It is drawn horizontally or vertically, and is wavy, zigzag or v-shaped in shape.
"Lunar" manicure
"Lunar" manicure, "Antifrench" or French "vice versa", in contrast to the classics, highlights the nail hole in a convex, concave and v-shape. For short nails, it is preferable to wear a concave socket, as it visually lengthens the marigold. But a combination of a regular jacket (i.e. with a selection of the upper edge) and a lunar one will also look beautiful.
To highlight the hole, use a stencil (for a convex shape and a v-shaped line), a thin brush (for drawing concave lines repeating the shape of the nail plate) and foil.
To highlight the hole, use a stencil (for a convex shape and a v-shaped line), a thin brush (for drawing concave lines repeating the shape of the nail plate) and foil.
Performance:
- Base layer. Dry.
- Main color. It is applied to the entire nail and is the color of the hole. Dry.
- The selected stencil is attached to the bottom of the nail.
- The rest is covered with a different color and dried.
- Remove the stencil, cover with a top coat and dry.
- Remove the sticky layer.
For special occasions, the moon strip is decorated with rhinestones, sequins, microbeads. The moon manicure with gold or silver foil is stylishly and very effectively combined.
Single color manicure
For those who do not like experiments and appreciate beauty without frills, a monochromatic manicure is perfect. It will complement the everyday look and calmly emphasize the well-groomed hands. Natural colors will do, they will look especially impressive with a matte texture... Monochrome dark shades will accentuate the shape of the nails and visually lengthen the fingers.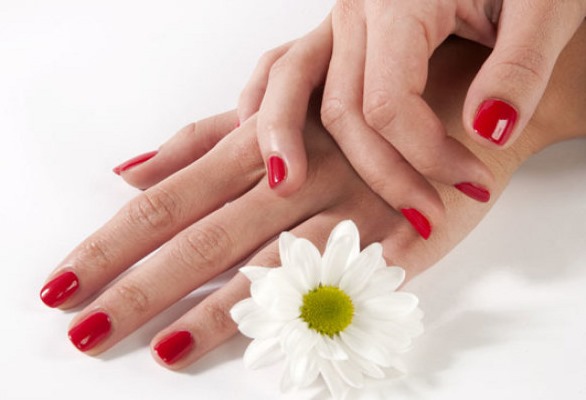
Performance:
- Application of a base coat to prepared nails. Drying.
- Application of a colored layer of gel polish and drying.
- If necessary, repeat the stain for a more intense shade and dry.
- Securing with top coating. Drying.
- Removing the sticky layer.
No matter how trends in design change, a monochromatic manicure is always relevant and attractive.
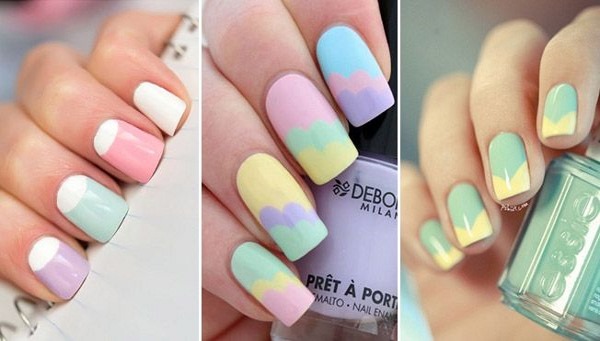
Bright manicure
Energizes bright manicure for short nails. Photo, design of this technique is a real riot of colors.In it, you can combine 2-3 close shades or completely different colors, accentuate 1-2 nails or choose one color for each hand.
The bravest will be able to surprise everyone and paint each finger in a different shade! Color-blocking and New York-style manicure are the most effective techniques in this design.
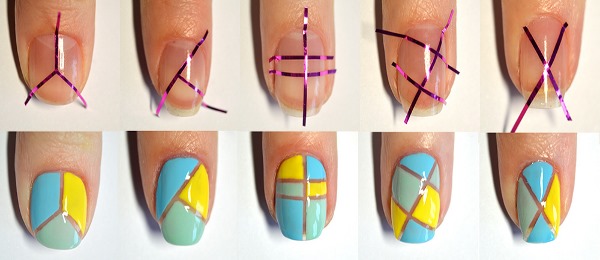
Color blocking. Technique of execution (from 3 colors):
- Base coat and dry.
- Choose three contrasting colors. The more contrast they are, the more effective the final result will be.
- The first coat is the lightest shade of the varnish. It covers the entire nail plate. This layer is the base for the rest of the colors. Drying.
- The second layer is the first color block. To create a pattern from blocks, use scotch tape or a thin brush. Drying.

- The third layer is the second color block. Drying.
- Top coating and drying. The super-glossy finish is an important detail in block design: it will add richness and contrast to the manicure.
- Removing the sticky layer.
Gradient
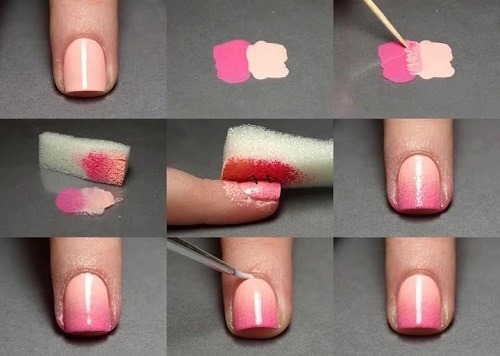
Gradient manicure or ombre is a technique for creating smooth color overflows. More than two shades can be used in it, which, due to the softness of the transitions, will make a manicure for short nails unusually attractive and mysterious.
Design with an ombre effect can be obtained in several ways: with a sponge, a brush (with a straight end or a fan), airbrush.
The gradient allows you to experiment with color, as well as choose the direction of transitions: horizontal, vertical or from finger to finger. For those who are trying this technique for the first time, numerous gradient photos will help you find the right option. Design with an ombre effect can be obtained in several ways: with a sponge, a brush (with a straight end or a fan), airbrush.
Technique (sponge):
- Base coat application. Drying.
- Creation of color fantasy. Selected varnishes are mixed on foil or traced in stripes on the sponge itself.
- Saturate the sponge with varnish on foil.

- Apply the varnish with gentle, springy movements with a sponge. Dry (for a more saturated color, add several layers with a break for drying).
- Top coat application. Drying.
- Removing the sticky layer.
Selected shades of varnish can also be applied in thick layers on the nails themselves, followed by shading with a sponge.
Technique (fan brush):
- Basecoat application and drying.
- Of the selected shades of varnish, the lightest is applied in 1-2 layers. Dries up.
- The other colors are mixed on the foil.
- With a fan brush, slightly touching, the resulting shade of varnish with foil is applied to the nail from side to side. Drying.
- Top application, drying.
- Removing the sticky layer.
Design in black and white
Manicure in black and white tons, despite the classic color combination, is inspired by many nail artists to create stunning and original designs. Gradients, geometric patterns, various decorative elements, velvet sand, etc. will help to effectively emphasize the contrast of shades. Black and white jacket or moon is especially attractive.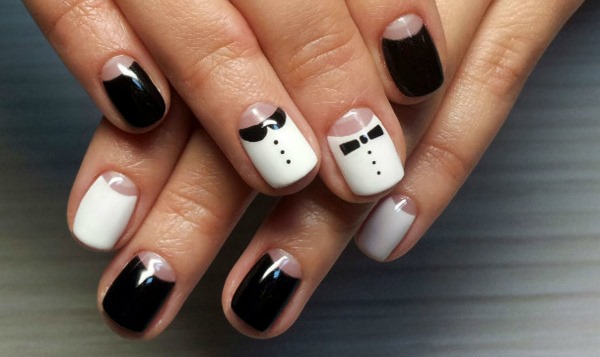
Black and white jacket:
- After preparing the nails, apply a base coat and dry.
- Apply black varnish in 1-2 layers. Dry each layer.
- Draw the upper edge of the nail with white varnish, as in the French manicure technique, and dry.
- Apply topcoat and dry.
- Remove the sticky layer.
Geometric patterns
Nail geometry is an unusually bold and catchy design that will be relevant in the coming 2018 as well. It gives room for imagination, but at the same time requires a careful approach to the choice of patterns, since some of them, for example, squares and circles, can visually shorten the nails, and being overloaded with figures will make the manicure very difficult.
You can create geometric patterns in different ways: with a long-bristled brush, adhesive strips, sliders, using tape, dots, stencils.
You can create geometric patterns in different ways: with a long-bristled brush, adhesive strips, sliders, using tape, dots, stencils.
Thin brush:
- Base layer. Dries up.
- The main tone is applied. Dries up.
- A geometric pattern is drawn with a brush. Dries up.
- The resulting design is secured with a top and dried.
- The sticky layer is removed with napkins.
 Adhesive strips "check marks":
- The base coat is applied. Dries.
- The triangular strips are glued to the nails and pressed tightly against the nail plate.
- Free areas are covered with colored varnish. The nails are sent under the lamp.
- The strips are removable.
- Cover the manicure with a top and dry.
- Remove the sticky layer.
Negative space is a new fashion trend in geometric design. When creating a pattern, unpainted areas are left on the nail plate, which ultimately add originality to the entire manicure.
Volumetric manicure
"Mirror drops" and "Knitted sweater" are techniques for creating a volumetric pattern with gel polish. Droplets and knitted patterns do not make manicure heavier, do not cling to clothes and last for a relatively long time. Usually 1-2 nails are given volume and they are distinguished with a different shade of varnish.
For more effect, add other techniques, such as a gradient. But both designs are seasonal (knitting - autumn-winter, drops - summer) and are not considered universal, therefore, other options should be chosen for gala evenings and ceremonies.
"Knitted" manicure:
- Base coat application. Drying.
- The main color of the gel polish is applied in 2 layers. Dry each layer.
- Cover your nails with top. Dry in ultraviolet light and remove the sticky layer.
- Patterns are drawn with a thin brush and gel polish of the main color. The resulting drawing is dried.
- If desired, you can add a velvet effect with acrylic powder. It is scattered over the pattern just drawn. Then the nail is dried, and the excess powder is removed with a soft brush.
- The manicure is covered with a top, dried and the sticky layer is removed. If acrylic powder is added, the top is not needed.
The patterns here can be completely different. From simple braids or diamonds to a pattern from a sweater.
Cat's eye
Magical "Cat's Eye" - a spectacular manicure for short nails. Photos, designs in any color draw the attention of others. To create a manicure, use unique gel polishesconsisting of metal microparticles. They are connected into fantastic patterns by a special magnet, which is simply enough to move over the surface of the nails.
The most popular colors in the Cat's Eye technique are malachite, wine, gold, brown, dark blue, black and chestnut.
The maximum effect will be achieved by keeping the magnet at a minimum distance. The cat-eye design is versatile, suitable for any occasion and looks stunning in both glossy and matte finishes.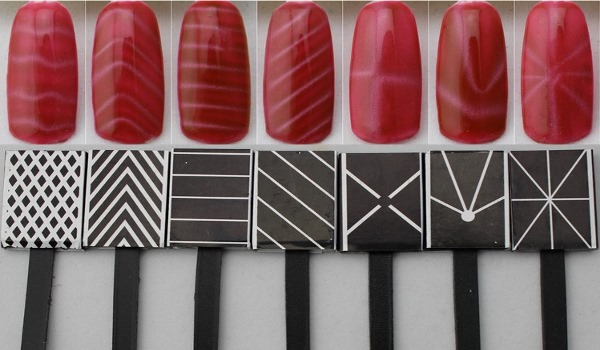
Performance:
- The base coat is applied in 1 layer and dried.
- The selected shade of gel polish is applied. If the texture is dense, one layer is sufficient.
- A magnet is brought to the painted nails. By moving it in the right directions, he gets the intended drawing. Create a "cat's eye" should be on each finger in turn and limit the exposure time of the magnet to 5-10 seconds to avoid drying out the varnish. Fasten the result under the lamp.
- Fix and dry the top.
- Remove the sticky layer.
The most popular colors in the Cat's Eye technique are malachite, wine, gold, brown, dark blue, black and chestnut.
Rub-in manicure
A trendy manicure for short nails with rubbing appeared last year. Numerous photos of this technique present various options: "Holography" and "Prism" with diamond tints, mirror "Metallic", multicolor "Melange", "Chameleon" or "May beetle" and "Northern Lights".
nail design experts recommend applying a sufficient amount of rub in to make the color as saturated as possible.
The design is unusual and bright, but there are fantastic solutions for special events and for every day. The smallest particles from which rubbing takes place require a special approach. In order for the manicure to turn out with a uniform shine and without defects, the nails should be carefully prepared.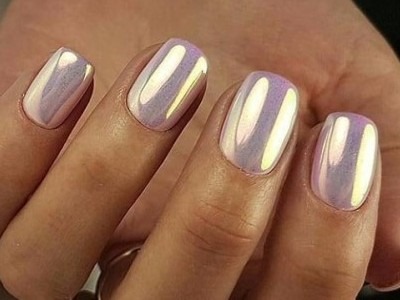
The surface of the nail plate should be perfectly flat and smoothotherwise all the irregularities will be visible. It is quite difficult to remove them later, and decorative elements, for example, kamifubuki, will quickly disappear. Also, nail design masters recommend applying a sufficient amount of rub in so that the color is as saturated as possible.
Metallic:
- Apply base to nails and dry.
- Apply a suitable shade of gel polish in several layers and dry.
- Top cover without sticky layer. Dry.
- Using the applicator, distribute the "mirror" particles of the selected shade over the entire nail and gently rub in the powder until the desired effect.
- Apply a glossy top. Dry.
- Remove the sticky layer.
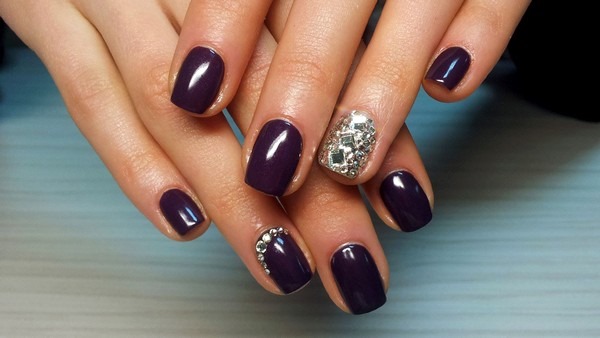
Manicure with rhinestones
Rhinestones of any shape, size and color make manicure incredibly attractive and luxurious. Usually 1-2 marigolds are decorated with sparkling stones., but in special cases, a rhinestone pattern is created on each finger. Rhinestones inlaid on short nails should be minimal, as overloading with decorative elements can ruin the entire design.
There are several classic options for securing rhinestones: "Shirt", "French" / "Double French", "Pyramid", "Lunar manicure", "Geometry", "Wave", "Luxury".
There are several classic options for fixing rhinestones: "Shirt", "French" / "Double French", "Pyramid", "Lunar manicure", "Geometry", "Wave", "Luxury".
Performance:
- Apply a base coat. Drying.
- Choose a shade of gel polish and apply it in 1-2 layers. For design, you can focus on one color or highlight the nail with rhinestones with another varnish.
- Nails without rhinestones are covered with a top and dried. The sticky layer is removed.
- To attach rhinestones, the selected nails are covered with a thick top layer. With the help of an orange stick or tweezers, the rhinestones are carefully transferred to the line of the intended pattern.
- After completing the drawing, the marigolds with rhinestones are dried.
- The top is applied with a thin brush without touching the surface of the rhinestones. The layer is dried.
Manicure design "Chameleon"
The constant play of colors is the highlight of the Chameleon manicure. The mobility of the design is given by microparticles that are part of the gel polish and react by changing shades to light and temperature. You can choose contrasting or less pronounced color transitions by examining the information on the varnish bottles.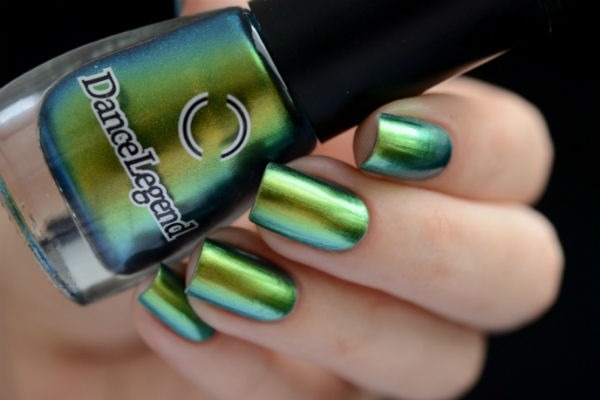
Performance:
- Cover nails with a base coat and dry.
- In one or two layers, depending on the thickness of the varnish, paint the nails with Chameleon gel varnish of the desired color. Dry each layer.
- Finish the manicure with a finish and dry.
- Remove the sticky layer with special napkins.
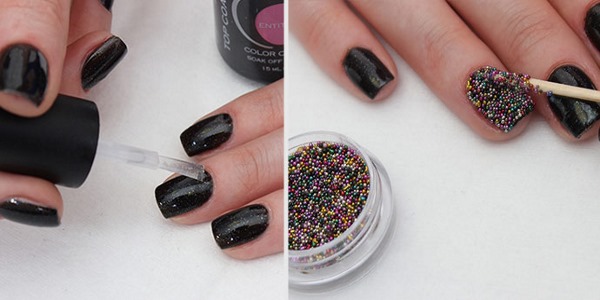
Broth manicure design
Broth beads are a convenient and practical element of the nail decor. Tiny (no more than 4 mm.) colorful balls can be easily combined with other decorative elementssuch as rhinestones and sparkles. With their help, nail masters decorate ready-made drawings and create various designs: "Caviar", Ombre, Lunny.
Performance:
- Be sure to cover the marigolds with a base and dry.
- After the base, the nails are painted with gel polish of the selected shade in several layers. Dry each layer.
- A finish is applied to nails without a design. The layer is dried and the dispersion layer is removed with special napkins.
- A top without a sticky layer is applied to nails with a future design.
- Selected broths are poured into a small jar.

- Applying beads to nails.Two options are used for continuous coverage of the nail surface. You can gently sprinkle broths on the marigold and then press them against the nail with your finger. If there are empty spaces, sprinkle again and press with dots. Or dip your finger into a jar of broth, and then squeeze. In the case when beads decorate a drawing, they should be attached and pressed with a dots.
- With a top without a sticky layer, using a thin brush, secure the design along the edge of the marigold and near the cuticle. Dry in a lamp.
Glitter manicure design
Sequins are versatile and able to decorate manicure on short nails using any technique. Photos of all kinds of combinations will help you choose the right option or come up with something of your own. Shimmering particles can become the main decoration of the entire manicure or emphasize the lines of the drawing. Dry glitter and liquid glitter of various sizes are used to create a sparkling design.
Dry glitter and liquid glitter of various sizes are used to create a sparkling design.
Performance:
- Prepare your nails - apply a base coat and dry.
- Choose the color of the gel polish and apply the first coat. Dry.
- With a second layer of varnish, the nails are painted without drying.
- Pick up the sparkling particles with a brush and sprinkle on the nails. Alternatively, you can dip your fingers into a jar of glitter.
- Remove excess glitter carefully.
- Dry the glitter manicure in the lamp.
- Secure with top, dry.
- Remove the sticky layer with napkins.
Manicure design Broken glass
A mesmerizing imitation of "broken glass" is created using pieces of polyethylene, foil, cellophane with a holographic effect. The color combination of the "shards" can be different, but black with gold and silver is considered popular. “Broken glass” can be successfully combined with other techniques, such as French and gradient.
“Broken glass” can be successfully combined with other techniques, such as French and gradient.
Performance:
- Cover the nail surface with a base coat and dry.
- Apply the base in several layers with a break for drying.
- Cover the nails, on which the drawing will be, with a thin layer of top.
- Use tweezers or an orange stick to lay out a drawing from pieces of film. The resulting layer is dried.
- Fix all the nails with a top in two layers. Dry
- Remove the sticky layer.
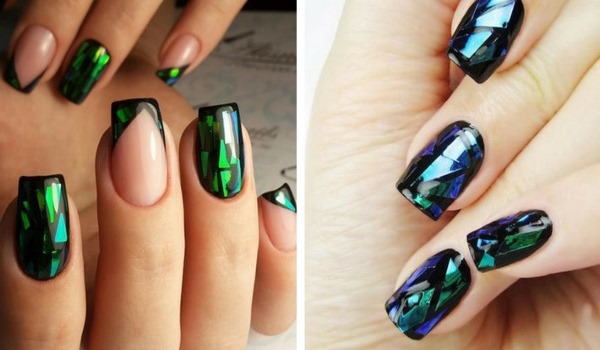 When creating the Broken Glass design, nail masters advise not to place large pieces of film at the edge of the nails. they can flake off. It is better to lay out the drawing with “fragments” at a distance of at least 1 mm., and press the pieces to the nail as hard as possible.
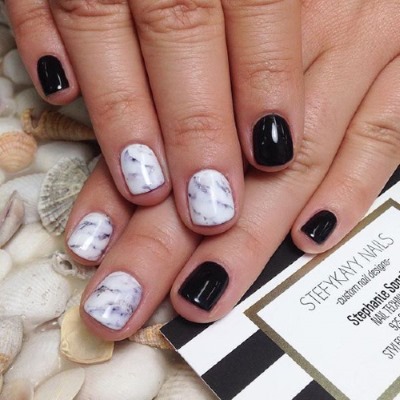
Marble manicure design
"Marble" design is a fashionable and effective technique that imitates a stone pattern. Manicure can be done in classic shades - white, gray, black, beige, and in bright colors - green, blue, blue, red. The marble technique consists of three options for staining: water, with a thin brush, cellophane or cling film.
Water technology:
- Apply and dry the base coat.
- Treat the area around the nail with a greasy cream, so that later you can easily remove the gel polish.
- Prepare a container with water at room temperature. Drop a drop of each gel polish into water several times. To form a pattern with a toothpick.
- Dip your fingernails over the pattern.
- Use a cotton swab to cleanse the skin around the nail.
- Dry the resulting drawing.
- Finish the manicure with a top. Dry the finishing layer.
- Remove the sticky layer.
 Brush:
- After preliminary preparation of nails, apply a base coat and fix it in the lamp.
- Apply the main color in two layers and dry.
- Cover nails with clear gel polish, but without drying
- With a thin brush, draw smooth, slightly curved lines with the selected shade of gel polish to recreate the stone pattern. Gold and silver stripes look stylish.
- Dry the drawing under the lamp.
- Cover with top, dry.
- Remove the sticky layer.
Lace on short manicure
Lace is the most beautiful and most feminine type of decor in nail design.You can “weave” lace in different ways: using a thin brush, dots, needles, stickers, stamping or using lace fabric. Lace patterns can be both an independent element and an additional design for a manicure.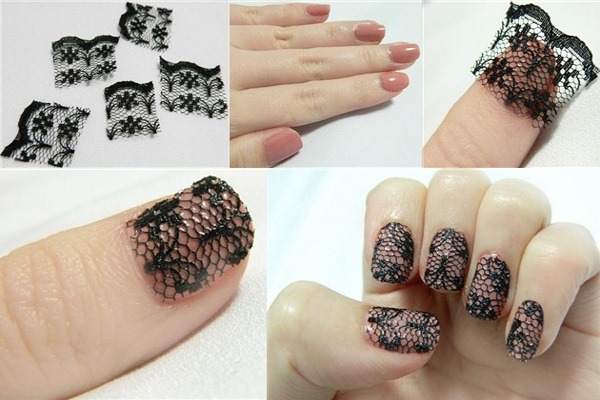
Fine brush technique:
- The nails are covered with a base and dried.
- Application of the base color until a rich shade is formed. Each layer is dried.
- Complete the manicure on the nails without a pattern: cover with a top, dry and remove the dispersion layer.
- A lace design is created on the remaining nails. With the help of a thin brush and thick gel paint, the lines of the future lace pattern are drawn and then dried.
- Designed nails are covered with a top in 1-2 layers. Dry.
- A lace pattern is drawn to the end with a brush. 3D gel paints or gel pastes are used to add volume to the lace.
- The finished drawing is dried under a lamp.
How to make a shellac manicure
Painting nails with shellac is a very popular procedure: it does not take much time, and the result is a bright and rich manicure with a durable coating. The main thing in this process is the sequence of actions, after completing which you can enjoy the manicure for a long time.
Sequence:
- After standard nail treatment, go through with a degreaser (primer, dehydrator, cleanser).
- Cover nails with a base coat and dry for 1 minute in a UV lamp or 10 seconds. in the LED lamp.
- Gel polish is applied in several layers (usually two are enough) and each is dried for 2 minutes in a UV lamp.
- The manicure ends with a top coating, which is dried for 1 minute in a lamp.
- The sticky layer is removed with lint-free napkins.
Step-by-step instructions for manicure using scotch tape technique
Scotch tape is a stylish and versatile decorative element in the form of a thin strip with a self-adhesive surface. The ribbon can be easily combined with any design and any technique, as it has a wide palette of colors. But in the design, a golden tint is most often used.
The ribbon can be easily combined with any design and any technique, as it has a wide palette of colors.
Step-by-step instruction:
- Apply the base to the prepared marigolds and dry.
- Apply 1-2 coats of gel polish of a suitable color and dry.
- Carefully separate part of the tape from the roll and glue, pressing slightly, to the nail.
- Fix the resulting pattern with a top coating and dry under a lamp.
So that the manicure lasts a long time, adhesive tape is glued only to the dried varnish, slightly stepping back from the edge of the nail and cuticle... In scotch tape design, you can use regular French manicure stencils or simple scotch tape, cutting it into geometric shapes.
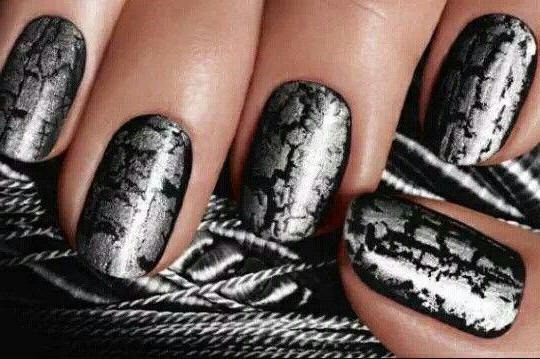
Crackle technique on short manicure
Crackle is a bright nail design with the effect of "cracked" varnish. The main thing in this technique is to choose the right color of gel varnishes for the base and the cracks themselves. Generally, the universal shades of the "crackle" coating are used - white and black.
Generally, the universal shades of the "crackle" coating are used - white and black.
Performance:
- A base coat is applied to the prepared marigolds and dried.
- The nails are painted with a base color that will stand out through the cracks. The layer is dried.
- Apply a gel polish with a craquelure effect and dry for 2-3 minutes without a lamp. During this time, cracks are formed. The thickness of the cracks depends on the thickness of the layer. The smaller it is, the easier the drawing is.

- The manicure completes the top coat in two layers, each of which must be dried.
- The final touch is to remove the sticky layer with special napkins.
Alternatively, foil is used in the design with "craquelure":
- The nails are pre-coated with a base and dried in a UV lamp.
- The base is applied in several layers and dried. But the sticky layer does not come off after drying.
- Pieces of foil are glued to the nail plate, slightly larger than the nail, and lightly fixed with an orange stick in different places.
- The foil is removed with a quick motion. The rest of the pieces (those that were pressed against the orange stick) create the effect of cracks.
- The drawing is covered with a top and dried under a lamp.
- Remove the sticky layer.
Correct manicure with a magnet
An original manicure design can be easily created using a magnet and special gel polish. The essence of the technique lies in the fact that metal particles of gel polish, reacting to the brought up magnet, form various volumetric patterns.
But in order to get the ideal option, you need to know the features of the technique:
- Select the color of the magnetic varnish and the design of the magnet.
- Apply base coat to prepared nails and cure in a lamp.
- Apply 1 coat of varnish and dry under the lamp.
- The second coat of varnish is applied using a magnet. After staining one nail, a magnet is immediately brought to its surface, since its effect is stronger on fresh varnish. Thus, in turn, a pattern is created on all nails. The magnet should be held as close to the nail as possible for 5-10 seconds. After processing all nails, the varnish is dried under a lamp.
- A top coat is applied and dried.
- The sticky layer will be removed.
Actual drawings for short manicure
A manicure for short nails does not exclude a design with a pattern, but on the contrary gives scope to creativity. There are a variety of patterns from minimalistic to voluminous. But most often you can find a photo of a short manicure with geometric shapes, floral patterns, fruits and prints.
The main rule is not to overload the drawing with unnecessary details. (it can simply merge) and try to visually lengthen the nail plate, for example, due to vertical or diagonal lines. For a winter version of manicure, a drawing with snowflakes is suitable, as in the photo.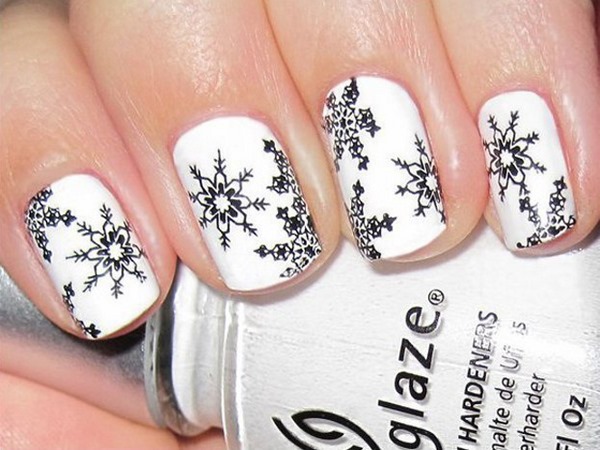
Technique for stamping manicure design for short nails:
- After preliminary preparation, the nails are covered with a base coat and dried for 1 minute in a UV lamp.
- The main color of the marigold is painted in several layers and each is dried in a lamp.
- Top is applied to fix and dried.
- The sticky layer is erased with napkins.
- Using a scraper, varnish is applied to the plate with the image of a snowflake, it is evenly distributed over the surface of the picture, and the excess is removed with a quick clear movement.
- With a light rolling motion, the drawing is transferred to the stamp.
- And with the same movement, the snowflake is transferred to the nails selected for the design.
- The traces of varnish on the skin are removed with acetone.
- The contours of the snowflake are drawn with a thin brush.
- You can decorate nails with snowflakes with velvet sand. First, the entire surface of the nail is sprinkled. After 1 minute, you need to turn your hand over and shake off excess particles. Dry the drawings in a lamp.
- After drying, the remaining velvet sand is shaken off with a brush.
Various manicure techniques give absolute freedom in choosing designs for short nails. And the use of gel polish will give a pleasant feeling of confidence in the beauty and attractiveness of fingers in any situation.
Video about manicure for short nails
5 design options for short nails:
https://www.youtube.com/watch?v=u4l0hfd-VTo&t=1s
Photo ideas for manicure for short nails:
Cool design options! There are plenty to choose from! I especially liked the "broken glass".