Gel polish manicure is a popular trend that gives a well-groomed look to your hands for 2-3 weeks. 80% of women who first tried long-term nail art subsequently repeatedly returned to the procedure they liked. It is possible to create a manicure using shellac at home by carefully studying the nail art technique and carefully following the sequence of necessary actions.
General recommendations for manicure with gel polish at home
Gel polish manicure (at home, nail art allows the use of single-phase cosmetic products) is a rather laborious task that requires full concentration and significant financial investments. Gel polish is a universal decorative coating applied to the nail plate, which is a mixture of regular varnish and strengthening gel.
Shellac benefits:
- ease of application;
- preservation of a spectacular appearance of nails for 2-3 weeks;
- high durability of the coating;
- speed of drying;
- lack of a feeling of weighting of the nail when applying 2-3 layers.
Recommendations of experts for self-manicure using gel polish:
- Coating is impossible without proper nail treatment. Before using shellac, it is recommended to do dry edging or hardware manicure without the use of oil products. The application of the gel is necessarily preceded by degreasing the nail plate.
- A woman who does a manicure on her own must strictly adhere to the technology of nail art.
- The purchase of a starter kit precedes nail decoration The kit includes: tools for hygienic manicure (apparatus), UV or LED lamp, multi-colored gel polishes, first layer (base), transparent top to complete the procedure.
- The key to beautiful nail art is the correct polymerization, the duration of which depends on the instructions for the coating and the power of the lamp.
- Top, base, colored varnish should be of good quality (ideally from the same manufacturer).
- After completing a manicure, it takes 24 hours to refrain from water procedures, saunas, and the use of chemical detergents. Housekeeping is carried out only with rubber gloves. This precaution is necessary to avoid smudging, chipping, damage to the decor.

- Gel polish should not be used all the time. To preserve the strength of the nails, you should take a break from wearing shellac for at least 14 days after 3 full courses.
- Nail design is carried out with cosmetic substances that require different amounts of coatings. The most durable manicure is done with a 3-phase system, consisting of sequential application of base, varnish and top with careful polymerization at each stage. Single phase shellac is used for quicker and easier application. This cosmetic product combines a top, base and color coating, it is easy to lie down, dry 1-2 times (1 min each), but has a small durability (1-2 weeks).
- The color of shellac is chosen depending on the woman's desire, the size of the nail plate, and the season. For the winter period, beige shades, peach colors are suitable.In the summertime, you can diversify your everyday look with a juicy, bright manicure, made in blue, light green, yellow, raspberry tones. Dark colors are preferable for covering short nails, for long areas it is recommended to use pastel shades to prevent excessive vulgarity.
- Additional decor is created with sparkles, rubbing, glitter, rhinestones, decals or stamping technique (transfer of a design from a stencil). Decoration material is purchased in stores or ordered on the Internet. The quality of the pattern does not vary from place of purchase.
Techniques and methods of gel polish manicure at home
Homemade gel polish manicure requires the purchase of a special set, adherence to a strict sequence of actions, a careful choice of nail coverage.
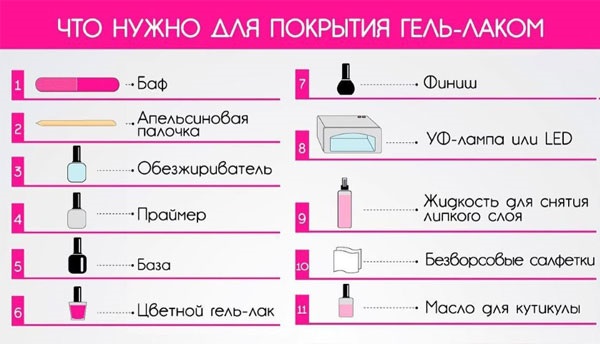
To create an independent nail art you need:
- a file for forming nails (several pieces of different lengths are possible);
- tweezers (apparatus for hygienic manicure) or remover (solution that removes keratinized cuticles);
- buff - a special pad for plate polishing;
- orange (wooden) stick;
- primer (degreaser);
- ultraviolet or LED lamp for fixing varnish;
- basic base for manicure;
- top - securing topcoat;
- cuticle softening oil;
- gel varnishes of different colors;
- decorations for decor (stickers, rubbing, foil, glitter, acrylic paints, stencils for pictures);
- cosmetic solution that removes the sticky layer;
- nail polish remover;
- cotton disks, sticks, toothpicks;
- Scotch.
Manicure techniques:
- water - characterized by the creation of a pattern on the water, followed by transfer to the finger;
- newspaper - the design is created by a scrap of the printed edition;
- gradient (ombre) - smooth transition of shades of the same color range;
- stamping - using stamps;
- nail art with microbeads, foil, various decorations;
- matt - differs in the creation of a rough coating with a lack of gloss;
- photo design - imposition of ready-made drawings on the nail plate;
- art.
Instructions:
- Nail preparation including removal of old coating. Before handling, wash your hands with detergent.
- With the help of an orange stick, the cuticle is gently moved away from the base of the nail, which is removed by the apparatus, tweezers, and remover.
- The nail file is given the required shape (oval, square, peaks).
- The nail plate is polished with a buff. At the end of the procedure, the removed particles are shaken off with a powder puff or napkins.
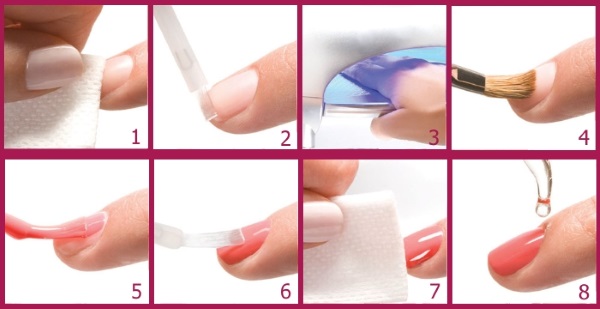
- The prepared nail is covered with a degreaser (the product dries up in 30 seconds).
- The first layer of manicure is a primer. The nails are covered with a base, polymerized for 1-2 minutes in an ultraviolet lamp.
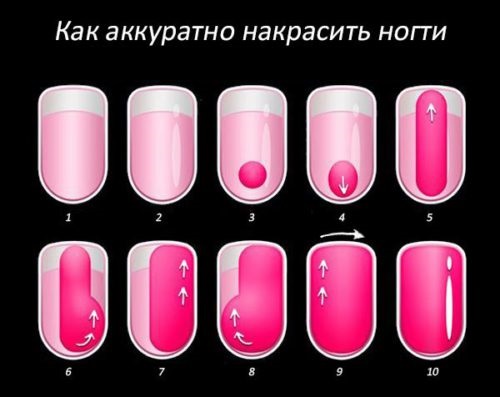
- The second stage is colored coating. The choice of shade depends on the woman's desire. Shellac is first applied to the lunula of the nail, then the brush paints the sides, and finally the middle and end are covered. The varnish is applied in 2 layers, each is dried in a lamp for 1-2 minutes. The setting time of the product depends on the manufacturer, it is indicated on the instructions attached to the bottle. Drying is carried out in parts. First, all nails are placed in turn, then 4 at the same time. Thumb plates are polymerized separately. Consistency prevents varnish from flowing into the sides of the nail.
- The last is the top that completes the nail art. The fixer is placed under the influence of UV rays for 2 minutes.
- After fixing with a special solution, the sticky layer is removed. Excess varnish is removed with a toothpick.
- At the end of the manicure, the cuticle is lubricated with a moisturizing oil.
All gel varnishes differ depending on the sequence of application:
- 3-phase system - the most popular and persistent, characterized by the use of 3 products for manicure (top, base, color).First, the nail is covered with a colorless primer, necessary to protect the plate, followed by a colored varnish, fixed with a transparent top. This option is applicable when decorating nails.
- 2-phase set consists of a base and a colored top.
- Single phase varnishes combine 3 tools. They are characterized by a short wearing period (no more than 1 week). Due to their ease of use, they are good for independent manicure. Greater strength can be achieved by combining 1-phase varnish with a top and base from other companies.
The choice of manicure products is based on a study of the price and manufacturer.
Shellac types:
| Shellac (CND) | The most popular nail polish for long-lasting manicure. Differs in easy application, density. Has a small tint palette |
| Kodi | The second most popular brand for nail art. Presented by a wide palette. Easy to apply, no dripping. Long-lasting, ideal for decorating with stickers, crystals, glitter. |
| In'Garden So | Nourishing and strengthening gel polish. It is used for long-term manicure. It is very difficult to remove, I injure my nails. |
| Irisk | Shellac with caring ingredients, thick consistency and a wide palette. |
| Color Century | Gel polish is easy to apply. Self-leveling, no chipping, no cracking. The palette contains about 140 shades |
| Jessica Celebration | A cosmetic product with a vitamin complex. Strengthens and cares for nails. Difficult to use independently. It has a liquid structure, often spreads and rolls in the sides (especially if the drying process is disturbed). |
| Actium OPI | Strengthens, nourishes the upper layer of the plate, but it is very difficult to lie down, swells, spreads. Short-lived (1 week). |
When decorating nails, it is recommended to use a primer and a bonder for better application and preservation of the durability of the varnish. All cosmetics used for the nail cover, it is better to purchase one brand.
Monochrome gel polish manicure
Manicure with gel polish (at home, careful adherence to the technique of the procedure is necessary) using a monochromatic design is the ideal choice for a stylish business woman.
The monochrome option is appropriate:
- in everyday looks;
- in a business style (the richness of the ornament can be distracting);
- in case of preference for plain clothes;
- as part of the image in harmony with other elements of the outfit;
- with an abundance of jewelry on the hands.
For the autumn-winter season, nail art made in gray, brown, beige, burgundy is preferable. Spring and summer require the use of brighter shades (gold, yellow, blue, crimson).
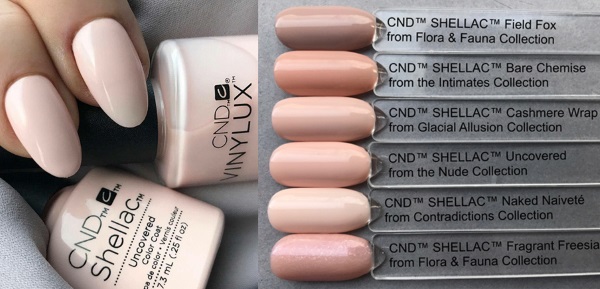
Natural manicure is especially popular, characterized by the imposition of a monochromatic coating that creates the effect of the absence of varnish. This option gives the nails a well-groomed look, ideal for office etiquette.
Performed by shellac:
- light pink;
- peach;
- beige;
- flesh tones;
- the color of coffee with milk.
Manicure with gel polish in different shades
Gel polish manicure made in contrasting shades is a fashionable trend used in various techniques. Depending on the method of execution, 2-3-color nail art is able to create a festive or business image. Types of manicure:
Rainbow
An original design, during the creation of which all fingernails are covered with different colors. Ideal for young, relaxed girls. The best time to create such a design is summer, vacation period. A more modest rainbow is applying a contrasting tone to 1 finger. This option is conservative, appropriate for an office dress code,
French
A classic nail design that draws a smile in a contrasting color on a solid nail cover. The classic jacket is a combination of a transparent base with a white edging.
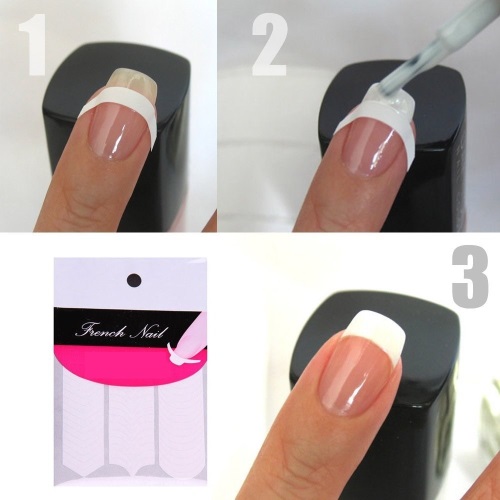
The design looks great on nails of any length, compatible with all fashion styles. French manicure is ideal for the office, combined with nude makeup. In the case of adding rhinestones, rubbing, drawings, it acquires a ceremonial look, suitable for a festive event.
To create a jacket at home, you need:
- transparent shellac (a light pink coating will do)
- white varnish;
- stencils;
- brush;
- colorless top and base.
The easiest way is to draw a "smile" with a thin synthetic brush (or liner) using stencils.
Procedure steps:
- Prepared nails are lubricated with a solution to remove oily shine.
- The plate is covered with a base of beige, light pink, peach shades. Dries for 1 min.
- Stencils are glued to the nails. With white shellac, with the help of a brush (thin liner), a smile of the same shape is drawn on each nail. Upon completion of the design, polymerization is required for 1-2 minutes.
- Each nail is alternately covered with a final transparent top, followed by drying (at least 2 minutes). After the shellac has hardened, the nails are wiped from the sticky layer.
In addition to the classic (transparent white) jacket, it is possible to draw a smile of any color on a contrasting coating.
Lunar
The antipode of the classic jacket, in the process of creating which the base (lunula) of the nail is covered with a color different from the base. Reverse manicure is universal, does not require a certain style of clothing. For a long time, it does not need correction.
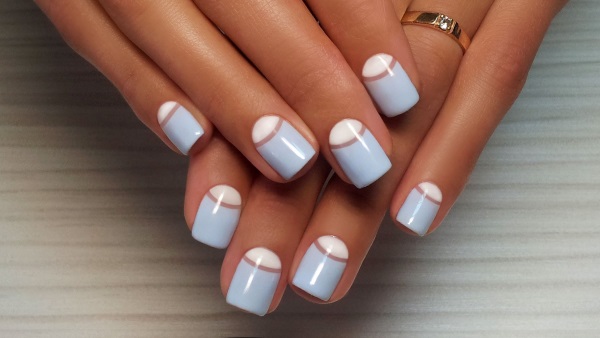
For independent nail art, you need:
- base and contrast gel - varnishes;
- thin brush with a beveled edge;
- adhesive strips stencils.
Creation technique:
- Hygienic manicure with cuticle and nail treatment.
- Lubricating the plates with a degreaser to remove gloss.
- Applying a base base over the entire length of the plate. Base polymerization (1 min).
- Sticking stencils near the base of the nail to create a lunula of the same size.
- Drawing a circle with a thin beveled brush dipped in a contrasting base shade (a semicircle is created at the very base of the nail). Upon completion, the decor is fixed in an ultraviolet lamp (1 min).
- Covering nails with a transparent top followed by polymerization (each finger for 2 minutes).
- Removing the sticky layer.
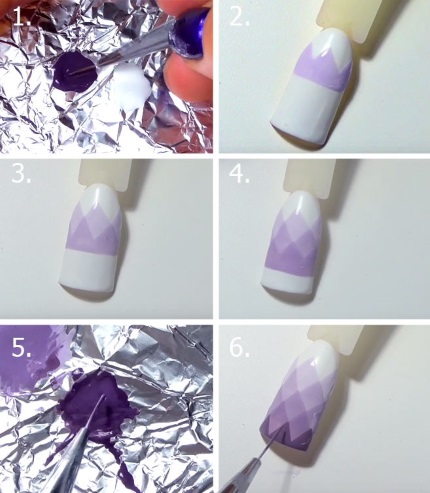
Ombre
Color Stretching is a free version of the classic jacket, during which the light color smoothly turns into a darker tone. To create a manicure, 2-3 shades of the same color range are most often used.
Business style offers the use of bed varnishes (beige, pink, peach). The evening version is created with a brighter palette. In the process of creating an ombre, the end of the nail is painted over in a rich tone, gradually fading towards the base of the plate.
Required devices:
- 2-3 varnishes of several shades from the same color range;
- transparent base;
- final top;
- a thin brush or toothpick;
- sponge or sponge;
- palette;
- cotton pads;
- nail polish remover.
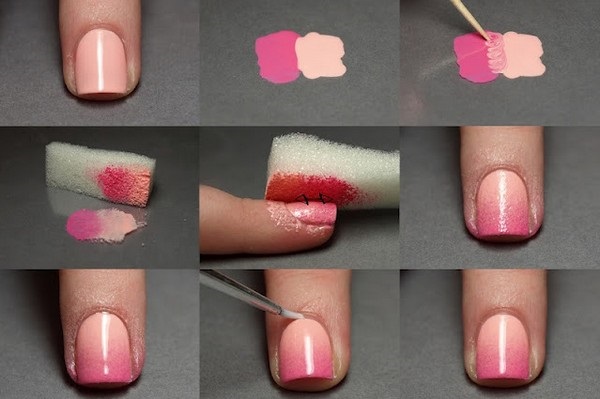
Execution technique:
- Carrying out dry edging or hardware manicure.
- Applying a solution to degrease the plate.
- Covering nails with a colorless base followed by polymerization (30 sec).
- Applying varnishes (1 cap each) to the palette in the selected color sequence. Feather shades with a brush or toothpick to erase clear boundaries.
- Placing a sponge soaked in water in a shaded varnish to transfer the cosmetic to the nail plate. Polymerization of the nail (1 min.) A new portion of varnish is prepared for each finger.
- Application of the final top gel, drying in an ultraviolet lamp (2 min)
- Eliminating excess varnish with cotton pads and acetone, cleaning the manicure from the sticky layer.
Ombre looks equally good on nails of any area. For added visual length, darker shades should be applied to the end of the plate.
Matte gel polish manicure
Gel polish manicure (at home you can create any design using special kits) with a matte finish is one of the new products that has won many fans.
Matte nails are given with the help of a special top that has:
- satin effectwhich retains a light shine with a slight bloom of matte;
- corduroy effect, making nails rough, with a velvety sheen.
Home manicure products:
- basic coverage;
- shellac of the selected color (matte manicure made in dark shades looks the most advantageous);
- degreaser;
- matte top;
- means for removing the sticky layer.
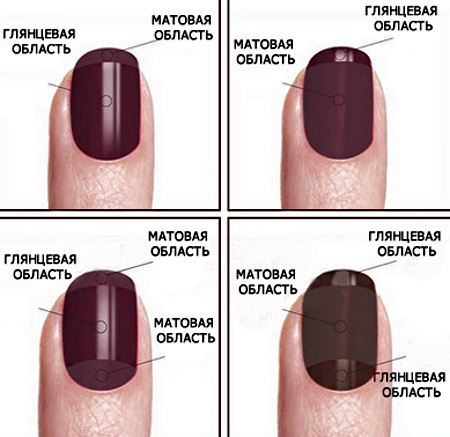
Technics:
- A preparatory procedure, consisting in the treatment of nails with the removal of cuticles and shaping.
- Degreasing the plate followed by coating with a base base. It takes 2 minutes to dry the base.
- Colored shellac application and curing polymerization (2 min.)
- Matte nails by using a special top. The final manicure is grabbed for about 2 minutes.
- Removing the sticky layer with cotton pads dipped in a special solution.
In the absence of a matte top, you can create roughness:
- sanding a glossy manicure with a buff;
- applying acrylic powder to a loose glossy top;
- holding a freshly coated product for 2 minutes to complete the manicure over steam;
- rubbing matte dust into the left sticky layer after finishing the glossy nail art.
A matte manicure is suitable for any occasion. Velvet looks perfect on dark varnish. Light colors get dirty, quickly lose their appearance, require special care and cleaning.
Gel polish manicure options with patterns and drawings
Gel polish manicure (at home, nail art is carried out only after the hygienic preparation of the nail plate) with patterns is a fashion trend suitable for office and evening styles. For a business woman, it is enough to decorate 1-2 fingers with a minimalist ornament or choose geometric, openwork jewelry placed on a transparent base.
For a party, any design is created to match a dress, jewelry or clutch.
Types of drawings:
| Geometry | Simple, transverse lines, shapes. |
| Floral print | Plants, leaves, flowers, branches |
| Abstraction | Various figures, drawings made in an unconventional form, colored blots, spots, fan stripes. |
| Fauna, cartoons | Figures of animals, cartoon characters. |
| Ethnic motives | Mythological paintings and figures, Arabic letters, hieroglyphs. |
| Ornament | Monogram, openwork design, lace. |
For self-painting you will need:
- needle;
- toothpick;
- dots with thin nozzles;
- 2 color contrasting varnishes;
- stencils, stamp;
- stickers, scotch tape.
Technics:
- Monogram, ornament, flowers are created with a toothpick, sewing needle, dotsem with attachments. The plate is covered with a solid base. Contrasting points are applied with a thin end, monograms, stripes, symbols, flowers are drawn until the varnish completely hardens. Depending on the desire, the pattern is applied on dried or freshly applied varnish. A thin brush with acrylic paint forms flowers, leaves, branches.
- Lace print can be created using tulle. A colorless base is applied to the nail, the tone is polymerized for 2 minutes. For drawing, the nail is wrapped in tulle, covered with white varnishes. The ornament is dried in a UV lamp, the tulle is removed, the emerging lace is fixed with the base.
- Hearts, stripes, circles are drawn using stencils cut by yourself or purchased in stores.
- Snow theme (snowflakes, white spots) are created with acrylic white paint, white shellac, applied with a thin brush, dotsem.
- For marble pattern you need a colored gel polish and a foil ball. The nails are covered with shellac. A ball is rolled over an incompletely dried varnish, creating a marble texture. The drawing is fixed with the base and dried.
- Zebra, feathers, bows it is convenient to draw with a sewing needle dipped in contrasting varnish.
- Abstract splatter paints are created with a toothpick. A wooden stick is moistened in colored varnish and shaken off onto a white nail cover.
- Stampin manicure formed by stencils and a stamp. The base color is applied to the nail. The selected pattern, located on the stencil, is smeared with acrylic paint or shellac. With a stamp (swinging movements), the ornament is transferred to the nail plate, fixed with a top.
- Water patterns. The nail is covered with a transparent base, the skin near the plate is covered with tape. A few drops of varnish are dripped into a glass of water, the desired pattern is quickly created with a stick. The finger is dipped into the mixture, varnish is screwed onto the nail with a toothpick. The hand rises, the pattern is fixed with a top and drying.
- Fan stripes are created with colored varnishes, transferred with a flat wide fan-shaped brush.
- Newspaper nail art. A piece of newspaper sprinkled with 70% alcohol is applied to the applied white gel polish, dried, removed from the nail, leaving a trace of the printed text.
- Transparent stickers with cartoon characters, animal figures moistened in water to remove the protective layer, applied to the base coat, taper under the lamp, and fixed with a colorless top.
Decor on manicure with gel polish
Decorating nails is a fashion trend that allows you to create the perfect manicure for an evening out or diversify the minimalism of an office style.
Festive decor is created:
- sparkles;
- microbeads;
- pearls;
- mirror rubbing;
- glitter;
- geometric sequins;
- photo drawings.
For everyday business manicure, it is preferable to choose a slider design (sticker drawing), spumping. Office style involves the design of 1-2 nails on each hand.
Decorating options:
- Sequins applied on the 2nd, uncured layer of colored shellac, polymerized in a UV or LED lamp.
- Sequins (shiny diamonds, squares, hexagons) are distributed along the entire length of the nail plate, on the 2nd incompletely missed shellac layer.
- Rhinestones it is possible to lay out in any order. The material is planted on the finished manicure without a sticky layer. Fixed with special glue.
- Glitter (shiny powder) is scattered over the surface of the nail into not completely dried shellac, the decorated plate is dried, the remaining powder is removed with a puff. Glitter can be applied to the end of the nail, spreading over the entire length (shiny ombre), fixed in the lunula (reverse glitter), used to create shiny monograms.
- Microbeads crumbles over the entire area of the nail immediately after applying a colored coating (you do not need to dry the base). Fixed in the lamp.
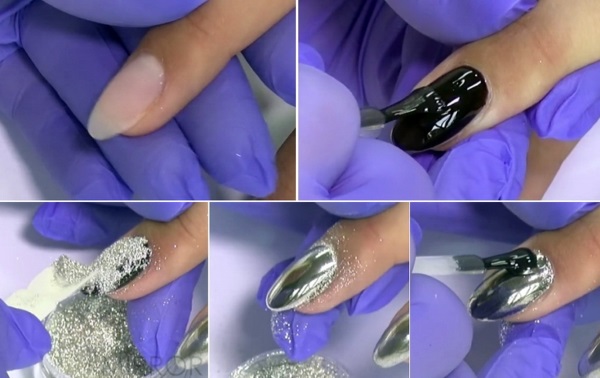
- Mirror rub gives a metallic sheen. Folds out in length, followed by rubbing with a brush on an undried base
- Stamping - transfer of a drawing with a stencil stamp. To create it, an aluminum sample is smeared with shellac, acrylic paints. With rolling movements, the stamp fixes the pattern and transfers it to the plate. The decor is fixed with a top.
- Slider design is a distribution of finished designs soaked in water to remove the protective film. The blank covers the entire nail area (applied 0.5 mm from the base).
- Photo design. Printed stickers are placed on a white base. It is possible to decorate one finger or create a complete composition for the entire hand.
Fashion trends of gel polish manicure in 2019
Nail art fashion trends in 2019 continue the main trends of last year's season. Mixing of styles is gaining gradually popularity, monochromatic and minimalist designs made in nude colors still retain the leading position.
For the office, stylists offer maximum naturalness with a discreet pattern. An evening out involves an abundance of decor, a combination of various techniques, dark and bright colors.
Fashionable colors of manicure in 2019:
- cold shades of blue;
- green;
- olive;
- Orange;
- citric
- brown;
- beige;
- red;
- white;
- the black;
- yellow.
As before, monochrome manicure is relevant.
The color of the main coating in 2019 should be selected in accordance with the season and shape of the nails:
- beige, pastel colors are suitable for winter;
- summer is replete with bright colors, gold, green shades;
- owners of long nails should limit themselves to a classic jacket in a natural range;
- the short plate can be decorated with any colors with a matte or glossy finish.

It is recommended to dilute a monochrome manicure with a contrasting shade made on one nail.
Fashionable ornament 2019:
- stickers with landscapes;
- cartoon characters;
- movie heroes;
- inscriptions;
- branches;
- abstract drawings.
The decor with monograms, flowers, symbols is hopelessly outdated. When choosing cartoon stickers, the emphasis is on the 1st nail. The rest of the hand is covered with prints that complement the central character in order to create an overall composition.
When choosing a technique for performing nail art in 2019, you should combine minimalism, accompanied by simple decoration with 3 other options. It is allowed to design each finger with various techniques, a variety of elements and decorations within the framework of creating a single style.
A manicure made with gel polish is very popular among modern women due to its durability, the possibility of creating a unique design, and maintaining a well-groomed appearance of the hands for about 3 weeks. In addition to the salon specialists, any woman is able to perform nail art on her own at home, scrupulously following all stages of the procedure.
Video tutorials on creating a gel polish manicure at home
13 products that you need to buy to create a gel polish manicure:
Tips and rules for applying gel polish:
For a long time already I myself have been doing gel polish at home! There is no need to sign up anywhere, adjust and suffer especially before the holidays. The starter kit sold off its price already after three months, now I just buy the necessary goods. Already as a hobby!