Modern varnishes look beautiful, but, unfortunately, they last no more than 2-3 days. They were replaced by shellac, which allows the manicure to look flawless for 2-3 weeks. And making gel polish at home, as it turns out, is not at all difficult.
Required materials and tools
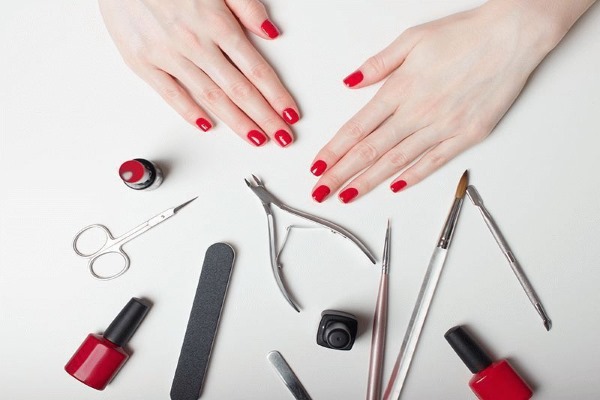
For a high-quality shellac-coated manicure, the following materials and tools are required:
- base;
- color gel polish;
- fixer or top;
- degreaser or alcohol;
- Ultraviolet lamp;
- cuticle oil (jojoba, castor, almond)
- buff file;
- scissors, nippers;

- orange stick (it is soft and durable at the same time, and it also has an anti-inflammatory effect);
- primer;
- bondex;
- klister;
- cotton wool;
- foil;
- nail polish remover;
- lint-free napkins;
- brushes and decor tools.
A step-by-step guide to applying gel polish at home
First of all, you need to get your hands in order. First you need to take warm water into a container, add a teaspoon of lemon juice and sea salt, a few drops of shower gel or shampoo. Hold your hands in this solution for 15 minutes, then wash them well with a brush and wipe them off with a towel.
Then you need to make a bath, which includes any oil (heated in a water bath), 5 drops of lemon juice and a few drops of vitamin E. Nails are immersed in this oil solution for 10 minutes. At the end of the procedure, you need to thoroughly dry your hands with a paper towel and start removing the cuticle.
After the oil bath, you need to wait a few minutes in order to better see the dead skin. Since the cuticle has softened, it is easy to push it back with an orange stick. Next, using manicure scissors or tweezers, the cuticle and excess skin around the nail plate are removed.
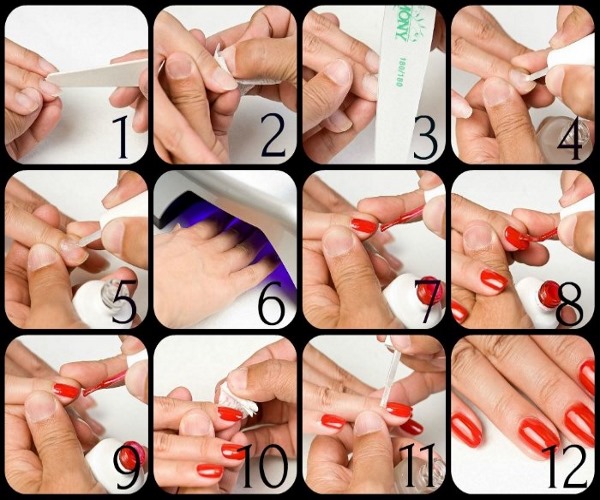
Preparing the nail plate
For the manicure to hold well, you need to properly prepare the nail plate. Wipe your nails with rubbing alcohol and then buff thoroughly with a buff. It is necessary to carefully remove the keratin layer, leaving no untreated, even small areas. The more carefully this operation is carried out, the longer the manicure itself lasts.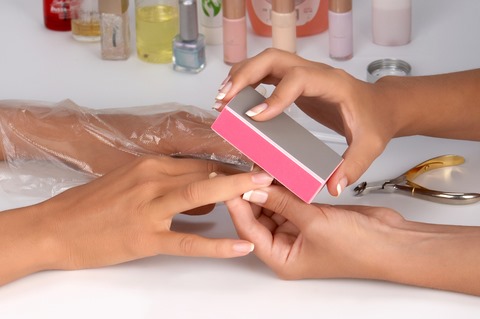
Buff processing is carried out along the nail plate. When all the nails are prepared, you should lubricate the skin around with baby or sunscreen so that the ultraviolet light does not dry it out during drying in a UV lamp.
Base application
The main task of the base is to help the colored coating better adhere to the nail. Therefore, you should not save on it, because the quality of the coating and the durability of the manicure depend on it. The base is applied in a thin layer and then dried in a UV lamp.
Applying color gel polish
Now you can start applying the gel polish of the desired color. The varnish is applied in several layers, usually two or three. It is necessary that each layer is very thin. The thinner the shellac layers, the better it will hold up later.If the gel leaves marks on the skin when applied, then remove it with an orange stick.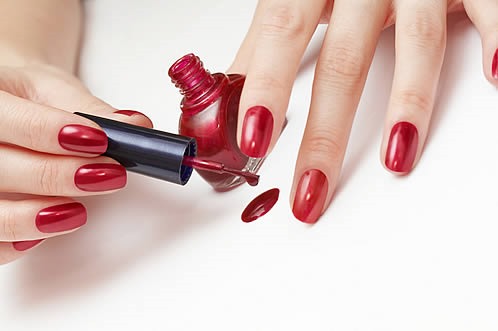
After the first coat, the fingers are placed under the lacquer curing lamp.
Then the next layer is applied and again the hands are placed under the lamp. If the color is not saturated enough, the procedure can be repeated again. After the color coating has completely dried, proceed to the last stage - applying the top.
Top application
Top is often called a top coat, as it is the final one in creating a manicure. Its main task is to consolidate the coatings that were applied before. How bright the color will be and how neat the manicure will be depends on the correct choice of the finish. The top is applied in an even, thin layer not only over the coloring layer, but also under the nail, sealing it.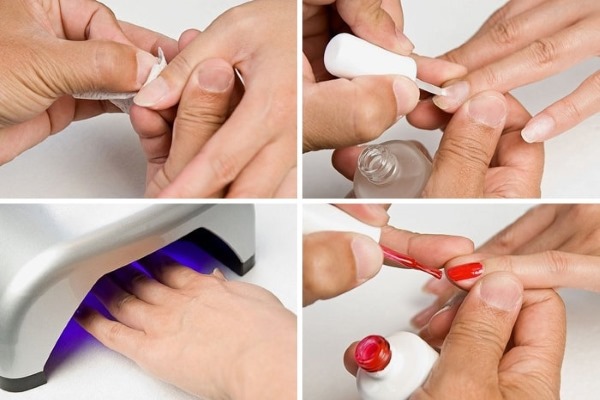
The coating is dried under a lamp for a couple of minutes. Then you should repeat this procedure again. At the end of all stages, the nails are wiped with a cleanser or alcohol. It remains to rub in the cuticle oil and admire the manicure. As it turned out, it is quite possible to make gel polish at home and you should not be afraid of it.
What does gel polish consist of?
Gel polish is something in between gel and varnish. It is durable and beautiful. It has a polymer structure. Remove the coating by softening.
Gel polish consists of a photoinitiator, film former, thinner, pigments and other decorative fillers.
The photoinitiator reacts to ultraviolet light. Thanks to him, the varnish is structured and becomes hard. The hardening speed and drying time depend on its amount. The film former creates a barrier that prevents the coating from collapsing.
Thinners help the varnish adhere to the nail plate. Not only the durability of the varnish depends on their quantity, but also how easy it will be to remove it. Pigments give the shellak a certain color and density. The gel can be mixed in a wide variety of shades and colors. Best of all, if varnishes from the same manufacturer are mixed, then you do not have to worry about the quality of the future manicure.
Fillers are very diverse. They give the coating a special sophistication and originality.
How to choose a UV lamp for home use?
When choosing a UV lamp, first of all, you need to decide what it is for and what funds you can afford to spend on its purchase.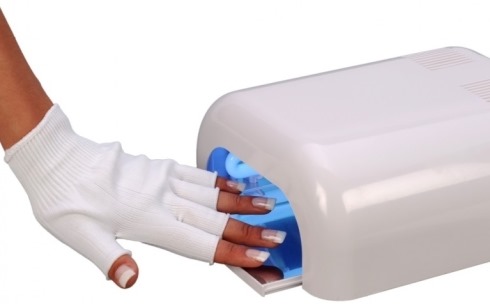
Lamps are divided:
- Fit: You can hold one or two hands.
- By type: LED or fluorescent.
- According to the ignition scheme.
- By power: the more powerful the lamp, the shorter the curing (drying) time of the coating.
For home use, a lamp with a power of 9 W to 54 W is quite enough. The power of the lamp depends on the number of 9 W bulbs that are in it. So in the 36 W lamp there are 4 of them, in the 54 W lamp there are 9. And you need to dry your nails after applying each layer. If the lamp is 36 W, then the drying time of the base is 30 seconds, the color coating and the top is 2 minutes.
At a lamp power lower, the polymerization period is increased, more powerful - it is reduced.
Why is it necessary to apply a base coat?
The base coat is the basis of any silk manicure.
Its main functions are:
- protection of the nail plate;
- alignment;
- adhesion of the subsequent color layer to the nail;
- strengthening the nail plate;
- treatment.
Without a base, even with the most expensive shellac, a manicure will not be perfectly even and will not last long. The base is the first and main component of a reliable manicure, so you should not neglect it.
Why apply a top coat?
The final step in the silk coating is the top coat.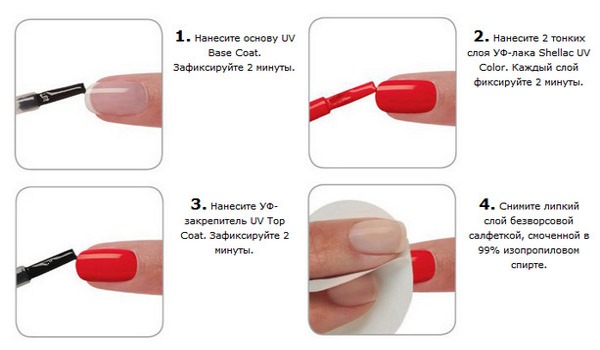
Its main purpose is:
- alignment;
- drying;
- preservation of blooming varnish;
- strengthening.
Recently, coatings have appeared that also perform decorative functions. There are top coatings that allow the manicure to glow under the influence of ultraviolet radiation, make the nails glossy or matte. Gives a sandy texture.
It should be remembered that in order to make a gel polish at home, you need to think about how the manicure will look if you apply a coating with "special" actions.
Smooth application tricks
Considering that gel polishes have a sticky structure, it is not always possible to apply them smoothly.
Experts share some tricks for even application of shellac:
- Each coat should be applied evenly, without touching the cuticle and sealing the edge.
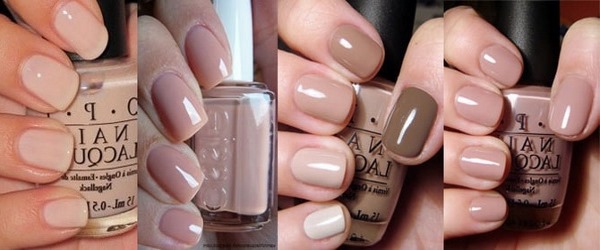
- Make the first manicure in a pastel shade in one layer. And only after the hand is trained, you can move on to brighter shades of varnish.

- The material must be of high quality. Bad material will never allow you to make a neat manicure, there will always be irregularities and chips.
Primer, bondex, clinser: differences
There are a lot of words in the terminology of gel polish that are difficult for a beginner to understand.
A primer is a tool that prepares the nail for connection, but does not itself participate in this process. It degreases the nail plate and restores pH. The primer does not need to be dried under a UV lamp.
Bondex - is a gel that is used to connect the nail with shellac. Prevents the nail plate from flaking and allows the coating that is applied to it to hold firmly.
Klinser is an alcohol solution that contains some oils. It is used to remove the last sticky layer from the surface when the manicure is completely finished. Sometimes it can be used instead of a primer, as it disinfects well and is a good antiseptic.
Masters recommend buying products of the same brand. This will avoid chemical incompatibility and hence the durability of the coupling.
Features of applying gel polish on extended nails
It is possible to apply gel polish on extended nails. However, it should be borne in mind that when applying shellac, the nails become thick, so the layers should be as thin as possibleso that your nails do not look rough and bulky. In general, the painting procedure does not differ from the classic application of shellac.
First, the nail is polished with a special file, degreased and a base is applied. After polymerizing and applying a colored coating. Again under the lamp and a second color layer. Polymerization, top, lamp.
As you can see, making gel polish on extended nails at home is quite possible. The problem arises when it needs to be removed. Since shellac is the same gel, it is impossible to remove it from extended nails. This must be considered before deciding to apply it on acrylic or gel nails.
Simple home design
How to make a gel polish at home in stages has already been discussed. But not everyone will want to be limited to just a single color coating. Having several bottles of multi-colored silk, you can begin to master the skill of applying a pattern or multi-colored coating.
It is not only beautiful, but also quite possible to do it yourself. This requires 2-3 brushes and a desire to experiment. Consider a few simple options for nail design at home.
Drawing with gel polish: rose
The rose is one of the simplest designs. Even a person without much experience can draw it. First of all, you need to choose the background color on which the drawing will be applied. A red or deep pink flower looks good on a white, beige background. White or sand rose looks original on a black matte background.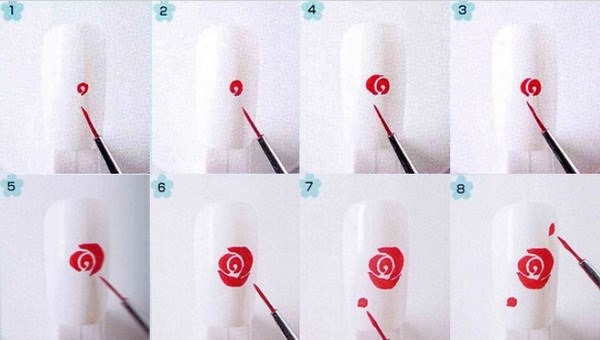
The flower can be either one for the entire nail, or several small ones. Now it is fashionable when the drawing is applied to two nails of one hand. So the manicure looks unobtrusive and neat. After the background is selected, applied and dried under a UV lamp, you can start applying the pattern itself. Rose petals are applied with small strokes, similar to commas from the center to the edges.
Then they are smoothly connected.If there are flaws in some place, wipe it with a lint-free napkin and paint again. When the rose is painted, the nails need to be placed under the drying lamp. If desired, the petals are shaded with a more or less intense shade and again dried under a lamp. You can add leaves or curls.
Experts recommend drying the gel polish after painting part of the drawing with one color, unless of course there is a desire to mix shades or make a smooth transition. After the drawing is ready, it is covered with a top and dried.
Drawing with gel polish: butterfly
The butterfly pattern on the nails gives the manicure a special tenderness. In order to clearly imagine how the future drawing will look like, you need to draw it on paper. Think over the nuances and color options. Clearly define your artistic ability.
Having started work, the outline of the butterfly's wings is drawn on the selected background. Fill them with the selected color. Draw streaks. Each time, after the drawing is drawn in one color, the marigolds are dried under a UV lamp. The butterfly looks unusual, its wings are on two adjacent fingers. The color of the wings can be either monochromatic or with a transition from one to another. It all depends only on imagination.
Drawing with gel polish: hieroglyph
Hieroglyphs look very interesting on the nails. Drawing a hieroglyph does not provide anything complicated. After passing all the stages of the main manicure, apply the image on the nail with a thin brush with strokes. You should not draw meaningless lines, it is better to choose a hieroglyph whose meaning is known.
French gel polish
French is still in fashion and is appropriate for both a business woman and a young girl. Drawing a "smile" is not particularly difficult. It takes a little practice and there will be no problems. For the first case, you can use special strips, later one brush will be enough.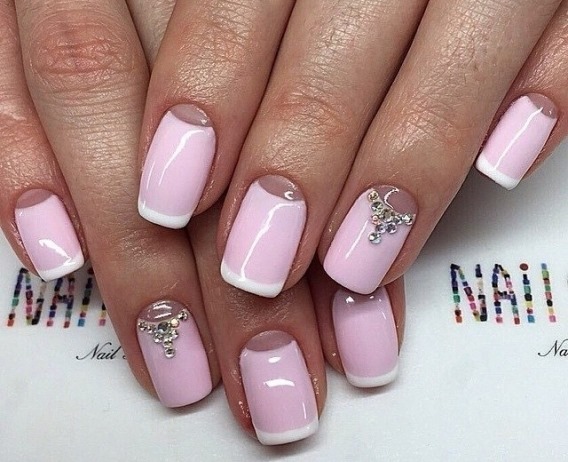
After the main color has dried, draw a smile line with a brush. Then they paint over it intensively. Defects or irregularities are corrected with a stick or toothpick. After drying and covering with a top, the manicure is ready.
In addition to the classic French manicure, you can use bright combinations of varnishes, an inverted "smile", decoration with rhinestones and sparkles. As it becomes clear, making a French gel polish at home is very simple.
Ombre gel polish
The ombre manicure looks original. The smooth transition from one color to another makes the manicure very attractive. The color palette ranges from very bright and catchy, to gentle and businesslike. But the technique of applying such a coating is not easy and differs in some subtleties.
After applying and drying the base, two strips of silk of the selected colors are applied to a small piece of foil. Then the boundaries of the gel are mixed with a toothpick. The skin around the nail is smeared with a greasy cream. After that, the nylon sponge is dipped into the shellac prepared in this way and applied to the nail. The varnish that has got on the skin is removed and only then is it dried under a lamp.
Combining an ombre with a jacket, the so-called moon manicure, looks very impressive, when the white tone smoothly turns into a beige or pink haze.
Imitation of water manicure
It is impossible to make a water manicure with gel polish in the full sense of the word, since it sinks in water. But you can achieve an imitation of this effect by applying a special varnish application.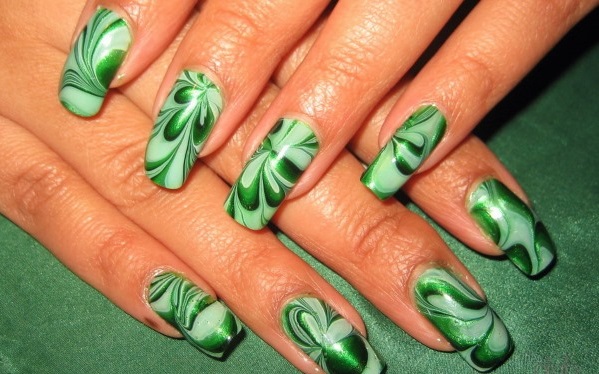
To do this, after the base, parallel lines of different colors are applied to the nail plate. Then, a thin brush is drawn across the lines, mixing colors and creating different patterns. It is worth considering that in this case drying under a UV lamp takes a little longer than usual.
As you can see, making your own gel polish at home is not only possible, but also very interesting. There are a lot of design options, and every two weeks you can admire a new neat and well-groomed manicure.
Video on how to make gel polish at home
Applying gel polish step by step:
Tips and rules for the perfect home gel polish:
Water manicure is an amazing technique. So it is fascinating.