A manicure is a sign of a woman's grooming. Not everyone has the time and money to visit salons, so you can take a basic course of manicure for beginners or self-study in order to be able to do beautiful nail designs at home.
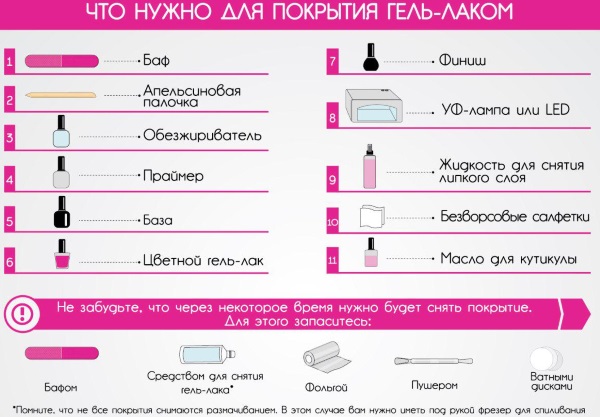
What do you need to work with gel polish?
To work with gels and shellacs, you need to prepare in advance. In order for the material to stay on the nails for a long time, they need to be thoroughly prepared, and this will require additional tools and materials.
How to choose a UV lamp for drying gel polish, rating of the best, characteristics and prices
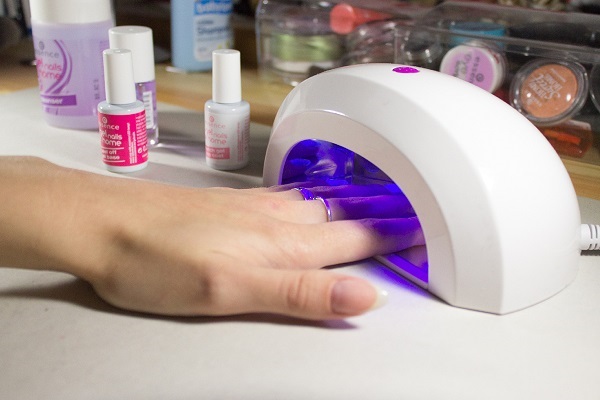
An ultraviolet lamp is the basic equipment needed to create a gel or shellac coating. The lamp is a small box with built-in ultraviolet rays, without which the gel does not solidify. There are a huge number of models and manufacturers that produce quality equipment for every wallet.
There are several types of lamps:
- Classic lamps were among the first. They are bulky, but roomy. They yield to new inventions only in drying time. For high-quality polymerization of materials, you need to keep your hands in the lamp for 3-6 minutes, depending on the density of the gel. They are the best option for home use because they dry all kinds of nail extension materials. However, they are inexpensive.
- LED lamps differ in the type of radiation, they do not have UV lamps, but LEDs. They dry only shellac, gel polishes, biogel. That is, such lamps are not suitable for building up and are used mainly in salons.
- LED + UV Are combined devices in which both ultraviolet lamps and LEDs are exposed. They dry all materials and are widely used in salons.
- CCFL + LED Are also combined lamps, equipped with LEDs and a spiral ultraviolet lamp. There is gas inside it, so it consumes a minimum of energy and serves for many years.
Top 5 UV lamps:
| brand, model | Characteristics | The cost |
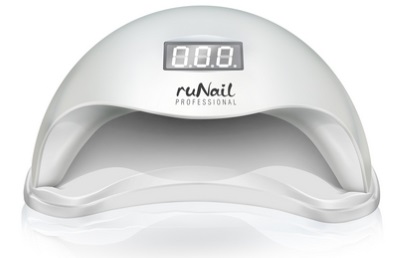
| UV-LED 48 Watt Runail | This is a model used for professional and home manicure. The lamp has several functions and is capable of drying gel, LED gel, shellac and gel polish. Built-in 36 LEDs. The panel has a screen and a timer for 10, 30, 60 and 90 seconds. Touch control. | Average price 4 thousand rubles. Buying in online stores, you can save a little or get a discount when ordering several units. |
| Professional Nail 18K 48 W CCFL + LED | Hybrid lamp with 12, 36 and 48 W power. Touch control helps to quickly turn on the LEDs for drying. The lamp is spacious and comfortable. Thanks to the removable bottom, it can be used for pedicure. High power allows you to quickly and efficiently dry a long and dense extended nail. | In stores the cost is 3 thousand rubles, on the Internet 2700-2800. When purchasing online, you need to carefully read the terms of delivery. |
| Soline Charms SUN 9X plus UV / LED 36 W | Lightweight and compact hybrid lamp for polymerization of all types of gels and decorative coatings. The mill is a real favorite among craftsmen. Convenient for pedicure, as the model is open and has no bottom. Equipped with 1 diodes and a timer. The manufacturer claims 5000 hours of operation, but in practice this model lasts longer. Available in pink, blue and green. | Price 1400-1600 rubles. Depends on the point of implementation. |
| JessNail KUKLA UV Lamp 36 W | Ideal for home use. Presented in bright yellow color. Has a built-in timer for 2 minutes and an infinity mode. For better polymerization, all surfaces are mirrored inside, which enhances the effect of the lamps. | The cost is 1200-1300 rubles. |
| Diamond Quick 36 W CCFL + LED with sensor | The hybrid lamp is used to cure all types of gels and shellacs. The device is equipped with touch controls and a timer. The model is presented in different colors. This lamp is perfect for salons and for home use. | Average cost 1400 rubles. |
Each of them has advantages and disadvantages. It is better to give preference to universal models that polymerize all types of gels and acrylics.
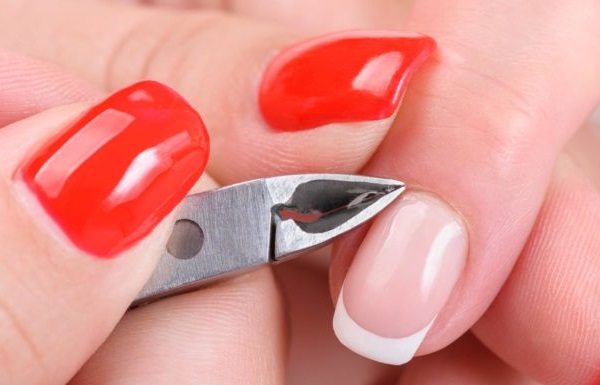
Nail Tongs / Scissors
Scissors and forceps are used to remove cuticles and rough ridges around the perimeter of the nail plate. Scissors perform 2 main functions - cutting off the free edge of the plate and removing the overgrown skin. For the second purpose, you need to choose thin blades with rounded blades, since it is more convenient to cut the cuticle with them, especially for novice craftsmen.
It is better to choose appliances made of steel, because models with plastic handles will not last long. It is also important that the free edge is perfectly flat, without jagging. The forceps are used to remove cuticles for manual water-based manicure. They come in different sizes and shapes.
Here you need to choose, starting from personal preferences: it is more convenient for some to cut the skin with large tongs, while others - with small ones. The shorter and sharper the blade, the easier it is to work with, especially for a beginner. Blunt canvases can injure and tear the skin around the hole.
The key to a long service life of tools is proper storage and use. After performing a manicure, they need to be disinfected (you can use Peroxide or Chlorhexidine and dry them before hiding in a cosmetic bag.
The best gel polishes. Overview and prices
Due to the popularity of gel varnishes, there are many fakes on them, and low-quality material falls unevenly, dries poorly and does not hold.
The main criteria for choosing a quality gel polish:
- the duration of the preservation of the coating without chips and loss of color saturation;
- quality of application without stripes and gaps;
- density and length of the brush for ease of application;
- nice smell;
- wide range of colors.
Top 5 best gel polishes:
| Manufacturer | Overview | The cost |
| Akzentz Luxio gel varnish | This is a line of professional nail cosmetics. Produced by a Canadian manufacturer for more than 30. Gel polishes have been produced since 2014. Feature of the line - black bottles that protect the product from direct sunlight. Before applying, it is not required to wash down the nail plate, it is enough to cover it with a base, and at the end with a top. The palette is about 100 shades. | 1200 RUB |
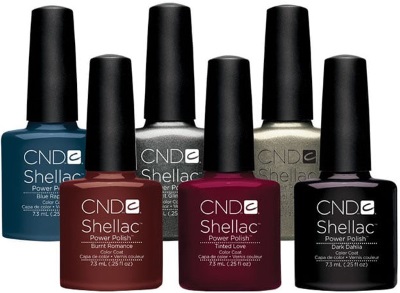
| Shellac CND gel varnish | The manufacturer is considered one of the most popular, due to the many advantages of the product:
| 1000 RUB |
| Gel Polish Kodi Professional | Kodi products are widely used in salons and at home. This is the "golden mean", that is, a compromise between price and quality. This is a budget series with high quality materials.The manufacturer produces several series of gel varnishes that differ in shade, density and effect (mirror, hologram, matte, glossy) | RUB 450-500 |
| F.O.X gel polish Professional Gel Polish | American gel polishes. Easy to apply, dries in 30 seconds in LED lamp. Great for beginners and home use. do not spread when applied. A wide assortment allows you to choose a color for every taste. | RUB 350-370 |
| Bluesky gel polish | Bluesky is a line of budget nail cosmetics. It is not suitable for professional use, but for home it is not a bad option. The downside is that when applied in 1 layer, the color is not saturated, therefore 2-3 layers are required. Lasts up to 14 days without chips. | RUB 100-120 |
In order for the manicure to last for a long time, it is recommended that the tint gel polish is of the same firm as the top and base coat. Thanks to this, the materials hold better and are bonded to each other with high quality, while the products of different companies may not be combined and chipped when worn.
Files, pushers, buffs
Manicure for beginners at home should start with the selection of materials. Files, buffs and pushers are essential tools for shaping and textured nails. Files differ in shape and abrasiveness (hardness). For a natural nail and a free edge, you need to choose the softest files possible.
Pushers and buffs are used to smooth the surface of a natural or extended plate.
When using some gel polishes, you need to ruffle the natural plate a little in order to eliminate the glossy layer to increase adhesion. To do this, it is better to use a file with an abrasiveness of 240-600 grit.
Degreaser
This is a tool that must be used to cleanse and degrease the nail plate. In addition to disinfection, the degreaser increases the adhesion of the base layer to the natural nail. You can also remove the sticky layer from the top with it.
Primer
It is a liquid for cleaning, degreasing and drying the nail plate.
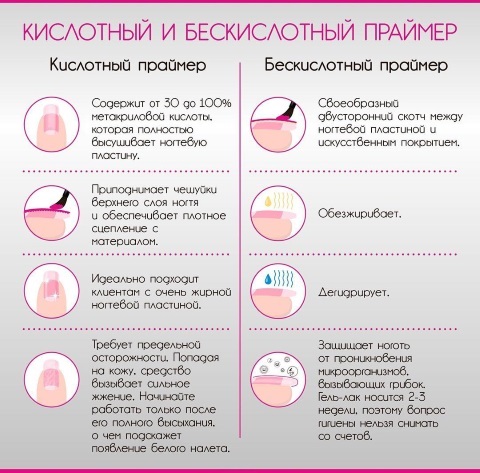
There are two types of primers:
- acid;
- acid-free.
It is used mainly by professionals, and at home you can do without a primer. Although professionals call it "double-sided tape" for nails. It serves as a primer, dries the plate and secures the base layer, on which the beauty and durability of shellac or extended nails depends.
Base, top
The base is called gel polish, which in appearance resembles a thick transparent varnish. It can be beige, flesh, pink or peach. Its main task is to provide a bond and a basic tone. In addition, the base layer evens out the nail plate, strengthens it and gives it density. The base has a sticky layer that does not need to be removed before applying the tone.
Top is the topcoat. It fixes the color gel polish, provides matte or glossy shine, guarantees the wear of the varnish for the next 2-3 weeks. The top is much thinner than the base, easy to apply and dries quickly in the lamp. Some varnishes have a sticky layer that must be wiped off with a degreaser.
Aids
There are many aids and materials that you can do without at home, but in salons they are used:
- disinfectants for treating cuts, the hands of the master and the client's nails (at home, you can replace with Chlorhexidine or rubbing alcohol);
- cuticle oils they are used to soften the skin before manicure and moisturize after, because nail files and materials dry out the cuticles;
- remover - liquid for removing gel polish (acetone can be used, but it dries the nail plate and disrupts intracellular metabolism);
- thinner for gel polish used if it thickens a little and lumps appear in it;
- brush cleaner from gel polishes (you can use a remover).
Step-by-step preparation of nails for coating at home
Before coating, it is imperative to get rid of the materials on the plate (varnish, gel polish, acrylic), do a manicure (shape the nail, cut off the free edge, remove the cuticle) and prepare the nail for a new coating.
Trim manicure
This type of manicure is called regular, classic or edged. It is done with tweezers and scissors.
Algorithm of actions:
- remove the remnants of the previous material from the nail plate;
- place nails in a bath with warm water and an emollient cosmetic, for example, bath foam;
- when the nails steam out a little, you can start the manicure;
- first you need to move the cuticle around the perimeter of the nail plate (with a spatula or an orange stick);
- further remove dead and rough skin with thin scissors or tweezers.
After that, you need to dry your hands and shape the free edge. Some wash down before steaming, so as not to provoke delamination of the plate. After that, you can apply varnish, gel varnish or build up the nail plate (optional).
European
European manicure differs in that when it is performed, the cuticles are not cut or removed. For beginners, at home, you can do this manicure once a week.
Sequence of execution:
- you need to remove the coating from the nail plate;
- cut off the free edge and lateral parts of the nail on a dry one, giving it a shape;
- oil or softening gel is applied to the cuticle;
- cuticles are pushed back with an orange stick;
- the plate is sanded with a soft buff.
This manicure is suitable for men, women and owners of thin and delicate skin. The less the cuticle is trimmed, the less it grows.
Hardware
For this type of manicure, a special automatic apparatus with many attachments is used. All of them are of different abrasiveness and are used to remove old coatings, free edges and cuticles. Such a manicure should be done by a master, because from inability you can injure the nail and soft tissues.
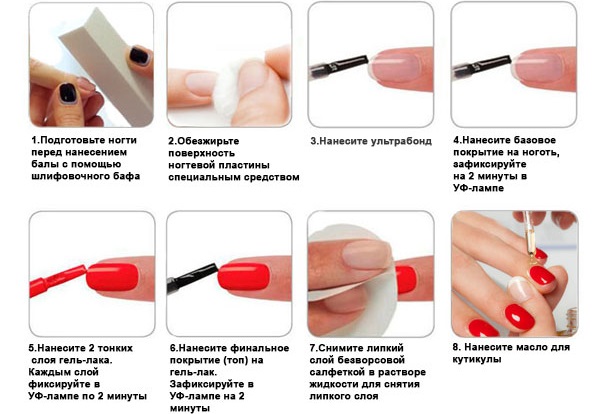
How to properly coat your nails with gel polish in stages?
It is important to observe the phased application of materials. Some beginners disregard the rules and apply pigment to an unprepared plate. Such a manicure will not last long and can spoil nails over time and lead to their fragility and delamination.
Base coat application
Before the base, you need to do several procedures:
- First, a manicure is done, preferably hardware or European, so as not to steam the nails before applying the gels.
- Then you need to remove the gloss from the natural nail. To do this, you need a file with a hardness of 300-500 grit, no less, so as not to damage it.
- A degreaser is applied to the nail (wait until it is dry before applying the next material).
- The next step is a primer (some do not apply).
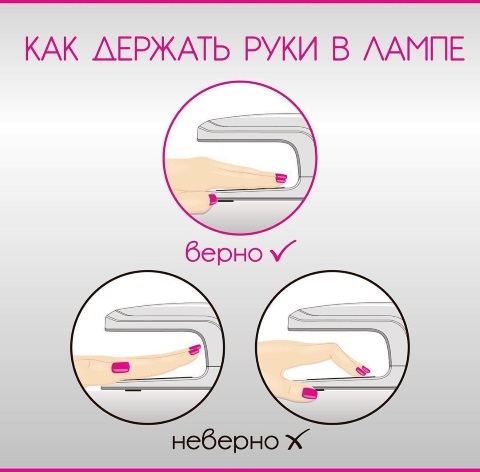
- When the plate is completely dry, you can start applying the base. It should be applied in a thin layer and dried in a lamp (ICE - 30 s, UV - 2 min).
Applying gel polish
The base is put in 1 layer and then colored gel polish is applied. Each layer must be dried in a lamp, before that, look at the cuticles and, if the shellac is dripping, remove the residues with a stick or a thin brush.
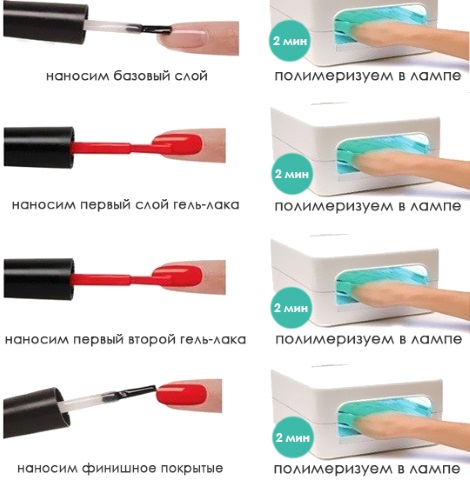
Important: if the gel polish is liquid, then it is better for beginners to apply it 1 nail at a time and dry immediately so that it does not spread. Brush movements should be smooth, directed from the cuticle to the free edge of the plate.
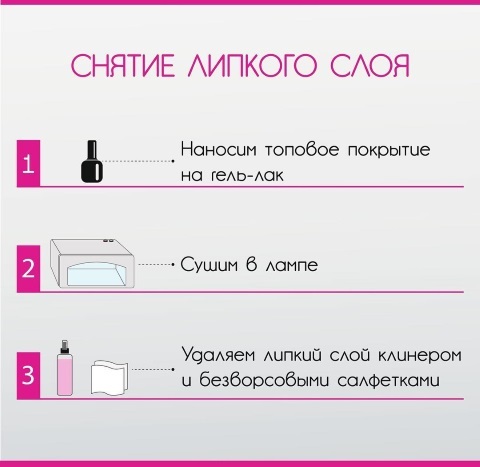
Top application
When the base is dry, a top coat is applied. It can be matte or glossy, sticky or not. If the layer sticks after drying, you need to wipe it with a degreaser (at home, alcohol or nail polish remover is suitable).
Advice: the top is the most liquid of the materials (compared to the base and pigment), so it needs to be applied very little to the brush so that it does not flow under the nail and on the cuticles.
How to cover extended nails with gel polish?
Extended nails are covered in the same way as natural ones. They also require washing down, degreasing, applying a primer, base coat and at the end of the top to secure the design. Application technologies are practically the same. The extended nails are slightly thicker than natural ones, so special attention should be paid to the ends and paint them too.
Why do I need to apply a base?
It is applied only for three-phase gels, because in single-phase gels, the base, like the top, is already present in the composition.
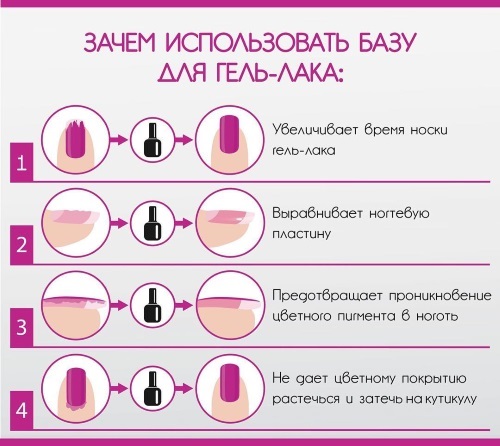
The base layer has several important functions:
- strengthens the adhesion of gel polish to the surface of a natural or artificial nail;
- protects the nail from the absorption of pigment elements that make up the gel polish;
- evens out the surface of the nail, eliminates cavities, grooves;
- seal the plate and reduce the risk of chipping on the base material.
Why wear a top?
The top is applied at the end and acts as a fixer. First, it adds matte or gloss to the base color gel polish. Secondly, it provides an even color and fixation so that the shellac lasts for several weeks without tarnishing and chipping.
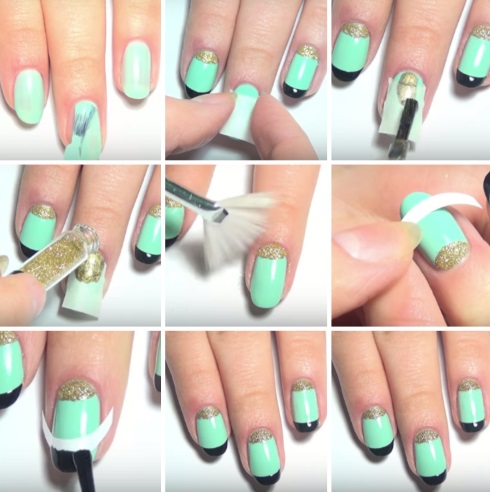
Secrets of even application of gel polish
In order for the gel to lay down in an even layer, you need to observe several subtleties:
- pre-align the nail plate;
- dry the base qualitatively;
- apply gel polish in three main movements: first, with a brush, it is drawn in the middle of the plate, then from the right and left edges, without touching the cuticles and lateral ridges.
Manicure is not difficult to do. In addition to craftsmanship, you need to have quality materials. For beginners, it is recommended to buy equipment and varnishes (shellacs) of well-known brands in order not to fall for the tricks of scammers. At home, you can do any kind of manicure and design, as far as imagination is enough.
Video tutorials on creating manicure gel polish
Classic trim manicure:
How to apply gel polish:
Thanks for the helpful tips! I'm just going to purchase everything I need for a home manicure. Tired of spending a lot of money on salons. I will learn to do it myself!