When considering the work of masters of manicure, there is a desire to learn how to paint on nails. Our article will tell you how to do it yourself, beautifully and in an original way.
Where to start: tools and materials needed
Before you start learning to paint on nails, it should be borne in mind that this lesson requires patience and a desire to improve your skills.
First you need tools:
- needle or toothpick great for beginners. They can easily draw simple patterns. This should be done carefully, without pressing hard on the nail plate, so as not to damage it;
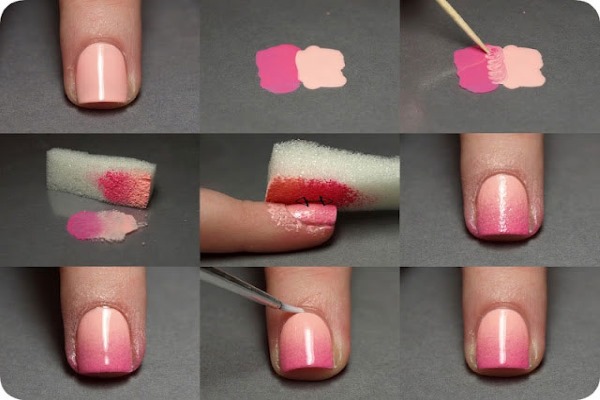
- sponge. It is used when working with paints of pearlescent shades. They also get a gradient manicure;
- stick with a wooden base, at the end of which there is a cut. It is more convenient to use it when decorating a picture with rhinestones or similar materials;
- tweezers. Can be used instead of a wooden stick. Also used when working with fabrics and lace;
- dots. It is also called a point brush. It is mainly double-sided and has 2 balls of different sizes. Used not only to make dots, but also for many patterns;
- paint brushes acrylic paints. They need to be treated carefully. Be sure to clean and dry after work. Preferably store in a case.
There are several types of brushes and each has its own purpose:
- draw small details;
- mix shades and fill in the spaces in the picture;
- for thin lines;

Before learning how to paint on nails, you need to know which brushes are needed and what they are for. - for connecting colors without mixing them (fan brush).

To create a drawing you will need:
- varnishes. Most suitable for beginners, as they make simple drawings. Due to the density of the texture, it is impossible to work with brushes with this material;
- acrylic paints. Used to create more complex patterns. The color scheme is quite varied. You should not experiment and replace them with gouache, as it will simply “float” on the varnish.
To decorate a manicure, use:
- rhinestones of different shapes;
- beads for manicure;
- broth;

- pearls;
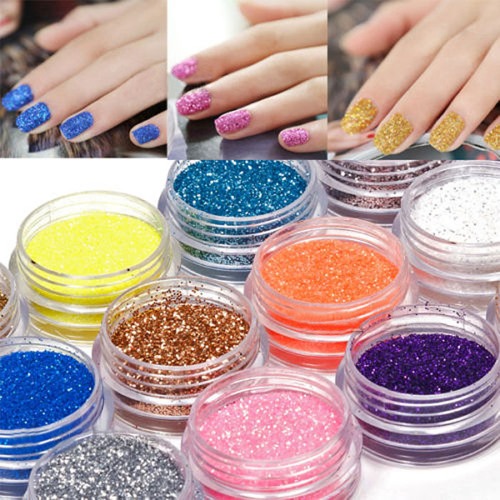
- sparkling micro-dust.
Manicure techniques
Drawing on nails is available to everyone, as there are many manicure techniques that can be learned at home:
- monograms. The technique is distinguished by various combinations of fine lines. A self-made pattern is considered unique. To simplify the drawing process, special stencils are used. You can also buy stickers with ready-made patterns and simply glue them onto a varnished nail plate;
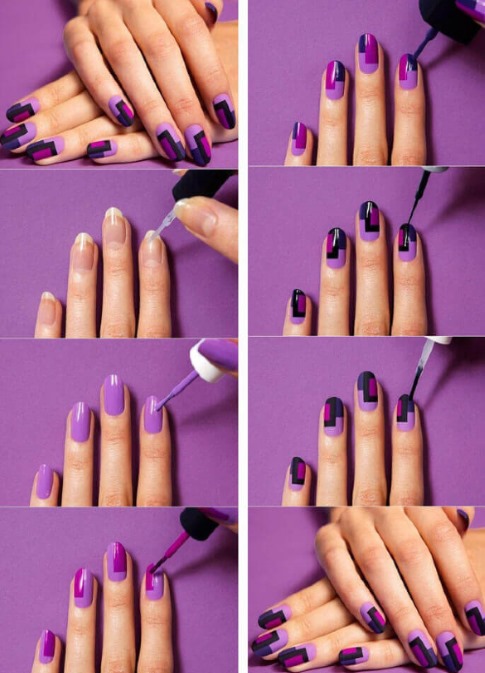
- using scotch tape. With it, you can embody the most unusual ideas of graphic drawings. If you do not want to “play” for a long time to get the desired result, you can use multi-colored adhesive tape, which you just need to stick on the nail;
- with a sponge a gradient manicure is done.For a drawing, 2 or more colored varnishes are required. Looks great on any nail length;
- tulle. It can be used to create a pattern with a "snakeskin" effect;
- point technique. By drawing with dots, you can achieve an original pattern. If there is no dots, then it will be replaced by hairpins, toothpicks or other items with a thin rod;
- drawings with a needle. First, a point or several is put, and then patterns or lines are made with a needle;
- brush drawings. The process is similar to the needle process, only the varnish distribution is softer. In this case, the brush must be thin.
How to paint with a toothpick
When you first try to draw patterns, it is better to use a toothpick to avoid damaging the nail plate.
In addition to her, you will need:
- several varnishes, including colorless (used as a protective one);
- a small piece of lint-free material to remove coloring material from the toothpick;
- nail polish remover.
 Drawing creation takes place in several processes:
- apply the main tone and wait until it dries;
- with a brush of varnish of a different color, point or draw a line;
- then make a pattern with a toothpick;
- cover the finished dry drawing with a protective varnish.
Drawing with a needle
For such drawing, it is more convenient to use not a household needle, but a machine needle, since you can use both sides of it to create a pattern.
You will also need:
- protective and colored varnishes;
- cloth to remove varnish from the needle;
- nail polish remover.
 Drawing with this tool goes like this:
- a protective varnish is applied - it must dry;
- then the nails are painted with the basic tone of the picture;
- on a still not dried base, distribute drops of varnish, one or more colors;
- then use a needle to mix shades to obtain an original pattern;
- so that the drawing has clearer outlines, apply colored drops on a dry base;
- Finally, apply a protective varnish.
The process of painting with acrylic paints with brushes
Before you start painting with acrylics on your nails, you should learn how to use a brush. Workouts can be done on a cardboard or plastic surface.
To draw you need to have:
- 2 varnishes - for base and colorless;
- acrylic paints;
- at least 3 brushes - thin, beveled and rectangular;
- a needle or toothpick;
- palette for the main material;
- water;
- napkins.
 The drawing process goes like this:
- cover nails with a varnish base;
- start painting only after it is completely dry;
- first you need to draw the contours of the intended pattern and only then paint over;
- make sure that the new layer of paint does not fall on the wet previous one;
- fix the finished drawing with colorless varnish.
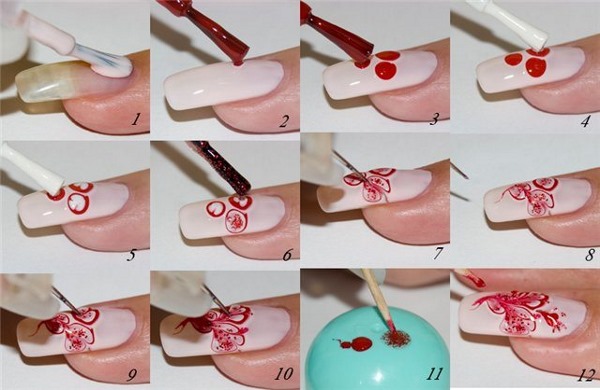
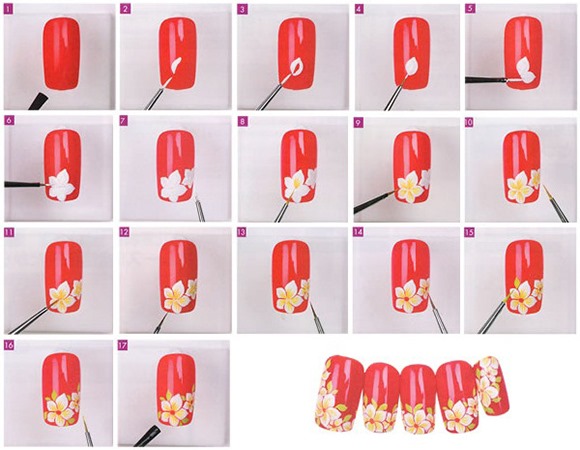
How to make simple drawings on your nails with a needle
One of the spectacular needle patterns is a flower located in the corner of the nail. It will be appropriate both on a French manicure and on a plain finish. It's not worth worrying about how to learn how to draw such a pattern on your nails.
For the result, you need to do 4 processes:
- Cover the nail plate with varnish, which will become the background of the drawing - it is desirable that these are light shades, perhaps even transparent. Let it dry.
- Apply 3 medium drops of varnish with a contrasting color. Starting from the center, stretch it with a needle to form 3 petals.

- The middle of the flower can be made with shiny varnish or a pebble can be placed in this place.
- When the drawing is dry, once again secure with colorless varnish.
How to make simple nail art with a toothpick
This tool is best used for drawing spirals.
Manicure process:
- The nails are covered with varnish, which will serve as the basis for the drawing.
- After it dries, a line of a different color is drawn. Its location and thickness depends on the idea of the pattern.
- Next, spirals are made, which can be located both on one side of the line, and on both.
- A protective agent is already applied to the dry drawing.
- If you want the pattern to be not so clear, the line should be done on a not dried base.
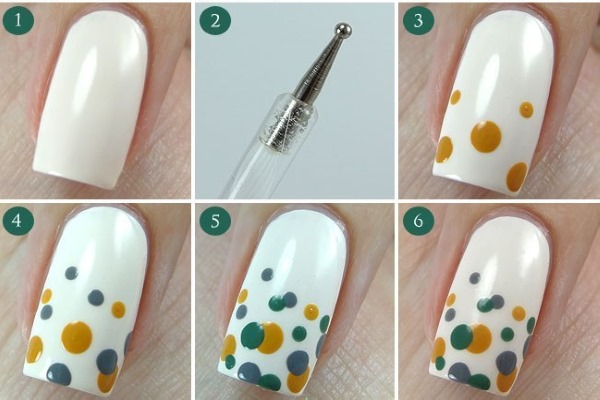
Simple in execution, but always original, such drawing is considered:
- The base color is applied to the nails.
- When the varnish dries, small dots of one or several shades are put with a toothpick. You can distribute them, both chaotically and with the manifestation of some kind of pattern.
- Coat the top again with colorless varnish.
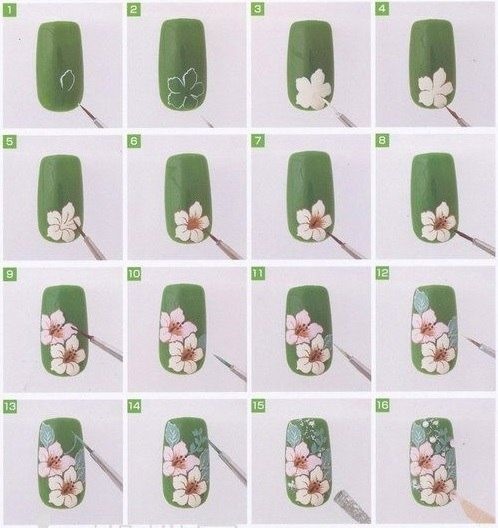
How to make simple nail art with a brush
Since learning to paint on nails with brushes will not work out right away, it is recommended that you first make simple and original patterns from lines and petals.
A manicure is done with the following sequence:
- A light varnish is applied to the nail, which will become the background of the picture.
- For lines, it is best to use white and black paints.
- In the corner area of the nail plate, paint 3 or 4 petals with white paint with a thin brush.

- Distribute black, slightly curved lines between the petals at a short distance from them. Their length and width can be any.
- When the paint is dry, paint along the lines with a thin brush with white paint.
- In the place where the petals begin, a pebble can be used as a decor.
- With a thin brush next to the lines with varnish, make a few shiny strokes.
- When the finished drawing is dry, fix it with colorless varnish.
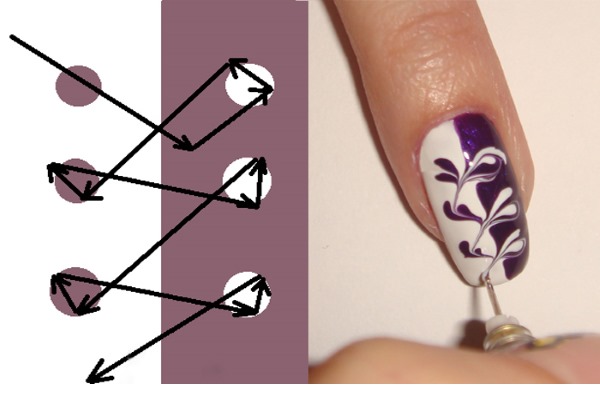
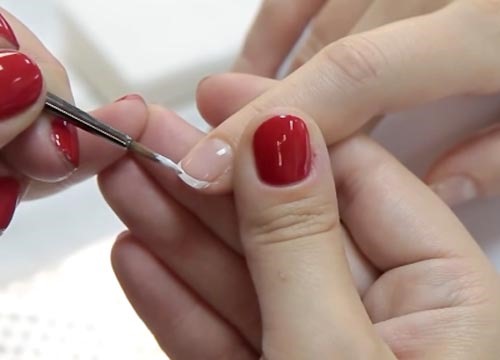
The process of creating lace nails
But how to learn how to draw a lace pattern on your nails, because it requires real skill. There are several options for this manicure.
For those who have learned how to handle a brush and acrylic paints well, you can draw yourself:
- apply varnish on the nails, which will be the background of the picture. It can be either light or transparent, or dark. Wait to dry;
- you need to draw with the thinnest brush. On the basis of a contrasting color, lace is created, the pattern of which will be the result of your own imagination;
- fix the finished dry drawing with colorless varnish.
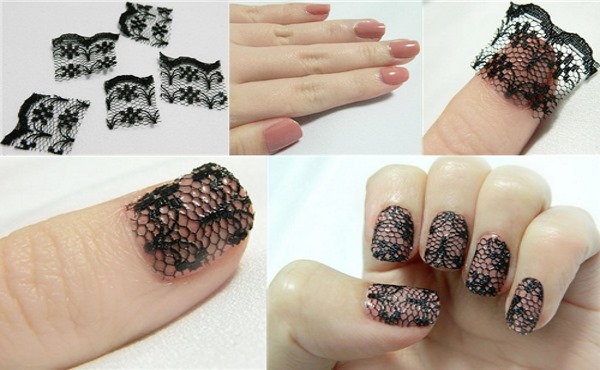 To create such a pattern, you can use lace fabric:
- First of all, you need to prepare the main material. Cut out pieces from the fabric, the shapes of which are identical to the nail.
- Apply colorless varnish, it will be the background of the picture, and wait to dry a little.
- To make it easier to distribute the tissue on the nail plate, you should use a toothpick.
- Then the fabric is coated with colorless varnish. Wait a little for it to be absorbed and apply again to secure the pattern.
The simplest and fastest version of this manicure is water stickers with lace of a wide variety of patterns.
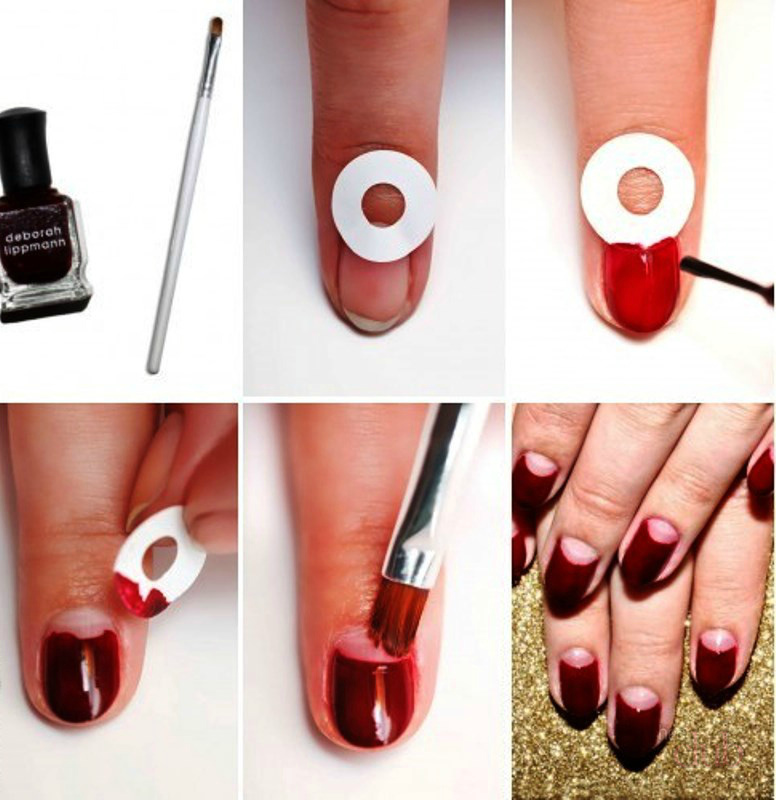
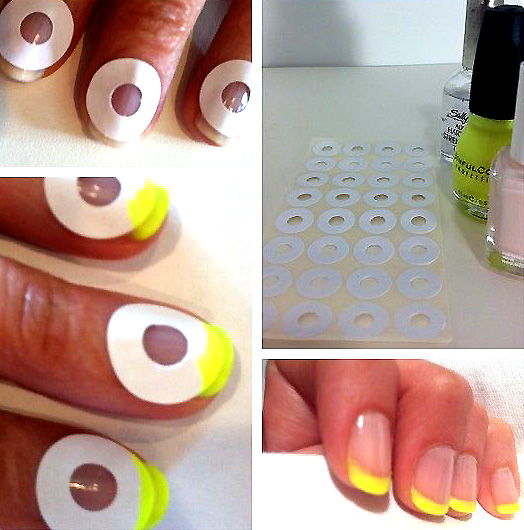
How to paint a jacket on nails
To make a beautiful jacket, the nails should be the same shape, length and with neatly trimmed cuticles. On long plates, any imperfections are very noticeable. For a classic jacket, in addition to colorless and white varnish, beige, peach or transparent pink are also taken.
The drawing can be done in the following ways:
- Apply the base shade first. Wait until it is completely dry and make "smiles" with white varnish. Fix the result with transparent varnish.
- First, a colorless base is applied. After it dries, "smiles" are made and everything is fixed with colored varnish.
To make the "smile" perfect, the width should not exceed a fifth of the nail plate, and the bend should be done symmetrically to the growth of the cuticle. This is especially true for short nails - if you make it too wide, then such a manicure will make your hands rough. It will look best when it is no wider than 2 mm.
 "Smiles" can be applied in 3 ways:
- using a stencil;
- carefully paint with varnish, and remove irregularities with a brush with a varnish remover;
- with a thin brush, make a contour of the "smile" and sketch.
Today, classic French manicure is common with the use of bright contrasting colors.
In addition, there are so many drawing options that any oversights can be "hidden":
- the millennium jacket is drawn, like the classic one, only the "smile" is drawn with glitter;
- an art jacket is characterized by the presence of a pattern or decorative elements;
- the moon jacket is a mirror image of the classic one, where the “smile” is placed on the light part of the base of the nail plate;

- smiles are also experimented with, making them various forms.

On long nails, a millennium jacket looks more impressive, and on short nails, a classic manicure in bright shades.
The use of decorative elements in manicure
To make the drawing more original, many decorative elements are used:
- Stickers with a huge selection of patterns that are applied to the main tone with a toothpick. If you wish, you can again cover the drawing with colorless varnish.
- Rhinestones - small stones of various shapes and colors. It is best to fix them with glue. It is possible with varnish, but in this way they will not last long.
- Broths or beads - multi-colored glass balls. They are used both as a separate part of the pattern and to create a specific pattern. Placed on an incompletely dry surface. Fixed with transparent varnish.
- Foil - a thin metal sheet. Has many shades. Used as part of a pattern or as the main background.
- Konffeti - foil circles of shiny tones. They are used both for a chaotic pattern and for a specific pattern. Placed on a dry surface.
- Sticker - paper sticker. Can be applied to the entire nail, and as an element of the pattern.
- Designer ribbons - self-adhesive colored stripes that can easily add a pattern to the design. The main thing in their use is that when gluing, the surface must be dry and make sure that the edges do not bulge.
- Sequins. There are 2 types - dry and liquid. The first ones are a shiny powder and are applied to a wet drawing. The second ones have already been placed in transparent varnish.
No matter how difficult a designer manicure may seem, if you wish, you can learn to draw incredibly attractive patterns on your nails yourself. The main thing is to study the techniques and enlist the necessary tools and means for a high-quality author's manicure.
Video on how to learn to paint on nails
Step by step drawing of monograms:
How and what to draw thin lines:
You read and look, everything is so simple and easy. And as I begin to undertake the implementation, it does not work. It takes practice.