Hands with beautiful, neat nails are an integral part of the complete image of every girl or woman taking care of herself. Moreover, in order to get a beautiful manicure, it is not necessary to go to a beauty salon, there are many simple ways that will allow you to put your hands in order at home.
What is needed for a manicure
Home manicure will look neat and beautiful if you use special, well-chosen tools.
These include:
- Manicure scissors for cutting nails and cuticles (there can be separate for nails with straight tips and the second with thin rounded blades for processing cuticles or universal with narrow, curved blades).
- Cuticle nippers (a steel tool with blades up to 5 mm is considered the most convenient and safe for novice craftsmen; when buying, you must make sure that it is sharp and that there are no irregularities, burrs on the cuts).
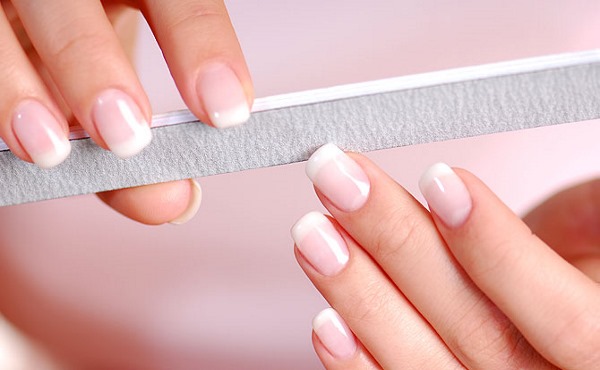
- Files: for adjusting the length and shape, they should be coarse-grained or medium-grained, for short nails metal, paper and glass are most often used for long nails.

- Cuticle pusher - a metal tool in the form of a spatula, with its help it is easy and convenient to move the overgrown cuticle layer.
- Brushes - used to clean the nail plates from the remains of varnish, small dust particles and skin particles.
- Buff - a special file in the form of a bar with a fine-grained coating for polishing the nail plates, as a rule, they have 4 coatings with different levels of grain (1 - for correcting the shape of the nail, 2 - for correcting uneven nail plates, 3 - grinding, 4 - polishing).
- Brushes - are used for drawing patterns on nails, differ in shape and material. For beginners, it is recommended to use a basic set of point, wide and rounded brushes, since they are easy enough to work with, they allow you to create simple but beautiful drawings on the nails.
- Dots - a stick-shaped tool with a rounded metal or plastic tip, used to create dot patterns.
- Special stencils allow you to make an original manicure without much effort, just stick the selected pattern on the prepared nail, apply and dry the varnish, and then remove the workpiece.
In addition to special tools, to create a beautiful DIY manicure you can use some of the tools at hand - needles, toothpicks, scotch tape... With their help, you can make simple but effective patterns.
Cosmetics for manicure
A simple manicure and its implementation at home will definitely require some cosmetics:
- Creams, gels, cuticle softeners - Ideal for gentle removal of keratinized skin around the nail plate. The products are applied for a few minutes to problem areas, and then the excess skin is painlessly removed with the help of an orange stick.There is a large assortment of similar products on the market, the best ones include: "Smart enamel for removing cuticles" (average price - 150 rubles), express cuticle remover from "Eveline" (costs about 100 rubles), professional drug "Orly" (average price - 300 rubles).
- Nail polish remover. They are considered the safest products without the addition of acetone, as well as enriched with vitamins and essential oils.
- Liquid dryers for varnish - special products that accelerate the drying process of the varnish and care for the skin around the nail. Based on the reviews, drying systems from "Smart Enamel", "AVON", "Orly", "Eveline" have proven themselves positively.
- Nail polishes. There is a huge range of decorative nail polishes on the market. Among professional products such varnishes as "Orly", "O.P.I." and others, the most popular budget options are Maybelline Colorama, Golden Rose, Oriflame.
Technique for correct varnish application
Correct application of nail polish will provide a beautiful, neat manicure that will delight its owner for a long time.
This technique includes several stages:
- Preliminary degreasing of nails before painting, it will ensure an even distribution of the varnish over the plate and make the manicure more resistant. As a degreasing agent, you can use specialized fluids or rubbing alcohol.
- Base coat application It is used to align the nail plate and protect it.
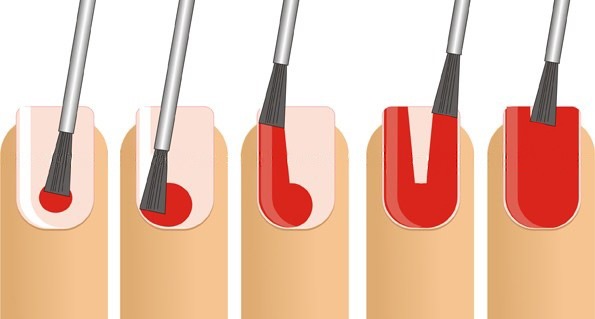
- Application of the first layer of decorative varnish. Manicure experts recommend starting with the little finger. It is necessary to dip the brush into the bottle before painting each nail; if necessary, remove excess varnish by pressing the brush to the neck. Professionals first perform a wide smear in the center in the direction from the base of the nail to its tip, retreating from the root by 2-3 mm, and then carefully paint over this part in a reciprocating motion. Carefully cover the sides with the next two strokes. The first layer should be allowed to dry for about 3 minutes.

A simple manicure at home, the main thing is to follow the correct technique for applying varnish. - Application of the second layer is made according to a similar principle. Complete drying of the varnish occurs in half an hour; this process can be accelerated by using liquid dryers.
- Excess varnish is removed with special sticks or an ordinary cotton swab dipped in nail polish remover.
Techniques for performing drawings on nails
A simple manicure at home will gain a zest if its design is supplemented with interesting drawings and patterns. There are many techniques that even an absolute beginner in the field of nail art can do.
Brush drawings
Drawings of varying complexity can be made with brushes of different shapes and thicknesses - from the simplest stripes and dots to real works of art.
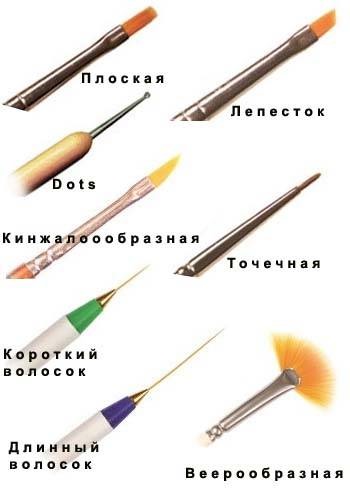
In the arsenal of a manicure master there are usually about 10 brushes, each of which has its own purpose:
- fan-shaped shades are mixed;

- flat, apply wide lines or cover the nail with powder or glitter;
- Lines and large elements of drawings are made with a "petal";
- the smallest details are drawn with a dotted brush.
Colored varnishes, acrylic paints, as well as rhinestones, glitter, stickers, etc. are used to create drawings.
The technique of applying a pattern to the nail with a brush consists of several stages:
- First, the base coat is applied, then the base varnish of the desired shade is allowed to dry.
- Next, a drawing is made with a brush, on top of which a fixer or transparent varnish can be applied.
With a needle
You can create intricate patterns on your nails with a regular sewing needle. They are performed quite simply, while the manicure turns out to be bright and effective.
For work, varnishes of bright contrasting colors and needles of different diameters are used.
After completing the drawing, it is recommended to immediately wipe the needle with a napkin so that the remaining varnish on it does not interfere with the work on another nail.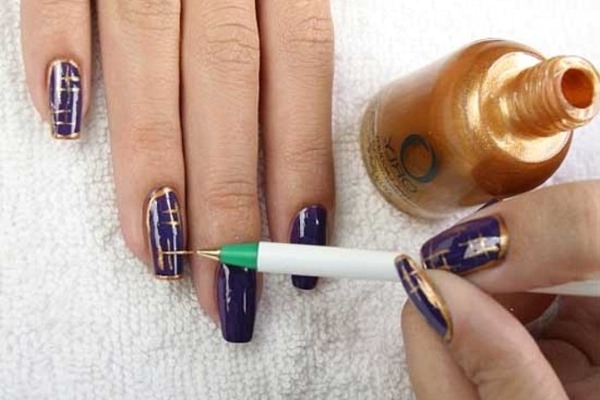
Execution technique:
- First, a base varnish of the selected shade is applied to the nail, then immediately in a certain order (depending on the desired pattern) drops of varnish of a contrasting shade, from which the pattern is drawn with a needle.
- After the manicure has dried, it is recommended to apply a colorless varnish to make the nails shine.
Using toothpicks
To decorate nails with patterns, instead of a needle, you can also use toothpicks, the only difference is that they have a wider tip diameter. The rest of the drawing technique is completely the same.
Patterns using tape
Scotch tape is another handy tool with which you can easily perform an unusual and very stylish manicure. Various geometric shapes, strips are cut out of strips of adhesive tape, glued to nails in the order you want. On top of it, varnish is applied and allowed to dry completely, then the tape is removed. Also, according to this principle, you can apply several colors in several stages.
Decorative items for manicure
At home, a simple, but beautiful and unusual manicure can also be decorated with the help of special decorative elements, which are on sale in a wide range.
For example, it can be:
- various rhinestones;
- special stickers;
- beads and beads;
- rubbing;
- sequins.
These elements are glued to the base coat of varnish and dried along with it. For fixing, a colorless varnish is applied on top.
Master class 1: Simple beautiful edged manicure with stripes
Manicure is an easy way to tidy up nails at home, edging is often called "classic".
To complete it you will need:
- a container with hot water for steaming hands;
- scissors for manicure;
- cuticle forceps;
- nail files;
- varnishes in contrasting colors;
- Scotch;
- clear varnish or fixer.
Edged manicure technique:
- Hold your hands in hot water with salt for 3-5 minutes.
- Trim nails to the desired length, use a file to correct the shape.
- Remove the cuticle with tweezers.
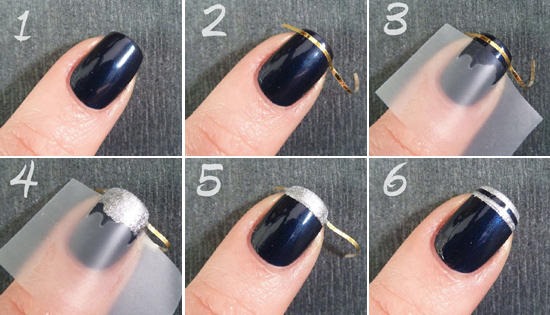 Striped manicure:
- Apply base color varnish, dry well.
- Cut thin strips (1-2 mm wide) from the tape, glue them on the nails in the desired order. You can draw a pattern on several nails, or on all.
- Apply contrasting varnish over the strips, let it dry slightly. Remove strips.
- Cover the manicure with a fixative or colorless varnish.
Master class 2: Original unedged manicure
Recently, unedged manicure has become increasingly popular, it is also known as "European". It is absolutely safe, does not require much time, and the nails after it look well-groomed and neat.
To complete it you will need:
- cuticle softener (remover) and nourishing oil;
- orange stick;
- nail files, buff;
- decorative varnishes.
Unedged manicure technique:
- If necessary, you can hold your hands in a hot sea salt bath (recommended for rough skin).
- Apply a remover to the cuticle, leave it for the time indicated in the instructions, then remove the dead skin with an orange stick.
- With a file, give the nails the desired shape and length, align the nail plate with a buff.
- Apply nourishing oil to the cuticle area.
Original design options:
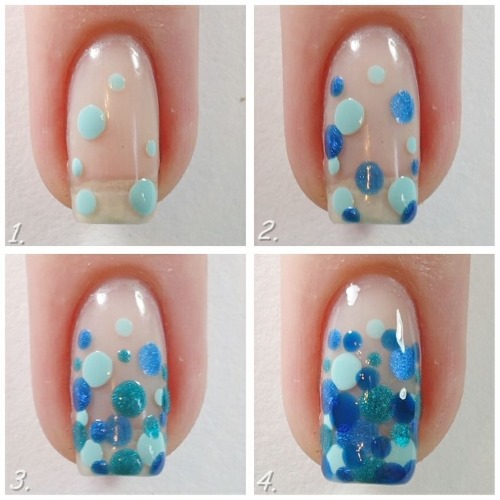
- Dots manicure. Apply base varnish of the desired color. With a dots or an empty ballpoint pen, apply the dots in the desired pattern with varnish of a contrasting shade. It can be "polka dots" scattered over the entire nail plate, a series of dots in the center or at the base, etc.

- Geometric manicure. Apply base color varnish to the nails, dry well. Cut out small oblong triangles from the adhesive tape, glue them to the nail with a sharp end to the base of the plate.Apply a layer of contrasting varnish, let it dry. Carefully remove the tape, add a layer of clear varnish or fixer.
- Two-tone manicure with curls. To paint the nail plate with varnishes of two matching colors, at their junction, perform circular movements with a needle, forming a pattern in the form of curls.
Master class 3: French manicure
French manicure is a universal option, suitable for both everyday and festive clothes.
It will require:
- manicure tools for nail preparation;
- stencils or tape;
- white, natural beige or pink and transparent varnishes.
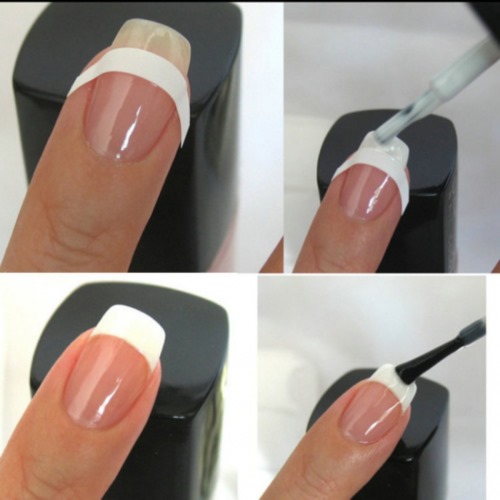 Execution technique:
- Prepare your nails in any convenient way - with the help of edged or European manicure.
- Apply varnish of a natural shade, dry well.
- Glue strips for French manicure, apply white varnish to the ends. After it dries, carefully remove the stencils.
- The final stage is to cover the nails with colorless varnish.
Master class 4: Manicure with rub
Rubbing is one of the latest trends in nail art. This is a special coating in the form of powder, sand or the smallest glitter, with which you can create a stylish manicure with effects such as mirror, shine, shimmer, metallic, chameleon.
The rub can be used only in combination with gel polish.
For such a manicure you will need:
- degreaser;
- base and top coverage;
- gel polish;
- rubbing;
- Ultraviolet lamp.
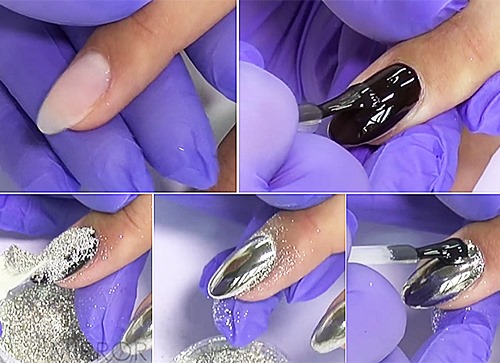 Technique for painting nails using rubbing:
- Put your nails and cuticles in order in any convenient way.
- Buff the nail plates, the final result depends entirely on the quality of this stage. On uneven nails, the rub may be unevenly distributed.
- Degrease your nails.
- Apply a base coat, cure with a lamp.
- Apply gel polish of the selected tone, dry with a lamp.
- Cover nails with top, dry.
- Apply the rub in with the brush that comes with it, and then rub it in in a circular motion, carefully working through all hard-to-reach places.
- Apply another layer of top, dry under a lamp.
Master class 5: Water manicure
Water manicure is one of the most unusual and original solutions for creating an intricate, unique nail design at home.
It will require:
- a bowl of hot water (about 40 ° C);
- nail polish remover;
- clear nail polish;
- colored varnishes;
- nourishing cream or cosmetic oil;
- toothpicks;
- cotton swabs.
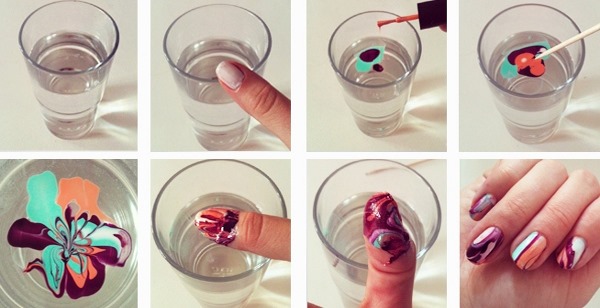 Execution stages:
- Prepare nails for painting - file them if necessary, remove cuticles.
- Cover the nails with transparent varnish, dry it.
- Apply cream or oil around the nails.
- Drop the varnish of the selected color into the water, let it flow. Add a drop of a different color on top. Repeat this procedure several times.
- Create a pattern with a toothpick as you wish.
- Dip each nail in turn in a bowl of varnish, immediately remove the excess around with a cotton swab or toothpick.
- Dry your nails well, fix the result with colorless varnish.
A very unusual, but easy-to-perform manicure at home is ready! With these easy-to-follow techniques, it is quite easy to create a bright, extraordinary, beautiful manicure without visiting a beauty salon.
Video on how to make a simple manicure at home
Manicure lesson at home:
Simple manicure idea for beginners:
Beautiful manicure is a real art. The idea of rubbing is interesting.