Techniques such as raglan top knitting are widely used by hand-knitted craftsmen. Models with raglan sleeves do not have seams, which makes the knitted item lighter and more comfortable.
Pros and cons of knitting raglan on top
Knitting starts from the neck, on circular or stocking needles.
Pros of the raglan top knitting technique:
- lack of seams;
- fast product execution;
- the ability to change the size of the finished product;
- the use of one thread when knitting;
- a large selection of models that can be knitted from the neck without seams;
- the use of raglan lines as a decorative element of the product.
Cons of the raglan knitting technique on top:
- an accurate calculation for a specific product size is required.
Getting started
It is better to start mastering the technique of knitting a product from the neck without a complex pattern.
 Getting started, you should decide on the model. The presence of a fastener, neckline, sleeve length, size - everything must be taken into account.
What do we need?
- A sketch of the desired model.
- Circular knitting needles - it is necessary to choose, taking into account the thickness of the thread.
- Yarn - selected depending on the model and size.
- Threads for marking.
- Stocking needles for working on a seamless sleeve.
We calculate the length of the neck
For a more accurate understanding of how to knit the raglan from above with knitting needles, you need to calculate the length of the neck. The neck circumference is measured initially. For example, the girth of the neck is 34 cm, then they find out how many loops need to be cast on a given length.
Calculating the loop test
First you need to determine the density of the loops per 1 cm of the canvas.
Loop sample calculation assumes the following algorithm:
- For the sample, a fabric is knitted with a size of 20 rows and a width of 30 loops. For the most accurate calculation when knitting a sample, you must use the knitting that will be used to make the main product.
- The finished sample should be washed and steamed, which will allow for a more accurate calculation.
- Calculate 1 cm loops with a ruler.
- The obtained result of the loops must be multiplied by the length of the neck girth.
For example, you can consider the option when the density is 2 loops. The girth of the neck is 34 cm. Based on the calculations, the length of the neck should be 34x2 = 68 loops.
We calculate the neck loops by segments
Next, the loops are distributed over the product segments: back, neck, sleeves. Based on preliminary (approximate) calculations, the neck length is 68 loops.
 From this number, it is necessary to subtract 8 loops for the design of raglan lines, divide the rest by 3. As a result, 20 loops are obtained for each segment.
 Taking into account the height of the neck of the front and back, the number of loops of these parts should be calculated.Masters recommend doing this calculation as a percentage, namely, leave 45% of the loops for the front; 35% for the back, the remaining 10% for the sleeves.
Now, simple math calculations will help you calculate the loops by segment.
60 loops - 100%, making up the proportion, you get:
- in front of 45% - 27 loops;
- back 35% - 21 loops;
- sleeves 10% - 6 loops per piece.
In this case, 2 loops are used to decorate each raglan line. Depending on the pattern, this number may vary; in any case, it must be a multiple of 4.
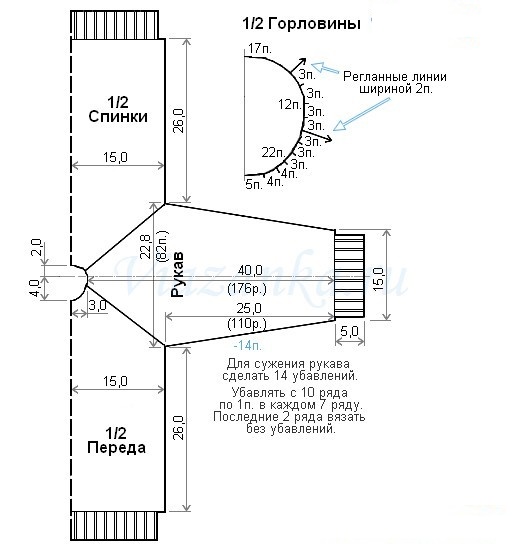
Another important point in the calculation is the scheme. The detailed description looks like this.
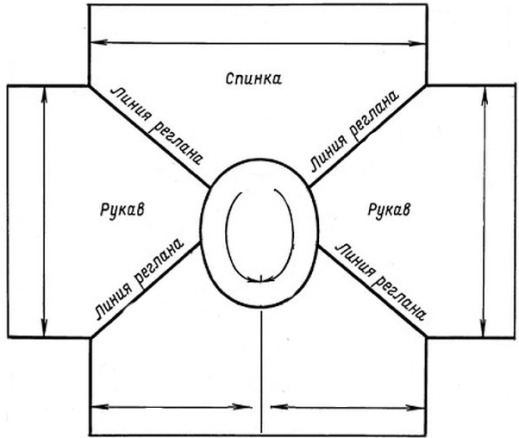 In the center of the sheet is drawn a circle "neck of the product", which consists of 68 loops. 4 rays are drawn from the circle - "raglan lines", between the lines - product segments. Upper part - back, lower - front, side - sleeves.
For proper knitting of the sprout, it is necessary to divide the loops of each segment, except for the back, into parts. The sleeves, if you count from back to front, will be divided as follows: 3 loops, 2 loops, 1 loop - for each sleeve.
The front loops are divided starting from the center. The diagram will look like this: 2,3,3,5,3,3,2, where 5 loops are the center of the front neck.
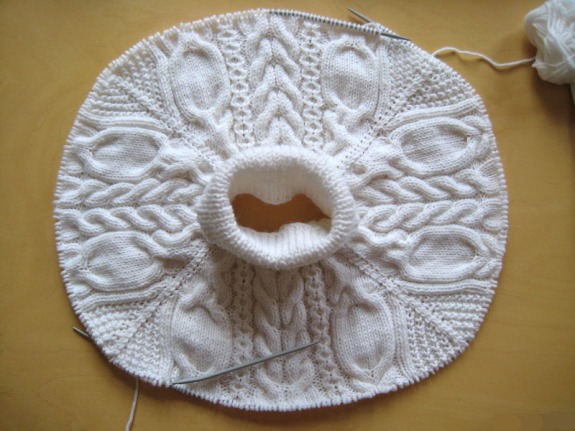
The essence of technology
The essence of the technique is the phased knitting of all elements.
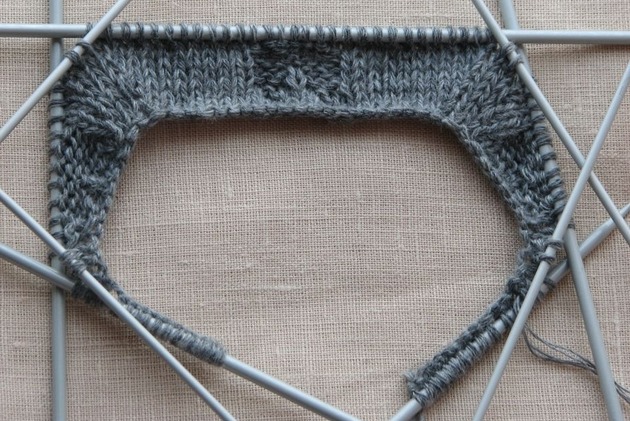
Work begins from the neck. To do this, you need to dial the calculated number of loops on the knitting needles and connect them in a circular knit.
Next should be noted the future raglan lines, and the center of the front neck. Any thread that differs in color from the main thread is used as a marker.
Since the height of the neck of the front and back is different, it is necessary to knit a sprout. Therefore, the back is partially knitted.
To do this, turn the work back to you. Now you need to determine the beginning of the sprout row. Based on the diagram, the beginning of the row will be considered the 3rd loop of the sleeve, when viewed from the back.
You should start with it:
- The product unfolds, the first loop is knitted with a crossed crochet, the rest - according to the pattern. All back loops and the first three loops of the second sleeve are knitted.
- Now you should turn the product and knit the first loop from the broach, then 3 sleeve loops in the usual way. Having reached the raglan line, the addition is performed.
- The last stitch of the sprout should be knit together with the next one.
- Expanding the work to the wrong side, continue knitting according to the pattern.
So knit until the neckline is formed.
Raglan lines design: ways
When knitting from above, you can choose any convenient way to decorate the raglan line. Depending on how the pattern will look on the finished product, the master chooses the execution of lines.
 There are two main ways:
- The most common and easy-to-follow way to design raglan is 2 face loops without holes. Regardless of how the main knitting is performed, the raglan lines are knitted with front loops, according to the following scheme: before and after the line, an addition from the broach is performed, 2 line loops are knitted with the front loops.
- An equally easy way - 1 purl loop in the center of the raglan line. This design looks good on the front surface. It is carried out as follows: in front of the raglan line, an addition is made from a broach, then 1 purl loop and again an addition. So the fragment is tied to the end of the raglan.
We decorate the gate
Collar decoration from the neck can be done in different ways. In the first case, the collar is made out at the beginning of knitting, and then the whole product. Otherwise, the collar is knitted last.
The first method is used when knitting a product with a low elastic collar.
The technique is as follows:
- 1 lp, 1 out. removed with a crochet in front of the canvas;
- 1 lp, removed with a yarn over the canvas, 1 out.
Knitting continues until the desired collar size is reached. The second method is more convenient when decorating the original gate.The collar is knitted from the neck loops, which are drawn on the knitting needles, then continue the basic knitting.
Some models are made with a separate knitting of the collar, then it is sewn on at the end of the work.
Completion of work
At the end, the elastic is formed, the loops are closed. Decorated with buttons and collars.
Raglan top with knitting needles for women (master classes)
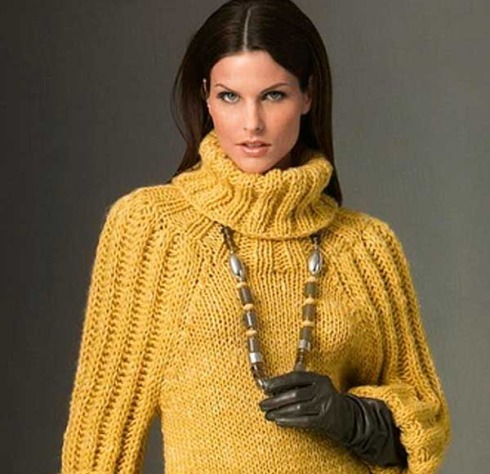
The raglan top with knitting needles is used when knitting various female models. A detailed description of the scheme will help to understand how to knit a stylish thing.
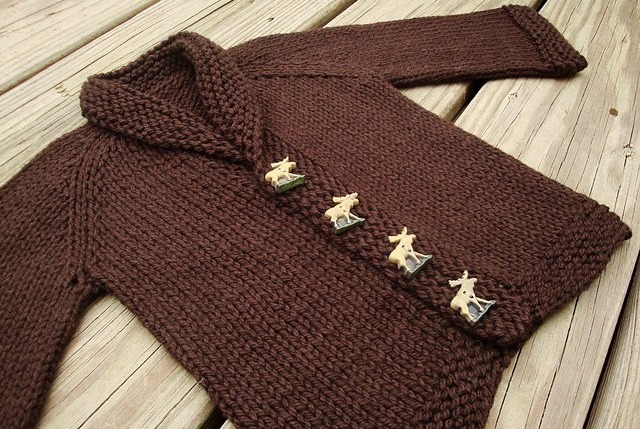
Raglan from the neckline with button placket and stand-up collar
Getting started, you need to perform the correct calculations. Having decided on the number of neck loops, the strap loops are calculated.
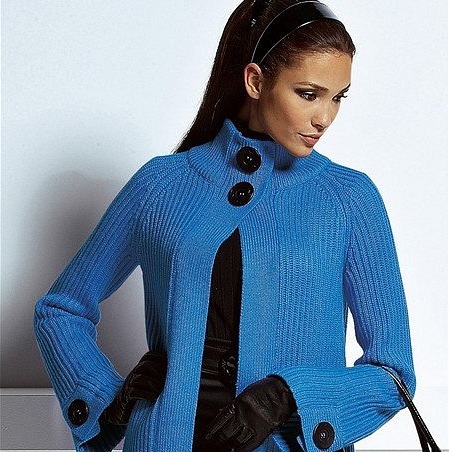
As an example, 48 stitches are shown. For the plank, cast on 8 more loops. Then 16 loops will go on the shelf, and the rest will be divided into the back and sleeves, respectively.
In the first row, the 1st edge is knitted with the front one, in the remaining rows it is removed.
Knitting pattern:
- 1st row - first and last 8 loops - plank: 1 out. removed, thread before work, 1 l.p. in the usual way, so alternating, knit 8 loops, the rest are knitted with stockings;
- 2nd row - a strip according to the pattern (purl. Loops are removed with a thread in front of the product), the remaining loops are knitted with a 1x1 elastic band, knitting the front one from the previous row, and the wrong one in the usual way;
- 3rd row - repeats 1st.
In order not to get confused with the pattern, knitting professionals advise to mark each bar with markers.
After knitting the gate, they begin to distribute the loops for the raglan.
It is also worth marking the raglan lines with markers here.
Scheme:
- The first row is knitted according to the main pattern. Planks are knitted without changes until the end of the product.
- Second row, all stitches are knitted, raglan - out. P.
- Starting from the third row, a sprout is knitted, then the knitting of the product continues, performing the necessary increases in the lines.
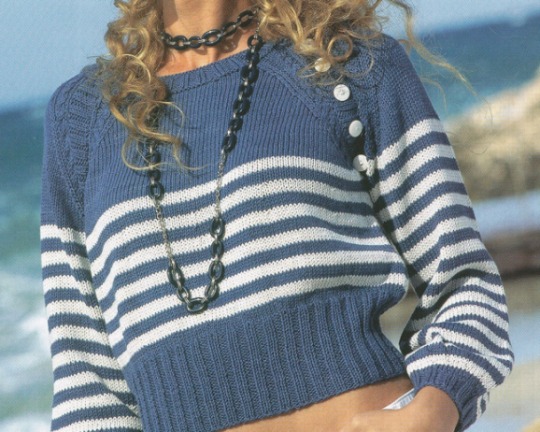
Raglan Navy Pullover
A nautical piece can be knitted using a combination of white and blue yarn. For work, you need to prepare 450g of white yarn and 150 blue, circular and stocking needles.
 Stages of work:
- On circular knitting needles, 77 loops of white yarn are typed.
- The first row is out. loops.
- The loops are distributed according to the scheme for determining the ragged lines.
- Increases are performed only in the front rows before tying the sprout, then the work is performed in a circle of 15 rows.
- The next 4 circles are knitted with blue yarn.
- Changing yarn every 4 rounds, knit to the waist.
- Next, the fabric is knitted with white yarn, the elastic of the pullover is made in blue.
- The sleeve is knitted on stocking needles with white yarn to elastic.
- The elastic is done with blue thread.
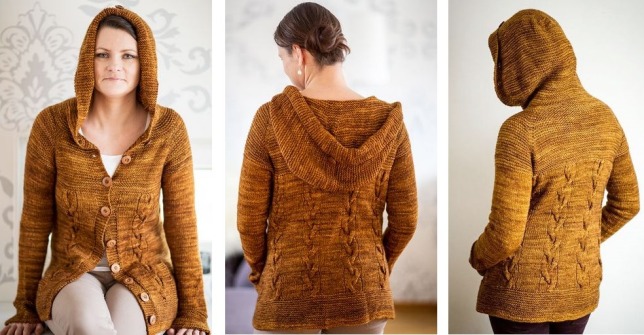
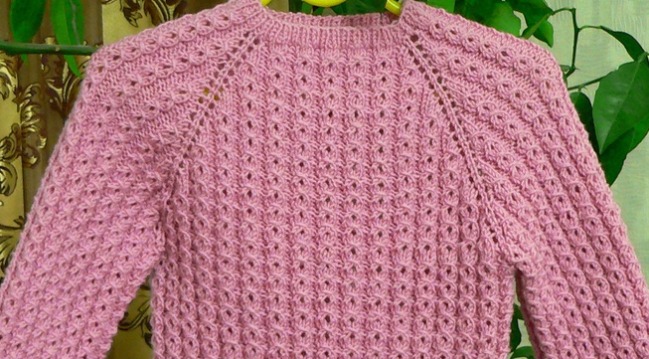
Cardigan with openwork rhombuses
This model is made according to the knitting pattern of a sweater with a strap. But the main difference from knitting a sweater is the length of the product. The cardigan can be elongated, fitted or loose.
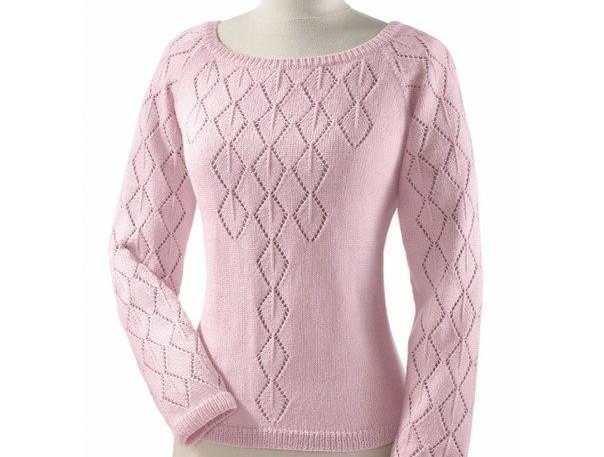 The openwork rhombus pattern is knitted according to the following pattern:
For example, a sample of 17 loops + 2 edging is used, the pattern repeat is 12 rows. All even rows are made with purl loops, and the pattern is formed in odd front rows.
The size of the rhombus can be selected according to your choice. Choosing small rhombuses, the product will turn out to be more delicate.
The basic principle of knitting such a pattern involves performing a yarn from oneself, and knitting the next loops along with a change in the slope, so that in the end you get a clear rhombus in the pattern.
Having mastered this pattern, you can easily apply in the basic knitting of a cardigan with raglan sleeves.
Raglan top knitting for men
Men's clothing, knitted using the raglan technique on top, will appeal to both young people and older men.
Raglan knitting master class for men's sweater
Having carried out a preliminary calculation of the buttonhole test, the number of loops for the neckline is 120. Sweater size 54.
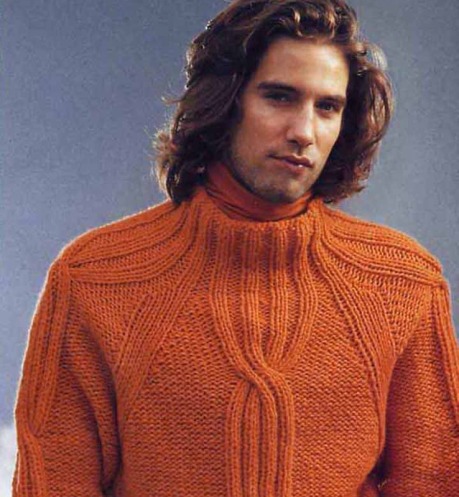 Knitting of the neck and sprout is performed according to the classical scheme, then the loops are distributed and the raglan lines are marked. The whole product is knitted with front stitch.
The sleeve is knitted on stocking needles, the corresponding increases are made. The stand-up collar is made with a 2x2 elastic, the same technique is used to decorate the elastic of the sleeve and bottom of the sweater.
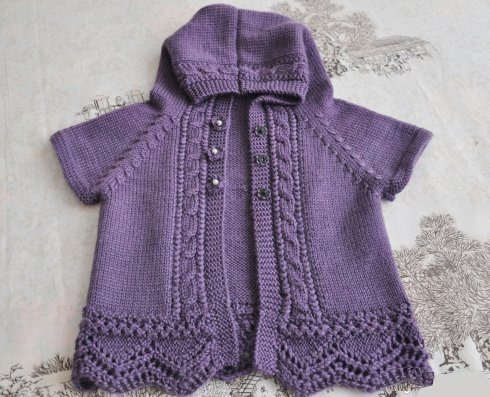
Features of knitting baby raglan
Seamless clothing is especially good for children. The clothes are soft and comfortable. And the easiest way to tie such a thing is the raglan technique from above. Using the technique of knitting raglan on top with knitting needles, you can get such children's things as sweaters, vests.
For girl
Raglan is especially often used when knitting a dress for a girl. It will look good on a girl and a tunic knitted in this way.
 The knitting technique for children's raglan is different in size, otherwise the techniques are according to the classical scheme. Calculation of a loop test, distribution of loops by segments, circular knitting with expansion in the area of raglan lines.
Clothes for girls can be decorated with laces or embroidery, pom-poms or tassels. It all depends on the imagination of the knitter.
For boy
Models for a boy can be very diverse: pullovers, jumpers, sweaters, vests, sweaters. Having calculated in detail the required amount of yarn, they work on the selected model according to the classic raglan knitting pattern.
 When knitting a thing, it should be periodically tried on on a child in order to correct shortcomings in a timely manner. For a more colorful design, you can use a combination of yarns of different colors or decorate the finished product with embroidery.
Step-by-step instructions for knitting a children's pullover using the raglan technique
Having completed the calculation of the loop test, and having determined the required number of neck loops, the loops are typed on the knitting needles.
Knitting is done with the front stitch from the neckline, without a collar.
Execution order:
- 9 front rows: 1 air loop, 1 front, yarn, 5 front, yarn, 1 purl (raglan line), yarn, 15 front (back), yarn, 1 purl, yarn, 1 front, 1 air loop.
- The purl rows are knitted according to the pattern.
- In the 11th row, 1 air loop is taken on each side of the shelf and the work is closed in circular knitting.
- Knitting continues until the required number of sleeve loops is set.
- The sleeves are removed with stocking needles.
- Continue circular knitting without additions to the required length of the product.
- The last 6 rows are knitted with a 2x2 elastic band and the loops are closed.
- Knitting of the sleeves is performed on stocking needles with the decrease of loops in every 6th row to the required length.
- The sleeve ends with a 2x2 elastic.
- To decorate the gate, the first neck loops are typed on circular knitting needles and 4 rows are knitted with a 2x2 elastic band.
This pullover is very comfortable. Can be worn by both boy and girl. Decorating with embroidery or other decorative elements, you can create an accent for a girl or boy.
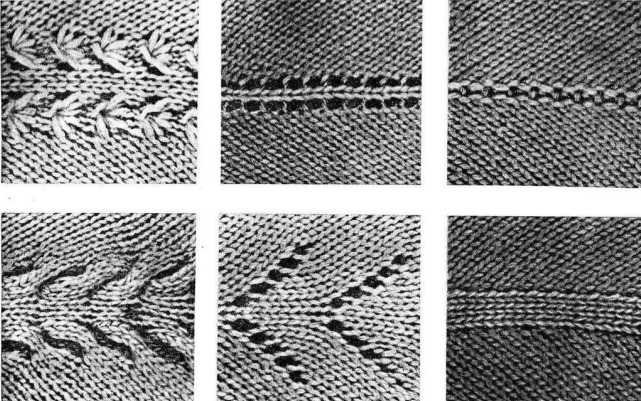
Raglan lines design: ways
The design methods for raglan lines are different. Depending on the taste of the author or the model of the product, the lines use classic 2 face loops without holes, a three-dimensional braid pattern or openwork patterns.
6-stitch braid pattern
Knitting is done with front stitch, pattern repeat - 6 rows.
 The scheme is as follows:
- front row - 1 yarn, 6 front, 1 yarn;
- purl row - according to the pattern, the yarn is knitted with the purl with crossing the loop.
So knit 6 rows, cross in the 7th row:
- yarn, remove three loops of the braid on the auxiliary knitting needle;
- knit the next three;
- return the first loops of the braid to the working needle and knit them with the front ones.
Then the knitting technique is repeated. This way of decorating raglan lines looks original. The braid turns out to be voluminous without holes.
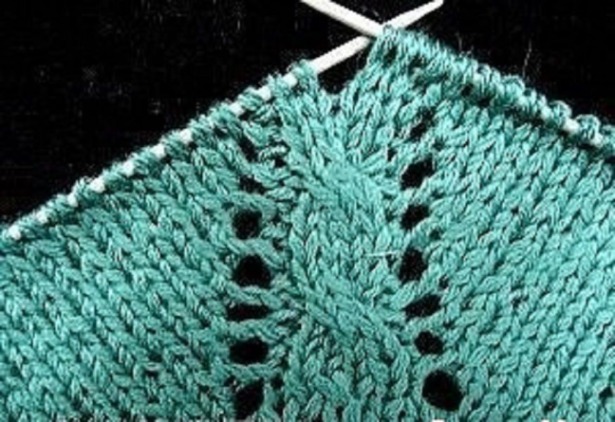
Hole pattern
The openwork raglan line looks great on fine yarns. The number of line loops can be any. The easiest way to decorate raglan lace lines is by performing increases with a regular yarn.
 Knitting steps:
- on the front side in front of the raglan pattern, a regular yarn is performed, 2 front loops of the raglan line, a yarn;
- on the seamy side, all purl loops, including the yarn of the previous row.
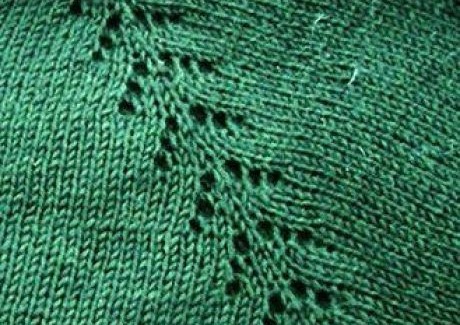
Another very beautiful way is the "Herringbone" drawing. Rapport of the drawing of 10 rows. All additions are in the front rows, purl rows are patterned.
 Execution stages:
- 1st row - yarn, knit, yarn;
- 3rd row - yarn, 3 knit, yarn;
- 5th row - yarn, 5 knit, yarn;
- 7th row - yarn, 7 knit, yarn;
- 9th row - yarn, 9 knit, yarn.
In every 11th row, the pattern is repeated. The result is a herringbone-like pattern of holes. Such a raglan line looks great on products made of thin yarn knitted on top of both adult and children's models.
 The master's imagination will prompt him to choose the most suitable line design option. Products with raglan sleeves are an easy and convenient way to do knitted items with your own hands.
How to knit raglan from above with knitting needles, calculation of loops:
How to tie a raglan top with a placket and stand-up collar:
How to tie a raglan sprout on top:
Very efficient, sensible site and excellent helper !!! Ё Thank you!
Thanks! Very helpful and instructive.
Everything is very clear how to find you in the social. networks? Marina
Thanks. I am trying to figure out the partial knotting of the neck in a men's sweater.
Thank you!