Most nail designs include geometry. It can be complex color combinations of shapes or simple accents in the form of straight lines in a minimalist style.
If you use simple patterns, then all fingers are decorated with them. The combination of floristry on the ring and middle fingers goes well with the geometry on the rest of the nails. Such designs transform from year to year, but do not go out of fashion.
General recommendations
Geometric patterns are an integral part of many nail designs. Such patterns can be decorated with rhinestones and sequins. Create multicolored stained glass-style geometry with reversible stamping. Geometry on nails - designs that consist of thin straight lines and shapes.
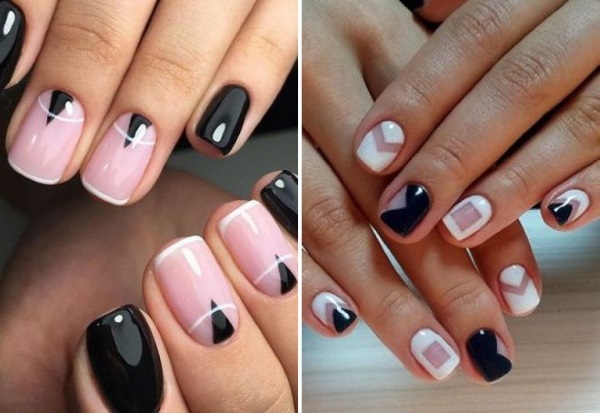
For decoration with rhinestones, figures in the form of a circle or square are often used, located at the base of the nail (nail hole). Variations of the classic moon manicure. You can draw straight straight lines yourself with a long thin linear brush. The length of the pile ensures that long lines are drawn evenly.
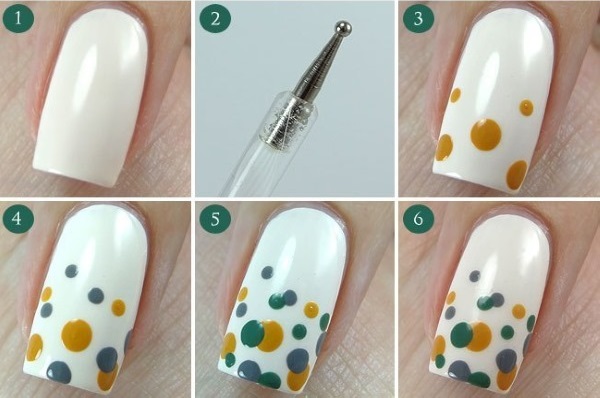
It is convenient to draw short lines with dots, which can create more than just dots. With these tools, you can draw complex geometric patterns.
For masters who do not know the drawing technique, sliders come to the rescue. With their help, it is possible to reproduce geometry of any complexity. Small geometric shapes are transferred to the nail with tweezers, and large patterns can be easily spread over the surface of the nail with a silicone sculpting brush (also called "silicone pusher").
Techniques and methods
Despite the complexity of some geometric patterns, which are composed of many thin lines, they are not difficult to obtain using sliders or stamping. It is not necessary to be able to draw to decorate all fingers with geometric designs. Having mastered such techniques, you can reproduce the pattern yourself on both the left and right hand.
What methods are used to create geometric patterns:
| Name | Description | Tools |
| Painting | geometric patterns are drawn on the dried background coating with a thin brush. Complex geometry requires intermediate drying of part of the pattern in the lamp. | highly pigmented gel paint for painting, thin linear brush (bristle length from 0.7 cm) |
| Sliders | depending on the type of slider, the picture is removed from the substrate using water or tweezers from the glue base. Transferred to the nail covered with colored gel polish. Overlapped on top with 2 top layers. | a set of sliders with geometric patterns, tweezers, a container of water |
| Stamping | using a stamp from the engraved plate, the pattern is transferred to the nail. Covered with a layer of top | plate with pictures, stamp, scraper, gel paint for stamping |
| Holographic foil | a holographic geometric pattern is transferred to the sticky layer (after drying the gel polish or special glue). Overlap with 2 layers of top | Foil with a pattern, special glue, silicone brush for pressing the foil to the nail |
To create complex designs that consist of several layers, it is necessary to purchase a powerful lamp to cure the material. Each design layer in modern LED lamps is dried for at least 10 seconds.
It is recommended to cure the topcoat for at least 60 seconds. The more powerful the lamp is, the better the materials will be fixed. The power of the lamp at home for working with modern building gels and top coatings must be at least 48 watts.
Ideas for a solid color manicure
Geometry on nails - designs that are not only intersecting straight lines. Ethnic motifs in the style of mehendi - mandala - belong to the category of complex geometry. These symmetrically repeating patterns are usually circular in shape. They are used in India to paint the body with henna.
In nail design, stamping is used to reproduce the mandala on the nail. To do this, it is necessary to have in the master's arsenal a thematic plate with a set of engravings of the picture and a well-pigmented gel-paint for stamping, which can reprint the fine lines of the mandala.
Basic geometry compositions on nails:
- mandalas - drawings in the style of Indian mehendi painting;
- minimalism - straight horizontal or vertical lines;
- compositions of weaving of round and rectangular shapes;
- imitation of brush strokes.
The versatility of the design is that it can be applied to any color coating.
Basic colors of geometry:
- the black;
- white;
- gold;
- silver.
Lines made in these colors are harmoniously combined with any style of manicure. They are often applied over the top coat with gel paint without residual tack and do not overlap with the top coat. The quality of the completed manicure is determined by the perfectly flat surface of the nail.
In case of poor alignment of the nail plate, applying a geometric pattern will only emphasize the depressions, and the nails will look untidy. Therefore, it is recommended to level the surface during the application of the base coat. You can correct errors during the application of the top, before creating the picture.
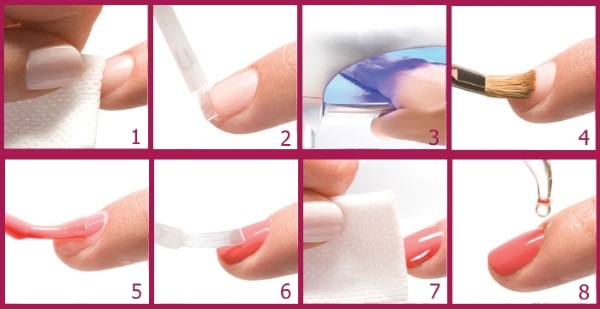
Technique for aligning the nail with the base:
- Perform a manicure - lift the cuticle with an orange stick or a pusher (remove it), peel the overgrown skin near the cuticle and lateral ridges (pterygium).
- Buff the surface of the nail, grinding it in one direction in order to qualitatively raise the scales from the bone surface.
- Remove dust with a brush.
- Disinfect hands and fingers with an alcohol-based liquid, paying special attention to the cuticle area and the inner side of the nail at the butt end.
- Apply a primer to a natural nail with a semi-dry brush, do not apply the liquid to the skin around the perimeter of the nail, air dry.
- Apply a thin layer of base liquid, making swiping movements with a brush, as if driving the liquid into the surface, dry for 10 seconds in an ICE lamp.
- Collect a drop of the base and place it in the apex zone (part of 1/3 of the nail length, retreating from the cuticle).
- When spreading the drop, you can use a thin paint brush or a bottle brush if it's not too fluffy. At this stage, it is necessary to push the edges of the drop towards the cuticle and lateral sides of the nail and smoothly stretch it towards the end, while leaving most of the drop at the apex. When working with a brush, do not press on it, easily pulling the liquid without pressing down.
- Turn your hand upside down, while carefully monitoring the position of the finger with the base. It should be strictly parallel to the floor. According to the laws of physics, the liquid material will flow down the rounded surface of the nail and form an even glare. Keep your hand in this position for at least 30 seconds. This will prevent side bolsters from dripping, which can occur when using a liquid agent or slow spreading of a drop.
- Place your hand in the lamp for 30 seconds, while your finger should lie flat so that the base does not glass to the cuticle or end.
After performing such manipulations, the nail will be ready to apply a uniform coating of even the lightest tones, which emphasize all surface irregularities.The hand-turning technique can also be used when coating with gel polish, which will allow the liquid to level out on its own.
Options in different shades
The geometry on the nails (the designs in the photos of the masters are given below) can be made in a minimalist style or consist of a combination of multi-colored geometric shapes in the style of cubism.
How to create nail designs from colorful shapes:
- it is necessary to pre-mark on the plane of the nail, drawing lines with a thin marker or a simple pencil with a soft lead;
- lay out the colors that will be used in the design on the palette;
- draw a geometric shape with a thin brush within the markup;
- dry the design fragment in an LED lamp to fix the color for about 10 seconds;
- start drawing the next figure with intermediate drying;
- repeat the steps until the nail is completely covered with a pattern, cover with a top without a sticky layer, dry for 30 seconds;
- with a thin brush of white or black gel paint without residual stickiness, draw the boundaries of the connection of geometric shapes, do not overlap with the top.
Drawings can be created from bright, neon fragments or using delicate pastel colors, depending on the design style. The versatility of designs using geometry on nails is that they fit any look. Neon prints are great for summer vacations, while the same geometric pattern, done in soothing colors, would be appropriate in the office.
A multicolored geometric pattern can be quickly created using the reverse stamping technique:
- treat the surface of the plate with an alcohol-containing liquid for degreasing, and clean the stamp from dust using the sticky side of the tape;
- apply a special stamping gel paint on a part of the pattern on the plate;
- with a scraper (scraper) distribute the paint so that it fills all the grooves in the engraving of the picture;
- transfer the drawing from the plate onto the stamp (with a rubber or transparent silicone pad);
- dry the surface of the stamp with a pattern in an ICE lamp for 10 seconds;
- decorate the drawing over the main lines with colored gel paints, grab it in the lamp for 10 seconds;
- apply a thin layer of top over the pattern, dry for 30 seconds;
- with tweezers, pick up the edge of the formed film and remove it from the surface of the stamp;
- transfer the homemade slider to the nail, distribute over the surface with a silicone brush;
- cover with 2 layers of top, drying each layer for at least 30 seconds.
Using this method, you can create unique geometric designs in a combination of different colors at home.
Matte manicure
The special top coat creates a matte base tone effect. Against such a background, the drawings of geometric lines that are made with glossy gel paint look beautiful. It is fashionable to use thin lines decorated with dots with dots. By creating patterns from thin straight lines and small dots of different diameters.
Small rhinestones and Pixie crystals organically fit into such patterns on a matte background.
Matte manicures are difficult to use in everyday life, as the surface wears out and acquires a gloss. When applied on top of a pattern, it protects the matte surface and it retains its properties longer.
The pattern can always be decorated with colored acrylic powder or glitter. The matte surface does not have residual stickiness and by drawing on it with a dispersion gel, you can achieve a strong fixation of glitter or sand.
How to get a velvet geometric pattern:
- On the nail after manicure and leveling with the base, apply the main color, dry in a lamp.
- Cover the nail with a special finishing varnish with a matting effect, dry in an ICE lamp for 30 sec.
- Draw a drawing with white or black gel paint with residual stickiness or reprint it with a stamp from the plate (stamping).
- Sprinkle glitter or colored acrylic powder on top of the undried pattern, dry in a lamp for 60 seconds.
- Clean the surface with a soft fluffy brush or brush from excess loose material (cleaning can be done vigorously, since the main part of the powder has dried and become polymerised);
- Do not overlap the pattern from above with anything.
When performing such designs, it should be remembered that the bulk material should be sprinkled abundantly on the nail, and not slapped with a brush or sponge, which can smudge wet paint into a large blot.
Decor ideas
Geometry on nails (designs of fashionable manicure) is presented on the pages of many catalogs of international nail art competitions. Design features are considered either the desire for minimalism, or rich decoration with rhinestones and foil.
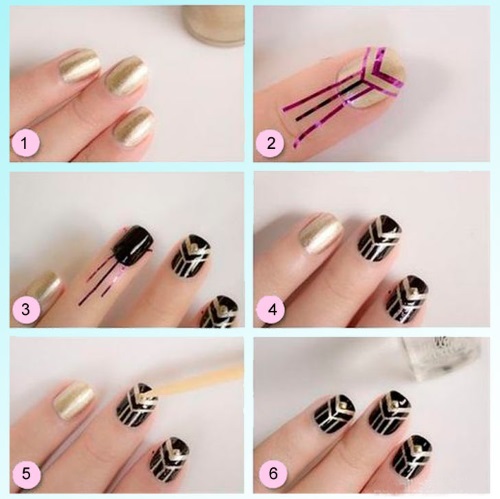
The most common decor for minimalist designs is self-adhesive tapes. They are produced in different colors and thicknesses. In one design, you can use strips of different thicknesses, gluing them horizontally or vertically.
Geometric patterns are decorated with small (ss3) rhinestones. To fix them along the straight lines of the design, special glue or transparent modeling gel is used. They are applied with a thin brush pointwise at the points of attachment of stones. Rhinestones are installed on liquid drops of glue and dried in an ICE lamp for 60 seconds.
After drying, it is recommended to circle the rhinestones around the perimeter again with glue or gel and dry. The design does not overlap with the top on top of the crystals, therefore the main coating with colored gel polish for the design should be covered with a top without a sticky layer (if there is no such top, then the dispersion must be removed with a lint-free cloth soaked in alcohol).
Fashion trends in 2019
Fashion in nail art does not dictate strict canons about designs and shapes. Trends only recommend this or that color and decor. Practicality in everyday wear dictates its own rules and techniques for performing designs. More and more often in salons, clients ask for beautiful short nails.
Forms "pipe" and "stiletto" are made for special events and are not intended to be used in the office. Daily communication with a computer keyboard dictates the requirements for a stable and practical nail shape. This leaves geometry in the trend line as it looks organic over any nail length.
The main directions of development of geometric designs in 2019:
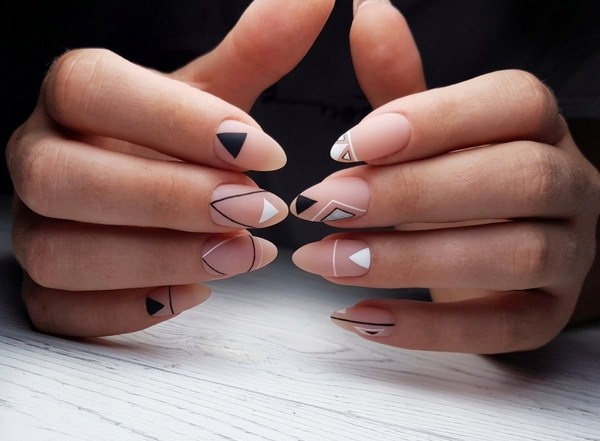
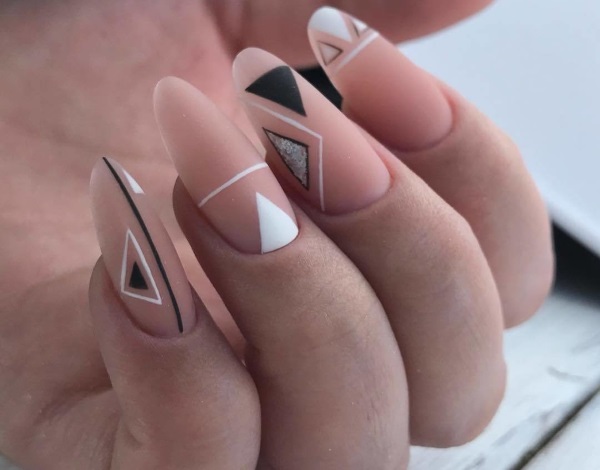
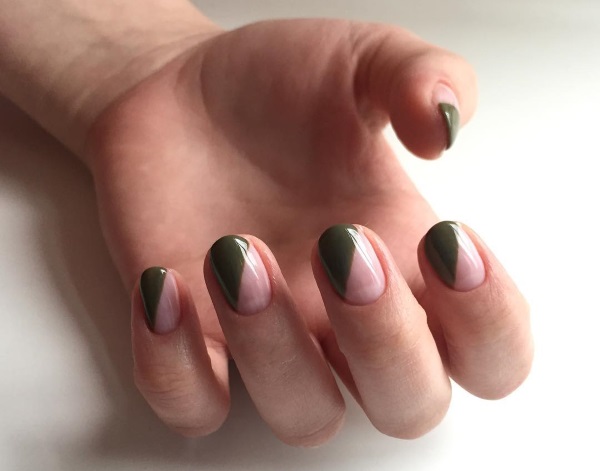
- Imitation of a beveled jacket - in this case, the "smile line" takes on bizarre geometric shapes or shifts to one side. As a rule, I emphasize the non-standard shape of the free edge with the help of geometric shapes and drawing thin lines. Often such designs are performed on long nails covered with a nude shade of gel polish. A complex geometric jacket does not require additional decoration of the nail plate.
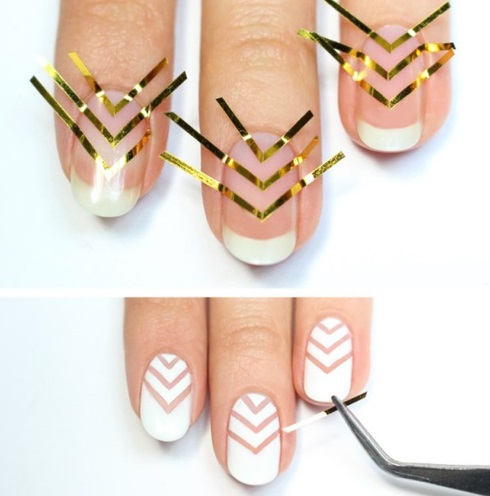
- Geometry with negative space and foil - a combination of unpainted areas of the nail plate and areas decorated with foil. To perform this design, a tear-off foil is imprinted in small fragments on the nail covered with a camouflage base. A geometric pattern is drawn on top, dividing areas with a natural tone and golden shine with colored lines. This decor solution combines naturalness and lush artificial shine on one surface, providing a play of contrasts.
- Vertical stripes - are drawn in white or black. The space between them is painted over with different gel polishes, a combination of multi-colored stripes is created. Depending on the chosen color scheme, you can get manicures in different styles - from gentle pastel to summer in the combination of neon stripes.
No matter how used geometric elements in the design, they will be part of the trending manicure in 2019. Fashion provides an opportunity to combine white geometric designs with trendy colors (electric blue, ocher, gray) used as backgrounds.
Since the square shape, which has been popular for several years, is replaced by the classic form - migdal, geometry does not become topical. Both symmetrical patterns and asymmetry will look good on the trendy almond-shaped nail plate.
This shape of the nail is more practical to wear and has several varieties:
- classic almonds - a more refined shape in relation to the central axis, which is simply cut out of a square and an oval;
- modern almond - a very pointed form of nails, performed on long artificial nails;
- "Ballerina" ("pointe shoes") - a complex shape, which the craftsmen call "cut almonds", suitable for long nails made of artificial material.
Geometric designs of varying complexity can be performed on nails of any length and shape. Simple geometric patterns with a thin brush and dots can be done even for beginners.
In this style, you can perform both strict designs on a nude background, which are as close as possible to naturalness, and bright golden geometry, decorated with rhinestones. Geometric drawings go well with floristry on adjacent fingers of one hand. This manicure belongs to the category of timeless classics.
Author: Anna Beauty
Useful videos on creating geometric designs on nails
Video tutorial on drawing geometry:
Geometric Glitter Design:
Such a manicure always looks stylish and elegant. Especially in matte finish.