Not everyone has the opportunity to visit a beauty salon and get a professional manicure with a beautiful and unusual finish. There are many nail art techniques that you can use for beginners at home yourself.
Where to start - materials and tools
Before you cover your nails with varnish, you need to make a high-quality and neat manicure:
- Remove any remaining varnish.
- Move aside or trim the cuticle.
- Give the desired shape to the nail plate, carefully sawing.
- Sand your nails.
Nail art for beginners can be done using simple tools at hand.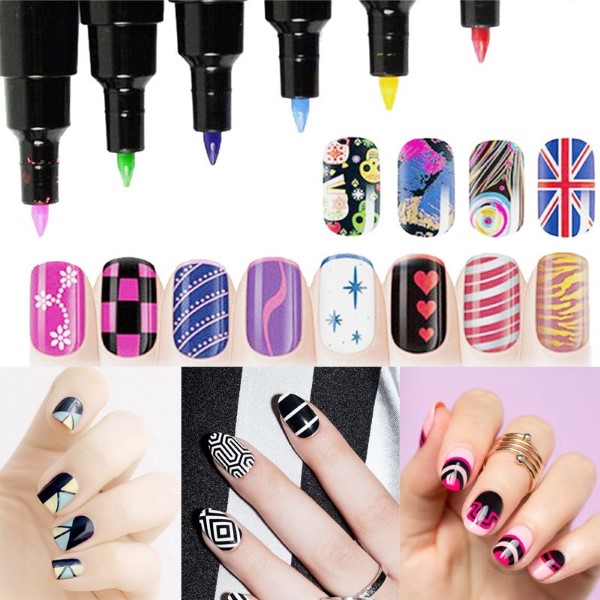
For this you may need:
- Cotton swabs (to gently remove any varnish that sticks out of the nail).
- Nail polish remover.
- Sponge.
- Bamboo (wooden sticks).
- Needle (it is better to choose a safety pin - a needle with a ball at the end).
- Skewers or toothpicks.
- Varnishes in different colors with a standard and thin brush.
- Foil for manicure.
- Rhinestones or small beads.
- A sponge or piece of foam rubber.
- Scotch.
- Stickers for nails.
- Special glue.
Advice: You can buy or make your own manicure box or box with compartments of different sizes. So all the necessary tools will be in one place and nothing will be lost.
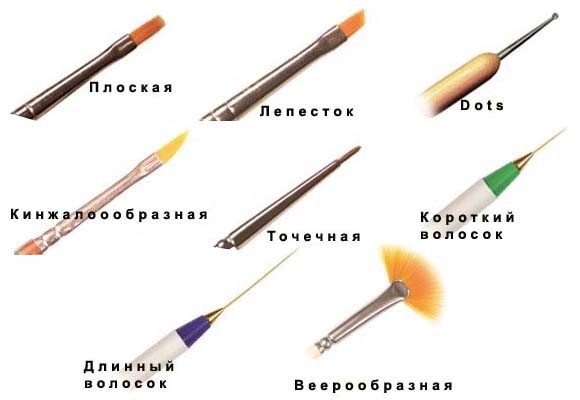
The above list is basic. Later it will be possible to purchase special brushes and dots. Dots is a pen-shaped manicure tool with a tip in the form of a ball of various diameters.
Popular techniques for creating manicure: "abstraction"
Abstract nail art is perfect for beginners. It does not require special skills and a lot of time. Such a manicure can be romantic, extravagant, restrained, flashy. Everything will depend on the chosen colors and pattern.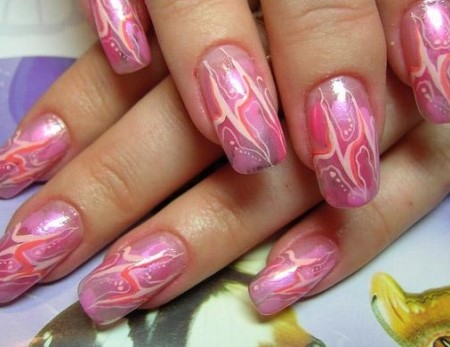
For such a manicure you will need:
- Base varnish.
- Several varnishes in different colors.
- Needle or toothpick.
- Cotton swab.
- Drying.
It's better to start with the simplest pattern. You will need two varnishes of similar colors, for example, pink and lilac, white and blue, purple and red.
Before doing a spot manicure, you need to practice a little and choose the right tool.
Execution technique:
- The nail plate is covered with one of the varnishes.
- Without letting it dry, it is applied in the center of 3-4 points (depending on the length of the nail).
- Now these points are connected with a needle in one direction (from the edge to the hole, or vice versa). You can alternate. Make one finger from the edge, the second from the hole.
- The finished drawing is covered with a fixer.
There is another option where it is better to choose varnishes in contrasting shades. For example, black and red, black and white, yellow and green, blue and white.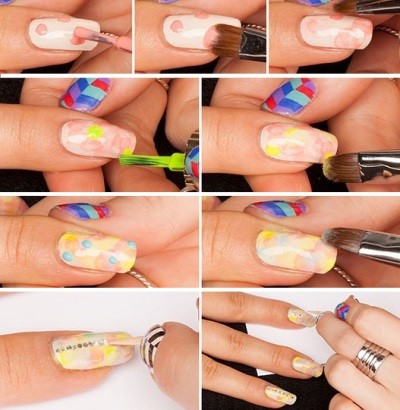
The technique for its implementation is as follows:
- A vertical line is drawn mentally, which divides the nail plate in half.
- Each half is covered with a different varnish.
- One color (black) must be applied to the ring finger.
- The middle one is the other (red).
- Three red dots are put on the black half, and black ones on the red.
- Now with a needle you need to draw a line from the middle of the point to the center of the nail, slightly lowering the line. And so all 6 points.
The fastest and easiest option would be:
- Cover the nail with base varnish.
- Place points of different sizes and colors in any order.
- Connect all the dots with a toothpick (mix all the colors).
Advice: For an abstract drawing to look neat, all nails must be the same length.
Point technique
Before doing a spot manicure, you need to practice a little and choose the right tool.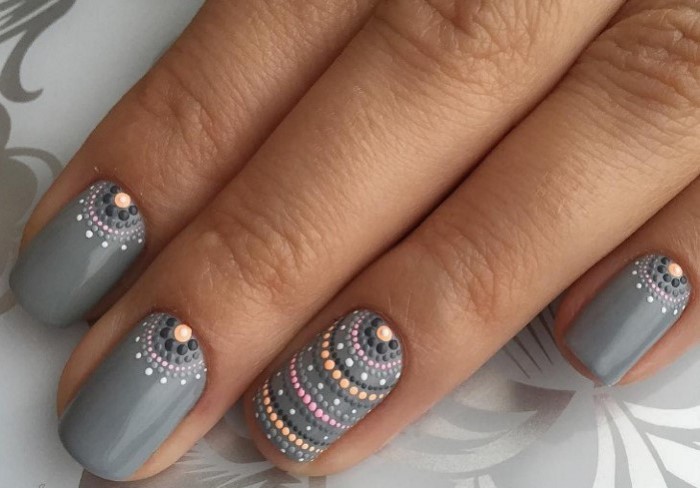
For this type of manicure you will need:
- base or base (which will align the nail so that the varnish lays down evenly);
- varnishes of different colors;
- dots;
- fixer;
- foil.
For beginners, instead of dots for drawing on nails, you can pick up tools from your home inventory.
Well suited for these purposes:
- safety pin;
- hairpin;
- pencil;
- a pen;
- cotton swab.
It's better to practice on a piece of paper first. So it will be easier to understand the circle of what diameter each tool gives and how it will look on the nails.
The procedure will be as follows:
- The base is applied. It should dry completely.
- The nail is covered with white varnish. Can be replaced with pale blue, light pink or beige. It should dry well too.
- You need to drip red varnish on a piece of foil. With a dots or other tool, points of different sizes are applied at the bottom of the nail plate, repeating the shape of the hole.
- The tip of the instrument must be wiped with a napkin to remove any remaining varnish.
- The same procedure must be repeated with varnishes of other colors up to the tip of the nail.
- After complete drying, the pattern is covered with a fixer.
Using a sponge
There are two techniques for painting with a sponge. They differ from each other in the degree of complexity and the final result.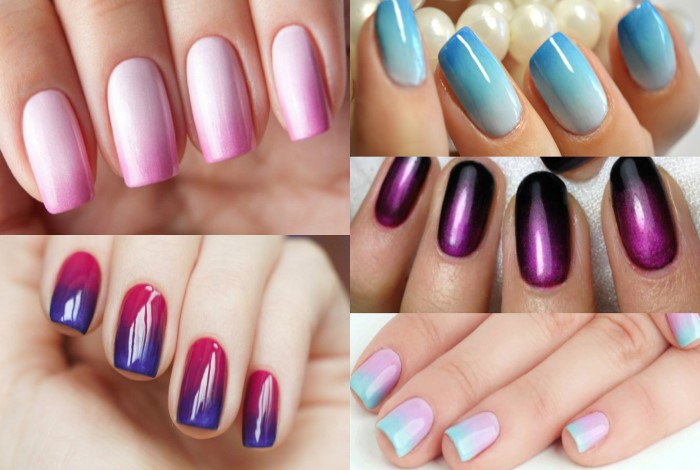
For such a manicure you will need:
- Basic coverage. Better with strengthening function.
- Varnishes of different colors, but similar shades.
- A piece of foam rubber.
- Foil.
- A cotton swab to remove irregularities.
- Nail polish remover.
- Toothpick.
- Finish coating.
The first method is perfect for those who decided to do such a manicure for the first time. It is easy to execute.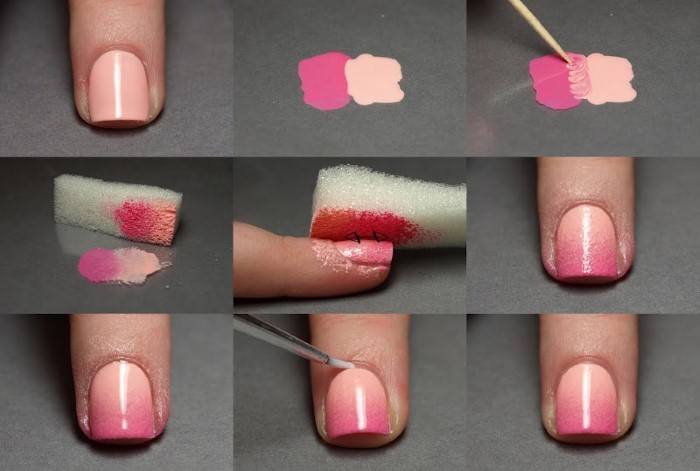
Execution technique:
- Any manicure begins with applying a base under the varnish.
- Then varnish is applied in the color that will be the main one. This should be the lightest shade. Wait until it dries completely.
- On the foil you need to drip varnish of a different color (darker or any opposite, in which case the manicure will turn out to be brighter and more extravagant).
- Dip a sponge in varnish and apply to the base of the nail. Press down, but not very hard. Remove the sponge.
- If several shades are planned, then the next color is applied with an overlap slightly higher than the previous one.
- A third or fourth color is optionally applied to the tip of the nail.
- It is necessary to remove excess varnish (on the cuticle and on the sides) with a cotton swab dipped in a special solution (nail polish remover, acetone).
- Fix the drawing with colorless varnish.
At first glance, the second option seems easier than the previous one, but, in fact, requires more concentration of attention:
- The nail is covered with a base for the manicure.
- 3-4 colors are applied to a piece of foil.
- With the help of a brush or cotton swab, all the colors are transferred to another piece end-to-end. If there is free space between them, you can simply connect the layers with a toothpick.
- The sponge is dipped into the palette and pressed against the nail along its entire length.
- The remains of the varnish are removed with a cotton swab dipped in liquid.
- After drying, a top coat is applied.
Advice! It is better to choose a sponge with a small thickness and dense texture. A regular eye shadow applicator is a good option.
The use of tulle
An openwork pattern on the nails will be a wonderful option for beginners. A very beautiful, delicate, romantic and elegant manicure is obtained if you use a piece of ordinary tulle or lace.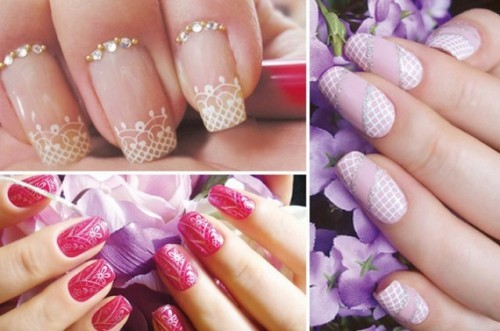
In addition to standard things (base and topcoat) for such a pattern you will need:
- Varnishes in two colors.
- A piece of tulle or lace with a fine finished pattern.
It is better to cut several strips with the same or similar patterns. So the rest of the varnish after the first application will not spoil the pattern on the next nail.
Technics:
- After the base has been applied and dried, the base varnish is applied.
- It is necessary to wait until it dries completely and only then proceed to drawing the pattern.

- To make the pattern come out neat, it is better to take a thin and long piece of fabric so that it is convenient to hold it with your side fingers. If there is an opportunity to attract a second person, then it will be easier.
- A piece of lace is pressed against the nail plate and varnish is applied over it. It is quickly removed so that the varnish does not have time to set, otherwise the drawing will be smeared.
- After drying, a fixer is applied.
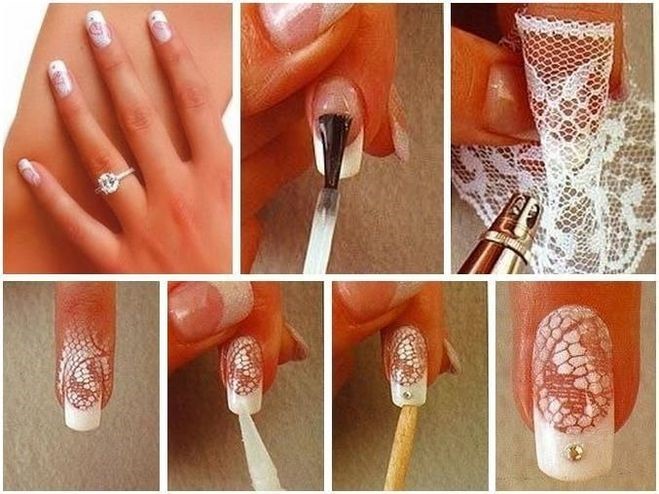
Advice! You don't have to cover all your nails with the same pattern. It can be larger on one nail, smaller on the second. Some nails may not be decorated with a pattern, but simply remain in solid color.
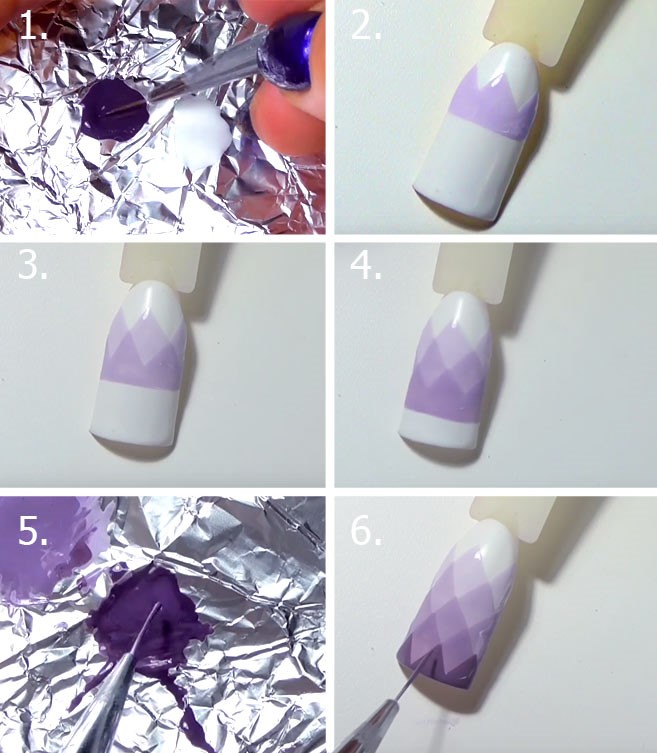
Gradient nail decoration
Gradient manicure is a gradual transition from a dark color to a lighter one. This technique is often called amber.
The easiest gradient option is to cover each nail in a different color. This requires 5 varnishes of different colors (for example, from white to blue). If this is not possible, then you can use only two colors of varnish: basic (for example, red) and white, and by mixing independently achieve the desired result.
For drawing on nails for beginners Hearts You will need 2 colors of varnish, base, toothpick and fixer.
Procedure:
- The first nail on the thumb is covered with the base color.
- On a piece of foil, you need to drip varnish of the main color and add a drop of white.
- The resulting shade covers the second nail.
- A little more white is added to the remaining mass and the third nail plate is covered and so on until the last.
You can do a gradient manicure with a sponge.
Advice! When performing amber, shades can be applied not only horizontally, but also vertically.
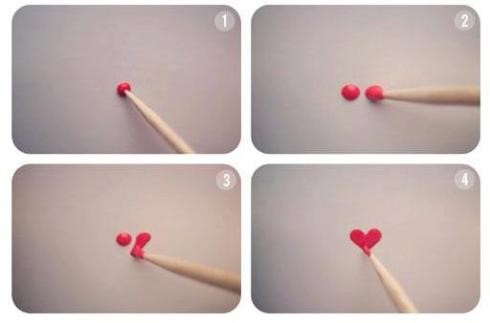
Drawing with a toothpick on the nails: "Hearts"
For beginners, it's best to use the simplest nail art techniques. To perform them, you need good lighting and accuracy of movements.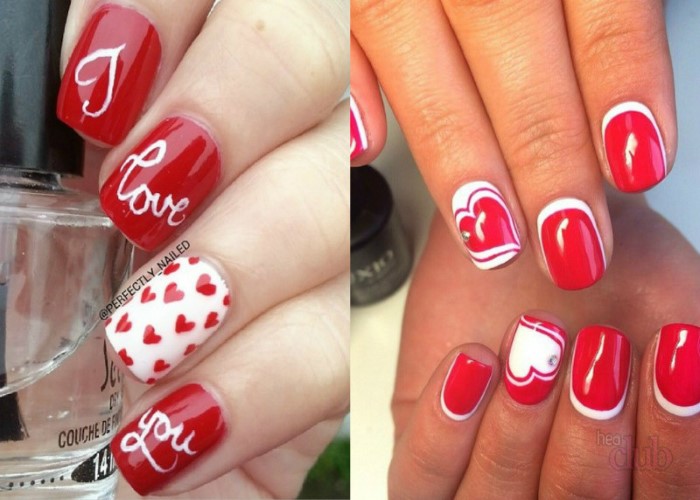
You will need 2 colors of varnish, a base, a toothpick and a fixer.
The technology is very simple, you can handle it the first time:
- A base for a manicure is applied.
- The nail is covered with varnish of the main color.
- Separately, a varnish is applied to a foil or a small piece of paper, with which the heart will be drawn.
- 2 points are applied to the nail plate parallel to each other.

- From each of the points, stripes are drawn down with a toothpick at an angle so that they can be connected at the end.
- The result is a neat heart.
- Cover with fixer on top.
Brush painting: Watermelon design
Brushes can be purchased separately in specialized stores, or you can buy ready-made sets: varnishes with a special refined brush just for drawing.
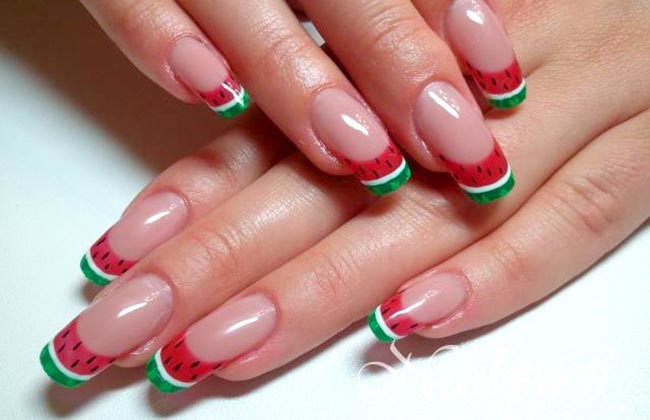
There are two ways to make the "Watermelon" pattern.
First option:
- The nail plate is covered with pink or red varnish.
- A green strip is drawn with a brush near the hole.
- A thin white stripe is drawn over the green one.
- Dots are drawn across the entire nail plate, imitating watermelon seeds.
- From above, the drawing is covered with a colorless varnish or fixer.
The second option is similar in technique to the first. Only green and white stripes are drawn not near the hole, but at the tip of the nail plate.
Nail art using scotch tape: "Geometry"
Before starting this type of manicure, you need to think carefully about the details and carry out preparatory work.
In addition to the standard set (base and topcoat, varnishes of different colors) you will need:
- masking tape.
- nail scissors (to cut the shapes you want).
- tweezers.
- thin brush for drawing.
It's easier to start with the simplest geometric shapes and patterns (stripes, triangles, squares).
Execution technique:
- After the base is applied, the nail plate is covered with one light color.
- The figures of the required shape are cut from the scotch tape with scissors and carefully glued to the nail with tweezers. Nestle tightly. In order to make it easier to remove the tape later, it should protrude beyond the nail plate.
- From above, the nail is again covered with a darker varnish.
- If desired, the entire procedure can be repeated, but with a different ornament and varnish of a different color.
- After the varnish has dried, the tape must be removed.
- Cover with fixer.
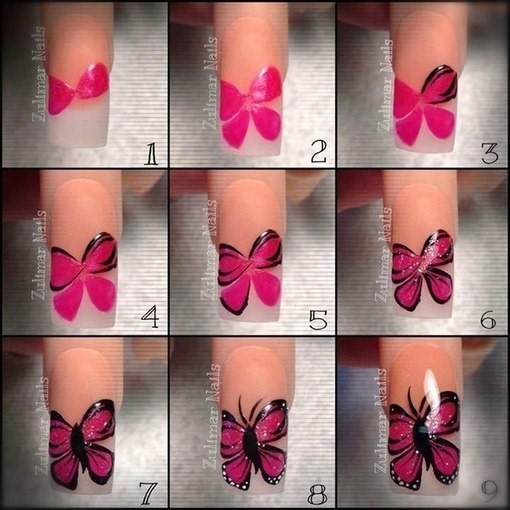
 Butterflies on nails with a needle
It is difficult to draw a butterfly on the nails, therefore, before applying the pattern to the nail plate, you need to practice on a piece of paper.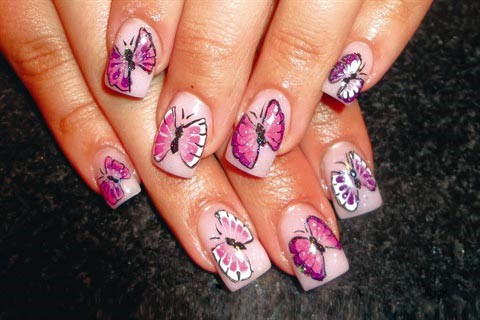
It is better to start with the simplest monochrome butterfly:
- The nail is covered with varnish of the main color (red). Let it dry well.
- On the nail coating, it is necessary to apply five dots with white varnish (one largest in the center, two less greasy, one on top and two fatter below). They should resemble the five symbol on the dice.
- Using a thin brush, paint the wings, torso and antennae of the butterfly.
 Lunar manicure with gel polish or acrylic paints
Lunar manicure is one of the types in which the root hole of the nail plate is painted in a different color or remains unpainted. The technique is very simple and does not take much time.
EIf gel polish is used, a special drying lamp is required. Dry your nails with a lamp after applying each color.
Acrylic paints are very easy to use, safe and have a wide range of creativity.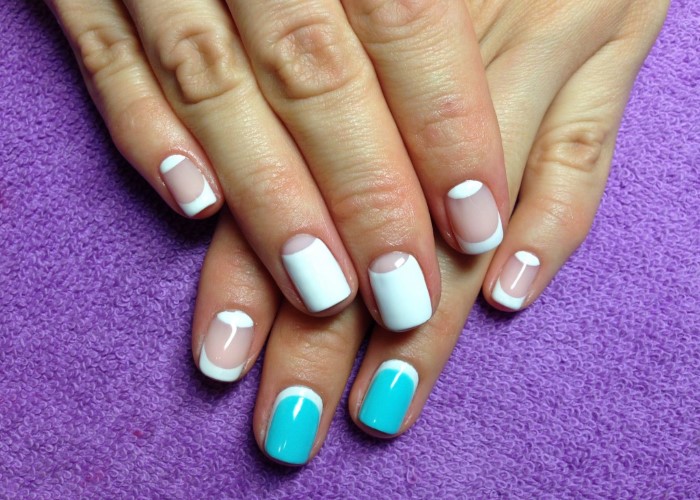
Technique for performing moon manicure:
- After the base under the nail has dried, a varnish of the main shade is applied to the entire nail plate.
- Let the varnish dry well.
- To paint the hole, you can draw a line with a brush and paint over it with the desired color.
Another option is to stick on special strips that will protect the hole., and again cover the entire nail with varnish of a different shade. When the strip is removed, you get a hole in the color of the varnish that was applied first. You can use additional decor in the form of stones or rhinestones on all nails or selectively.
Feng Shui manicure
For those who are fond of the teaching of Fei Shui, it will be interesting and useful to know what laws and rules must be followed in manicure. Feng Shui experts advise to start doing a manicure in a calm, peaceful state..
In the background, quiet, relaxing music or sounds of nature should play (for example, the sound of the sea, like the element of water), a candle should be lit (help from the element of fire), the window should be open (element of air).
First, you need to decide which area of life you need to activate, the color scale will depend on this, and even the fingers, which will need to be given special attention.
It is easier to start nail art with the simplest geometric shapes and patterns (stripes, triangles, squares).
Those who dream of attracting love into their lives should focus on the average (new discoveries, flirting, falling in love) and the ring finger (meeting, acquaintance, new connections) on the right hand.
Himself manicure is best done in pink (activates femininity, youth, tenderness) tones, and on the indicated fingers make soft, flowing drawings in red (happiness) and gold (spiritual and physical strength) tones.
Nail Art Designs for Beginners with Stickers
The fastest and most convenient option is patterns using stickers. There are multi-colored, solid, transparent, and even special sets with stickers individually for each finger.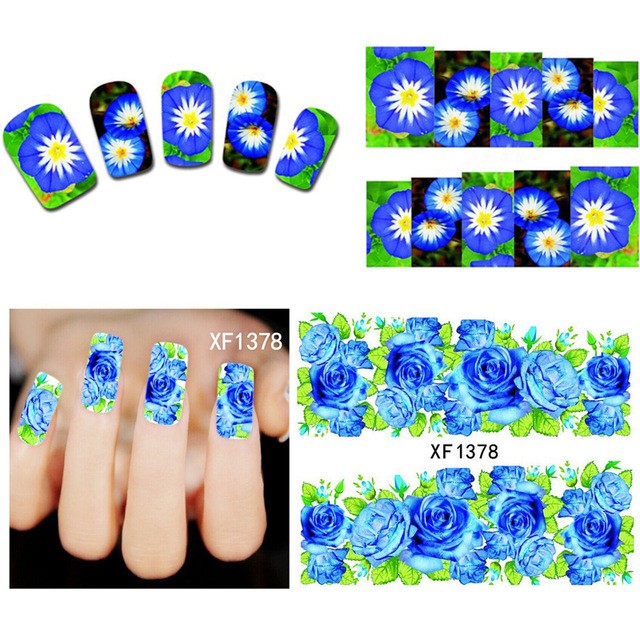
There are several types of stickers:
- Film. A thin sheet on which the drawing is applied. The desired size is cut. It is glued to the nail and covered with a colorless varnish on top.
- Thermal film... The appearance does not differ from the usual film, but due to its properties it differs in application. Cut the thermal film slightly smaller than the required size. Before applying to the nail, it is necessary to warm up well with a hairdryer. Then press firmly and align. Cover with top varnish.
- Sliders... A great option for beginners. It has a good glue base, which is activated with water. Adheres securely to nails. Sliders do not stick right away, so there is an opportunity to redo if the result is not satisfactory.
- Translators. Thin film on paper base. Can be applied to both varnish and clean nail. To peel off from the base, you need to hold it in water for a few seconds. Then attach the pattern down to the nail, press and separate the paper. The pattern will remain on the nail.
For beginners, it is better to choose simple patterns on the nails.... It can be very difficult to repeat difficult precise patterns without many years of experience.
As soon as the slightest damage to the manicure is found - chips, cracks, varnish with a pattern must be removed. You don't need to attach anything, it looks sloppy and not aesthetically pleasing!
Nail Art for Beginners:
Manicure lesson: how to make a simple drawing on the nails:
Interesting ideas. Honestly, I can't paint on nails. I haven't tried it though. But I found a few simple techniques here, I will try)