Gel manicure design is a way of self-expression and decoration of women's hands. To save money on regular visits to the masters, you can learn how to beautifully design your nails yourself. Beginners need to know what material to choose, how to create beautiful drawings and what is the difference between a gel and a simple varnish.
What is the difference between a gel and a regular varnish?
Nail gels vary in purpose. Among them there are means for lengthening the nail plate, as well as strengthening biogels that help prevent delamination. The purpose of the gel polish is similar to ordinary nail polish - it is used to decorate nails.
The main differences between gel and simple varnish can be seen in the table:
| Distinctive features | Gel polish | Plain varnish |
| Application | Preliminary preparation of the nail plate is required (cutting, degreasing, applying a base). | Before starting, you just need to degrease your nails. |
| Drying | It dries only under a special lamp for 2-3 minutes. | Dries in the air in 5-10 minutes. |
| Wear period | Manicure stays beautiful for about 3 weeks. | Nails look messy after 2-4 days. |
| Withdrawal | Dissolves with a special liquid in 15 minutes. | Easy to wipe off with a cotton pad soaked in nail polish remover. |
Another distinguishing feature of gel and regular varnish is cost. Gel polish is more expensive. And since the application procedure requires certain skills, then they also pay separately for the services of the master.
Composition of gel polish
Gel polish contains molecules that react and turn into a polymer, that is, they harden. They are called monomers and oligomers. The composition contains special photoinitiators. These are particles that actively absorb UV radiation and help the gel polish to become hard.
Also, the gel contains the following substances:
- solvents;
- coloring pigments;
- fragrances;
- formaldehyde;
- methylisothiazolinone;
- dibutyl phthalate;
- toluene.
The last 4 substances on the list are considered toxic in large quantities and can cause allergies. In gel polish, their concentration is so low that it does not pose a health hazard.
Which gel polish is better to choose?
For newbies creating nail designs, it is important to choose the right gel polish. Pay attention to the hypoallergenicity of the product and its persistence. These parameters are indicated on the packaging. There are several popular manufacturers that have earned the trust of experienced nail artists.
Scroll:
- Shellac CND.
- Entity.
- Ibd.
- Kodi Professional.
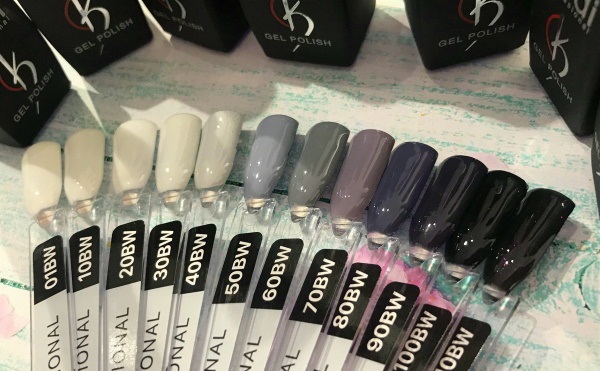
These gel varnishes are well applied, have high durability and are easy to remove. The color palette of each brand allows you to create any design. For a high-quality manicure, it is important to choose the right gel and choose good base and top coatings. It is recommended to buy products of the same brand as the gel polish.
How to choose a UV lamp for curing gel polish at home
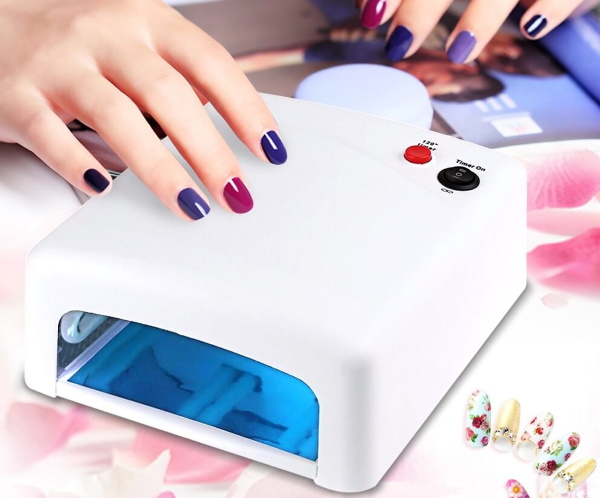
Lamps for drying gel polish vary in wattage, as well as in the type of light emitters installed inside. Ultraviolet lamps dry not only gel polish, but also other building products. For home use, 36 W models are suitable. Such devices have 2 drawbacks. Bulbs quickly burn out and need to be replaced with identical ones.
Other lamps will not work. UV radiation has a negative effect on the skin of the hands. After drying, you must use moisturizing oils and special creams. There are LED lamps that do not negatively affect the skin and dry the gel coating faster than ultraviolet. Bulbs in such devices serve for a very long time, and energy consumption is halved.
For home use, 6 W appliances are suitable. The disadvantage of such dryers is the high price.
There are hybrid bulbs that have both types of bulbs. They reduce the drying time of the coating from 2-3 minutes to 30 seconds. Their power is enough for drying any design, as well as for building gel.
For home use, it is recommended to purchase small-sized devices with low power. They are inexpensive and dry properly. Large and powerful lamps are needed for salons with a large flow of customers. In a large appliance, you can dry both hands at the same time, thus saving time.
How to draw?
Nail design for beginners will not cause any particular difficulties. The main thing is to find the right tools and learn how to use them. To create beautiful designs on the nails, the masters use special devices, which are discussed later in the article.
Brushes
To create unique designs, you will need to purchase a set of manicure brushes. Each of them is designed to create specific patterns. You can make a jacket thin and apply stripes. Fluffy brushes are used to create various effects such as ombre or graffiti.
Dots
It is a metal tipped instrument with a small ball. It is used to apply flat, round dots or peas. The shape of the tip allows you to collect a small amount of polish and gently distribute it over the nail.
Needles
Fine needles are used to create neat lines. Usually, drawings are made from 1 or several small drops of varnish, smearing them in the desired direction. This produces a very unusual effect.
Pieces of tulle
The tulle can be used as a stamp. A small piece is impregnated with gel and gently applied to the nail.
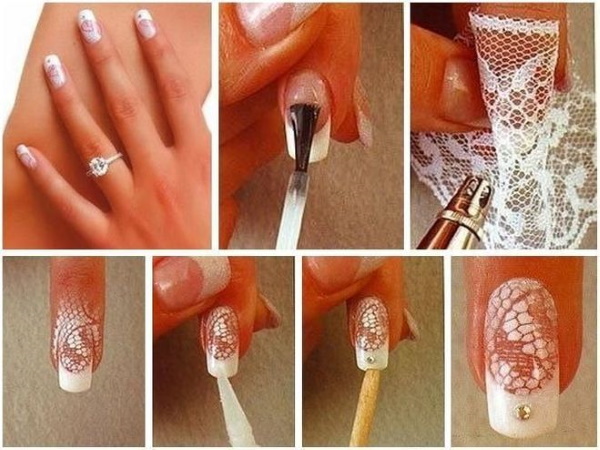
Press the tulle to the plate for 2-3 seconds and carefully remove. The result is a beautiful "lace" design.
Foil
Unusual patterns are created from foil by gluing small pieces onto a plate immediately after drying. Then the design is fixed by applying a base coat. You can use regular foil or special shiny nail film. There are foil threads and narrow ribbons, which are similarly used in manicure.
Sponge
With the help of a small piece of foam sponge, you can achieve a smooth transition from one varnish color to another. These effects are called gradient or ombre.
Sliders
These are stickers, the pattern from which can be transferred to the nail plate by moistening the picture with water. Sliders can cover the entire nail completely or a small part. You can cut different pictures and combine them with each other. After drawing the pattern, it must be fixed with a base.
Powders
Special powders are used both to cover the entire nail and to create beautiful volumetric patterns. Powders can be shiny, rub in, or give the coating a velvety surface.
Training cards, stencils
Practice cards are printed stencils on which you can practice accurately drawing patterns. The training system resembles a school recipe. There is a pattern on the card that needs to be repeated.First, the picture is outlined along the outlined lines, and then they try to draw it on their own. Nail design for beginners with drawings can be difficult to perform.
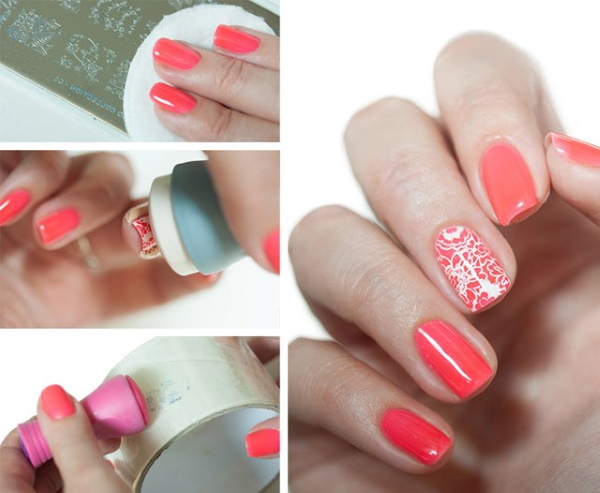
If you can't draw patterns by hand yet, you can use special stencils. This method of drawing a picture is called stamping. The pattern is engraved on the metal plate.
The varnish is applied to the plate and spread evenly with a plastic spatula. A special rubber sponge is pressed against the plate and then against the nail. The drawing is transferred to the nails as a stamp. It remains to dry it and secure with a final coat.
Gel manicure step by step for beginners
Regardless of the design, gel manicure must be performed strictly following the sequence of actions. Before applying the gel, it is important to prepare each nail, apply a base coat. Then correctly distribute the colored varnish and fix it well with a top. Below is a step-by-step description of each of these steps.
Base coat application
Before applying the base, you need to process the nail:
- The plate is given the correct shape and the cuticle is gently pushed back or cut.
- A thin layer is removed from the nail using a coarse-grained buff. It is necessary to give the plate a matte surface. You cannot press the buff strongly, otherwise you can injure the nail.
- The dust is swept away with a brush and the plate is degreased with a special tool.
- If your nails are thin and bend easily, then you need to apply a primer.
- The base coat is applied in a thin layer from the edge of the nail to its root, and then from the cuticle towards the edge.
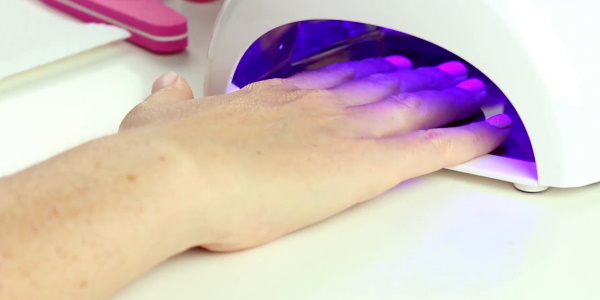
- The coating must be dried in a lamp.
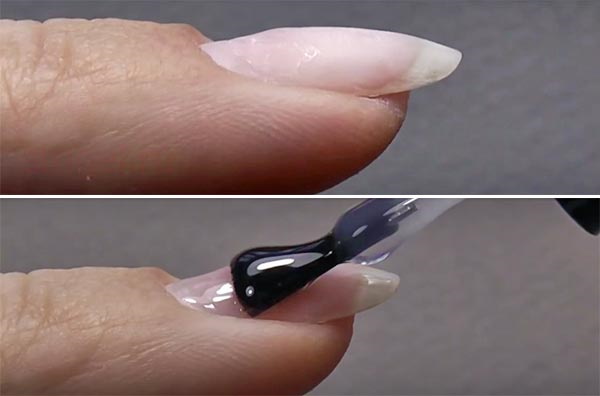
In UV lamps the drying time takes 1 min, and in LED lamps 10-15 sec.
Applying gel polish
Colored varnish is applied in 1 layer to obtain a translucent color.
For a rich color, you need to apply 2-3 layers:
- Application starts from the middle of the nail at the bottom, smoothly moving up.
- When painting on the sides of the plate, it is important to ensure that the gel covers the surface completely, without gaps.
- Each layer of gel polish must be dried in turn for a minute. In the LED device - 30 sec.
Special attention should be paid to the last point. If you do not dry the layers, but apply more varnish, then the coating will swell or crack.
Top application
A topcoat is necessary to secure the result:
- The top is also applied as a colored varnish. The layer should be slightly thicker.
- The ends of the nails must be completely sealed.
- The coating is dried for 2-3 minutes. In an LED lamp 30 sec.
Top coat gives nails strength and shine. To achieve a matte effect, you can purchase a special finish or use a colorless powder.
Simple and beautiful gel polish nail design for beginners
Nail design for beginners should be easy to complete. You can learn how to create simple patterns that are the basis for creating more complex patterns. Below are descriptions of the most popular nail design options.
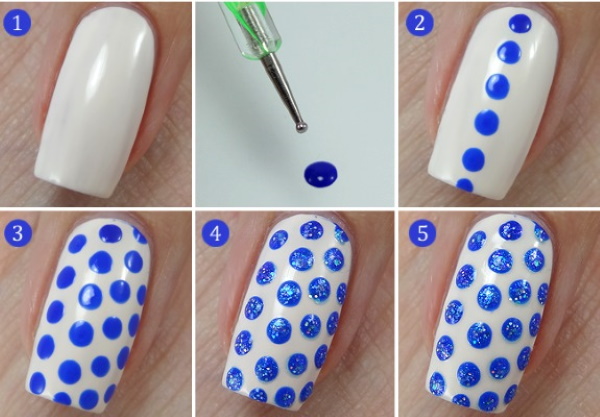
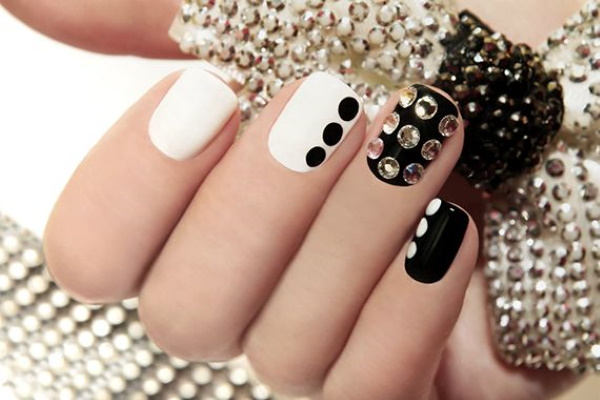
Dot patterns
The dots can cover the entire surface of the nail or gather in a specific pattern.
Patterns are applied with dots on a dried base or already on a colored layer:
- A suitable shade of varnish for dots is selected for the main color of the nail.
- The tool is allowed into the open bottle, having previously processed it with a degreaser.
- To get a big point. You need to drown the entire tip in the gel. To create a small point, just touch the polish with a ball at the end.
- Dots are pressed to the nail for 1-2 seconds, the varnish flows down, forming a perfectly round spot.
- The pattern is dried in a lamp for 1-2 minutes.
To put straight points. Need to practice on plastic tips or training cards.
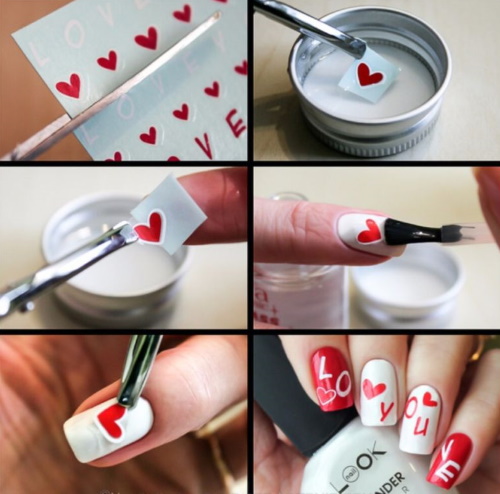
Hearts with a toothpick
You can draw mini-hearts on your nails without using brushes:
- On the dried base with the help of dots, place 2 drops of gel, placing them on the same level, close to each other.
- With a toothpick, you need to carefully connect the drops in the middle, leaving two round tops.
- You need to stretch a little to the bottom of the drop to get the end of the heart.
The drawing must be dried in a lamp and secured with a top.
Drawings through stencils
The use of stamping is considered one of the simplest design options:
- A pattern is selected on a plate with drawings and filled with gel polish.
- Using a plastic spatula, remove the excess from the plate.
- The silicone stamp is pressed tightly against the pattern, and then the pattern is transferred to the nail.
- Dry the layer in the lamp.
It is important to work with the stamp carefully, not allowing it to slip off either the plate or the nail. Otherwise, the drawing will be smeared.
Abstraction
The most popular type of abstraction on nails is brush strokes:
- On the dried base, apply small strokes in different directions using a flat brush.
- If you are planning a drawing of several colors. Then the smears of each color are dried separately.
Abstraction can be done with foil, stamping and self-adhesive strips.
Stickers
To transfer the drawing to the nail, you need:
- Apply base and base color.
- Separate the adhesive film from the sticker.
- Place the slider in the desired part of the nail and press gently.
- Put some water on the sticker and press down gently.
- Remove the slider after 1 min.
- Secure the design with a top coat and dry.
There are non-translatable sliders. They are simply placed on a plate and secured with a top.
Nail art geometry using scotch tape
Geometric patterns are easy to create using tape:
- The tape is cut into strips or other shapes.
- Pieces of scotch tape are glued onto the dried 1 layer and the nail is varnished.
- Use tweezers to remove the tape and dry the coating in a lamp.
If the varnish applied over the adhesive tape is liquid, it is recommended to dry the nail for 15 seconds and remove the tape.
Broken glass
This effect is obtained using foil:
- The material is cut into small pieces.
- Lay "glass" on the dried base.
- Cover the plate with a top coat.
Already cut pieces are sold to create this effect.
Painted watermelon brush
This summer manicure is very simple:
- Red is chosen as the main color. The layer is dried.
- A jacket is painted in green and dried again.
- The border between red and green is underlined with a thin white line.
- Dots that simulate seeds are added with black gel.
- Dry the layer and fix the pattern with a top coat.
You can use only green in 2 shades and draw stripes like on the peel of a watermelon.
Gradient
The gradient can be done with a foam sponge:
- Light gel polish is applied and dried as a base.
- Apply 2 gel colors to the sponge.
- The colors are transferred to the nails with dabbing movements.
- The colored layer is dried and then the base is applied.
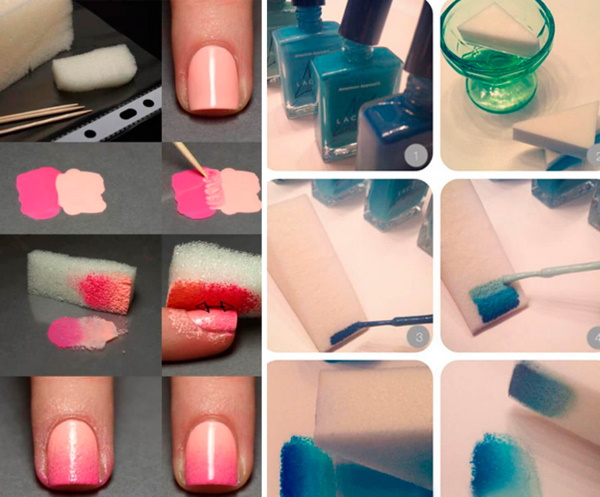
It is important to choose matching colors.
Moon manicure
The effect is very simple. On the main color, using a brush, draw an even hole near the cuticle itself. You can use different colors, the main thing is that they match.
Monogram
This is the name of ornate patterns. They are applied with thin brushes. Before creating such a design, you need to practice on stencils.
French
French manicure is called French. It will be difficult for beginners to draw it exactly, so it's worth purchasing special templates. French can be not only white, but also colored, shiny or black.
Flowers
To draw a simple flower, you need dots and 2 colors of gel polish:
- With dots, a central drop is applied to a dry base. This will be the middle of the flower.
- Having cleaned the tool, it is dipped in a different color and several drops are placed around the first at the same distance.
The flower petals can be left round or stretched out to the sides with a needle.
Decoration
You can decorate a gel manicure in different ways. It all depends on the skills and imagination of the master. The simplest ways to make your nails look beautiful are described below.
Rhinestones
Rhinestones are placed with tweezers on a wet base coat. You need to gently press the decoration to the nail for 1-2 seconds.
And then dry in a lamp. It is important to use only special rhinestones for nails so that they do not deform when drying.
Acrylic powder or sand
Using powder and sand, you can give the surface a rough look, or vice versa, add shine. Depending on the desired effect, the base is applied on top or underneath the jewelry.
Sequined
Sequins are small and large. The smallest glitter looks like a powder. It is called rubbing. They are applied with a brush to a dried base. It turns out an interesting mirror surface, which is additionally fixed with a top. Large gloss is placed on the nail with tweezers.
Openwork
There are 3 ways to achieve an "openwork" effect. You can use tulle, stamping or sliders. Everything except the sliders must first be dried and then covered with a final layer.
Removing gel polish
Gel polish takes longer to remove than usual.
This procedure will require a special liquid, foil with sponges and 15 minutes:
- The sponges are soaked in nail polish remover and applied to the nails.
- The fingers are wrapped in foil so that the liquid does not evaporate.
- After 15 minutes, the foil is removed from 1 finger and the varnish is scraped off with a wooden spatula.

It is important to remove the foil just before removing the varnish. If you remove it from all fingers at once, then while cleaning one, the rest of the varnish can harden.
Nail design is easy to learn. Beginners need to practice more and constantly improve their skills. Gradually, creating a beautiful manicure can grow from a hobby into a profitable business. The main thing is to follow all the rules for applying gel polish and choose high-quality material for work.
Article design:Lozinsky Oleg
Gel polish design video for beginners
The easiest nail designs for beginners: