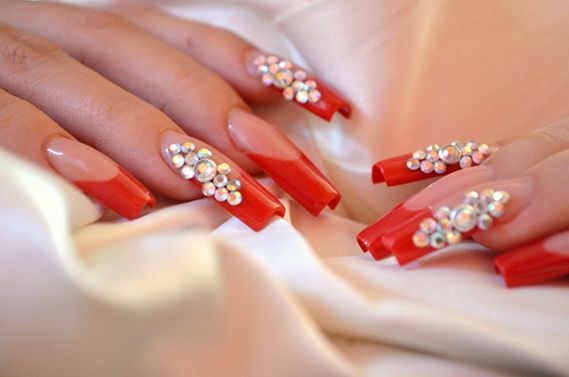
Inlaid with rhinestones perfectly complements any look: from everyday, office to solemn or wedding. As you can see from the photos, the different designs are suitable for women of all ages. The main thing is to adhere to several rules for wearing sparkling stones on your nails.
What rhinestones to choose for manicure
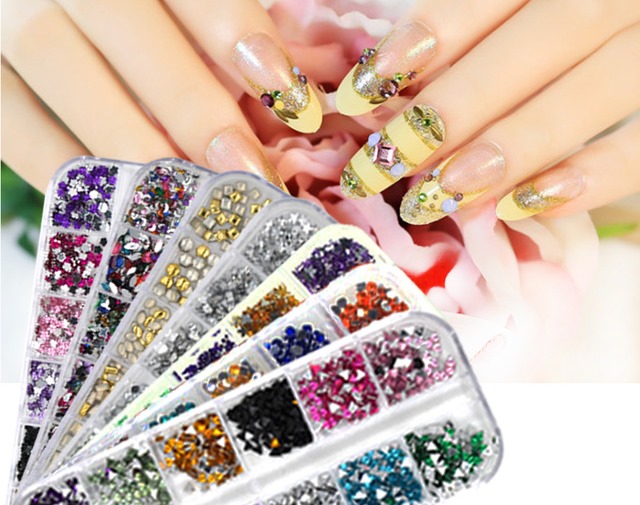
Stones for decorating manicure differ in shape, size, color, shine, material of manufacture and method of application.
According to the materials of manufacture, rhinestones are divided into 5 groups:
- Crystal.
- Glass.
- Plastic.
- Ceramic.
- Acrylic.
Plastic rhinestones have a dull and muted sheen and are not as durable. Nail artists prefer to use crystal or glass rhinestones. The most expensive and demanded are Swarowski. Their cut and brilliance gives them the appearance of real diamonds.
Crystal rhinestones are also produced under the Preciosa and Asfour brands. The material of these brands does not differ in the same rich color palette, but is in no way inferior in quality.
Rhinestones with a flat bottom are used for manicure. The stones can have a glue base or be glued to a special glue or varnish. Also, the jewelry can be placed on a special mirror base or in a metal frame.
Rhinestones come in a traditional round shape, imitating natural stones, in the shape of drops, oval, boat, rectangle, square, and even curly in the shape of a heart or flower.
Rhinestones are:
- Classic - round shape and clear crystal edges imitate precious stones.
- The hemispheres are polished, smooth, they can imitate pearls or a cat's eye.
- Сristal Pixie (crystals Pixie) - crystal chips. Their size does not exceed 1-1.5 mm.
- Conical - they are used only on extended nails, since they have not a flat, but a conical bottom.
- Siju Pearls - Imitate rough sea stones. They can be transparent or multi-colored.
- Charms are ready-made rhinestone compositions. They can combine rhinestones of various shapes, sizes and colors.
- Broths - small round grains of sand of different colors allow you to create a so-called "caviar manicure". The size of one such small bead can be 1-4 mm.
According to their brilliance, rhinestones are also divided into several groups:
- Traditional shine. It is obtained by reflecting light from the mirror bottom of the crystal and refracting it by the edges. They can be colorless (Crystal) or colored (Color).
- Aurora Borealis effect (northern lights) or "holographic", "gasoline", "chameleon". A special coating, which is applied to the surface of the rhinestone, changes its color depending on the angle at which it is viewed. They are marked with AB. The colorless stases will be called Cristal AB, and the colored ones will be Color AB. If the color of the crystal has its own individual name, then they write it first, adding it at the end of AB (Blue Opal AB).
- Pearl and pearl.
Experts advise women aged to avoid colored rhinestones and give their preference to miniature colorless stones, as they will look inappropriate and may even add several years to their owner. Colorless rhinestones Cristal are suitable for any base, Color can be used if they are of the same tone with the base varnish or in contrast to it.
In size, rhinestones can be from 0.8 mm to 8.4 mm, they correspond to the marking: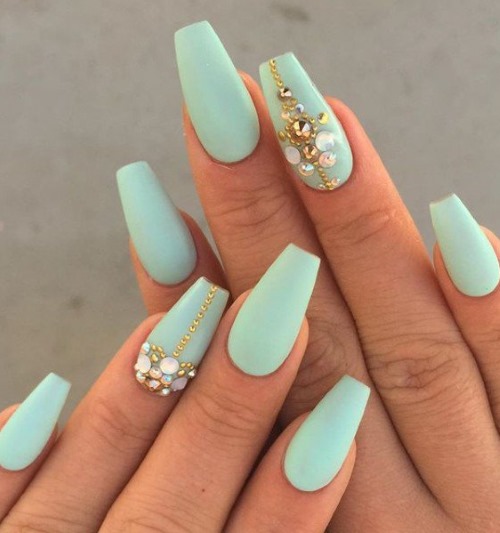
- ss3 - 1.3 mm;
- ss4 - 1.5 mm;
- ss5 - 1.7 mm;
- ss6 - 1.9 mm;
- ss8 - 2.4 mm;
- ss10 - 2.7 mm;
- ss12 - 3.0 mm;
- ss16 - 3.8 mm;
- ss20 - 4.6 mm;
- ss30 - 6.4 mm;
- ss34 - 7.2 mm;
- ss40 - 8.4 mm.
Manicurists often use ss3, ss5, ss8 and sometimes ss12 to create compositions. Experts do not recommend using all sizes of rhinestones in one drawing. The crystal size markings may differ depending on the manufacturer, so you should pay attention to the value in mm.
In what order to glue the rhinestones so that they do not fall off
Rhinestones on the entire nail (a photo of the design can be seen below), are glued only after all layers of varnish have completely dried. If the coating is not completely dry, then the rhinestone will not be able to fix tightly, the whole pattern will move, and the varnish will swell.
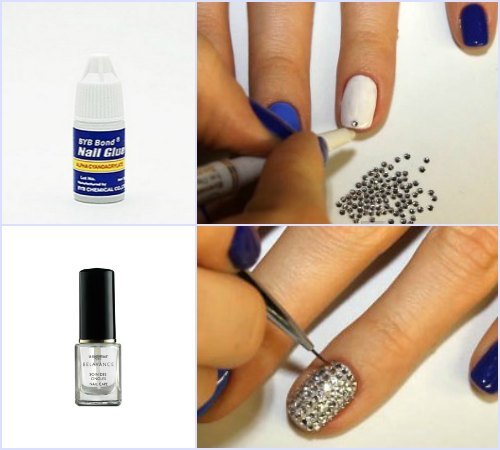
Inlaid nails do not require any special tools and you can get by with a minimal set of tools:
- rhinestones;
- thin brush (wooden stick, toothpick);
- cosmetic manicure glue;
- fixer varnish.
Instead of glue, you can also use transparent varnish, but then the stones will not hold tightly and will quickly fall off. You will also have to apply a final layer of fixer varnish to the entire composition. It will allow the jewelry to hold tight, but it will subdue the shine of the crystals.
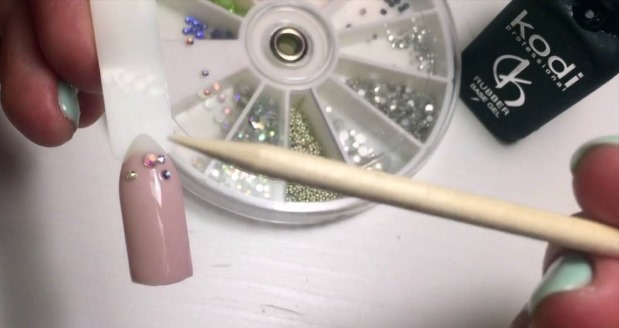
Rhinestones are applied to the nails in the following order:
- Applying all layers of varnish, drawings, patterns and lines.
- Dry the nail cover completely.
- Using a thin brush or stick, apply small drops of glue to the areas where the rhinestones will be.
- Using a stick slightly dipped in glue, spread the rhinestones to the prepared places.
- Wait until the glue is completely dry.
- Apply the hardener varnish with a thin brush, outlining the stones.
- Dry the varnish completely.
If you leave gaps between the surface of the nail and the stones, then they will fall off very quickly when worn, as they will constantly cling to hair and clothes. With a neatly executed manicure with rhinestones, the glue will slightly protrude beyond the edges of the decoration, but not spread over it. After gluing the rhinestones, the drawings are applied only with a thin brush or a toothpick so as not to paint over the stones.
How to make rhinestones for gel polish
Applying rhinestones to gel polish creates a long-lasting sparkling manicure if done correctly. When performing inlay, you need to prepare the base by applying the selected varnish to the entire nail, think over the design in advance by looking at the photo on the Internet or by consulting a professional.
For manicure with gel polish with rhinestones you will need:
- rhinestones of the required colors, shapes and sizes;
- top coating;
- colored varnishes, which will be the basis of manicure;
- basic coverage;
- ultraviolet lamp (UV lamp);
- primer;
- pusher or orange stick;
- thin and medium brushes;
- lint-free napkins.
Before applying rhinestones, you need to prepare the nail plate:
- Carry out basic processing of nails, shape them, remove cuticles and skin around.
- Apply the primer all over the nail.
- Starting with the thumb of the hand, apply the foundation to the entire surface of the nail, without affecting the cuticle and skin around it. Keep under the lamp for 2 minutes.
- Apply colored varnish, drying each layer under a lamp for 2 minutes.
- Apply a drawing, if it is conceived by design, dry under a lamp for 2 minutes.
- Apply a top coat, dry for 2 minutes.
After preparing the nails, you can start decorating with rhinestones.
It also takes place in several stages and requires accuracy and care:
- On the nails, where the inlay is intended, a layer of top or base is applied, but not dried under a lamp.
- Rhinestones are laid out on the not dried coating. It is convenient to take small stones with a brush, a toothpick or an orange stick dipped in water. Large rhinestones can be taken with tweezers. The pebble should be buried in the coating, leaving no gap.
- After applying the sparkling pattern, the fingers are placed under the light of a UV lamp for 2 minutes.
- Apply a top coat all over the nail, encircling rhinestones. A thin brush is required to work in between the stones.
- Dry under a lamp for 2 minutes.
- Remove the sticky dispersion layer with a cotton pad or lint-free cloth.
How to attach rhinestones to the base
If you don't have glue on hand, but you have a good thick base coat, you can use it to plant the rhinestones. Basic Kodi coverage works well for this.
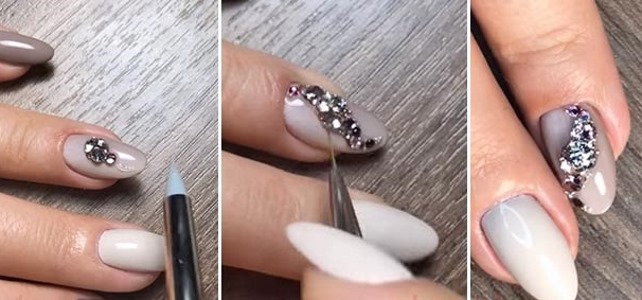
Before decorating your nails, you need to carry out the basic processing of the nail plate and cover it with colored varnish, dry it under a lamp:
- Then the base is applied to the entire surface of the nail or dripped onto the place where the rhinestone will be.
- With a moistened brush or stick, grab and transfer the jewelry to the base.
- When the composition is complete, cover the nail with a top, encircling rhinestones.
- Dry for 2 minutes under a lamp.
- If the stones are large, you may need to reapply the top until there is no gap between the nail and the jewelry. Rhinestones should be dipped in varnish. Each layer is dried under a lamp for 2 minutes.
Colored manicure with rhinestones
A safe option - transparent colorless stones, they perfectly complement any look and are combined with all varnish colors. It is with such rhinestones that it is better to decorate nails for lovers of pastel or restrained colors.
The simplest set of rhinestones is colorless, black, beige and white - they fit perfectly into any manicure. But the rest of the colored stones should either be in contrast to the main color, or be in tune with it.
Bright, juicy and dark colors emphasize the brilliance of rhinestones well. These shades will draw attention to the manicure, and the crystals will show themselves in all their glory. In this case, the base can be not only glossy, but also matte.
Black, red and blue varnish are perfect as a base. To create a delicate look, shiny stones are combined with white, light pink, sky blue, lemon or pastel tones.
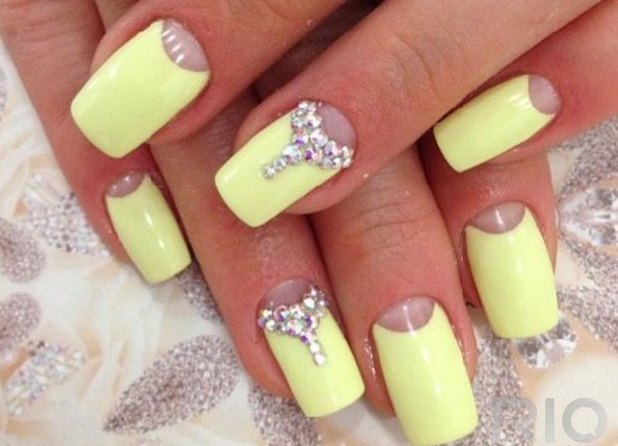
Options for the location of rhinestones on the nail
There are several simple options for decorating nails with rhinestones, all of them have already become design classics, but they are still relevant and can often be seen in photographs of the works of nail art masters:
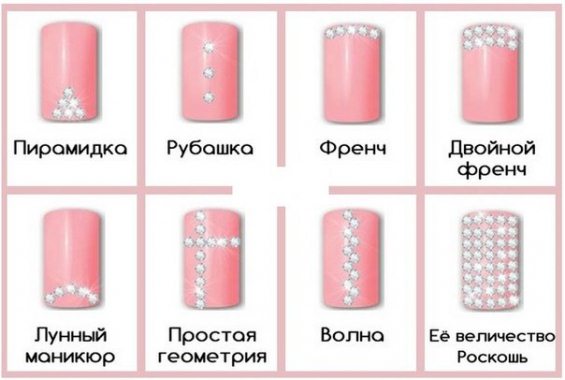
- The pyramid. At the base of the nail, stones are laid out in a pyramid, the angle of which is directed exactly in the center of the plate towards the free edge.
- Shirt. 3 separate stones located along the length of the nail in the middle of the nail plate.
- French. A strip of rhinestones located along the free edge of the nail.
- Double jacket. Two stripes of rhinestones along the free edge of the nail.
- Lunar. A strip of rhinestones is laid out in a semicircle along the line of the hole.
- Geometry. Two arbitrary lines, intersecting with each other, made of rhinestones.
- Wave. It is performed along the length of the nail along its midline. In this case, the rhinestones are arranged in 2 rows, imitating a wave pattern.
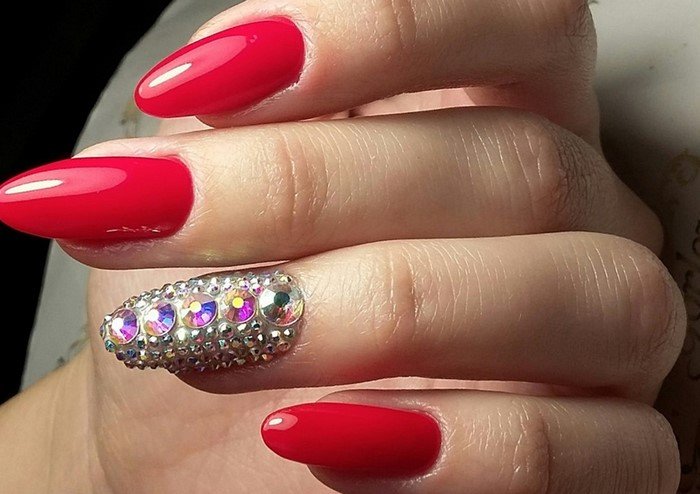
- Luxury. Full coverage of the nail surface with rhinestones.
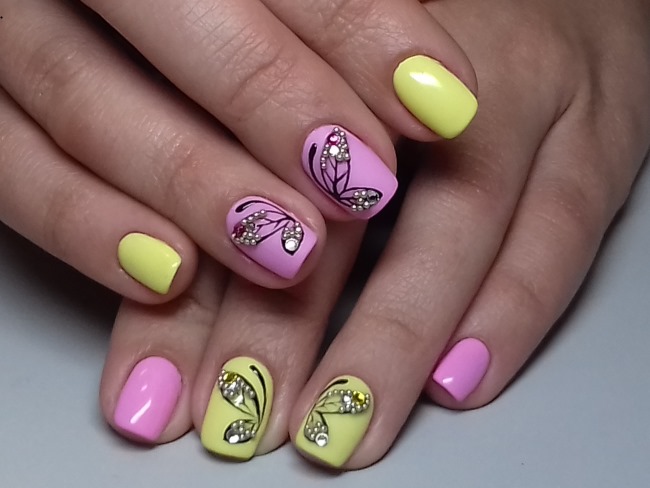
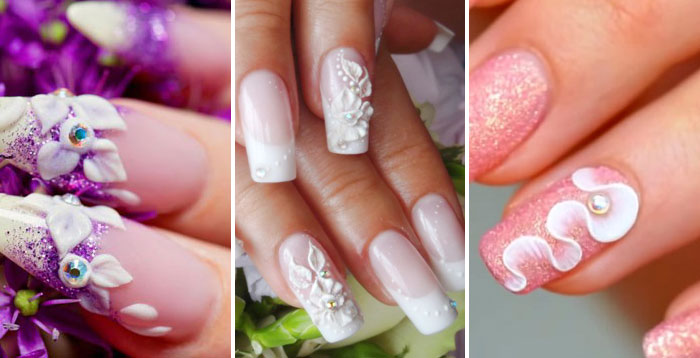
Butterfly
There are many options for applying a butterfly pattern to your nails. You can stretch one drawing for 2 nails or place it on one, lay out the entire butterfly with rhinestones or decorate only its individual parts by applying several small rhinestones on the body and antennae or a couple of large ones on the wings. You can choose the desired design and find inspiration by looking at the photo.
To create a drawing in the style of Diamond Painting, you will need a standard set of gel polishes and tools for them, as well as a set of rhinestones and acrylic paint. As a background, manicure masters are advised to use a varnish of one tone, which will contrast with the color of the picture.
To create a butterfly from rhinestones you will need:
- rhinestones, broths of the required colors, shapes and sizes;
- top coating;
- colored varnish for the main color;
- base varnish;
- acrylic paint in black;
- ultraviolet lamp (UV lamp);
- primer;
- pusher or orange stick;
- thin and medium brushes;
- lint-free napkins.
Before you start inlaying, you need:
- Prepare the nail plate by adjusting the length and shape of the nail, cutting off the skin around it, apply primer and all layers of varnish, dry it.
- Apply a top coat and dry for 2 minutes.
- Remove the sticky layer.
Only after the background is ready, you can start drawing:
- It is necessary to draw with black acrylic paint the contours of the future butterfly, observing the proportions, to determine the shape of the wings, making the upper wing larger than the lower one, to designate the body and antennae.
- Then the wings of the butterfly are carefully painted over with the same paint, starting from the edge to the center, while the area around the body can be left unpainted.
- The finished drawing is sent to dry under a lamp for 2 minutes.
- Apply the base to the entire surface of the nail, do not dry.
- Start to inlay, starting with the larger wing. First, you need to apply the largest rhinestones in the center, and then lay out the smaller ones around them, gradually closing all the wings and not going beyond the picture so that it is neat. Rhinestones can be applied with a stick, toothpick or brush.
- The gaps between the stones are perfectly filled with small bouillons, which are easy to apply with a brush. When all the gaps are filled, the wings are considered complete.
- If you wish, you can decorate the torso and antennae of the butterfly with the same elements as the wings, or you can leave them as they are.
- After applying the last decorations, the nails are placed under the lamp for 2 minutes.
- You can gently circle the stones with a top so that they hold tight, and dry again with a lamp.
- The Diamond Painting style butterfly is ready.
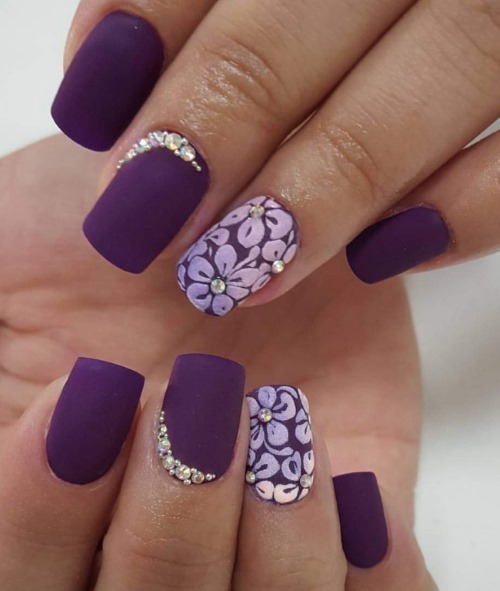
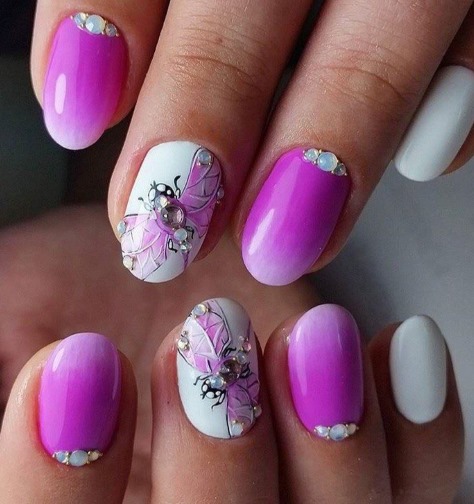
Flowers
To create flowers on rhinestone nails, stones of different sizes, shapes and colors are suitable. Colored rhinestones, contrasting with the main color of the varnish, will look beautiful. For the center, one large bright and round stone is often used, and for the petals you can take rhinestones of any shape - round, drop-shaped, oval, rice and even heart-shaped.
For a simple flower on rhinestone nails you will need:
- a couple of large rhinestones and several small ones, broths;
- top coating;
- colored varnish for the main color;
- base varnish;
- acrylic paint in black;
- ultraviolet lamp (UV lamp);
- primer;
- pusher or orange stick;
- thin and medium brushes;
- lint-free napkins.
First, you need to process the nail plate, apply a primer and cover the nail with all layers of varnish. Then the varnish must be dried under the lamp and the base must be applied. Before spreading rhinestones over the entire nail. The design (photo attached) should be well examined.
A simple flower is laid out as follows:
- A large rhinestone is transferred to the center of the nail with an orange stick.
- Place small rhinestones around the large. They should be in one row and evenly spaced around the center stone.
- If desired, the gaps between the stones can be filled with broths or one broth can be placed between the petals on the outside of the picture.
- When the design is completed, the nail is sent to dry for 2 minutes.
- Apply the top to the entire surface of the nail, carefully tracing the jewelry with a thin brush.
- Dry for 2 minutes with a UV lamp.
Crown
For the design of nails in the form of a crown, it is easier to use ready-made jewelry (charms), which are attached to special glue. But in order to create a unique pattern that is ideal for the shape and size of the nail plate, they collect the image from rhinestones themselves.
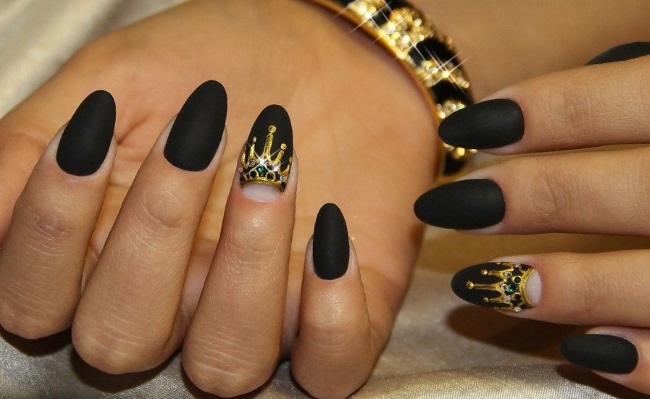
The royal symbol can be supplemented not only with rhinestones, but also with pearls, foil, glitter and small beads.
Making a crown with broths with one large stone
To do this, you will need a standard set of gel polishes and tools, as well as one large crystal and golden or silver broths.
Sequencing:
- The nail plate is processed.
- Apply all layers of varnish, dry them with a lamp.
- Remove the sticky layer.
- Apply the base to the entire surface of the nail.
- With a thin brush, pick up the broths and lay out a horizontal line from them in the lower part of the nail. This line will be the base of the crown. It can be done in 2 rows.
- Carefully lay out the contours of 4 petals of the future crown with broths, starting from the base. To do this, you first need to mentally divide the base into 4 parts, while the 2 central petals should be slightly larger and thicker than the outer ones. Then you need to lay out vertical lines and connect their vertices with each other with arcs.
- When the main body of the drawing is done, the selected stone is added to the top of the crown.
- The whole composition is dried, a top is applied on top and also dried for 2 minutes with a lamp.
The broth crown looks a little modest, but for a more chic and sparkling manicure, the decor can be supplemented with several large rhinestones or pearls at the base of the crown and in its center.
This pattern looks especially gorgeous with gold foil. For larger items, you will need special glue. It is advisable to keep a photo of the design you like in front of your eyes so as not to make mistakes when applying rhinestones.
When adding large stones to the nail, the whole sequence changes slightly:
- Basic preparation of the nail, applying all layers of varnish, drying and removing the sticky layer.
- Gel paint designates the base and petals of the crown, dried with a lamp.
- At the base of the future crown, a horizontal row of several pearls is laid out, starting from the center.
- The crown petals are covered with rhinestones. If you wish, you can add one rhinestone to the top of the crown, it may differ in shape and color from the rest.
- The drawn contours of the crown are covered with broths, and they also fill the space between the rhinestones.
- The finished drawing is dried.
- All nails are covered with a top, carefully outlining the rhinestones, without getting on them with the coating.
- Dry with a UV lamp.
Bow
The bow is another design that will perfectly complement the feminine look. To create it, you can use 2 colors of stones or one, they can be contrasting or in tone to each other.
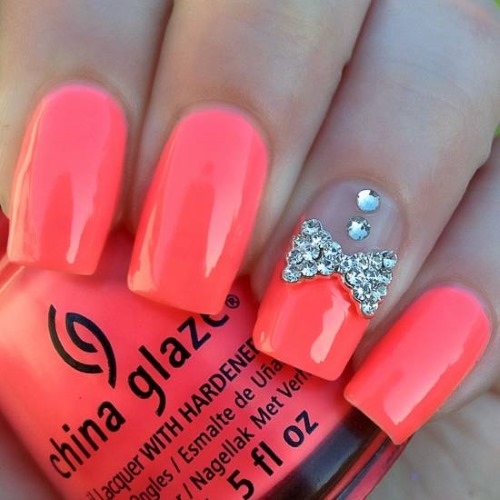
If 2 colors are taken for the base, then the bow will perfectly divide the nail into 2 parts. It can be miniature or span the entire width of the nail. The shape and size of the jewelry depends on the size of the nail plate.
To make a simple rhinestone bow, you need:
- Carry out the basic treatment of the nail, apply all layers of varnish, dry them.
- Cover the nail with a base or drip glue on the place where the center of the pattern will be located.
- Move the central rhinestone to the planned location.
- Lay out the first row of 2 rhinestones on one side and repeat mirrored on the other.
- Lay out next row of rhinestones on both sides. You should get 2 symmetrical triangles with a common center. The stones should be close to each other, without gaps.
- Continue laying out the rows, adding one crystal in each new one, until the composition is completed across the entire width of the nail.
- Dry the finished drawing for 2 minutes.
- Apply top to the nail, tracing the stones with a brush.
- Dry with a UV lamp.
Dragonfly
A dragonfly with rhinestones on the nails is similar to a butterfly. It can also be stretched over 2 nails or modestly placed on one. The simplest option for making a shiny dragonfly is to lay out its torso and head with rhinestones, and the wings can be decorated with sparkles or a pair of small rhinestones.
In order for this insect to adorn the nails with an abundance of sparkling stones, you need the most common set of gel polishes and related accessories, as well as decorations for inlay. The master must have drawing skills and a steady hand.
The order of the dragonfly in the style of Diamond Painting:
- Treat nails, apply all layers of varnish, dry it.
- With black gel paint and a thin brush, you need to draw the contours of the future body and wings of a dragonfly, if desired, draw paws and veins on the wings, dry it under a lamp for 2 minutes.
- They bring a little color to the wings, carefully painting them with colored varnishes using a thin brush, and dry for 2 minutes.
- Apply base or top to the entire surface of the nail.
- They begin to inlay, starting with the wings and the largest rhinestones. Rhinestones are placed with an orange stick dipped in the base or top. One large rhinestone is placed in place of the insect's head. Do not use too many large stones for the wings, 1-2 will be enough.
- Decorate the remaining parts of the wings with small rhinestones.
- The body of the dragonfly is carefully covered with silvery broths. They also fill the gaps between rhinestones.
- The completed dragonfly is placed under the lamp for 2 minutes.
- Apply the top, brush around the stones, dry for 2 minutes.
Design "Cat's Eye"
Cat's eye nail polish looks great without jewelry, so you shouldn't overload a manicure in this style with decor. Nail art masters advise to decorate only one fingernail, without overusing it.
With short nails, in this case, crystal decoration is better to minimize or completely abandon them. The best option for inlaying would be one rhinestone or several, as with a reverse jacket. It is recommended to use only small jewelry.
For medium to long nails, it is possible to use one large rhinestone per nail. A large rhinestone is placed in the middle of the nail and surrounded by smaller ones or sand.
The composition can occupy the entire surface, or it can encircle the nail from above or in the middle, bending in a wave. Then a matting coating is applied to the surface. A vertical thin strip of small crystals along the entire length of the nail or a diagonal curved composition with a large stone in the center accentuates the overflow of varnish.
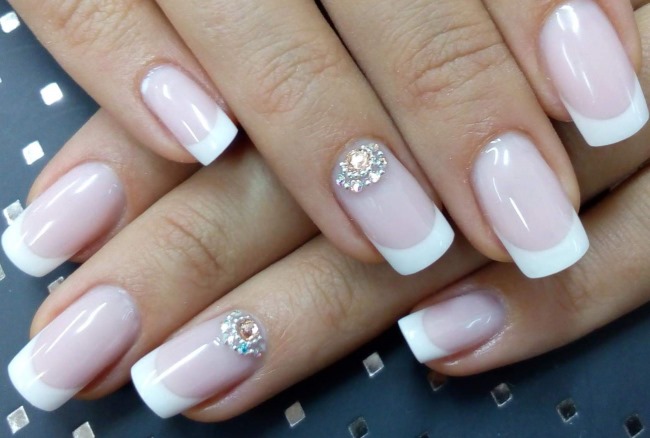
French, decorated with rhinestones
There are many types of French manicure and they all look great, complemented by rhinestones. Even a classic jacket with a white stripe at the free end of the nail and a nude base, adorned with dazzling crystals can suit any occasion. To create a delicate look, experts advise decorating your nails with a thin strip or one crystal.

The ring finger is distinguished with rhinestones, laying out the whole composition or covering the entire nail with stones, and the rest can be made in any style of jacket. A colored jacket, a jacket with a pattern and other bright options themselves ask for shiny jewelry.
The reverse jacket design can now be seen quite often in photos in fashion magazines. It allows you to use larger jewelry without worrying about the durability of the manicure and the integrity of the nail.
When performing a jacket with rhinestones, do not forget about the rules for combining jewelry and the main color. Thus, Crystal rhinestones are suitable for any color scheme - both for a classic jacket and for colored, matte and others, and colored varieties must be selected taking into account the tone of the base.
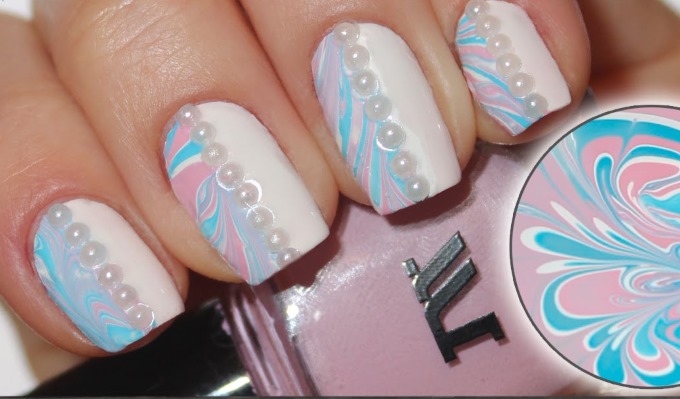
Lunar manicure with rhinestones
In a moon manicure, a nail hole is perfect for inlay, on which attention is focused. It can be surrounded by small grains of sand, completely covered with stones of different sizes, or decorated with one small rhinestone.
For a more solemn occasion, craftsmen often lay out a sparkling tiara. Take the lower edge of the hole for its base.
Water manicure
Water manicure itself looks interesting and bright. Experts advise against decorating such a drawing with an abundance of rhinestones. For water manicure, it is recommended to use small decorative elements that will fit into the drawing or will pass in a thin line, without distracting attention from the colors.
Crystals in this case look laconic on 1-2 nails.A good option for a water-based manicure would be a thin line on one side or as with a reverse jacket.
Wedding design
Wedding manicure allows you to roam the fantasies of any master. It would seem that there are absolutely no restrictions on the size, quantity and shape of jewelry. The spirit of focusing on the ring finger is very useful here.
Any rhinestones - colored and colorless, pearls, broths, pixies, gasoline, charms and many others - are suitable for a gentle bride's image. Since a manicure for such a celebration is usually performed in light, bed, pale pink and white colors, the use of dark and bright decorations will be inappropriate.
For short nails, you should also not choose bulky design elements, but for long nails you can attach several shining stones surrounded by small ones. If the manicure is supplemented with lace or acrylic figures in the form of flowers, bows and hearts, then it is permissible to use only small crystals.
Ombre and gradient with rhinestones
A gradient decorated with rhinestones is perfect for a special occasion and a formal outfit.
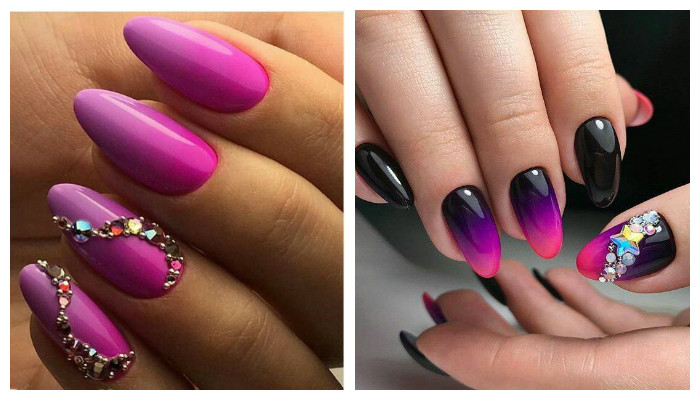
Since the main intrigue of such a manicure lies in the transition of colors, this line is most often decorated with decor or a thin rim of rhinestones is applied to the nail at its base.
Manicure with rhinestones and patterns
When used correctly in the hands of professionals, jewelry becomes part of a real artistic composition made on the nails. In a manicure with a pattern, rhinestones should become part of it, and not an independent decoration. It is worth carefully choosing shiny stones so that they fit into the overall picture, make the design deep and complete.
Rhinestones on short nails
Professionals prohibit the use of large rhinestones on short nails. It is recommended to use small stones, glue them individually on each nail or lay them out in the form of a pattern on one.
Geometric patterns, thin rims and tiaras along the line of the hole, stripes, pyramids look beautiful on short nails.
How to complement the design with rhinestones
The design with rhinestones for everyday wear is not recommended to be supplemented with anything, they already attract attention to the manicure.
For special occasions when you need to give the image shine, rhinestones can be supplemented with sparkles, foil, beads, modeling, rubbing, dusting, acrylic decorations and many other elements for decorating nails. Creating a manicure with rhinestones requires good taste and a sense of proportion. A specialist will help you choose the right crystals and other design elements.
Crystals and beads, stones and grains of sand in the skillful hands of the artisans turn into stunning compositions on the nails. The use of rhinestones allows you to add zest to even the simplest design. Photo and video lessons will help everyone to create their own unique image and find inspiration.
Interesting video about design using rhinestones
All about the types of rhinestones and how to fix them on gel polish:
Rhinestone manicure ideas - photo selection: