A manicure should not only be fashionable, but also have a unique, inimitable design. Some of the popular coatings used to decorate nails are gel polish and shellac coating.

The materials are particularly durable and can be decorated with a variety of patterns that are easy to do on your own, following step-by-step instructions for beginners. And the proposed photos will help to visually represent the process of work.
The choice of coatings for manicure
Today, manufacturers are ready to offer masters a huge selection of goods for creating a manicure. One of the most popular new products is long-term coatings, the only drawback of which is the need to purchase special tools and aids, as well as to study the features and application technology of each of them.
Gel polish
Nail design for beginners (step by step photos will help you understand the process of creating a manicure) using gel polish is easy to do if you follow the application technique correctly. This coating was a compromise between build-up and regular varnish.
The base of the gel polish is acrylate, which hardens under the influence of UV and LED rays. They are emitted by special lamps, which are used by craftsmen when creating designs.
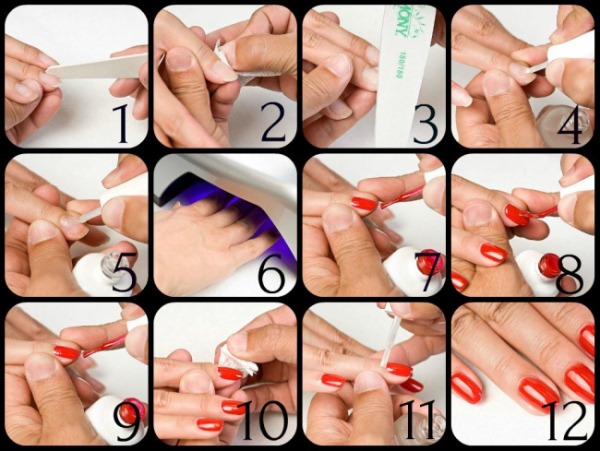
The procedure for applying gel polish consists of several stages:
- Filling the nail.
- Treatment of the nail plate with a degreasing agent.
- Base coat application.
- Application of the first layer of gel polish.
- Application of the second layer of gel polish.
- Topcoat application.
- Removing the sticky layer.
- Cuticle treatment with special oil.
Removing gel polish from nails should be carried out only by a master, since it is impossible to do this procedure yourself. Removing the coating begins with cutting off its top layer. After that, a special solvent is applied to the nail, which is kept for about 15 minutes. After the specified time, the master removes the remains of the coating.
Gel polish has many positive characteristics:
- The composition of the gel polish is unique. It does not contain strong allergens and toxins.
- This coating is not able to provoke the occurrence of allergic reactions on the skin.
- The composition of the gel polish contains many useful substances that help to strengthen the nails.
- This coating is considered one of the most durable. Manicure correction will be required no earlier than 2 weeks later.
- The coating does not change its attractive appearance and structure.
- Gel polish is able to withstand a variety of loads, including frequent cleaning, washing dishes.
- Protects long nails from brittleness.
Shellac
Shellac was invented by CDN. The coating has transformed the salon manicure service and brought it to a new level.
Shellac is applied to the nail plate according to the standard scheme:
- Degreasing the nail using special tools.
- Application of a special base to the nail plate.
- Colored coating.
- Securing the coating with a special tool.
- Removing the sticky layer.
- Cuticle treatment with oil.
Each layer is fixed with a special ultraviolet lamp. Removal of the coating from the nail plate is carried out without washing down the nail. This helps keep it safe from damage.
To remove shellac, the master applies a special solvent to the nail, after which the finger is wrapped in foil and left in this form for 10 minutes. After the specified time, the master removes the shellac from the nails.
The benefits of shellac include:
- no need to file the nail and use a primer;
- ease of removal of the coating;
- the absence of such components as dibutyl phthalate, toluene and formaldehyde in the composition;
- fast application.
Negative characteristics:
- the solvent used to remove the coating contains acetone. This substance can strongly dry the nail plate;
- short wearing period. A manicure that is created using shellac needs correction in 10-14 days.
Acrylic paints
Nail design can also be done with acrylic paints. Step-by-step instructions for beginners and photos will help beginners understand the intricacies of this skill. Acrylic is a mixture of liquid and special powder.

The technology of applying this material implies an external effect on the nail plate, which has both positive and negative characteristics.
The pluses include:
- creating the effect of natural nails;
- protection of nails from external influences;
- durability of the coating. Acrylic lasts up to 4 weeks on nails;
- simple process of removing the coating;
- strengthening nails.
Negative features and nuances:
- the need to apply a coating to the regrown part of the nail;
- the presence in the composition of acrylic of substances that can cause an allergic reaction;
- the price of a manicure created using acrylic will be higher.
Acrylic is not able to cure nails. This coating only protects them from external irritants.
How to draw?
Nail design for beginners step by step (photos will help to visually represent the process of work) is described in the instructions that should be followed correctly. An important role for the design of drawings and decor on the nails is played by tools, which are divided into professional and for home use.
Brushes
Brush for drawing small elements - with a short nap, tapering at the end, suitable for drawing lines, shadows, with which you can add volume to the image.
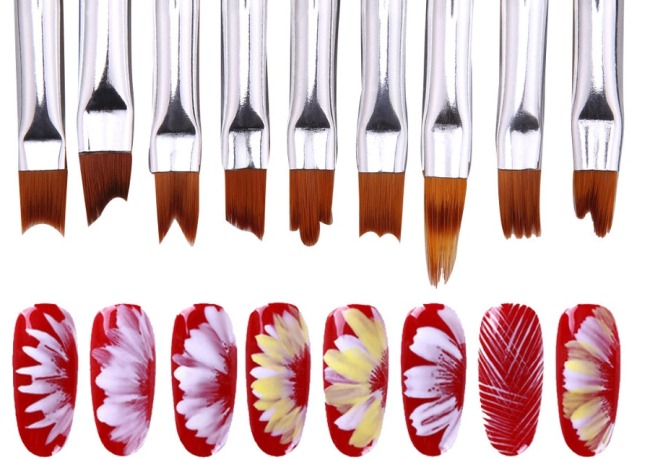
Flat brush - with a wide working surface, suitable for pouring. It will help to create gradient designs on nails, mix paints to get the desired shade. Used to paint elements such as flowers and leaves in the ombre technique, distributing sparkles.
Fan - suitable for experienced craftsmen. Outwardly, the brush looks like a fan, thanks to the villi diverging to the sides. Suitable for working with sequins and for creating textured designs of varying degrees of complexity. Liner - a thin brush for drawing fine strokes, small elements: to delimit the tip of the nail when decorating a French manicure.
Dots
Dots is a thin stick with a metal ball at the end. Using tools with different sizes of heads, you can adjust the volume of design elements - from small dots to large drawings (flowers, butterflies).
Needles
Tool with a plastic handle and a sharp metal needle at the end. For home use, a regular sewing needle is suitable.
It is better to use a thin one, since novice craftsmen cannot work quickly, and the varnish has time to dry out.A thick needle in such cases will leave stripes and scratches with the lumen of the nail plate.
Toothpicks
For drawing on nails, ordinary toothpicks are suitable, which do not scratch the nail plate, but are quite sharp. Therefore, it will be possible to accurately draw small details of the image.
Pieces of tulle
This method produces a lace-like pattern. To do this, you need a piece of tulle with a small pattern. Further, the nails are processed as in the usual staining (degreased, covered with a base and selected varnish for 2 layers).
After the varnish dries slightly, a piece of tulle suitable for the pattern is applied to the nail plate, pressed tightly for a couple of seconds and carefully removed. The result is an imprint of the pattern, which is covered with a colorless or finishing varnish.
Foil
The use of foil in nail design will help to embody any ideas: combine a coating with a glossy or matte surface in a manicure, combine different colors.
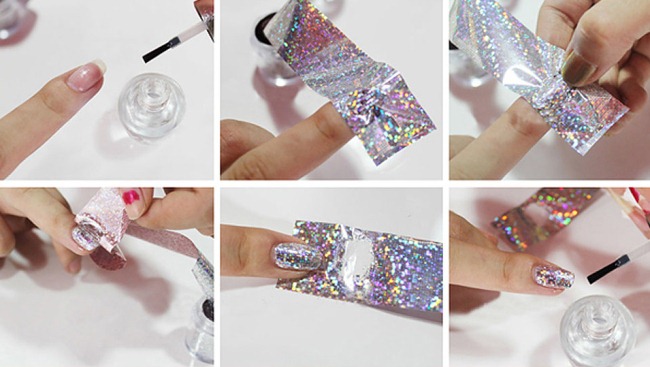
Foil can be plain or with a pattern, with embossing or imitation of engraving, with a protective film. Packing format: rolls, sheets or strips of different colors and textures.
Sponge
With its help, an interesting effect of a smooth transition of colors from a dark to a light shade is obtained, which, if desired, is complemented by a pattern. The uniformity and density of the coating depends on the porosity of the sponge.
Scotch
To create a design on your nails, stationery tape is useful. With its help, it will be possible to obtain clear geometric patterns. The cut strips or shapes are applied to the nail plate in a random or sequential order.
Stamping
Nail design for beginners step by step (photos are presented for visual viewing of ordinal actions) is described in instructions that differ from each other depending on what decor is used. It is worth doing everything in the sequence in which it is indicated in order to get high-quality nail art.
Stamping technology involves transferring the pattern from the disk to the nail plate using a special stamp.
What tools are used:
- Metal plate with an extruded contour on the surface. The number and size of patterns on discs varies. As for the theme, these are geometric, floral, openwork patterns.
- Small die with a silicone or rubber pad, with which the pattern is transferred to the nail plate.
- Scraper - a thin plate, which removes excess varnish from the disc. The paint remains only in the recesses of the contour, the drawings are clear, neat and not smeared.
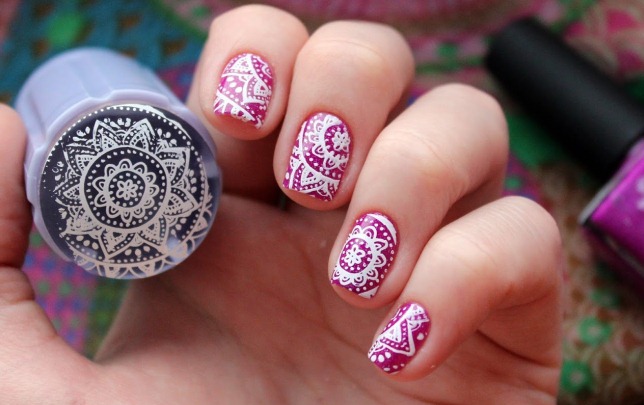
The stamping technique is comfortable and the result is much better than using nail stickers. Stamping supplies and kits can be purchased from the store or ordered online.
Sliders
Sliders are stickers with an image on a film base. They resemble decals, work on the same principle. The drawing is separated from the base by the action of water and transferred to the nails. The thin sticker easily takes the shape of the nail plate, and after drying it snugly adheres to the surface of the nail.
The sliders look neat, the borders of the sticker are invisible. It is easy to work with them, the stickers do not curl when applied, and if it did not work out correctly, then the error is easy to correct.
Powders
Acrylic powder (dusting powder) is used to create any type of manicure. From simple, discreet design for everyday wear to nail design for special occasions (with textured elements, patterns and stucco molding).
| Name | Application | Decorative effect |
| Transparent (matte) | Strengthening, building the nail plate | Volumetric elements, modeling |
| White powder | Nail edge decoration | Drawing a smile line in French manicure |
| Camouflage | Alignment, smoothing of irregularities, nail defects | _ |
| Shiny | Bright accents in manicure (full coverage or drawing of pattern details) | Bright color and shine. For everyday wear, it is better to use the option with an emphasis on one or two nails. |
| Neon | Decorative coating | Nails glow under neon lights (like in a club). |
| Colored | Nail design | Colored textured patterns, stucco molding, ornament |
Training cards, stencils
To learn the intricacies of drawing complex elements, you should practice on special cards or stencils. Training cards are used to clearly draw elements.
Training cards are divided into:
- basic, which will help you understand the main principles of drawing elements;
- simple (lines, strokes, curls);
- complex (composition of several types of elements).
Simple techniques for beginners step by step
There are many techniques with which you can create designs on nails of any complexity.
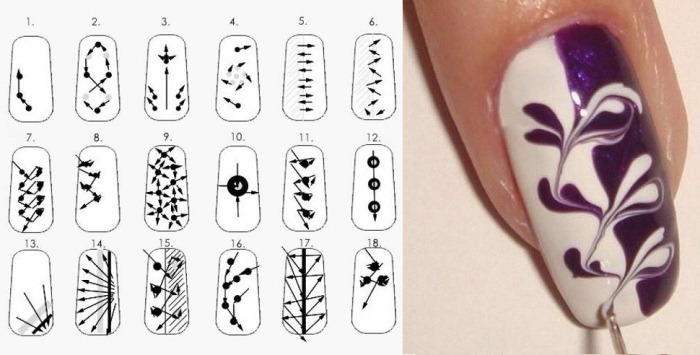
Dot patterns
To create simple and concise dot patterns, you will need improvised materials and a special tool for manicure - dots.
The drawing technique is in most cases the same:
- You should prepare a palette - a piece of foil or cardboard, and apply a few drops of varnish on it.
- Dip the working end of the dots into varnish and gently draw the necessary elements using a drip motion.
- To get curls or straight lines, it is recommended to smoothly draw the elements without lifting the tool from the surface of the nail plate.
- After applying the drops, you can stretch them so that you get the intended pattern.
- After the drawing is ready, you need to fix the coating with a special varnish.
Decorating nails with stickers
Manicure with stickers, despite the simplicity of its implementation, is also a popular trend in nail design.
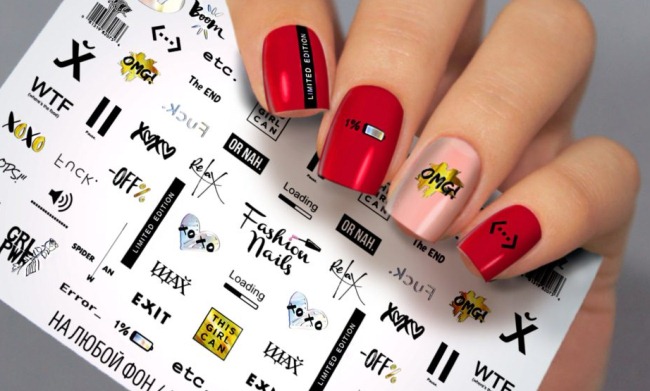
Design procedure:
- First, you need to remove excess cuticle skin and shape the plate.
- Then treat your nails with an antiseptic and degreaser.
- The next step is to apply the base. A light background is preferable for stickers, then the picture will not merge.
- After the background dries up, you need to cut the picture you like from the palette with stickers.
- Place the cut out drawing in water. This is best done with tweezers. Then carefully separate the film and the backing, and place the sticker on the nail plate.
To increase the durability of nail art, it is better to apply gel polish. However, you should proceed with caution and test it for compatibility with the labels. If this is not done, it may happen that the gel polish will corrode the glue and paper, and the drawing will be severely damaged.
Hearts with a toothpick
Nail design for beginners step by step (photos are shown for a visual view of the application technique) are provided in the instructions so that you can quickly draw a heart and decorate it. Inexperienced craftsmen are advised to start drawing a heart with a toothpick.
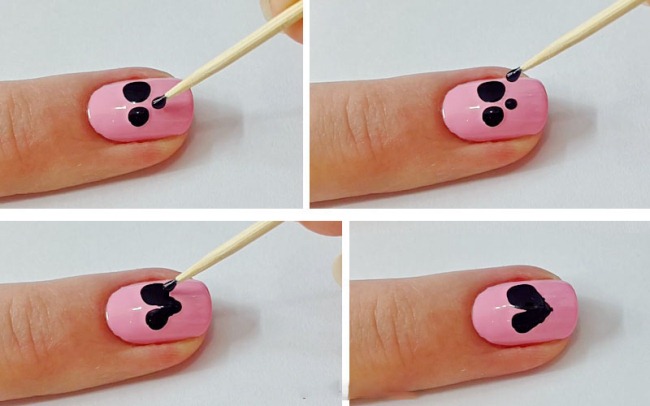
Work process:
- Soak the tip of a toothpick in gel polish and put a dot on the top of the heart.
- In the same way, make the second point next to the first.
- From the points, you need to draw down the strip to get an angle.
- Fix the resulting pattern with a special varnish and wait until the nails are completely dry.
Pale pink and bright red colors are perfect for this design. To give a festive look, you can use varnishes in white and golden shades. Sequins will add effect to this nail art.
Nail art geometry using scotch tape
To create a geometric print using gel polish and tape, you need to perform several steps:
- Training: hygiene procedures for the skin of the hands; warm baths with herbal supplements; polishing the nail surface; degreasing.
- Covering the nail with a base... The base helps to protect nails from harmful impurities of gel polish, and also prevents delamination of the plates, strengthens them.The applied base should be thoroughly dried in an LED lamp, it only takes a minute. Suitable for drying base and UV lamp.
- Background application... You can take gel polish of any color as a background. Dry well after application.
- Creative stage... With the help of narrow tape, a pattern is created from various lines.
- Applying a transparent topwhen the drawing is ready.
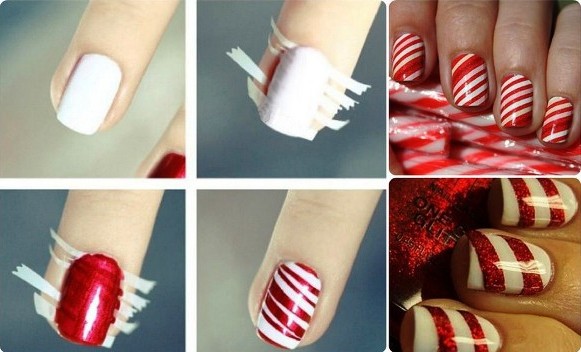
Using this algorithm, you can create an original individual design. In order for the manicure to turn out flawless, you should not violate the procedure, especially for novice masters.
Drawings through stencils
To apply patterns, both simple and complex, to the nail plate, special stencils are used.
To apply this technique correctly and create an interesting design you must adhere to certain rules:
- The cuticle should be removed or trimmed as usual.
- You need to file the nails according to the desired shape and required length.
- It is recommended to treat the surface of the plates with a buff and degrease with a special agent.
- Cover the nail plate with a colorless base agent.
- If adhesive templates are used, apply a thin and even coat of gel polish.
Particular attention must be paid to ensure that the stencil fits quite tightly to the nail plate. This procedure is necessary to prevent the paint from leaking over the edges and ruining the pattern. White space should be painted from the middle to the edges.
With a self-leveling topcoat, the base design can be smoothed out. And to remove the stencil from the nail plate, it is recommended to use tweezers. To do this, grab the corner of the template as close to the nail as possible and carefully remove it.
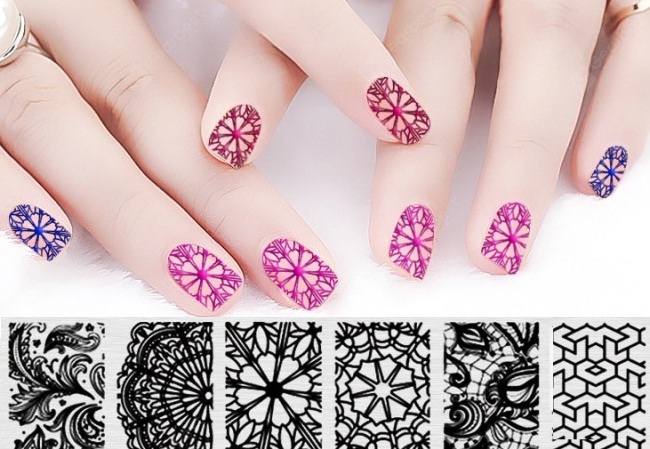
Broken glass design
The reflection of light on the material and the overflow of rays allows you to create an imitation of broken glass:
- It is necessary to prepare the nails - to give them the desired shape, remove the cuticle and remove the shine with a buff.
- Prepare pieces of special film of different sizes and shapes.
- Degrease the nails and cover them with a base product, dry in a lamp.
- Cover nails twice with gel polish, and each layer should be dried in a lamp. A good basis for this manicure will be a combination of a glossy texture with a matte finish.
- The place where the pieces of film will be placed must be covered with a top. The layer should be very thin. Then, using an orange stick dipped in the top, you can lay out the previously cooked pieces in any shape. Dry the result in a lamp.
- After the performed procedure, fix the pattern in two layers with the top, dry it in a lamp and remove the stickiness.
Abstraction
The main advantage of abstraction is its versatility, whether it be a solemn event, a business meeting or everyday life. This design looks original in combination with foil.

Making such a manicure design is quite simple, if you consider the rules:
- Prepare your nails, then cover them with an acid-free primer and wait until it is completely absorbed.
- Spread the base layer and cure it under the lamp.
- Choose a varnish of calm tones with good pigmentation and medium fluidity.
- Wait until the colored layer cures, after which you can start the decorating process.
- Using a brush, gel polish or acrylic paint should be applied to the nail plate with chaotic movements.
- Secure with a glossy or matte top.
Painted watermelon brush
Watermelon manicure designs look great on nails, regardless of their length.
Following the instructions, you can do the manicure yourself:
- Paint your nails with a bright red varnish and wait until it is completely dry.
- Apply a strip of light green with a brush and a strip of deep green on top.
- On the dark strip, draw a couple of dark lines that will resemble strips of watermelon peel.
- Draw some dots with black varnish using a thin brush - watermelon seeds.
- After waiting completely dry, apply small dots on the seeds with white varnish. This is necessary to create volume in the picture.
- After the varnish is completely dry, the resulting pattern must be fixed with a transparent agent.
Gradient
The technique of applying a catchy gradient is simple and suitable for beginners.
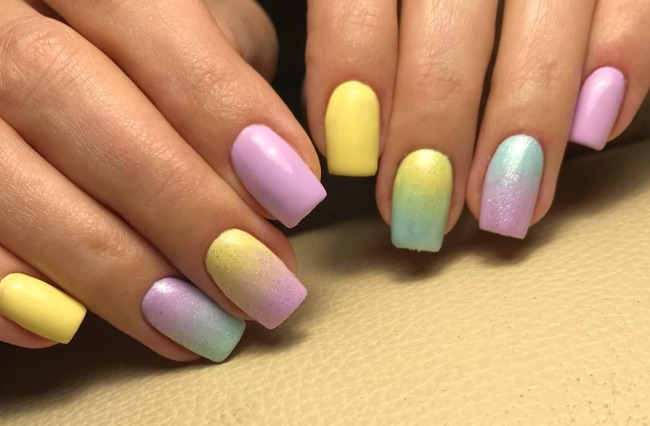
To get a smooth transition of colors, you should follow the instructions:
- Apply even stripes of different shades of gel polish to the sponge or sponge, let it absorb a little. For a neat transition of colors, it is recommended to use the most loose sponges.
- Apply the sponge tightly to the nail plate and hold until one color changes to another.
- Apply a transparent fixer to a well-dried coating.
Lunar manicure with gel polish, acrylic
Lunar manicure looks good on both long and short nails.
Step-by-step application process:
- Cover previously prepared nails with base varnish.
- Apply the template in such a way that it extends over the base of the nail plate, resulting in a crescent moon.
- Cover the non-traced part of the nail with a different shade of varnish.
- You need to fix the manicure with a colorless varnish, applying a thin layer.
- The second coat of varnish should be applied after the first dries, otherwise bubbles may form.
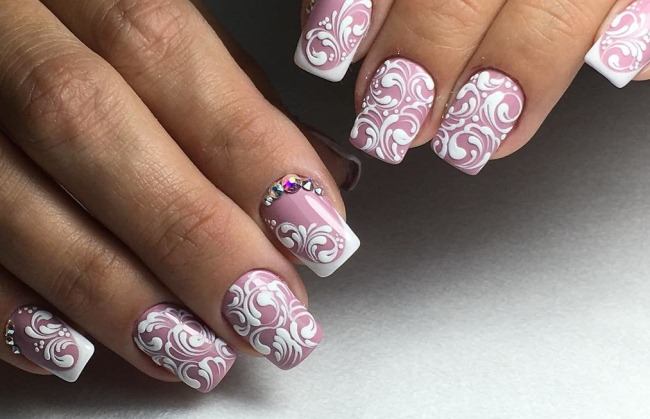
Simple and beautiful monograms with shellac, gel, acrylic
The creation of drawings in the form of monograms can be the main decor for a manicure or an additional one on some nails, using the main elements. The work process is performed using acrylic, shellac, gel, and goes well with sparkles, rhinestones. Monograms are drawn using a needle or brush.
Volumetric
Volumetric monograms are patterns combined with volume, which give a convex effect to a design, and are easily reproduced. To work, you need gel paint that does not stick - the drawings are applied over the topcoat.
Each component is drawn with a thick curling and immediately dried under a lamp - 10 sec. it is enough for the material to dry out and not mix with the subsequent curls in the composition.
With a jacket
First, a french design is made on the nails, decorating the top with unpretentious weaves with divorces. The difference between this nail art is the spirals painted on the sides of the nail plate, usually on one side, supplemented with rhinestones.
With rhinestones
Especially stylish and graceful strokes with the addition of shiny pebbles look on long nails. Professional craftsmen advise to emphasize the brilliance of the design by combining decorative elements and a plain background. Rhinestones can highlight the middle of the monogram, and also lay out along the edge of the hole itself.
With acrylic powder or sand
To create monograms, you must also use acrylic powder and varnish with a sticky property:
- Cover the drawn pattern with a sticky layer of varnish.
- Powder gently with a wide brush. The decor will be evenly distributed, the particles will be fixed, without further sprinkling.
- Dry the resulting manicure under a UV lamp.
This design is suitable as an independent nail design. It should not be combined with other techniques.
With sequins
In advance, the nail surface should be treated by painting it with a varnish base. Having decided on the choice of the necessary sparkles, they should be applied with a hairpin or a toothpick soaked in water along the contour of the indicated pattern. The final stage of the procedure is drying and applying the discolored fixer.
With openwork
The most complex and somewhat painstaking technology in manicure design. The finest mesh, similar to lace fabric, carefully traced over the entire surface. To facilitate this method, there are special stencils. Manual work, with the simultaneous use of different tones, requires a clear image of the future picture.
Particular attention is paid to the correct combination of colors, color harmony.The openwork lines of the pattern should be clearly visible on the base covering.
You can diversify the design of nails with drawings and decor elements. A step-by-step brief description of the work processes for beginners and photos will help you acquire skills and learn how to combine various techniques for applying gel polish.
Video about gel polish manicure
How to apply gel polish under the cuticle: