On neutral, calm surfaces beige nails designs from rhinestones and sequins stand out brightly. Since elegant naturalness does not go out of fashion, it is worth purchasing a pair of camouflage bases and beige gel polishes in the collection of materials.
Are common
When applying beige shades, it should be borne in mind that gel varnishes of this color do not fall on exactly one layer. For coverage without gaps and streaks, 2-4 coats of material must be applied. Therefore, novice craftsmen should not strive to level the coating on the first layer (it is a primer, it is not brought to the cuticle and side rollers).
On the 2nd or 3rd layer, using a thin brush, the coating is smoothed and its eyeliner is applied to the skin. To help the material to align itself, you need to turn your hand palm up and hold it in this position for 1-2 minutes. According to the laws of physics, the material will flow from the sides to the apex, and will itself be distributed in a thin, smooth layer.
At the same time, care should be taken that the hand is parallel to the floor, does not lean down, otherwise the material will drain to the end of the nail, forming an unnecessary thickening.
To get an elegant nude design using beige gel polishes, you need to do a high-quality manicure. By "manicure" we mean a set of actions aimed at the technical preparation of the nail for coating.
The qualifications of the master can be determined by the thoroughness of the manicure before the design. Experienced craftsmen do not neglect any of the stages, since this not only ensures the durability of the coating, but also an aesthetic appearance.
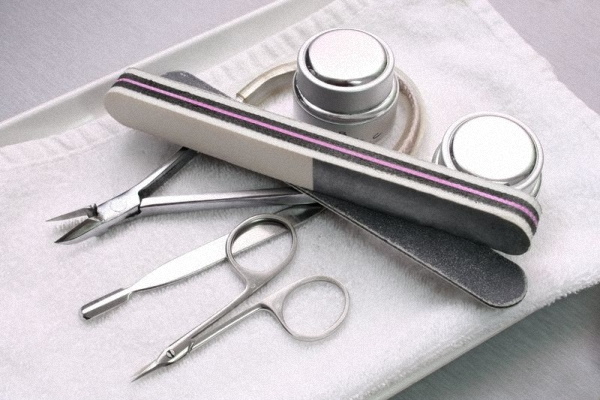
The required set of materials and tools for manicure:
| Name | Description | amount |
| Pusher | Metal shovel with a long handle, sharpened with a sharp edge. Serves to lift the cuticle and cleanse the skin growth (pterygium). | 1 PC. |
| Orange stick | A stick made of natural wood looks like a spatula at one end, sharply sharpened at the other. Used instead of a cuticle pusher. It is often used to remove streaks when applying color coatings. | 5-10 pcs. |
| Nail scissors or nippers | Must be made of quality materials and sharpened. Used for cutting the cuticle. | 1 PC. |
| File | There are different roughness (gritness). The less grit, the grainy the work surface. Coarse saws are used for building up and filing artificial material. With this tool, shape the nail plate. | 2-4 pcs. different roughness |
| Buff | Files or sticks made of soft foam material, which are used to remove gloss and polish the surface of the nail. | 1 PC. |
| Dehydrator | A liquid that, in addition to cleansing, must also remove stickiness (dispersion after polymerization). | 200 ml. |
| Primer | Liquid for degreasing the nail. Removes excess liquid and disinfects the surface. | 2 pcs. (acidic and acid-free) |
| Base | Polymeric material that serves as a base for applying colored gel polish. | 2-3 pcs. |
| Top | Polymeric material that serves to fix all layers of the design. Can give a glossy sheen or matt surface. | 2-3 pcs. |
| Lint-free wipes | Special napkins made using the pressing technique do not leave lint on the sticky layer of the coating. Serve for technical needs - removing dispersion, removing streaks, cleansing the skin around the nail. | 50-100 pcs. (at the rate of 10 pcs. for one manicure) |
| Fraser | Apparatus for all stages of manicure using various cutters. It is a power supply unit and a handle in which the attachments change depending on the type of work. Powered by electricity. | 1 PC. |
| LED lamp | Lamps with ultraviolet radiation of a certain frequency, in the light of which polymerization (solidification, drying) of modern gel varnishes and modeling materials occurs. Today, LED lamps of varying power levels are most often found. Depending on it, the time of the manicure and its quality are determined. | 1 PC. |
Techniques and methods
Beige shades in all their variety can be partially attributed to nude. Many of them provide elegant naturalness to the manicure. But they also combine successfully with other colors to form interesting color variations. You can mix them yourself on the palette to achieve the desired shade.
For example, to create a stone texture design, it is enough to have one beige gel polish and several other colors. An even coating is created from a monochromatic beige color, on which veins of mixed colors are drawn (on the palette, other shades are intervened dropwise into the beige varnish).
Multi-colored stripes can be blurred with a thin brush using a top and grabbed in a lamp for about 30 seconds. Then draw a thin, clear line on top with the same color. For such designs, it is recommended to take a thin brush with artificial bristles 0.7-1 cm long.
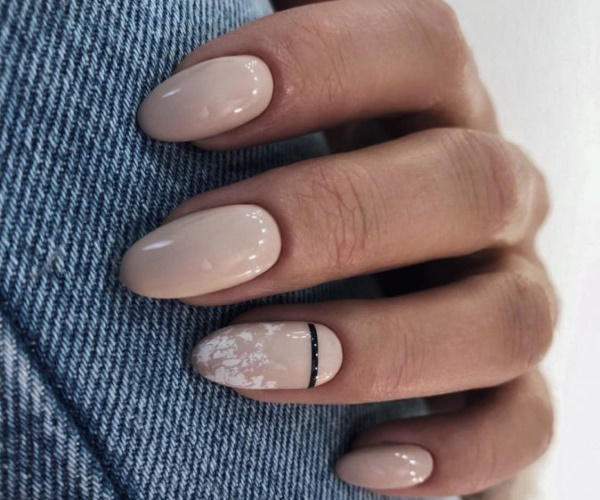
In the use of beige shades for decorating with rhinestones, a gradient is often used. To create it, choose beige and white. Moreover, it is better to take a white tone not boiling white, but a milky shade. As a rule, it is applied to the free edge and transferred with a smooth transition to a beige tone. Detailed execution technique will be described later in the article.
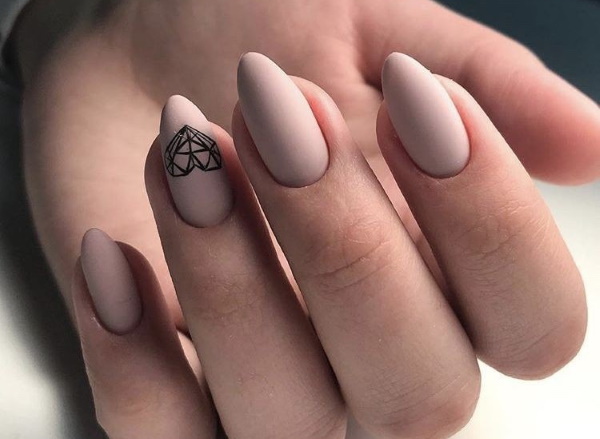
Abstractions in beige tones are also considered popular designs. To create them yourself, you need to have a thin brush available and master the technique of painting "wet". To obtain beautiful translucent abstractions, it is recommended to use a special gel - a base for spreading.
Ideas for a solid color manicure
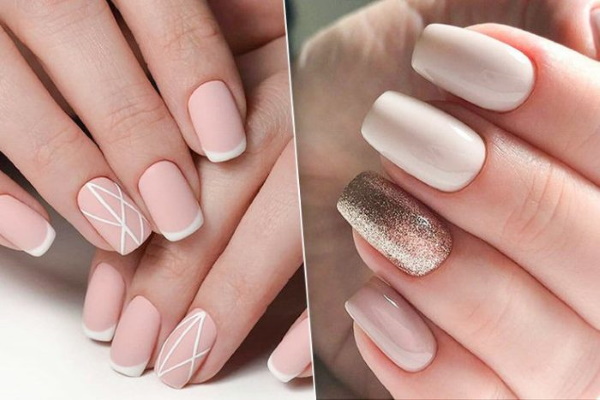
Beige nail design looks stylish without decor. The fashionable version of nude manicure assumes the most natural appearance of the nail plate. For this, a beige range of shades is used, since a pink nail plate is found only in babies and on the hands of adult women does not look natural.

A beige tone, matched to the skin tone of the hands, applied in 2-3 thin layers, makes nails of any shape look like natural well-groomed. The essence of a plain beige coating is to level the surface and color of the nail plate.
To do this, use a 3-phase gel system:
- 1st phase - application of a thick (rubber) base, which is used to level the surface of the nail after manicure manipulations (applied to a primer, which is not included in the system, but is a preparatory material);
- 2nd phase - application of a colored coating, laid out in 2-4 layers, depending on the pigmentation and density of the gel polish (each layer is dried in an ICE lamp for about 30 seconds);
- 3 phase - a finishing coat to fix the color and durability of the manicure (can be glossy or matting).
The quality of a manicure directly depends on the selection of materials. Sometimes the base and top of different manufacturers can enter into a chemical conflict of materials, which leads to chips and detachments.
Today manufacturers of nail art products offer special camouflage bases in different shades. With these materials, you can skip phase 2. They have enough pigmentation to cover the natural free edge of the nail and even out the tone of the nail plate. They are applied in 2 layers.
The first layer is laid out using the alignment technique (one drop in the apex zone with subsequent distribution), and the second one evens out the color of the nail. Different manufacturers have whole lines of camouflage bases in beige tones.
This versatile polymer material is often available with a lightweight holographic shimmer to create an intriguing shine on your nails when exposed to light. The use of such bases was a trend last year and fans of the nude style transferred its popularity to 2020.
Such beige shimmer bases are successfully used to create French manicure. Their use significantly reduces the time for creating a design and simplifies the work of the master without losing quality.
Options in different shades
A popular combination of natural beige is its combination with contrasting colors - white and black. Gradients and abstractions are created using these colors. It should be remembered that a smooth transition between these contrasting colors will occur with the formation of a third (intermediate) shade.
Therefore, it is recommended to create such gradients on nails longer than average. White and black shades can be placed both at the free edge (imitation of a French manicure) and at the nail hole (imitation of a moon manicure).
There are some ways to just make the gradient yourself:
- with the help of a special brush with a clipped thin bristle - "comb";
- aeroofing brush (replaceable foam ball on a long plastic handle);
- airbrush - a device for spraying liquid gel polish using a portable compressor (produced for salon and home use);
- a thin brush for painting with a long bristle or fan brush (you will need at least 3 layers of colored gel polish to achieve a smooth transition between colors);
- by cutting off a small square from a kitchen scouring sponge (use as a substitute for aeroofing brush).
Beginners should take into account that when using the last 2 methods, it will be difficult to achieve the perfect transition between colors. However, when overlapping with the top layer, any gradient is smoothed and smoothed out due to the "lens" effect that the top creates. Also, if rhinestones or sequins are subsequently attached to the gradient, the imperfections of the ombre will be invisible.
Often such a technique as "stretching with a glitter" is used on a gradient.
To do this, sequins of different sizes are mixed on the palette with a drop of top. With a thin brush, a dense row of mixture is applied to the free edge of the nail or at the hole. Then the brush is wiped on a lint-free napkin and the glitter is stretched over the area of the nail with a dry tool. In this case, the density of the sequins decreases and gradually fades away.
Glitter gradients are necessarily overlapped with 2 layers of top, which allows you to make the nail smooth and firmly fix the glitter. Moreover, the design consists of a large number of layers, which should be taken into account when applying them (they must be thin).
Sealing the free edge with color is carried out only before applying the top, otherwise the nail will thicken strongly and lose its attractiveness. According to international requirements, the thickness of the free edge of the nail should not exceed 1 mm.
Variants with patterns and drawings
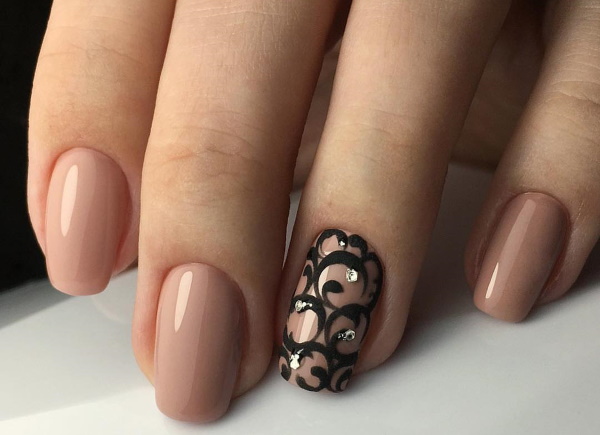
On a beige background, there are monochromatic patterns made with special paints and varnishes using the stamping technique. This method is a great alternative for beginners who cannot draw fine lines with a brush. This method is often used in salons as it significantly shortens the drawing process.
And in a more complex technique of "layered stamping" when applying several colors of gel polishes, they achieve complex patterns. As a rule, a black print is used as a base pattern, on which, after drying, gold or silver patterns are superimposed.
If you use beige as a backdrop, you can create simple and graceful floral designs in watercolor. To do this, it is enough to have a dense white gel paint without residual stickiness, a top, and a thin brush with artificial bristles.
Often, masters cut the brushes themselves with nail scissors, achieving the required pile thickness. Thus, you can create a collection of tools for all types of drawings from the same type of brushes.
For example, to paint white flowers using the watercolor technique, it is recommended to have two brushes:
- a brush with a thicker and longer bristle, with which the petals of the flower are drawn and blurred with the top;
- a brush with a small bristle length, literally a few hairs, to draw the thin contours of the picture, to place accents, on top of the top layer.
Drawing miniatures on a small plane of the nail is not a task for everyone and takes a lot of time. To facilitate the creation of hand-drawn designs, sliders are used. These are ready-made drawings that are printed in a printing house on thin film.
It is attached to a paper base and, after soaking, is easily detached from it. There are sliders that simulate not only watercolor flowers, but entire paintings using this technique. They are cut to the size of the entire nail plate and cover it completely.
Also on a beige background, you can print pictures with a holographic overflow (flowers or geometry, butterflies) by printing a special foil. To do this, decor manufacturers apply drawings to a thin transparent tape, which are then printed on a sticky layer of gel polish.
Not all materials have a sufficiently aggressive sticky layer to reprint the pattern. Therefore, it is better to purchase special glue for foil in advance. When it dries, its task is to create strong stickiness, which will pick up a shiny pattern from the tape and fix it on the nail. Today there are materials that dry in air or in an ICE lamp.
Decor ideas
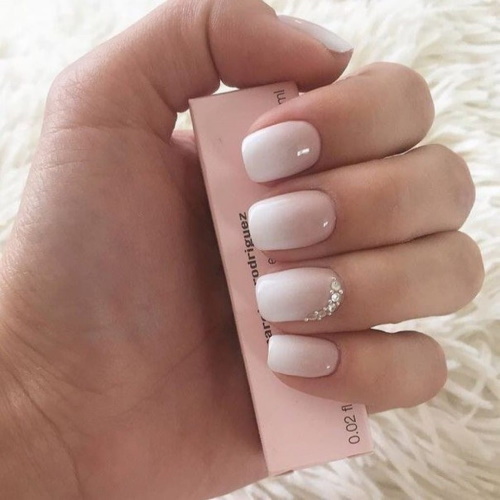
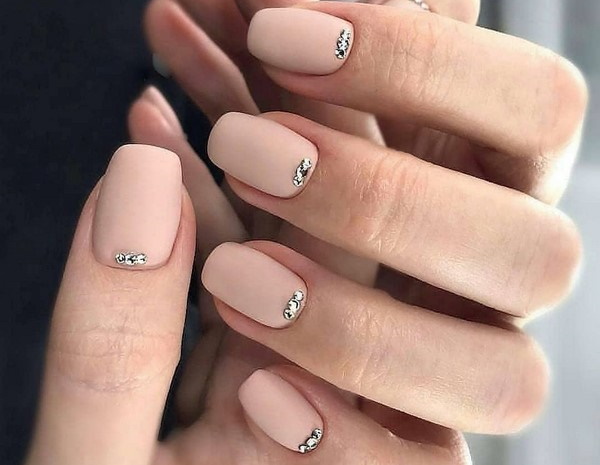
Beige nail design will allow you to create variations of compositions from rhinestones of different sizes. For design, you can use rhinestones of large diameters (ss 6-8), which look pretentious and defiant on brighter coatings.
Correctly composed inlays will last for a long time without chipping and will add sparkle of jewelry to the image of a woman.
The basic rule for the development of any type of inlays is the construction of the composition from the center. For this, a large central stone is selected and the rest of the rhinestones are laid out along the radius or linearly from it.
For novice craftsmen, it is recommended to first draw the inlay scheme on paper, then lay it out on a palette and only then start attaching the stones to the surface of the nail.
Such complex preparatory stages are due to the fact that complex compositions are fixed in several stages, with intermediate drying in an LED lamp. After fixing, it will be impossible to change the configuration of the rhinestones.
To make sure that the created composition is correct, you can lay out the design on a tip (imitating a natural nail in size and shape), which is previously covered with a beige color. This will allow you to evaluate in reality the appearance of the idea.
How to properly fix rhinestones on the nail:
- The coating is preliminarily created using a beige shade, with all the preliminary operations for creating a manicure (cleaning the pterygium, removing the cuticle, applying the primer and base layer).
- Cover the nail with a finishing layer, dry it in a lamp for 30 seconds. For this, it is recommended to use a top without residual stickiness. If there is no such option in the set of materials, then you can use any top, but carefully remove the stickiness after drying with a dehydrator.
- Put the rhinestones in the right order on the palette in advance. Immediately put a drop of thick top. In the future, a brush will be dipped into it to transfer the rhinestones to the nail.
- With a thin brush for painting (a brush with artificial bristles or a special pencil for rhinestones) dipped in the top, transfer the stones in the desired sequence to the nail. If a lot of stones are involved in the design, then the composition is built in several stages with preliminary drying (10 seconds in an ICE lamp is enough).
- Then, with a thin brush, you need to process the fixed stones around the perimeter and dry in a lamp for at least 60 seconds.
Fashion trends in 2020
Classic design options do not go out of style, smoothly moving from year to year. Certain accents can be introduced into the design, the technique of execution can be modified, but the classic jacket is firmly in the lead when choosing a manicure design.
Lovers of classic designs in manicure will be able to wear a jacket with pleasure, using a natural beige color instead of a pink base. Beige nail designs will be successfully combined with motivational lettering on the nails.
Nail art decor manufacturers have solved the lettering problem by releasing various sliders. In salons, craftsmen prefer to use charmikons (adhesive-based silicone sliders). They are quickly detached from the base using tweezers and firmly attached to the sticky layer of the top or base color.
Such decor does not require further overlapping with a finishing layer and drying, which significantly reduces the time for performing a manicure. Clear, legible lettering on a neutral beige background is used by women of all ages. As a rule, one finger on the hand is decorated in this way.
From the tendencies of the last year to the beginning of 2010, the “soap design”, which is used with rubbing on beige backgrounds, is moving. They will allow you to emphasize the texture of the "bubbles" and make them stand out against a beige background.
By emphasizing the texture with golden or silver rubbing, you can get a sophisticated and original design. This decor is created on 2 fingers of one hand. However, if desired, it is permissible to create a "soapy design" on all fingers, since such decor is not provocative and will not look vulgar.
Nude nail designs using beige are used for everyday or office manicures. Even decoration with a large amount of rhinestones or sequins, made against such a neutral background, does not look defiant.
Video about beige manicure
French gradient Baby Boomer: