Ombre on nails is a variant of a gradient manicure that has recently been at the peak of popularity. White classic shades will be appropriate for any life situation and will give confidence, both at work and in a festive setting.
Features of ombre design on nails
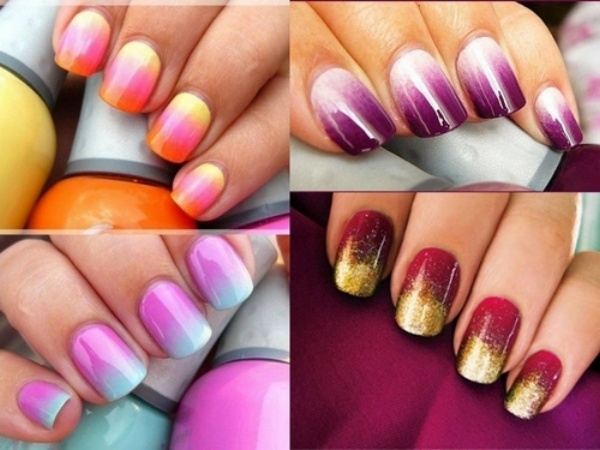
This technique provides for a smooth transition from one tone to another. There are several options for applying shellac.
Namely:
- One-color manicure, in which only the saturation of the selected shade changes.
- Application of two or three different colors on each nail plate, with a smooth transformation of light to dark.
- It involves applying different tones of the same palette to all nails (for example, 1 finger is light, the next is slightly richer, and so on until the last, darkest).
How to do an ombre manicure at home
White ombre on nails is made at home. To do this, you need to do a basic manicure, that is, put the work surface in order: remove the cuticle and give the desired shape to the nail plate.
The tools are used the same as for applying a regular manicure. Having chosen gel polish for work, it is advisable to first cover the work surface with it and dry it under a lamp. Then they start decorating.
There is also such a variation of the shellac design of a gradient design: the image is applied to the treated nail bed with a brush, first a light layer, then from the middle - a little darker, and along the edge - the most saturated drawing, while the transitions need to be shaded.
Required materials and tools
To perform a beautiful ombre manicure, you will need the following tools:
- several varnishes (top coat, a couple of pieces of white shades, and a fixer);
- palette (solid base or foil on which it is convenient to mix colors);
- toothpick;
- sponge or fine-grained sponge;
- cotton pads and stripper.
Basic design step by step
Gradient technique step by step:
- Give the desired shape to the nails, clean and process the cuticle.
- Cover with base composition, wait until dry.
- Apply the basic shade in several layers.
- On the palette, draw the stripes in the selected tones and gently mix their edges with a toothpick to achieve a smooth transition.
- Blot the sponge in the mixed composition and apply it to the nail bed 2-3 times so that the impression is clear and bright.
- Repeat the procedure with all the remaining fingers, let dry.
- Finally, apply a colorless coating to smooth out irregularities and fix the result.
- Remove excess nail polish with nail remover.
The correct technology for applying ombre on nails
By applying the same coating technology, it is possible to perform a gradient from one nail to another or on one nail bed.They use various colors and textures.
The main task of such a manicure is the correct selection of shades and the number of transitions.
A beautiful ombre effect is achieved by 2 methods: using a brush or a sponge. For the first method, gel polish is ideal, and for the second, it is better to opt for an ordinary coating. Both techniques are time consuming but not financially costly.
When performing the procedure with a sponge, manipulations are done quickly. Press it firmly enough, but for a short period of time. Repeat the movement, but 0.5 mm above the border of the first stroke. Thus, you should move to the edge of the free nail edge, gradually tightening the color.
White ombre options
White ombre on nails can be performed in the following options:
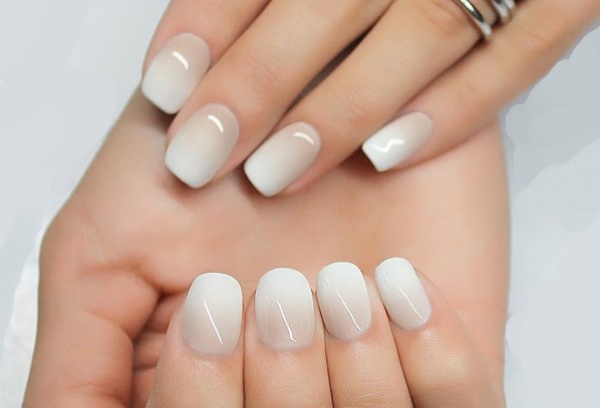
- The classic gradient implies an oval shape of the nail bed with a light tone along the edge and rich shades near the hole.
- Corner gradient manicure.
- With original transitions from the center of the nail plate.
- Chrome plated, with a metallic sheen on one finger, or with overflows on each.
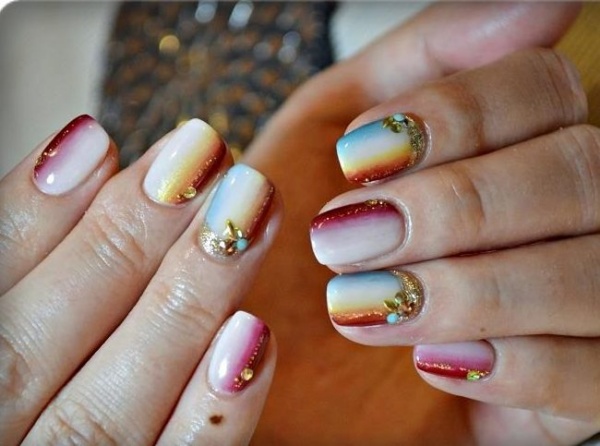
- With drawings for every taste. It can be both floral fantasies and geometric shapes.
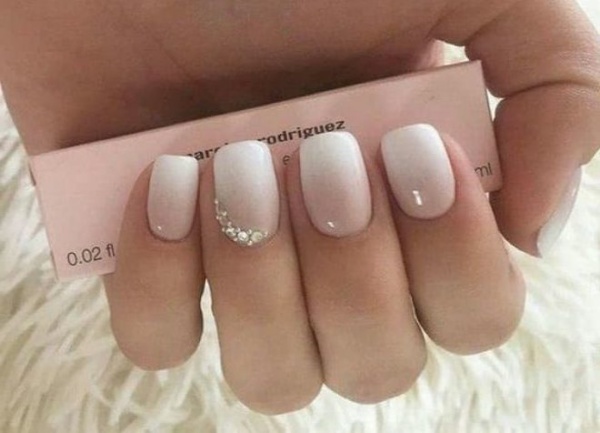
- With rhinestones and mini beads. For a sophisticated look, decorate with one finger.
- Glitter when white-painted nails are covered with sparkles.
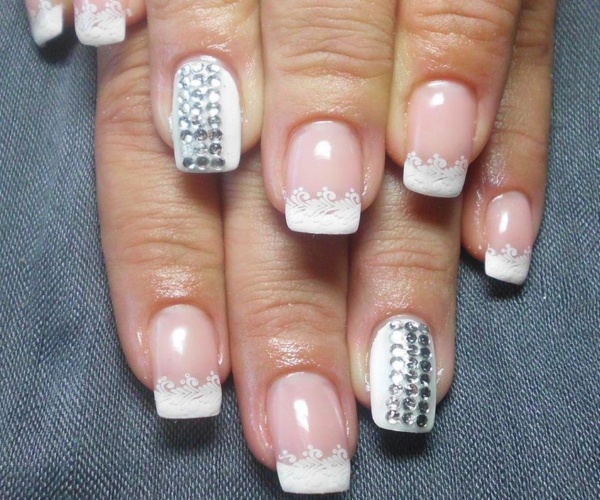
- French (a light edge with a blurred border).
Vertical ombre
The effect is formed separately on each nail bed, while the lightening is performed by a smooth color transition from one side of the working surface to another. This technique visually lengthens the nail.
Two or more types of varnish are used, sometimes with different textures. This coating method does not look original on all fingers, but on two, for example, and the rest will be painted in harmonious shades.
The gradual transition of colors from the little finger to the thumb looks beautiful.
Horizontal ombre
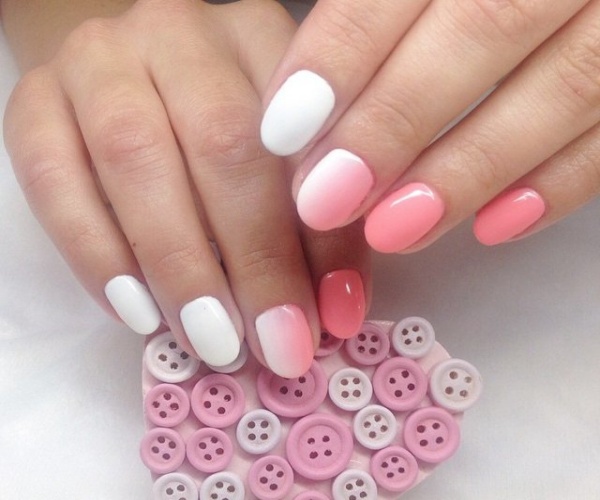
The horizontal ombre differs in the application of varnish both from the base to the free end of the nail plate, and vice versa. There is a simple way - to make all the marigolds the same, or you can apply different variations.
For example, on three fingers, make a transition from a milky tone to rich white from bottom to top, and on the rest, vice versa. Or perform a color stretch on three nails of one hand, and for the other two, apply any shade of the used ones.
Ombre manicure for natural and extended nails
An interesting manicure design is performed on extended and natural nails of any shape and length in different techniques. The most popular method of application is with a sponge.
French style artificial marigolds look beautiful, and here the masters embody a real flight of imagination. Alternatively, this is a moon manicure or a design with the addition of an original pattern.
White ombre design depending on the shape of the nails
White ombre looks great not only on long nails, but also on short ones. The advantage of the technique is that it optically lengthens the nails, and makes the hands refined.
This will work especially well if you apply a more saturated shade at the base, and closer to the edge it will be light. A gradient will give an unusual effect when the color palette changes its colors as you move from one finger to another. For medium to short lengths of nail plates, French manicure is suitable.
On too short nails, the ombre does not look attractive and even funny.
With a short length of nails, it is advisable to take into account the following recommendations:
- varnish 1/3 of the surface height, while doing stretch marks in certain places;
- add sparkles to emphasize them;
- perform the coating with smooth transitions;
- decorate with small glitter, and do not use large rhinestones.
Owners of long nails are lucky:
- the jacket looks beautiful on any plate shape (oval, sharp, square);
- you can apply a diagonal or vertical color stretch;
- on an elongated surface, it is easy to embody the most daring ideas.
Design ideas: popular decor and new items
White ombre on nails can be diversified with the following design:
- Make a gradient in which the lower part of the nail plate is transparent and the upper part is iridescent white. On the ring fingers of both hands, draw thin snow-white stains and stick shiny rhinestones.
- Winter version, made in the style of a classic jacket. One marigold, it is better to decorate the nameless one with a white pattern, made in the likeness of a knitted sweater. On the rest of the fingers, draw small convex snowflakes and snow droplets.
White ombre on nails with a pattern
A neat image is best decorated with a white ombre, for example:
- Make a horizontal gradient that starts with a light coffee color at the bottom and turns into a pale white. Paint the ring fingers with any pattern, using the shade that is located in the hole.
- Draw a geometric pattern in a darker tone along the nail plate with a white ombre.
- Monograms will look beautiful on nails made using this technique.
The combination of white ombre with a jacket
To make French manicure interesting, use the ombre technique to cover the tip of the nail bed with white. This double design is done on natural nails with gel polish.
Step-by-step instructions for ombre with a jacket:
- put each finger in order, grind the plate and give the desired shape;
- degrease and remove lint;
- cover the work surface with a bonder and allow to dry;
- apply base;
- paint one nail with white varnish twice, each time dry it under a lamp;
- like the first, paint the rest of the nails in a beige or light pink tone;
- with snow-white gel polish using a thin brush, draw a thin line in the form of a "smile" on the beige plates;
- stretch to the middle of the nail bed with a toothpick;
- dry under a lamp;
- fix on top with a top product and dry again.
Light ombre sequins on nails
You can decorate the light gradient with bright sparkles. It is a good solution for parties, special occasions and celebrations.
To make such a design, a white ombre is made, and after drying, it is covered with various sparkles. You can color all fingers in this way or select several.
White ombre on nails for wedding manicure
Light gradient is the perfect choice for wedding manicure. Here you can safely experiment with adding patterns, rhinestones or glitter. At the same time, it is advisable to adhere to the principle of proportionate minimalism.
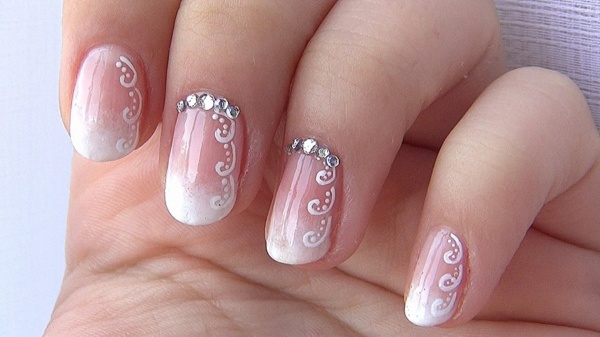
It is worth paying attention to the bride's outfit. If lace is present in it, then the design is better done with openwork elements. Delicate, romantic patterns are suitable for traditional decoration. If there are shiny decorative elements in the dress, use the glitter technique. The volumetric design looks very nice in a snow-white color.
Cost of execution in the salon and at home
The price for performing salon services in the ombre style ranges from 900 to 1500 rubles, depending on the coating (shellac or regular varnish).
At home, the cost of the master's services is stretched in the price range from 100 to 2000 rubles. It depends on the complexity of execution, design and on what type of varnish the nails are covered with.
Making a manicure at home on your own is not so expensive. First you need to purchase a manicure set, an orange cuticle stick, and a coating remover. These cosmetics should be found in every woman who wants to be well-groomed.
Additionally, you will need a degreaser, base coat, fixer and several shades of white varnish. Those wishing to make a manicure with gel polish, in addition to the starter kit, will need a special lamp. And, of course, you need to take time and gain perseverance.
What's the best way to remove the ombre design on your nails?
If the ombre is made with regular varnish, then remove it with nail polish remover.
To remove the gel coating at home, follow these steps:
- File off the top layer of the coating with a file.
- Lubricate the skin with petroleum jelly or cream to minimize the negative effects of acetone.
- Cut out nail molds from cotton pads, moisten them in a gel polish remover, attach them to the surface and wrap your finger with a small piece of foil.
- Keep for 10 - 15 minutes.
- Remove one cotton blank. The varnish that was left to gently pry off with a manicure spatula. Repeat this procedure with each finger in turn.
- Buff with buff to polish the nail plates.
- Rinse your hands and apply a regenerating mask.
There is a similar option for removing the coating, but for this each nail is wrapped with a plaster and dipped in a container with a nail polish remover.
Cons and pros of design
Advantages of the nail ombre:
- gives room for imagination. They use any shades, use horizontal and vertical techniques, which are complemented by various creative ideas;
- universal technique, suitable for different images and cases;
- specialists make color stretch marks using many technologies;
- manicure is performed both by the master and at home.
Disadvantages:
- working with ombre is quite difficult, not everyone can do it on their own;
- not just pick up the color palette and directions at once;
- if the design is too bright and tasteless, the nails will look ridiculous and defiant.
Ombre on nails with shades of white, will give the image a spectacular and stylish look, such a manicure is appropriate in any situation. The technique allows you to boldly experiment and decorate marigolds with picturesque transitions, even at home.
Video on how to make a white ombre manicure
10 secrets: how to make the perfect gradient (ombre) on your nails:
Gradient gel polish and sponge:
The ombre adheres firmly enough to the nails, so the usual wash will not take it. Once at home it was enough for me to take it off in order not to do this anymore and go to the salon. It was necessary to take a wooden stick and literally scrub the nail polish off. Not only did it take a long time, it also scratched my hands. And I like this very beautiful manicure.