A manicure is a decoration for every girl, but it is not always possible to choose a suitable design, despite the presence of a large number of photos and instructions for implementation. Bubble manicure is a new and unusual design that can be done at home.
What is bubble manicure
Bubble manicure has become popular not so long ago, but it continues to gain momentum. In the photo, nein art looks a little strange, but it already has a lot of fans.
For the first time, they decided to work with such a technique in the USA, the masters took a cardinal step in the field of manicure - to perform acrylic extensions not in length, but in volume. Due to this, the nail begins to look like a small inflated bubble of gum, hence the name “Bubble Gum”.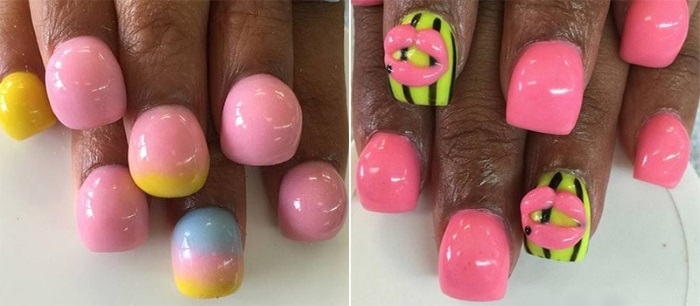
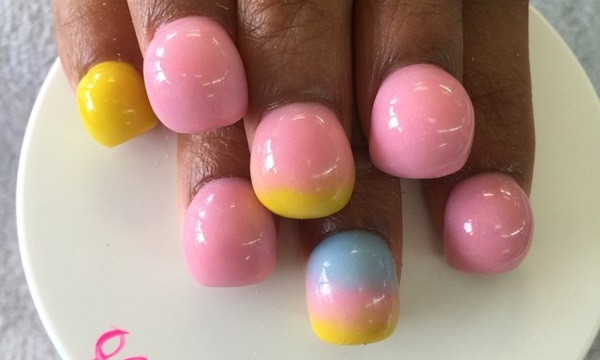
The color combination in this technique is very extensive. Most often, balls are made in bright pink, blue or yellow colors, which makes it possible to attribute bubble manicure to summer designs.
Advantages of technology
Of the advantages of the "Bubble" technique, one can single out a rather unusual appearance and extravagance. Bright colors combined with a fun shape attract the eyes of others, so that the manicure will not go unnoticed.
Persistence is an integral part of many techniques and Bubble is no exception. The design will last for about three weeks if done correctly.
Cons of technology
Unfortunately, there are more design flaws than advantages:
- discomfort and inconvenience. Due to the unusual shape of the nails and their large volume, there may be some inconveniences in everyday life. For example, typing on the keyboard or trivial use of the phone will be difficult;
- unflattering reviews from others. Bubble manicure has a lot of opponents. Not everyone is ready for such an extravagant design;

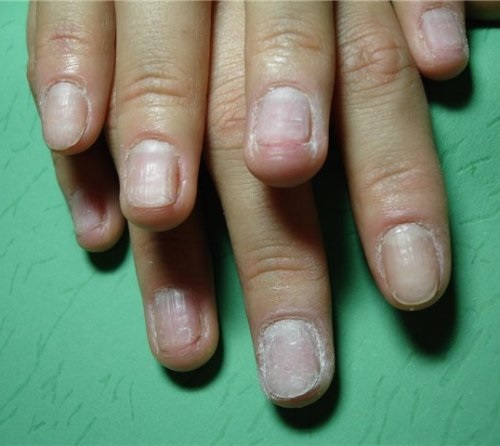
Photo of damaged nails after bubble gum manicure - subsequent treatment of the nail plate... This technique uses acrylic for nail extension, which damages the nails very badly, makes them weak and brittle, which contributes to the subsequent delamination. To prevent this from happening, the design should be worn no more than a month. Once removed, no other coating should be applied for several weeks. For the fastest restoration of the nail plate, you can use special hardeners or soak your nails in a salt bath.
What style is a manicure suitable for?
Bubble manicure, a photo of which has flooded social networks, is quite difficult to imagine in everyday life. This design is suitable for a theme party to surprise others and the audience.  Bubbles on your nails will look good during an unusual photo shoot or relaxing on the beach. Because of the bright colors and the inconvenience of wearing, like a regular manicure, you should not use it.
Tools and materials for work
For work you will need:
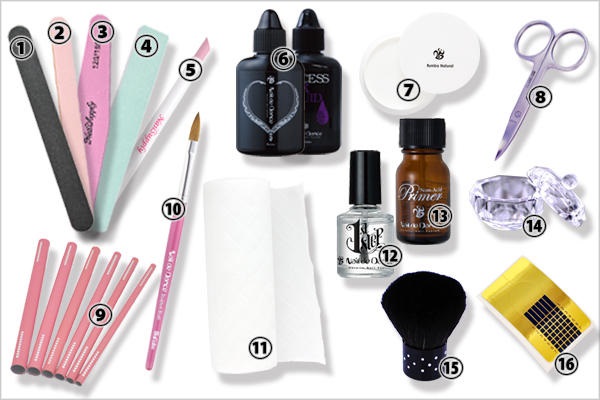
- Nail files with abrasiveness 220/240 grit and 280/320 grit.
 Soft rigidity is needed so as not to damage the nail plate during filing. A medium abrasive file is used to work through an acrylic bubble;
 - primer. Used to increase the durability of manicure;
- acrylic for nail extension: loose powder and monomer;
- brush for applying acrylic;
- plastic tips. Helps protect the nail plate;
- orange stick;
- buff or sanding file;
- topcoat. It will fix the manicure well, prolong the time of wearing it.
Bubble Nails Color Combinations
Bubble manicure, the photo gallery of which was initially replete with shades of pink, succumbed to some changes. Now craftsmen use almost the entire color palette of bright colors, as well as some dark colors.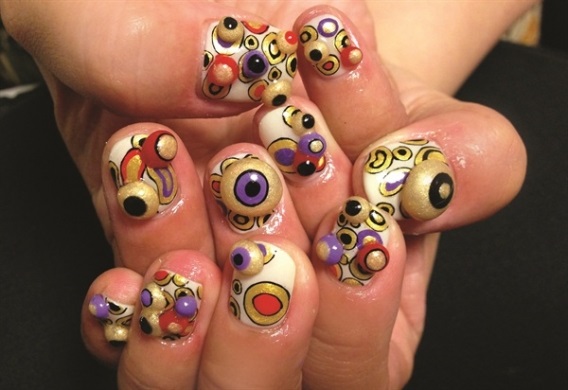
| Colour | Combines |
| Pink | Turquoise, mint, white, gray, light blue, olive |
| Yellow | blue or light blue, pastel purple, lilac, some pale shades of red, light green |
| Blue | Pink, yellow, gradient transition to purple or lilac, white |
| Green | Orange, yellow, black, cream |
| White | Combines with almost all colors, best with blue, pink and black |
| The black | Versatile, suitable as an addition to any color |
In Bubble manicure, pastel colors are most often used, which are combined with bright ones.
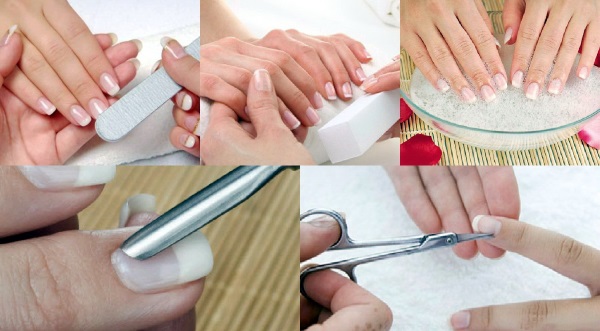
Preparing nails for manicure
Preparing nails for a bubble manicure is similar to preparing nails for extensions due to the use of acrylic.
- Hand disinfection. This will prevent bacteria from entering in the event of a wound.

- File the nail. The nail can be shaped in any shape, but bubble manicure looks best on short, square or rounded nails.
- Degreasing the nail plate. Acrylic or tips should be applied only to a previously degreased nail.
- Manicure. With an orange stick, move the cuticle to the edge, then you can use either scissors or nippers, or a special tool for removing keratinized skin - a remover.
- Sawing off the nail plate and applying a primer. This procedure will improve the adhesion of acrylic or nail tips to the nail plate.
The classical technique of performing bubble-manicure
After the preparatory stage, you can proceed directly to the design:
- Installation of tips. The tips will help protect the nail from acrylic attack. Apply special glue to the inside of the tips (you need to make sure that the product does not get on the skin), pressing and shaking, you need to install the tips on the nail plate, while removing excess air with patting movements. To make the transition from a natural nail to an artificial one more invisible, the border must be sanded with a file of medium abrasiveness and polished with a buff.

- Acrylic application and shaping. Using a brush, a small drop of acrylic is applied to the middle of the nail, which is smoothed over the entire surface. Acrylic layers are applied until the bubble has the required shape and height.
- Drying and polishing of acrylic coating. Bubble manicure is dried in an ultraviolet lamp until it hardens completely and sets with the nail. If the shape is not perfect, then it can be leveled with a 220/240 grit file.
- Color creation. The “bubble” is covered in any suitable color.
- Topcoat application. The finished manicure is covered with a top on top to increase durability.
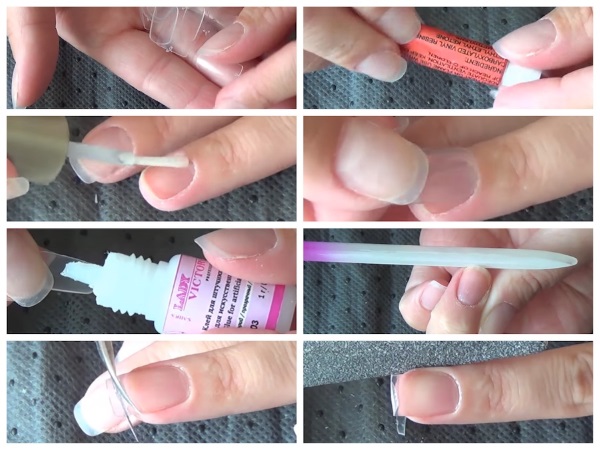
The design can be decorated with glitter, stones, sparkles, rubbing or foil.
https://www.youtube.com/watch?v=j03LOQdSmz0
Lite version: step by step guide
The simplified version differs from the usual one in its small volumes and the ability to apply acrylic powder directly to the nail plate, without using tips.
- Preparatory stage. After applying the primer and filing the nail plate, for reliability, you need to apply a base coat that will protect the nail from the harmful effects of acrylic.
- Formation of an acrylic bubble. A drop of acrylic is placed in the center of the nail with a brush, which forms the initial ball shape. Gradually apply several more layers until the desired result is achieved, and the shape begins to resemble a bubble gum.
- Curing in a lamp and sanding. The acrylic ball is dried in a lamp until fully polymerized, after which it is given a more even shape with a file. With a buff or a grinder, you can achieve the gloss and full smoothness of acrylic.
- Additional stage. The ball is covered with colored varnish on top, you can use auxiliary materials (rub, sparkles, glitter).

- Application of a protective layer. The bubble manicure is covered with a top coat to extend the design's wear life.

Bubbles in casual style
Bubble manicure, photos of which can already be seen in the catalog of manicure masters, has one more technique of execution. Bubble is a bubble, but it can be made not only like a bubble gum, but also like a regular soap bubble. Volume in this design is not given by layering acrylic, but by drawing details and creating shadows, which creates a kind of 3D effect.
Casual bubbles are easy enough to make. To complete the design, the nail is prepared in the usual way: reducing the length, shaping, processing the cuticle, applying a base coat.
The base varnish is applied over the base and polymerized in the lamp until it dries completely. The color of the coating can be absolutely any, but the best options are dark shades of blue, purple and black. You can use a gradient.
Circles are drawn on the colored coating - the basis of soap bubbles. For more realism, highlights are set and an additional color is applied. It occurs when soap bubbles are not drawn in sufficient detail, making do with ordinary empty circles, which looks quite unusual.
Bubble Nails Nail Design Ideas
You can make a manicure in the style:
- Gradient. A gradient transition can often be found in various nail art techniques, including bubble manicure. An acrylic ball is made in the usual or simplified way, but for a colored coating, not a monochromatic varnish is used, but a neat transition from one color to another.

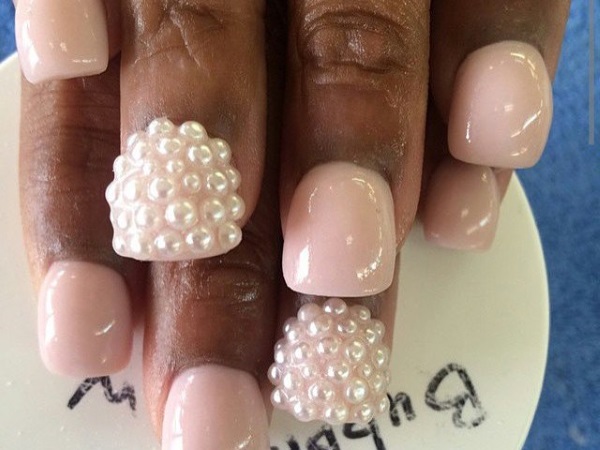
- Decoration with beads or stones... The “bubble” can be decorated with rhinestones or stones. You can stick them with special glue. Most often, stones are applied to one or two nails, and the rest are left with a regular bubble manicure.
- Drawing a picture... The drawn print can be made in any style: floral, fruity, abstract. The main thing is to combine colors correctly.
When is correction necessary?
Correction is needed in cases:
- The appearance of cracks and chips. If the manicure is worn incorrectly or as a result of mechanical damage, dents, cracks or chips may appear on the ball.
- Peeling acrylic coating... Peeling acrylic can occur due to improper application or insufficient polymerization of the layers.

- Regrowth of the nail. Most often, correction is required after prolonged wear, when the nail plate grows back strongly.
Nail industry expert advice
Experts advise against doing bubble manicure for people with soft, brittle or flaking nails. Acrylic strongly damages a healthy nail, and with such problems, things can only get worse.
Bubble manicure wear should not exceed more than a month. After removing the design, you need to take preventive measures - lubricate the cuticle with special oil, strengthen the nails with the means intended for this and use sea salt baths.
Bubble manicure is a new shocking manicure, photos of which are increasingly appearing on the Internet. The design has a lot of both fans and opponents, but this does not prevent it from attracting the views of others.
Author: Hadesx (Ismailova Eva)
Article design: Vladimir the Great
Bubble manicure video
Bubble manicure on long nails:
An interesting manicure, but it's not comfortable to walk down the street with one. Only suitable for a theme party