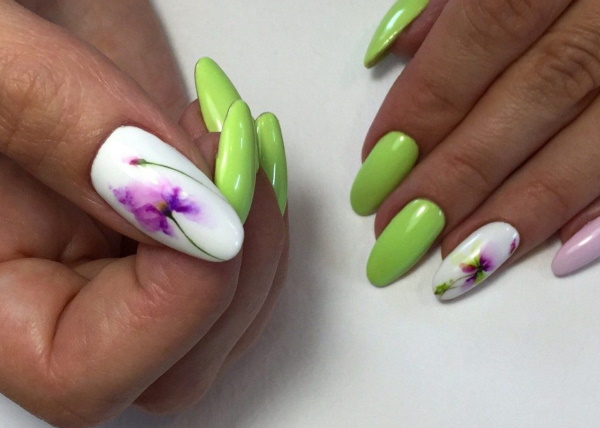
The classic solid color nail polish is still relevant, but many people prefer to add variety to their everyday manicure using different designs. One of these is watercolor painting. This technique looks very impressive.
What is watercolor painting on nails?
Watercolor painting on nails is one of the leading trends in the modern manicure industry. This technique involves the use of gel paint diluted with top, or acrylic paints, or a special gel polish that creates the effect of wateriness, which should be present in a similar technique on nails.
Also, the effect of airiness is achieved through soft gradient color transitions. This type of design is not limited by any framework. Any desired drawing can be done using the watercolor painting technique. Such an interesting technique has the ability to turn any nails into real works of art.
Pros and cons of spreading coatings
The main advantage of the design in the technique of watercolor painting is the unlimitedness in terms of drawings.
Also, this type of design has many other positive qualities, such as:
- Creation of unique and most suitable color solutions by mixing gel polishes.
- Ease of drawing with a single brush.
- There is no need to supplement the drawing with additional accessories to create a design (but kamifubuki, foil, rhinestones can be used if desired).
- Drawing using watercolor gel polish is created in a minimum amount of time.
In addition to the advantages, this technique also has disadvantages:
- the inability to make a full-fledged coating and design without a special base for watercolor gel polish;
- most often, this painting technique is used on long nail plates, since the drawings on them look more effective and easier to perform due to the sufficient amount of space;
- if the watercolor gel varnishes are stored improperly, they cease to give the desired effect, which is why the design ceases to look so light.
But none of these shortcomings are problematic.
Step-by-step watercolor painting of nails for beginners
Watercolor painting is considered one of the most difficult nail design techniques. This is because the colors there are layered on each other and it is not easy to get the desired wateriness effect because of this. However, even a novice master who does not have special artistic skills will be able to apply this technique in his works, using light sketches that do not require drawing outlines.
Coating varnishes
The assortment of varnishes for painting in the "Watercolor" technique is extremely diverse. Both special gel varnishes and ordinary colored coatings diluted with top, or acrylic paints can be used.
Aqua gels can also be called stained glass due to the fact that they do not have a saturated color that lies in one layer, but a translucent pigment, which makes it possible to layer different shades on top of each other and get a new unique color and watercolor painting effect.
For such a design technique, not only special colored coatings are needed, but also a certain base over which gel varnishes can easily spread.An example is the Irisk Wet Gel Polish base.
Such bases are available in 3 colors:
- transparent;
- white;
- black.
But in the absence of additional materials to create such decorations in a manicure, those that masters of the nail service use every day at work can be used. This is color gel polish and top. To create stained glass varnish, you need to mix a drop of top and color on the foil and mix until smooth.
And a special base for spreading can be replaced with a thin layer of top, on it the color will not spread so intensely, but in this case, to create the desired pattern, you should draw it with a brush, without using color.
The current brands of varnishes for watercolor painting today are:
- Nika Nagel (series "Lady");
- Lianail (series "World of Illusions");
- BlueSky (shades of the "B" line);
- Irisk (series "Watercolor" with enamel structure and "Watercolor shine" with pearlescent shimmer and micro-sparkles).
Tools
There are not so many tools required for watercolor painting: 2 brushes and a piece of foil for mixing colors. It is possible to make such a design using a thin round synthetic brush to draw small details and a brush stroke to create the watercolor painting itself.
To obtain gradient transitions, use a specialized flat brush. Experienced craftsmen use only one brush with a medium bristle length when decorating nail plates in this technique.
Steps for creating a watercolor design without a colored background
The initial stages of creating a manicure with watercolor painting coincide with the creation of the usual care for the hands and the nail plate:
- Creation of the required shape and length.
- Preparation of the nail plate for coating: to create better adhesion to the base, the nail is passed a special buff and degreased.
- Application of a primer or bonder before the base.
- Base application (it is better to use camouflage or leveling bases), creating a perfectly flat nail.
- Drying of the base (from 30 seconds in an LED lamp, from 2 minutes in a UV lamp).
- Application of a special coating Wet Gel Polish for watercolor painting (such a coating does not dry before, directly, the design itself) or a thin layer of top.
- Creation of an aquagel drawing on an undried surface for a watercolor design or top. For a better spreading effect, the color coating should be applied in a thin layer, just as in watercolor painting, you do not need to brush with color in one place several times, as this can ruin the drawing. To create a smoother color transition, the varnish can be stretched with a special gradient brush. The spreading time takes from 15 seconds.
- Drying in a lamp with a colored coating (in time it cures as much as the base).
- Covering the finished design with a top of your choice (if the selected sketch does not require further decoration with fittings, then it is better to choose without a sticky layer, otherwise use with a sticky layer on which rhinestones, kamifubuki and stickers will be attached).
- Drying of the final coating.
If the design does not require the effect of wateriness (if, according to the idea, only translucent shades should be obtained), then after drying the base, you just need to remove the sticky layer and continue painting with a special gelthat after all the steps should be dried and covered with a top.
Stages of watercolor design with color backing
Watercolor painting on nails with a colored backing is almost identical to painting without a colored backing. The only difference is that after the base, a colored coating is applied in several layers, and only then the base is laid over which the gel polish will spread.
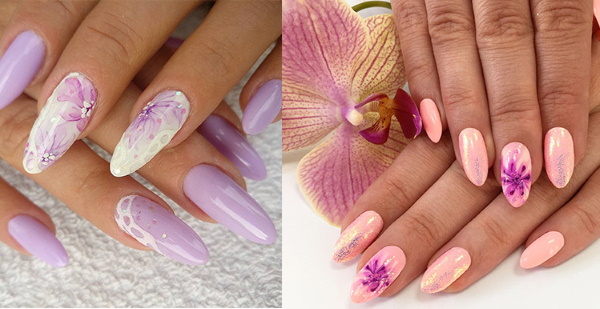
What kind of drawings can you make?
Watercolor painting on nails implies an incredible variety of designs that can be done. The topics can be completely different.
| Simple designs (no drawing skills required) | Complex designs (requiring artistic skills) |
| Waves | Animals |
| Marble | Marine life |
| Animal skins | Floristics |
Marine theme
Since the watercolor design creates the effect of wateriness and blur, it is the marine motifs that are most often performed in this technique. One of the possible drawings in this theme is a fish.
To create this pattern, it is advisable to use several different shades to create a beautiful gradient. "Rybka" is performed on a white substrate (a specialized base and a regular colored gel polish can be used as an undertone).
This figure is performed as follows:
- With a thin brush, the outlines of the fish are drawn in the darkest of the selected colors.
- Then a lighter shade of the same color with which the contours were drawn is added inside.
- Add the remaining selected colors and create smooth transitions between colors using a flat dry brush.
- Drying in a lamp (about 30 sec.).
- Adding the remaining small details (eyes, scales).
After drawing the design, only the top cover remains. This is not the only drawing that can be done in a marine theme. It will also include waves, seashells, anchors and various beach paraphernalia.
Reptile skin
Drawings in this theme are not as diverse as in the sea, but nevertheless, it is done in this design technique no less often than the sea theme. To create the texture of reptile skins, 2 colors are usually used. The color palette in this theme is not as diverse as in others. When using unusual colors, you can create an extraordinary and even unique pattern.
Reptile-style painting is one of the simplest, as it requires almost no artistic skill. You can make such a drawing in just 2 steps: monochromatic spots are placed on a colored substrate using a dots or a brush in a translucent color (the shape and diameter depends on the skin of which animal is drawn).
Then they need to be dried in a lamp and a different color added inside to create volume.
In addition to reptile skins, motifs of animal wool are also relevant. The simplest examples are tiger and leopard colors. Leopard print has the same technology of execution as reptile skins, only the second color is not put inside the first one to create volume, but outlines the spot with an uneven and discontinuous contour.
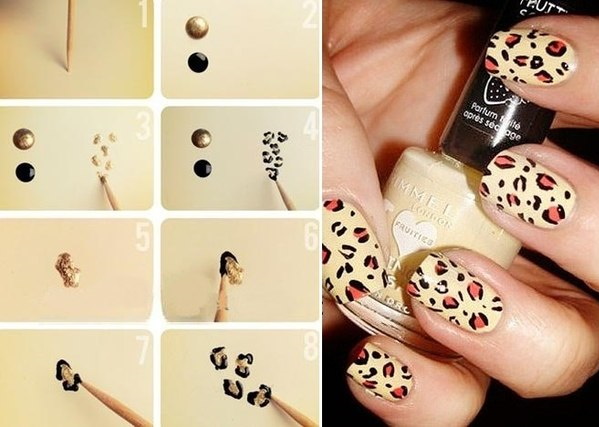
The tiger print is the simplest design. With this design, lines are placed on an orange colored substrate at such a distance from each other that they do not merge when spreading. Likewise, you can colorize the zebra using black and white.
Marble
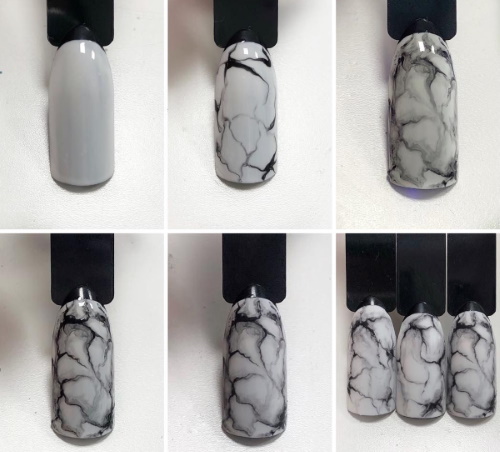
Watercolor painting on nails is considered a complex design technique, but you can also find a pattern in it that even a beginner can do. One such pattern is marble. Most often it is performed on a white substrate, but it can be any color.
Design technique:
- A special base Wet Gel Polish or a thin layer of top is applied to the colored substrate.
- Lines are drawn on the undried surface, which must be jagged to create a pattern similar to natural marble.
- The lines will spread independently over the undried coating, but if you wish, you can create the necessary pattern.
- When the desired pattern is obtained, the coating is lamp cured and covered with a top with any finish that is also cured.
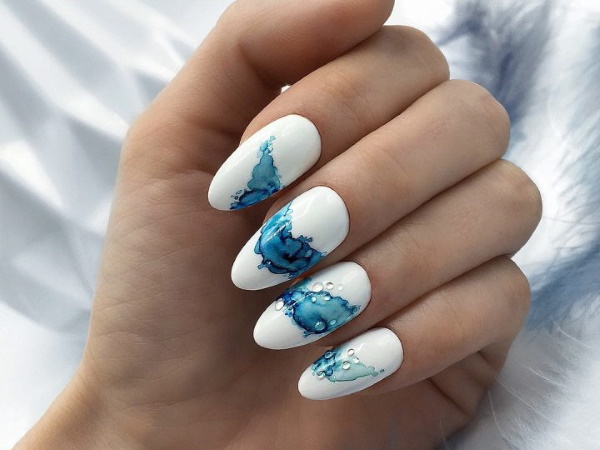
The wave design, related to the theme of the marine theme, is also carried out using the technology of marble design. Only when applied to an undried coating is not one color typed, but 2 different ones (in the case of sea themes, these are blue and white, applied to any other colored substrate).
First, a non-basic color is typed on the brush, and then, without applying the typed color to the nail plate, another color is immediately taken and put on the coating with uneven wide lines.
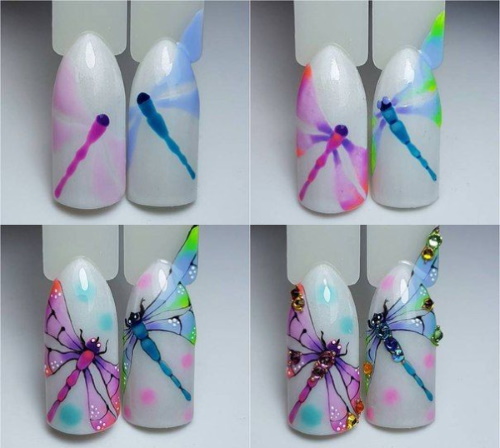
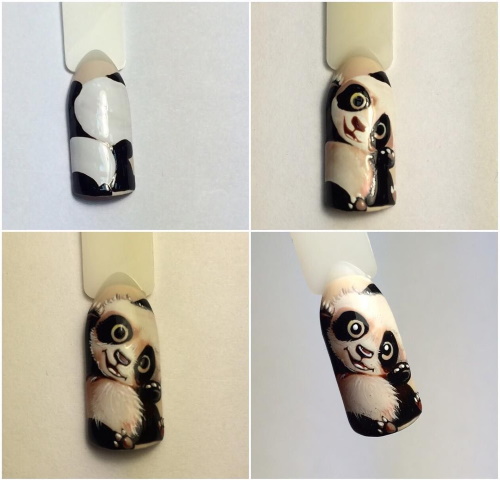
Animals
Animal drawings are no less frequently used theme in watercolor painting. By mixing colors, the design looks very voluminous and realistic. The artist needs minimal artistic skills to complete the technique. The stages of creating a drawing of an animal are exactly the same as in performing a drawing of a "fish".
- The contours of the desired animal are drawn with a thin brush.
- The drawn lines are dried in a lamp.
- The contours are filled with aquagel or colored gel polish mixed with the top, using a dots or a short brush (it all depends on the area of the drawing).
- The coating is dried.
- The necessary details are added to the dried gel polish.
- Drying in a lamp.
- Top coverage.
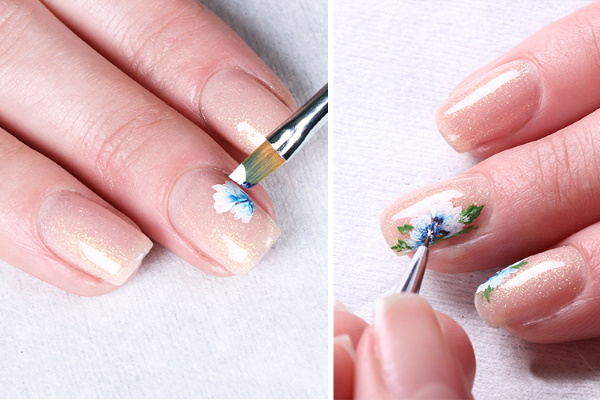
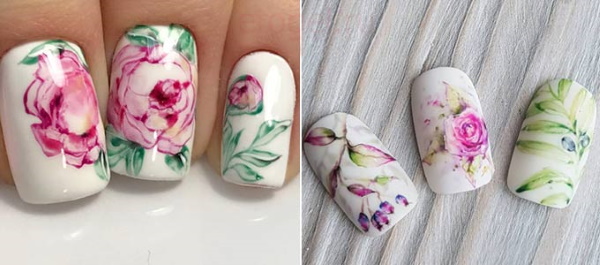
Drawings in floristic themes (various flowers, tree leaves and natural motives) are made using the same technology.
Stained glass watercolor
Stained glass watercolor is one of the most beautiful designs in the watercolor painting technique. Usually it is performed on long nails, since it is on them that the drawing looks like a real stained glass window. But this design is also used on short nails.
As in all other topics, the main thing in the drawing is the contour and it is it that is drawn after the complete preparation of the nail plate (shape, manicure and coating).
The contour is drawn over the dried coating, as it should be clear.
After drying the lines, colors are put inside the contour with watercolor gel varnish. In this type of design, the color should be translucent, but not spread, therefore, after drawing the lines, it is not required to apply a base over which the varnish will spread.
Professional advice
Professional nail technicians believe that the most important part of the job is practice. Therefore, tip # 1 is an ongoing internship in any particular topic dedicated to the manicure industry. At first, this can be done on tips, and then gradually move on to clients' nails.

Learning to design on tips is effortless, since the tips can be rotated in a way that is more convenient for the master to draw. That is why it is equally important to put your hand on real nails.
The hardest part of watercolor painting is drawing outlines in complex sketches. And in order for the contours to be clear, you need to learn to keep your hand in focus. The artist's fingers should be resting on the finger (or tipsu) on which the line is drawn, and the elbow or forearm should be firmly on the desktop. This will help beginners draw thin, clear lines.
In addition to drawing the contours, a significant point is the correct color coverage of the nail plate. The second, but no less important piece of advice is to constantly improve your skills and learn something new. The modern beauty industry does not stand still, and therefore it is important for workers in this field to constantly improve their knowledge.
Watercolor painting in manicure design is rapidly gaining popularity. And this technique is becoming a leading trend in the modern nail service industry because it does not require any additional investment and is not time-consuming. That is why on the nails of girls who follow trends, more and more often in 2019 you can see such a decoration technique.
Video tutorials on creating watercolor painting on nails
Drawing flowers on nails in watercolor technique:
Watercolor birds in 5 minutes:
Incredible work! It seems that it is simply impossible to create such masterpieces without artistic skills!